
Table of Contents
- Introduction
- What is Hyper-V Live Migration?
- Live Migration Types
- Shared-Nothing Live Migration
- Live Migration
- Quick Migration
- Storage Live Migration
- Live Migration option in Admin Center
- Takeaway
Quick Bites:
- The blog presents a step-by-step guide on configuring Hyper-V Live Migration
- It defines Hyper-V Live Migration and discusses its types: Shared-Nothing Live Migration, Live Migration, Quick Migration, and Storage Live Migration
- Each migration type is explained along with its process and purpose
- Tools such as Hyper-V Manager and Failover Cluster Manager are mentioned for managing Live Migration
- The article highlights options available for Live Migration in the Admin Center
- It concludes with a summary table of Live Migration types and hints at topics to be covered in the second part, including best practices and troubleshooting tips
Introduction
This post on Hyper-V Live Migration is a two-part series.
In this first part, we will discuss the following:
- What is Live Migration
- Types of Live Migration
- How each migration works
In the second part of the series, we will look at the Best Practices, Troubleshooting steps and Tips for Live Migration.

What is Hyper-V Live Migration?
Hyper-V Live Migration is the possibility to migrate any of your Virtual Machines between your physical Hyper-V Servers.
Hyper-V Live Migration works to a Hyper-V Server Standalone or a Hyper-V Cluster Node without any downtime (only in some cases) over the network.
One of the best benefits of Live Migration is the flexibility that administrators have and allowing them to create highly available and fault-tolerant systems.
Hyper-V Live Migration is possible by manual (Standalone Hyper-V / Hyper-V Failover Cluster ) or automatic (only Hyper-V Failover Cluster) method to migrate any VMs from your Hyper-V node to another node. Not only VMs between Hyper-V but also the location of your VM to a different Storage/Disk location.
To perform these migrations, you can use Hyper-V Manager (for manual migration) or Hyper-V Failover Cluster Manager (manual and automatic).
Automatic Hyper-V Live Migration is triggered when your Hyper-V Failover Cluster has a node failure (or isolation). In this case, all Virtual Machines in the failure node will automatically migrate to another node in the Cluster, using “The Best Possible Node” option.
Hyper-V Live Migration consists of four types of migrations:
- Shared-Nothing Live Migration
- Live Migration
- Quick Migration
- Storage Live Migration
Let us have an explanation about each migration type.
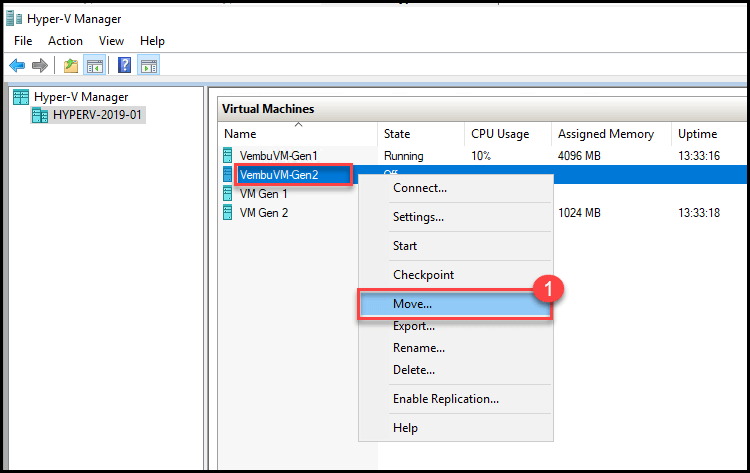
Shared-Nothing Live Migration is only available in Standalone Hyper-V Manager as you can see below:
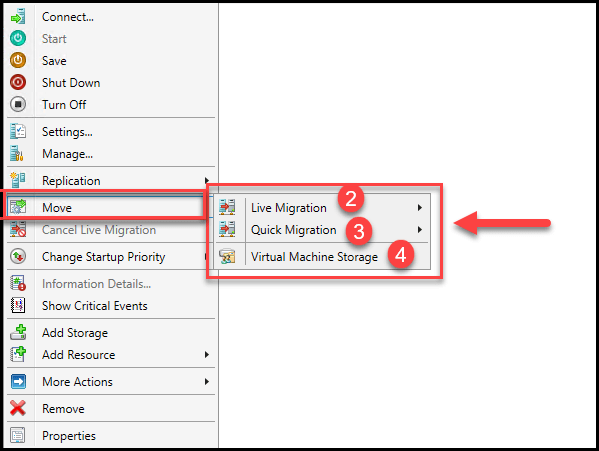
The next image has the options that are available only in the Hyper-V Failover Cluster Manager and are only migrations for Hyper-V Failover Cluster.
Any Live Migration option or type has seconds or milliseconds of downtime, also called blackout window.
The duration of this blackout window initially depends on the type of Live Migration we use. Then other factors are taking into account the minimum or maximum time of this blackout window and how it will affect your running Virtual Machines.
Many factors have an impact on the time a Live Migration process takes to finish.
Besides the factors that are detailed in each Live Migration type, the amount of memory that a Virtual Machine has – is the main factor for the time for the Live Migration (for Power On VMs) process to finish.
The goal is not to show how-to, but more how It works each option and where users can find options to use different types of migrations in a Standalone Hyper-V Server and a Hyper-V Cluster.
Live Migration Types
- Shared-Nothing Live Migration
- “Move the virtual machine’s data to a single location”
- “Move the virtual machine’s data by selecting where to move the items”
- “Move only the virtual machine”
This is the simplest option in this type of migration, where we will only migrate the Virtual Machine(configuration files), and data files (virtual disks) will remain in the source Hyper-V.
Note: Source Hyper-V Server and destination Hyper-V must have a shared NFS or another type of shared volume.
- Live Migration
- Quick Migration
- Storage Live Migration
This option is only available in a Standalone Hyper-V Server and for non-cluster Virtual Machines.
The main feature of this type of migration is the possibility to migrate Virtual Machines that are in Standalone Hyper-V Servers and/or located in non-shared storage or Storage Spaces Direct without any downtime on your Virtual Machine or VM Applications.
Shared-Nothing Live Migration can be migrated from a local disk to a local disk (to another Hyper-V) or also from a Local Disk to an iSCSI/NFS Volume or even a shared Storage Volume in a Cluster.
Administrators can migrate VMs to and from iSCSI/NFS Volumes.
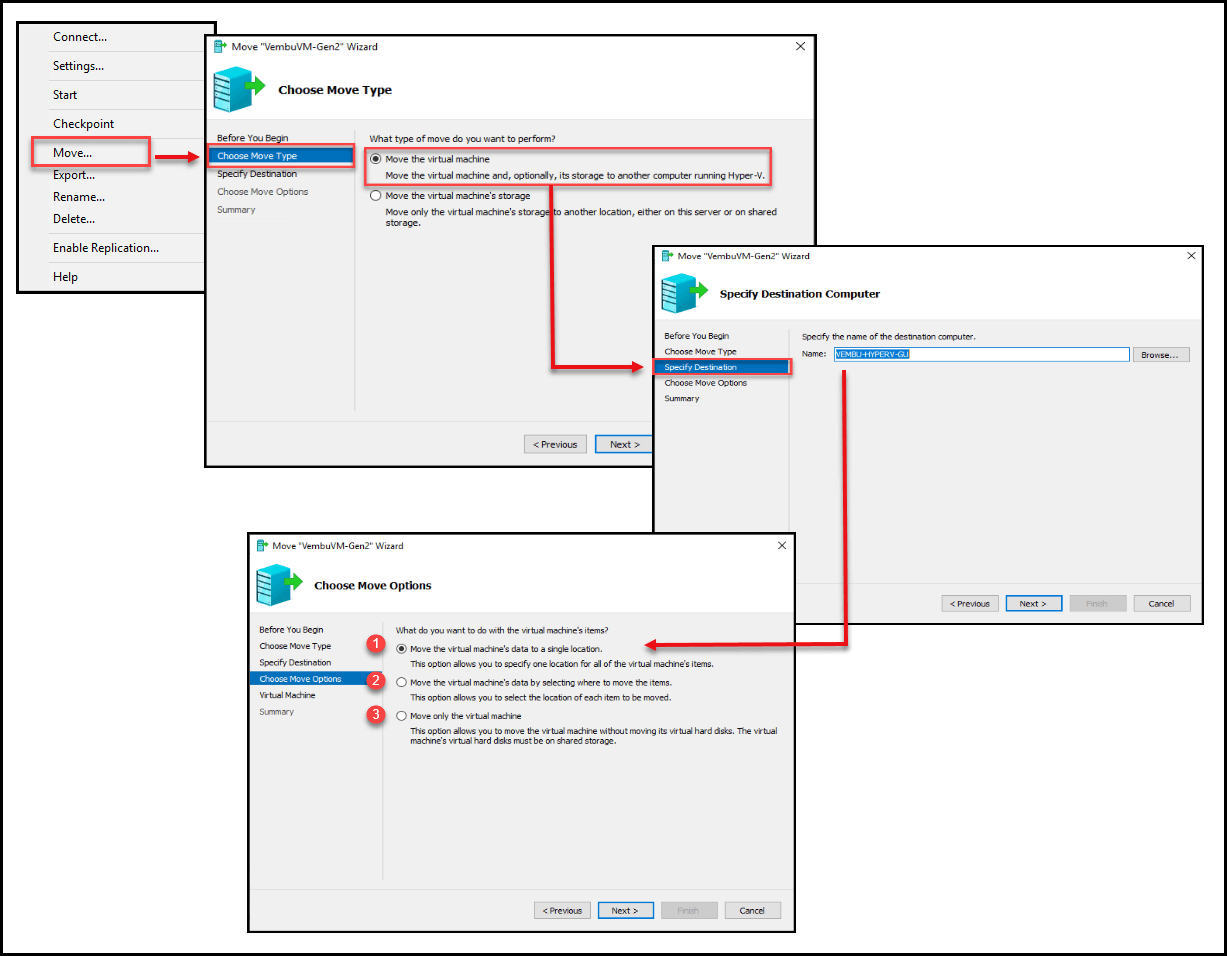
In the last option, we have three options to migrate the Virtual Machine.
This option, as it states, will migrate all data to a single location.
Meaning, that VM configurations files and Virtual Disk(VHD/X file) files will all be migrated to the same location in their specific Hyper-V folder(like Virtual Machine folder, Virtual Disks folder), following the default Hyper-V folder hierarchy.
All files will be located in the same local disk or any iSCSI/NAS Volume. Or even a shared Cluster Volume.
This option moves Virtual Machine and all data files from the source Hyper-V.
This option is a little bit different from the above. In this option, administrators can migrate each file to a separate location/folder.
It is not mandatory to follow the Hyper-V folder hierarchy, and we can select different locations for each file, even in different disks/volumes.
Like the above, this option moves Virtual Machine and all data files from the source Hyper-V.
Shared-Nothing Live Migration Process
Virtual Machine state is saved and automatically taken by the destination Hyper-V Node and then a reset is performed to bring the Virtual Machine online.
An initial state of the Virtual Machine is saved, and a new Virtual Machine is created on the target Hyper-V, and the initial memory state is copied through the live migration network.
A second memory state is copied by copying memory pages that were changed during the initial copy process. A third copy to the destination Hyper-V Server of memory pages is performed and this process continues until the number of pages is relatively small for the final copy and move of the Virtual Machine.
Finally, on the source, the Virtual Machine is paused, and the final state of the VM and data are moved to destination Hyper-V Server, and the source VM is deleted.
This option is only available for VMs that are Power ON and in a Hyper-V Failover Cluster Manager, and as the name indicates, this is a Live Migration with no downtime while migrating to another Cluster Node.
Live Migration is the Hyper-V most similar type of migration with the known vMotion from VMware.
Live Migration is the option that is triggered manually or automatically and is also the simplest type of migration.
Live Migration Process
The Live Migration process starts by copy to the destination node the VM state and memory that is used. After the Virtual Machine state is saved, the Virtual Machine migrates/move and the target Hyper-V node takes ownership of the VM. All VM transactions are through the network.
Since Virtual Machine state and memory are already in the destination, this makes the full process very quick.
Since this is an option that is available only in a Hyper-V Cluster, no need to move any data between storage or volumes, the migration process only migrates the VM memory state to the destination host.
Note: The time that migration takes it depends on the network used and their bandwidth.
Next is an example of how to use Live Migration manually.
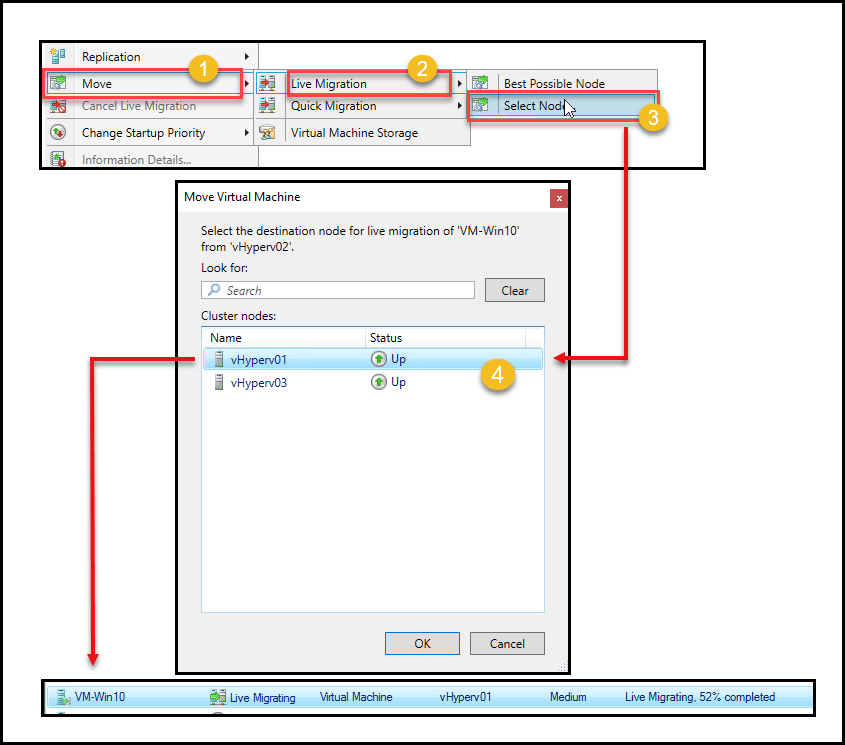
In the above option if you choose “Select Node”, we can select the Node to run this VM, but if we select “Best Possible Node,” Hyper-V Cluster will choose the best Hyper-V to migrate (as an example of the rules is the one with more resources available).
The automatic option is only triggered when there is a Hyper-V Cluster node failure or is isolated. Hyper-V Cluster will automatically move all Virtual Machines that are running in the node that as a failure.
Next image, we can see the full process running when it was triggered by a node failure (vHyper-V02).
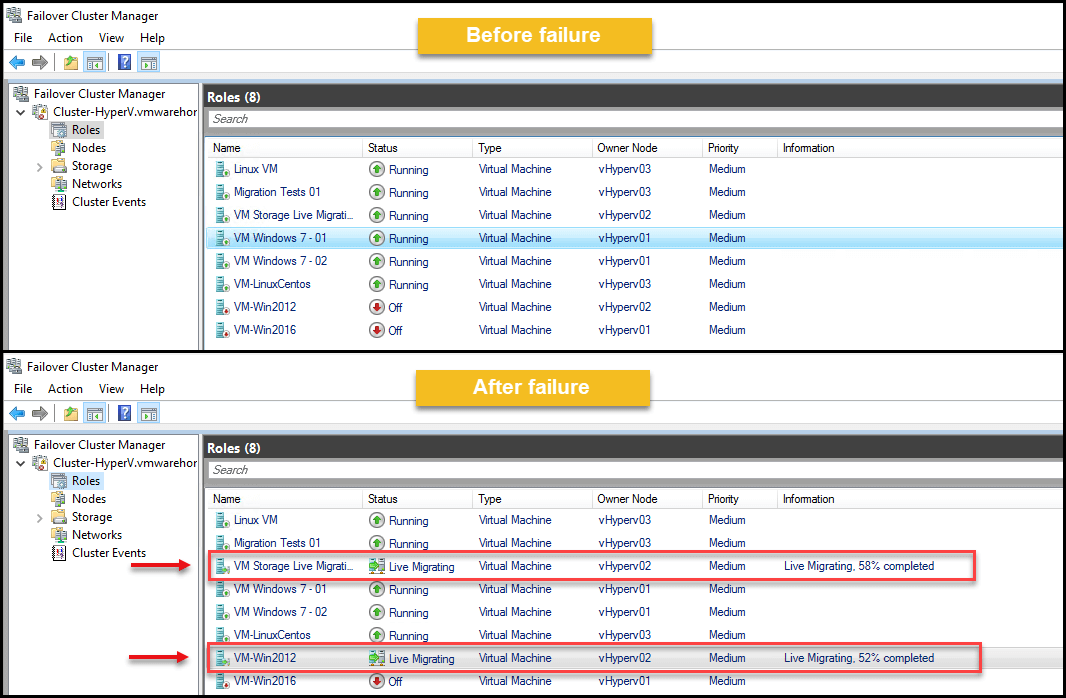
In the above image, we notice that VMs using Live Migration are automatically migrated from the node vHyper-V02 after the failure.
This type of migration is only available in the Hyper-V Failover Cluster Manager.
Quick Migration is similar to Live Migration type but is only triggered by the user, and the user has the option to select the destination location for different VM files. Also, in Quick Migration Virtual Machines can receive a short timeout; the downtime in the VM services always depends on how Guest OS and the applications can handle those time-outs.
When using Quick Migration, there is a brief timeout accessing the Virtual Machine and possible service interruption. The interrupt time and the migration speed depends on your network bandwidth and the type of applications used.
Quick Migration can be used in Power On VMs and Power Off VMs.
Quick Migration Process
Quick Migration process as Live Migration is also a straightforward process.
Initially, a saved state is created (only if VM is Power On), then a copy is transferred to the target Hyper-V node.
Since files are in a shared location or Cluster Volume, only a symbolic link (xml file) remains in the source Hyper-V node.
After a copy of the pointer symbolic link is created in the destination Hyper-V node, and the ownership of that file is changed to the target Hyper-V node.
Final tasks are: delete the source pointer symbolic link file and resume (reset) the Virtual Machine saved state.
With this type of migration, we have the option to move Virtual Machine files (all Virtual Disks files, Configuration files, Paging files, Snapshots files, etc.) to another location.
Virtual Machines files can be migrated to a Local disk, Storage Volume, or a CSV Volume without any downtime of your VMs and VMs applications.
When migrating a non-clustered VM, this type of migration can perform regardless of the location of a VM. It is not mandatory that the source or destination location is a NAS/iSCSI Volume.
This type of Storage migration can be done while the VM is power on.
- This an example when using Standalone Hyper-V Server:
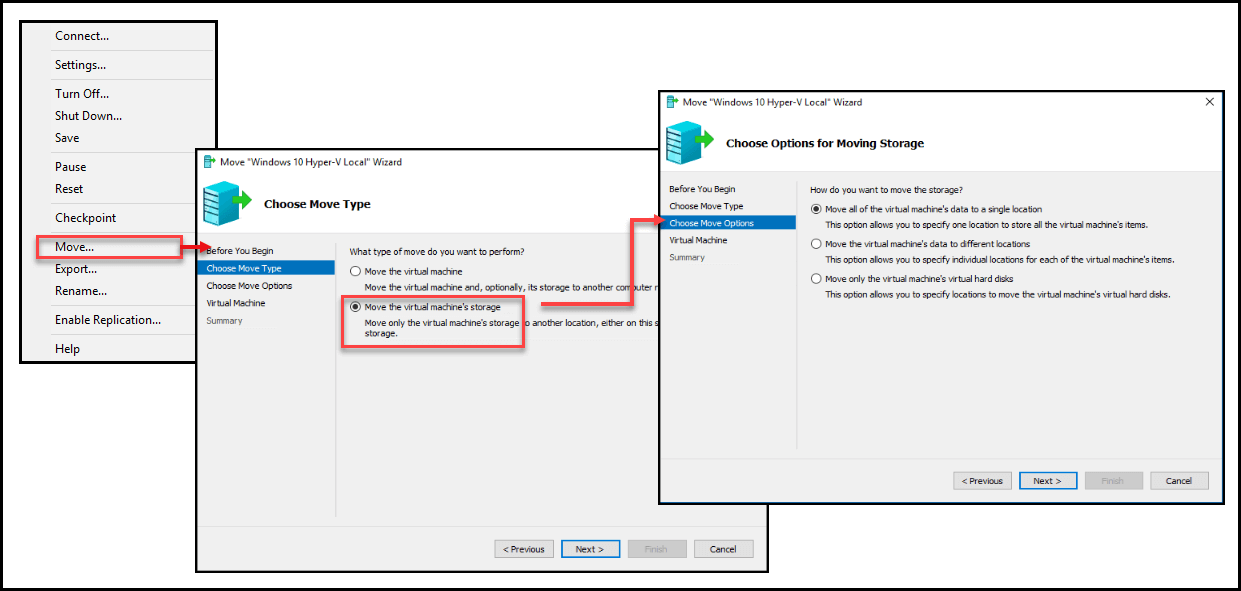
Next, you select a single destination for all files, different locations for different files (configuration files, data files, etc.), or select the new location just for Virtual Disks files.
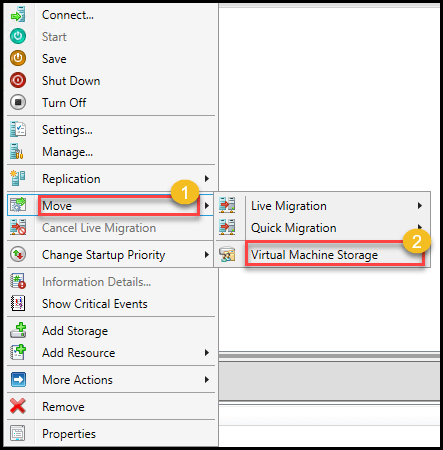
- This is an example of how it works using Failover Management:
Right-click on the VM, to access the Virtual Machine menu, select Move, and then Virtual Machine Storage.
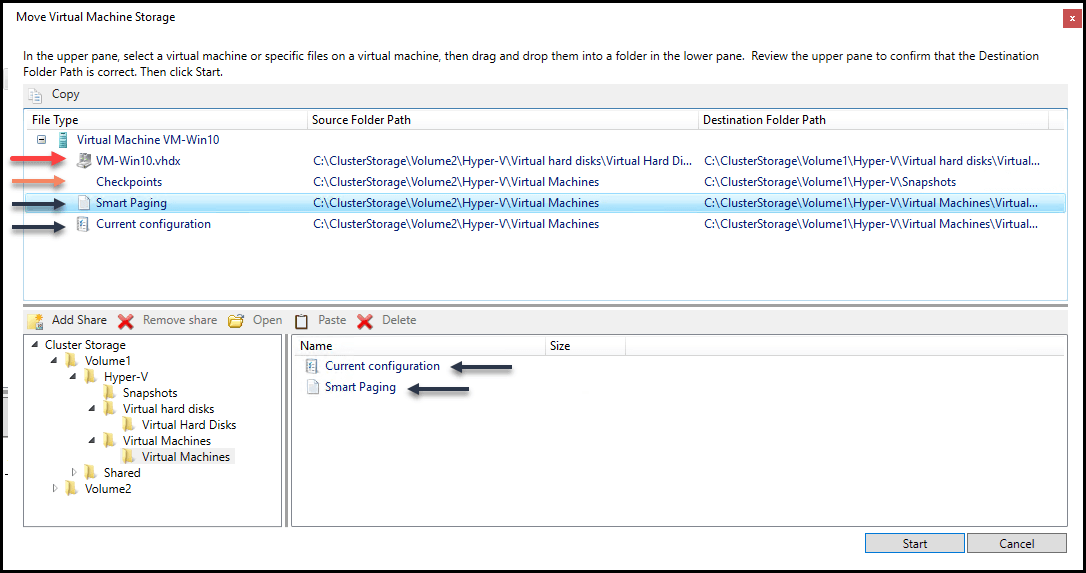
In the next option, select all the files from the Virtual Machine and drag and drop in the destination board.
Note: Virtual Disk files should be stored in the Virtual Disks folder. Configuration and Smart Paging files should be stored in the Virtual Machines folder.
Finally, the Checkpoints files should be stored in the Snapshots folder (the folder doesn’t exist if there are no VMs snapshots in the existing VMs, you can create a folder in the destination, or store in the Virtual Machines folder).

Storage Live Migration Process
The migration process for this type of Live Migration is simple.
Since we can migrate data files with Power off or Power On VMs this type of migration, the power off VMs is just a simple copy from the source to the destination and deleted the source files.
For Power On VMs, a first copy of the virtual disk files (and configuration files) is done. Afterward, a synchronization process is performed between writes and read on the virtual disk files. Any data that is needed to write is written in the destination data files; on the other hand, reads are done in source or destination; it depends where the required data is located.
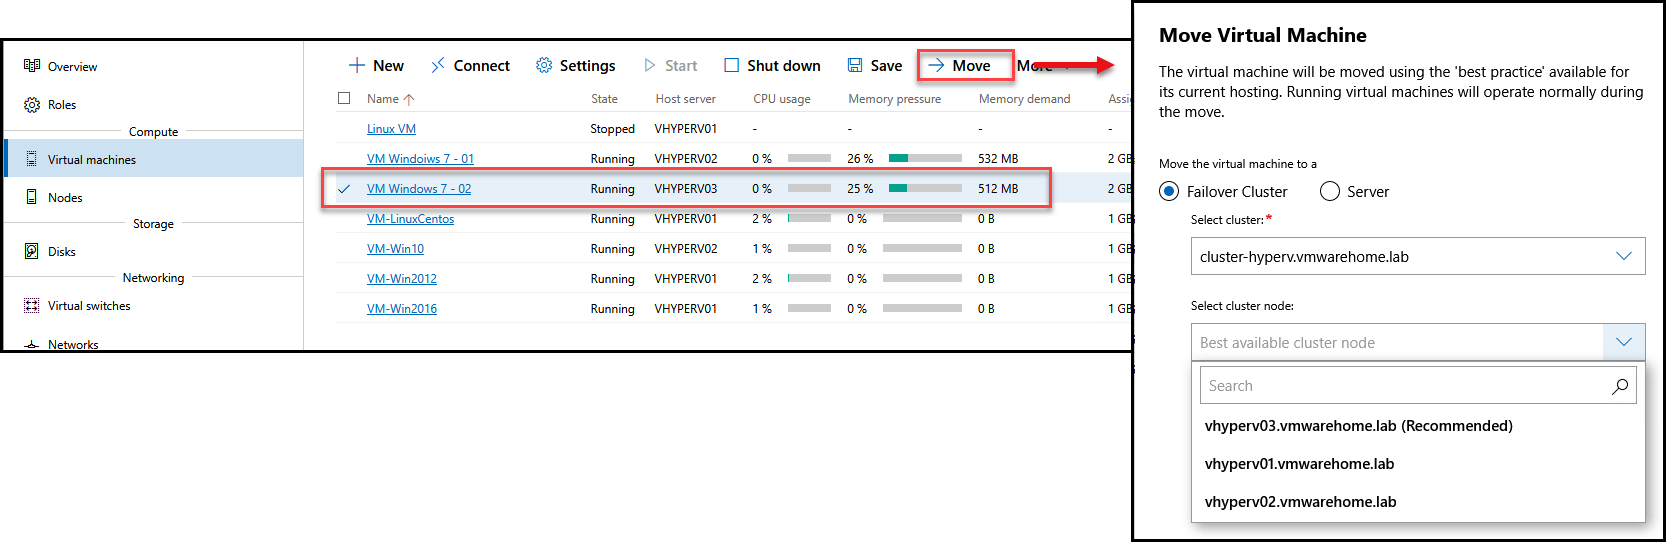
Live Migration option in Admin Center
In the next image, we can also check that using the new tool Admin Center we can use Live Migration.
With Admin Center is possible to migrate non-Cluster VMs to Standalone Hyper-V, but also migrate Hyper-V Clustered VMs.
We can even migrate a VM from a Standalone Hyper-V to a Hyper-V Cluster without the need to use Hyper-V Manager or Failover Cluster Manager.
Takeaway:
A quick table about the different types of Live Migrations:

Note: Using PowerShell to perform Live Migrations is also an option. We did not discuss the use of PowerShell to perform Live Migrations, but using PowerShell commands – Move-VM or Move-VMStorage is also an easy process.
In this article, we discussed the live migration and its types. Also how each migration type works. In the next part of this series blog, we will discuss the best practices that need to be followed for live migration as well as the basic troubleshooting steps & tips that you need to know for live migration.
Related Posts
Hyper-V Live Migration Part 2 – Troubleshooting and Best Practices
Beginners’ Guide for Microsoft Hyper-V: Hyper-V Live Migration – Part 24
Hyper-V Mastery: A Step-by-Step Guide for Beginners to Elevate Your IT Skills and Boost Your Career
Follow our Twitter and Facebook feeds for new releases, updates, insightful posts and more.