
This post on Hyper-V Live Migration is a two-part series. In our previous post – the first part, we discussed Live Migration, its types and how each migration type works.
In this second part of the series, we will look at the following:
- Best Practices for Live Migration
- Troubleshooting steps and Tips for Live Migration
Table of Contents
- Best Practices
- Troubleshooting and tips
- Live Migration between nodes with different processor models/versions
- Error when trying to use Live Migration option
- Shared-Nothing Migration
- Migrate between different Hyper-V versions
- No Credentials
- Ran out of memory
- Final Thoughts
Best Practices
- Source Hyper-V and destination Hyper-V hosts need to belong to the same Active Directory domain or trusting domains.
- If possible, use SMB shares for your non-Clustered VMs, then you would not need to relocate the data when migrating.
- When using SMB, for better performance, select SMB option in your Hyper-V Settings for live migrations performance options. Using SMB provides better use of bandwidth and CPU for the Live Migrations. Also, it should be mandatory to use an independent/isolated network with at least 10Gb of bandwidth.
- Do not mix processors from different manufacturers: example, mixing Intel and AMD in the same Hyper-V Cluster, or between Standalone Hyper-V source and destination Live Migration destinations.
- Create an isolated network for Live Migration traffic. For a better migration performance, a separate physical network should be used for Live Migration traffic. If this is not possible and you need to share your Live Migration Traffic with management traffic, or other traffic, separate the traffic by using VLANs.
- Enable Jumbo frames for Live Migration traffic.
- Allow the minimum simultaneous Live Migrations that your Virtual Infrastructure can afford. Many concurrent Live Migrations will tremendously affect the performance of the active Live Migrations and timeouts on the Virtual Machine with high blackout window times.
- If you have a Hyper-V Failover Cluster, always create VMs as a Cluster role in Failover Cluster Manager and not in the Hyper-V Manager.
Troubleshooting and tips

- Live Migration between nodes with different processor models/versions
If your environment has different processors between nodes, Virtual Machine migration will not work if the compatibility setting is not enabled on the Virtual Machine Settings.
To allow migration between this type of Hyper-V nodes, enable the compatibility setting on the VM. This option is only available to change when the VM is powered off.
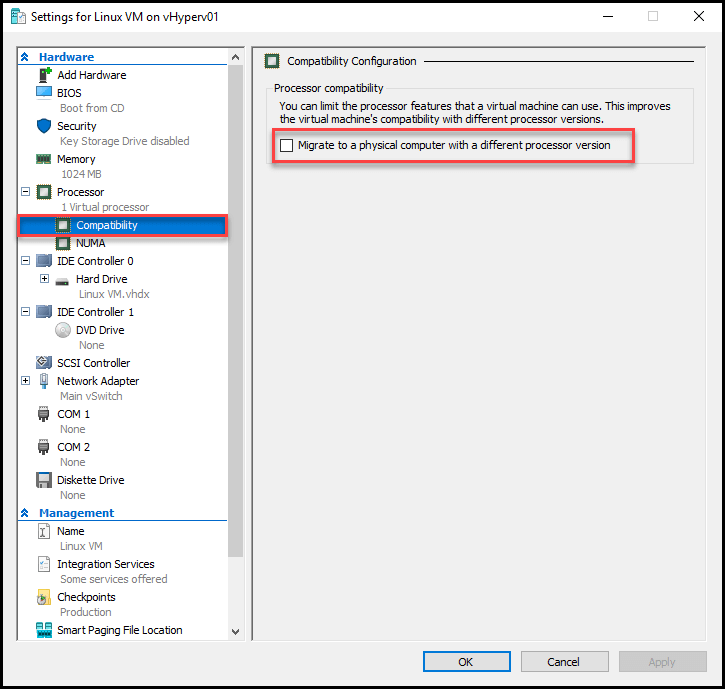
Note: It is not possible to migrate a Virtual Machine between different vendors. Example: between an Intel processor and an AMD processor.
- Error when trying to use Live Migration option
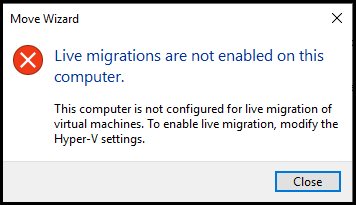
When we try to migrate a Virtual Machine between 2 Hyper-V Server and the destination, or source, doesn’t have the next option enable, we get the following errors.
Not enabled on the source:
Not allowed on the destination:
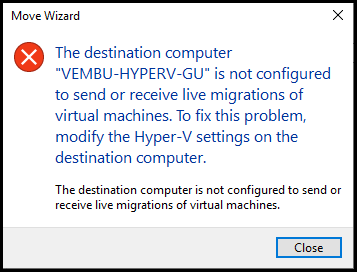
Solution: To allow Live Migrations (or even Migrate power off Virtual Machines), go to Hyper-V settings, and enable the option “Live Migrations.”
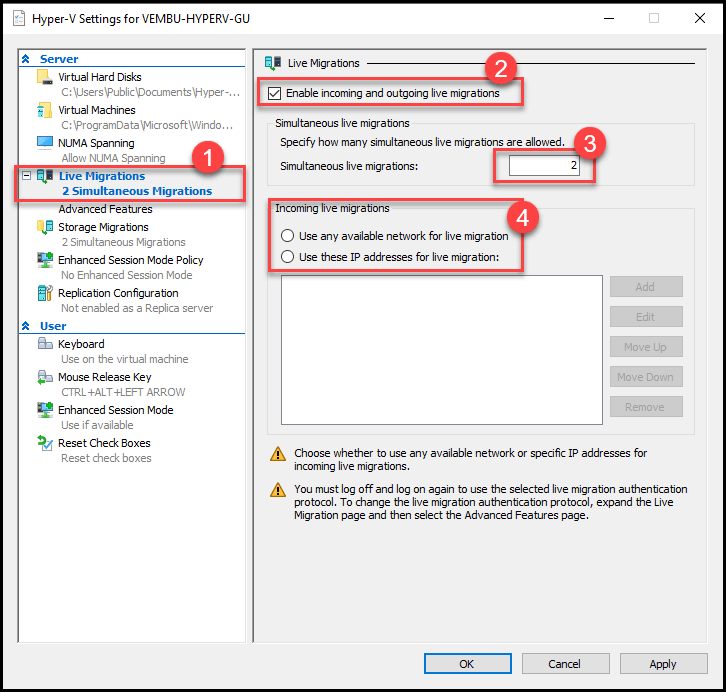
In option 3, we should set the number of simultaneous Live Migration that we want our Standalone Hyper-V or Cluster, and the default is two.
If you want to change this value, check if your Virtual Infrastructure (CPU/Memory and network) can handle more than two simultaneous Live Migrations.
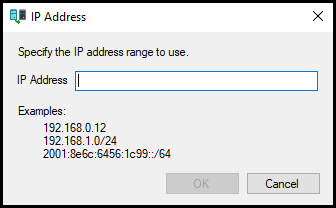
In option 4, we select which Hyper-V servers network we allow Live Migrations use.
To use any network or subnet that is set in the Hyper-V Server network, then select the first option.
If you want to specify a particular subnet, select the second option and the subnet.
Note: In a Hyper-V Cluster, by default, Live Migration is enabled, and in this option 4, the option “Use these IPs addresses for Live Migrations” is selected, and Cluster networks are used.
- Shared-Nothing Migration
Shared-Nothing Migration is only possible to migrate non-cluster Virtual Machines. When selecting a Clustered VM and try to migrate, you will get the next error.
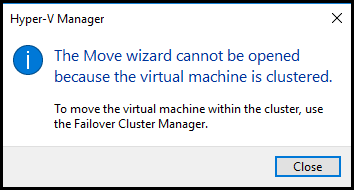
Solution: If you want to move VM to a Standalone Hyper-V, in Failover Cluster Manager in Roles, select the VM, and then choose Remove.
When removing the Virtual Machine from the Cluster after we can use the Shared-Nothing Migration to migrate the selected VM to a Standalone Hyper-V.
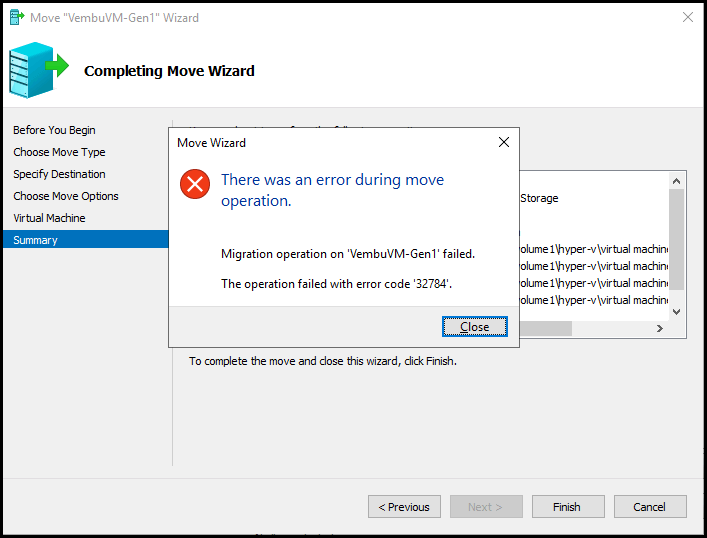
- Migrate between different Hyper-V versions
When you try to migrate a Virtual Machine between different Hyper-V versions, you will get this error: “The operation failed with error code 32784”.
Meaning, that you are trying to migrate a VM between two different Hyper-V versions that are not compatible. In this example was from Hyper-V version 9.0 (Windows Server 2019) with Hyper-V version 8.0 (Windows Server 2016).
Also, from any Windows Server R2 to lower non R2 version, we get a similar error.
Virtual Machine was created with an upper version and cannot be used in a lower version.
Note: From a lower to an upper version is possible to use Live Migration. As long the type of Live Migration is available in the Hyper-V used.
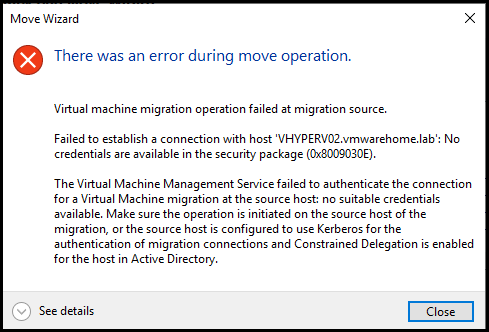
- No Credentials
In the next error, we try to migrate a VM Hyper-V Server that doesn’t authorize a delegation from the source.
Meaning, the source Hyper-V was not authorized to migrate any VMs to this destination Hyper-V Cluster.
This happens because the source was a Standalone Hyper-V that is trying to migrate a VM to a Hyper-V Cluster.
Note: This delegation between Hyper-V Cluster nodes is automatic and doesn’t need any special delegation authorization.
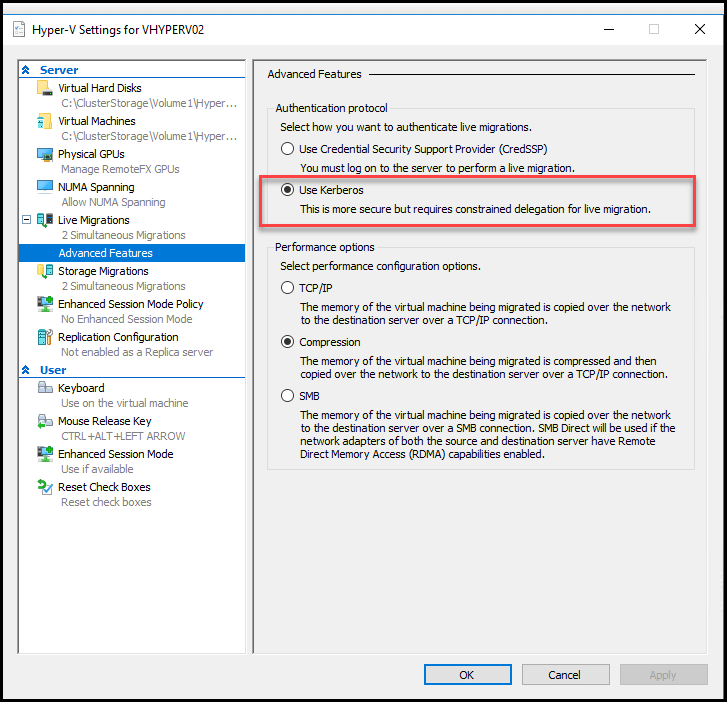
Solution: To fix this error, set Authentication Protocol with “Use Kerberos Only” in the destination Hyper-V settings and in the Domain Controller in your Hyper-V Computer object.
In Hyper-V settings, change the settings for the destination Hyper-V to use Kerberos.
Next, connect to your AD and in a Domain Controller, go to “Active Directory Users and Computers.”
In the Computer object folder, select the destination Hyper-V computer name and in the “Delegation” tab select “Use Kerberos Only” and add the following services from the source Hyper-V: CIFS and Microsoft Virtual System Migration Service.
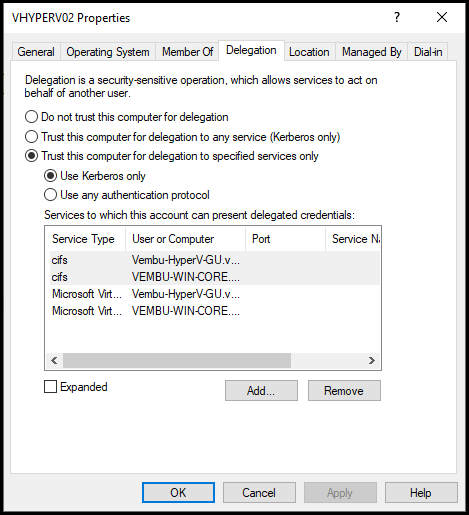
By authorizing the services from the source Hyper-V we were able to migrate VMs between the two servers.
Note: Microsoft stated that the above option could also trigger in Hyper-V Server 2016 (and others) the following error: “Virtual Machine Management Service failed to authenticate the connection for a Virtual Machine migration at the source host: no suitable credentials available.”
The recommendation is to change the above option to “Use any authentication protocol.” Even it is less secure is the actual Microsoft recommendation until the bug is fixed.
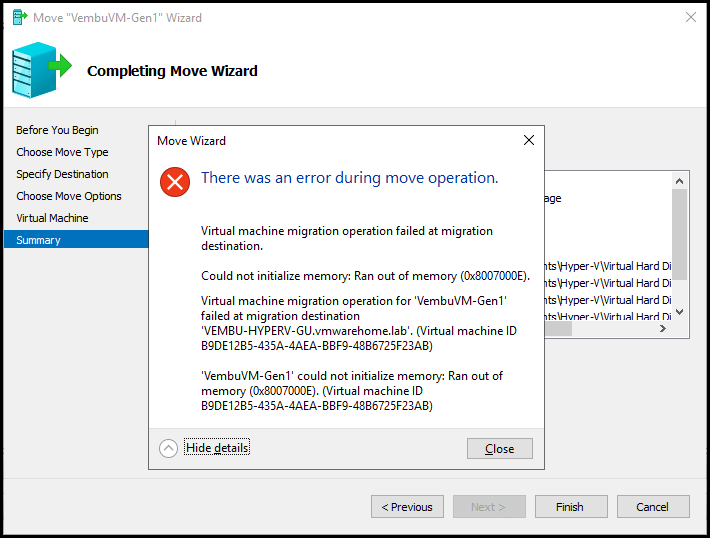
- Ran out of memory
When trying to perform Live Migration of a virtual machine to another Hyper-V (Standalone of Clustered), we may get an error stating that destination is out of memory.
This means that there are not enough resources (in this case, memory) to Power On the VM on the destination.
Solution: Select a different Hyper-V with enough memory, Power Off unneeded VMs that are in ON state, or upgrade Hyper-V memory.
Final Thoughts:
Hyper-V Live Migration has evolved and improved a lot since Windows Server 2012. It has been more stable and growing by adding more features. Particularly for the non-Cluster Hyper-V, and is now very similar and reliable as one of the best features in VMware, vMotion.
Using tools like Hyper-V Manager, Failover Cluster Manager, and Admin Center Or merely using PowerShell commands, we can perform all the types of migrations needed for our Hyper-V Infrastructure.
When it is correctly configured and used the best practices, Live Migration is a lifesaver and very easy to use it. But always make sure to test your Live Migrations, in Standalone Hyper-V and also Hyper-V Clustered before putting your Virtual Infrastructure in production. If not, there are chances where migration doesn’t work because of any of the errors detailed in the article or other misconfigured settings. Always take special attention to the virtual networks (and interfaces) that are used for Live Migrations.
Secure your critical data with a reliable Hyper-V backup solution, designed as a strong protective barrier. Discover its capabilities without any financial commitment.
Effortlessly strengthen your Hyper-V environment by downloading BDRSuite today.
Follow our Twitter and Facebook feeds for new releases, updates, insightful posts and more.