
Read on:
VMware for Beginners – Overview of vSphere: Part 1
VMware for Beginners – vSphere Installation Requirements: Part 2
VMware for Beginners – How to Install vSphere: Part 3
VMware for Beginners – vSphere Networking: Part 4
VMware for Beginners – vSphere Datastores – Part 5
VMware for Beginners – vSphere Virtual Machines – Part 6
VMware for Beginners – How to Install vCenter: Part 7
VMware for Beginners – Datacenter and Clusters – Part 8
VMware for Beginners – How to Create and Configure iSCSI Datastores: Part 9(a)
In the last VMware for Beginners article, we started to talk about iSCSI Datastores in the ESXi host and finish to install the first VMkernel in our first ESXi host.
In this article, we will finish that configuration and we will learn how to:
- Finish iSCSI Network
- Configure iSCSI Software Adapter
- Configure Network Port Binding
- Create Storage Multipath
- Add Storage devices
… and much more.
As we showed in the last part of the previous article, the first VMkernel was created, but the Teaming is wrong, so we need to fix it.

By default, vSwitch will always set both vmnics active. But this is not supported for iSCSI and Port Binding, so we need to change this after we create the VMkernel.
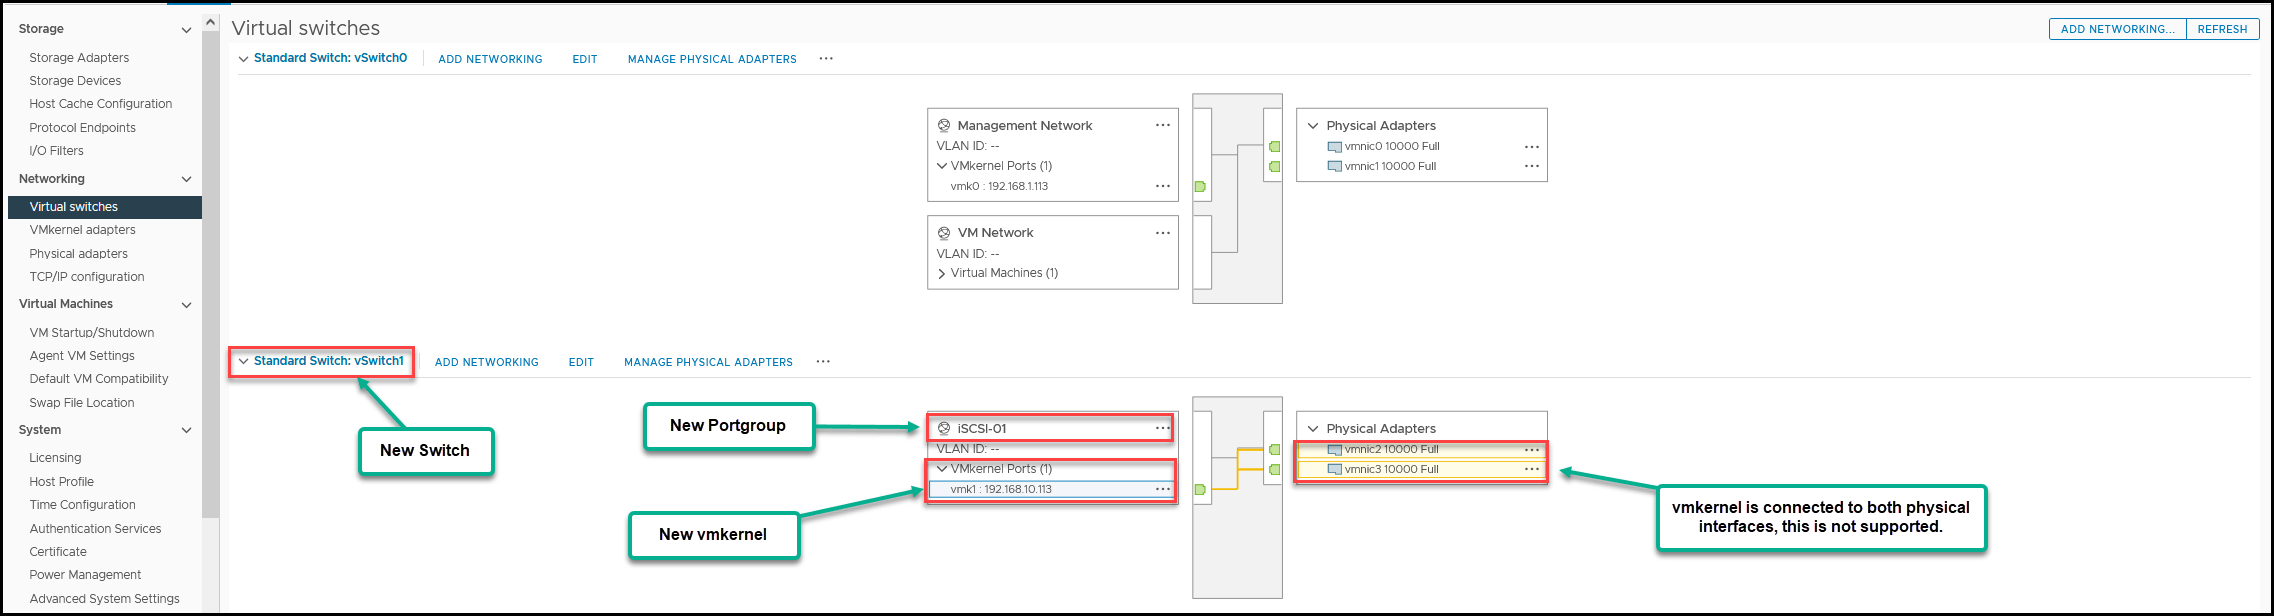
Let us set the configuration as active/passive(unused) so that we can create a Port Binding (if vmnics are both active, the configuration will not let you create a Port Binding).
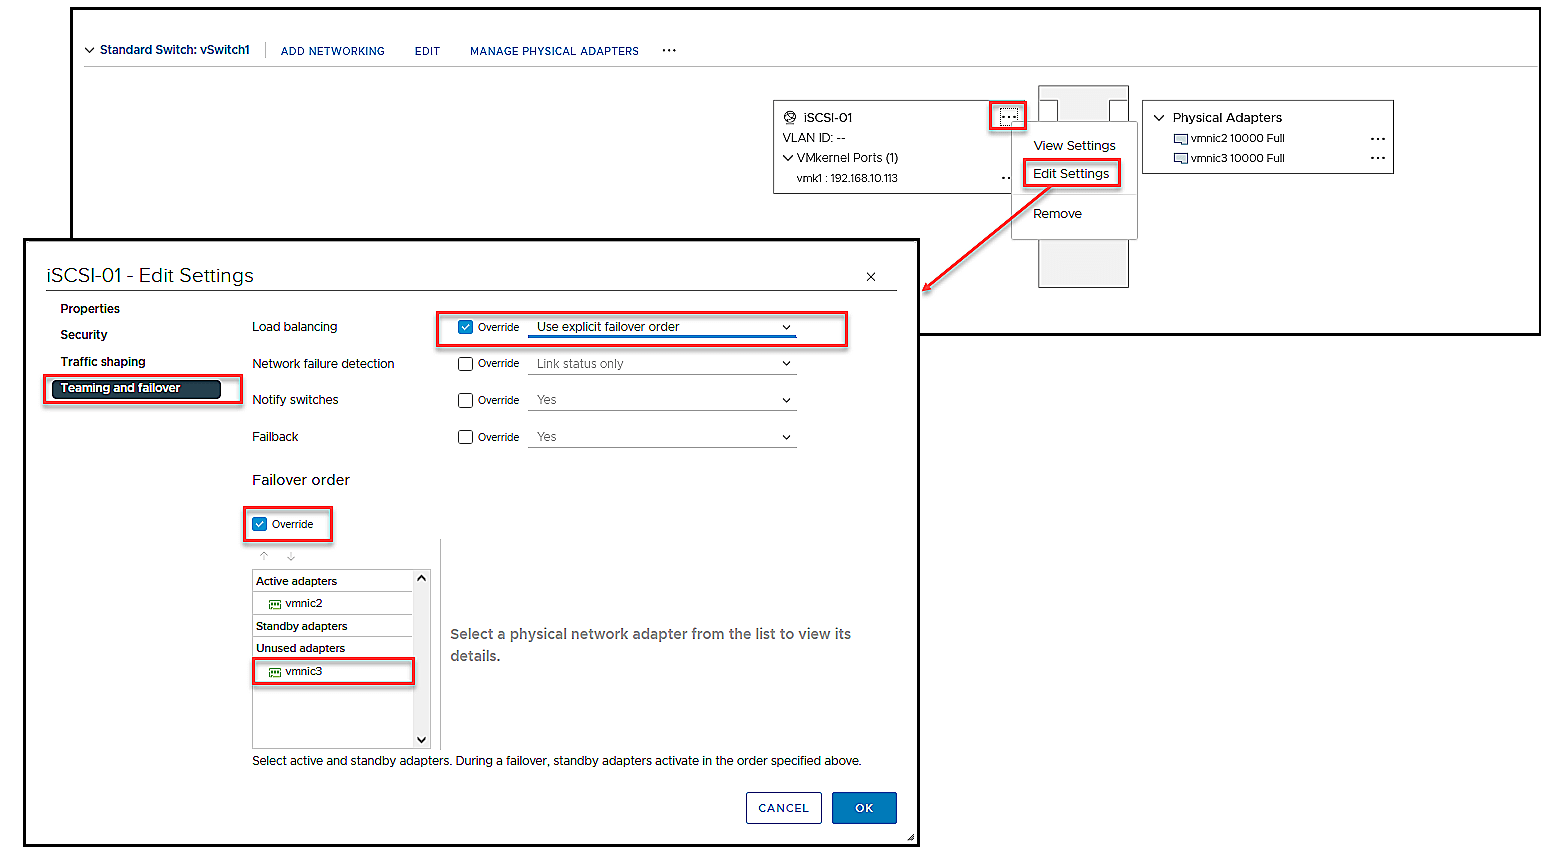
- On the Portgroup called iSCSI-01, click on … and select Edit Settings
- Go to the Teaming and Failover option, and set the Load Balancing to Use explicit failover order (meaning that in case of one vmnic fail, it will use the order)
- Next, on the Failover Order, enable Override and move one of the vmnics to Unused Adapters
- As set in our design, iSCSI-01 uses vmnic2 and vmnic3 is not used
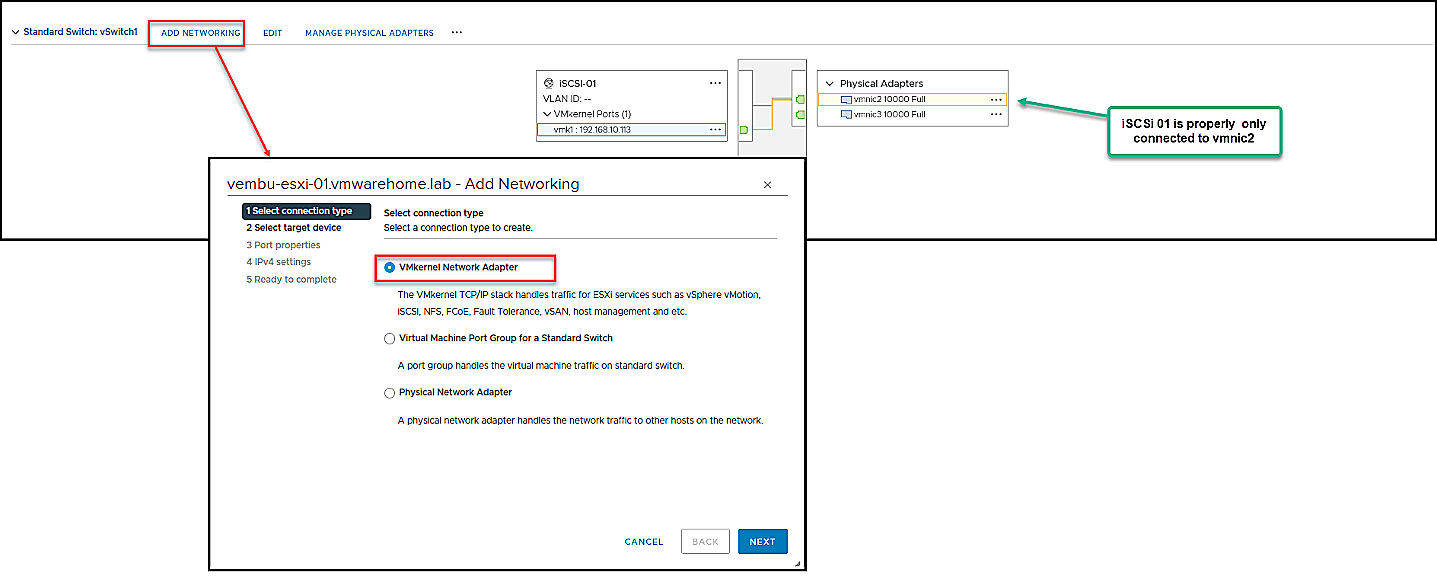
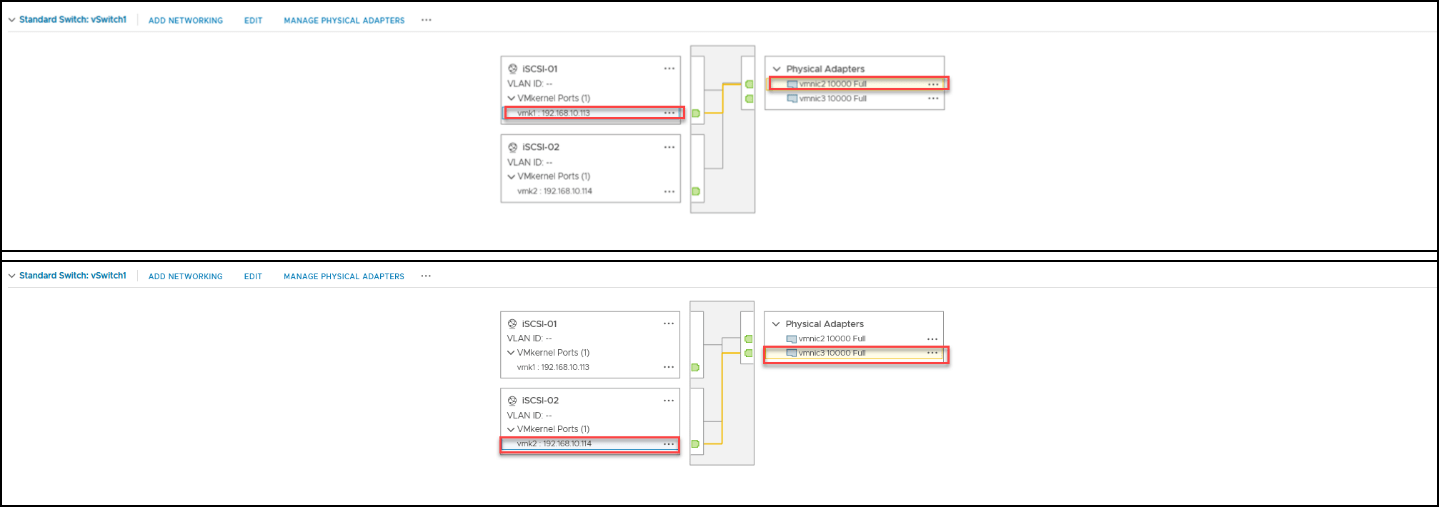
As you can see in the next image, the iSCSI-01 VMkernel is now only connected to the vmnic2. Meaning that in the iSCSI Storage, there is only one path from iSCSI-01, and it is to vmnic2.
We now have our first iSCSI VMkernel created. But since the minimum is 2, we need to create a second one.
- Click again in the Add Networking in your vSwitch1 and select the option VMkernel Network Adapter
- The procedure is the same as before, but now we will not create a Standard Switch since it already exists
- Instead, we will create a Portgroup called iSCSI-02 and a VMkernel in that Portgroup
Now, instead of creating a new Standard Switch, we will choose Select an existing standard switch
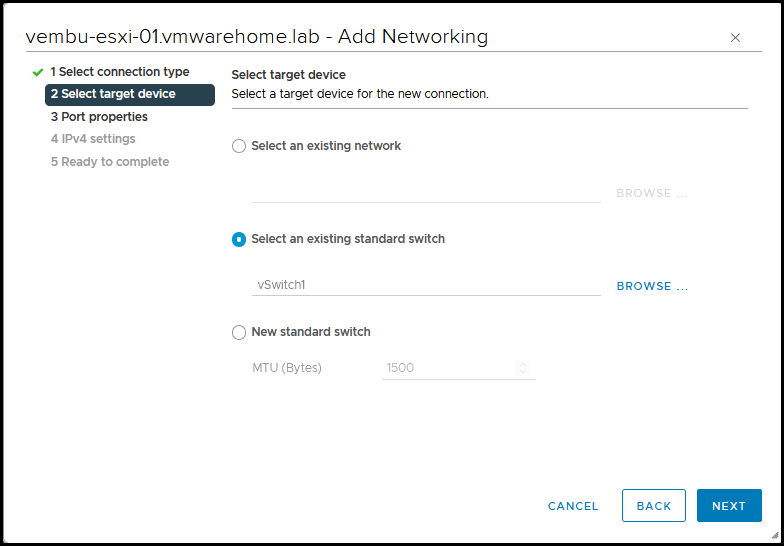
The rest of the options are the same as above, so there is no need to display them again.
- Create a Portgroup, set a name (in this case, iSCSI-02), and set an IP address for the VMkernel (in this case, 192.168.10.114)
- Now, we have two Port Groups (iSCSI-01 and iSCSI-02) with a VMkernel in each one
- As we can see, the iSCSI-02 is connected to vmnic3 (don’t forget to edit the iSCSI-02 Portgroup to set vmnic2 as unused)
Since we are using Standard Virtual Switch, we need to follow this process in all the ESXi hosts in the Cluster that connects to our iSCSI Storage.
Note: If we were using vDS, it would set the configuration for all ESXi hosts(except creating the VMkernel, which we always need to create manually and set the IP addresses).
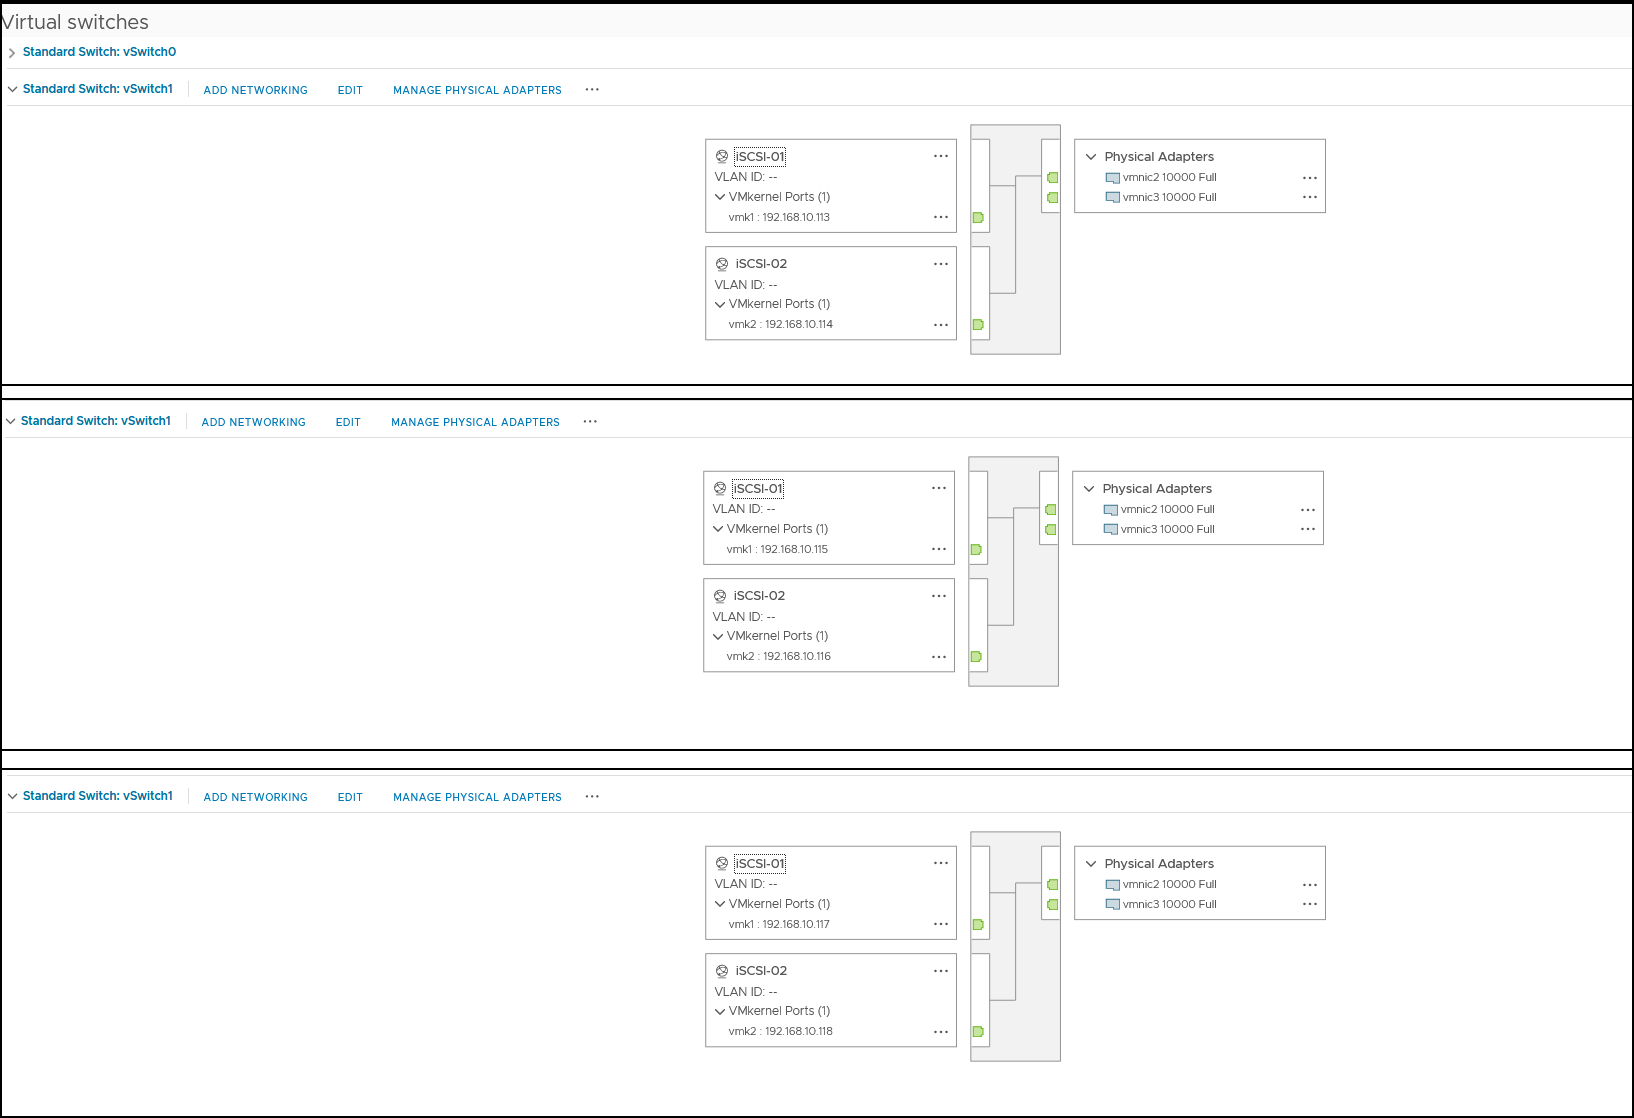
This is the final result for our iSCSI Network in all ESXi hosts.
After we finish our iSCSI Network and all the VMkernels are created, it’s time to go back to the iSCSI Software Adapter and connect them to the VMkernels and create Network Port Binding.
- Select the ESXi host – Configure Tab – Storage Adapters, select the iSCSI Software Adapter, and
- Then in the iSCSI Software Adapter section, select Network Port Binding, click Add and then select the VMkernel created in the last article(in our case, is vmk1 and vmk2)
Note: As we can see, when I select just one VMkernel, it says: Compliant. It means that the Portgroup and VMkernel are correctly configured.

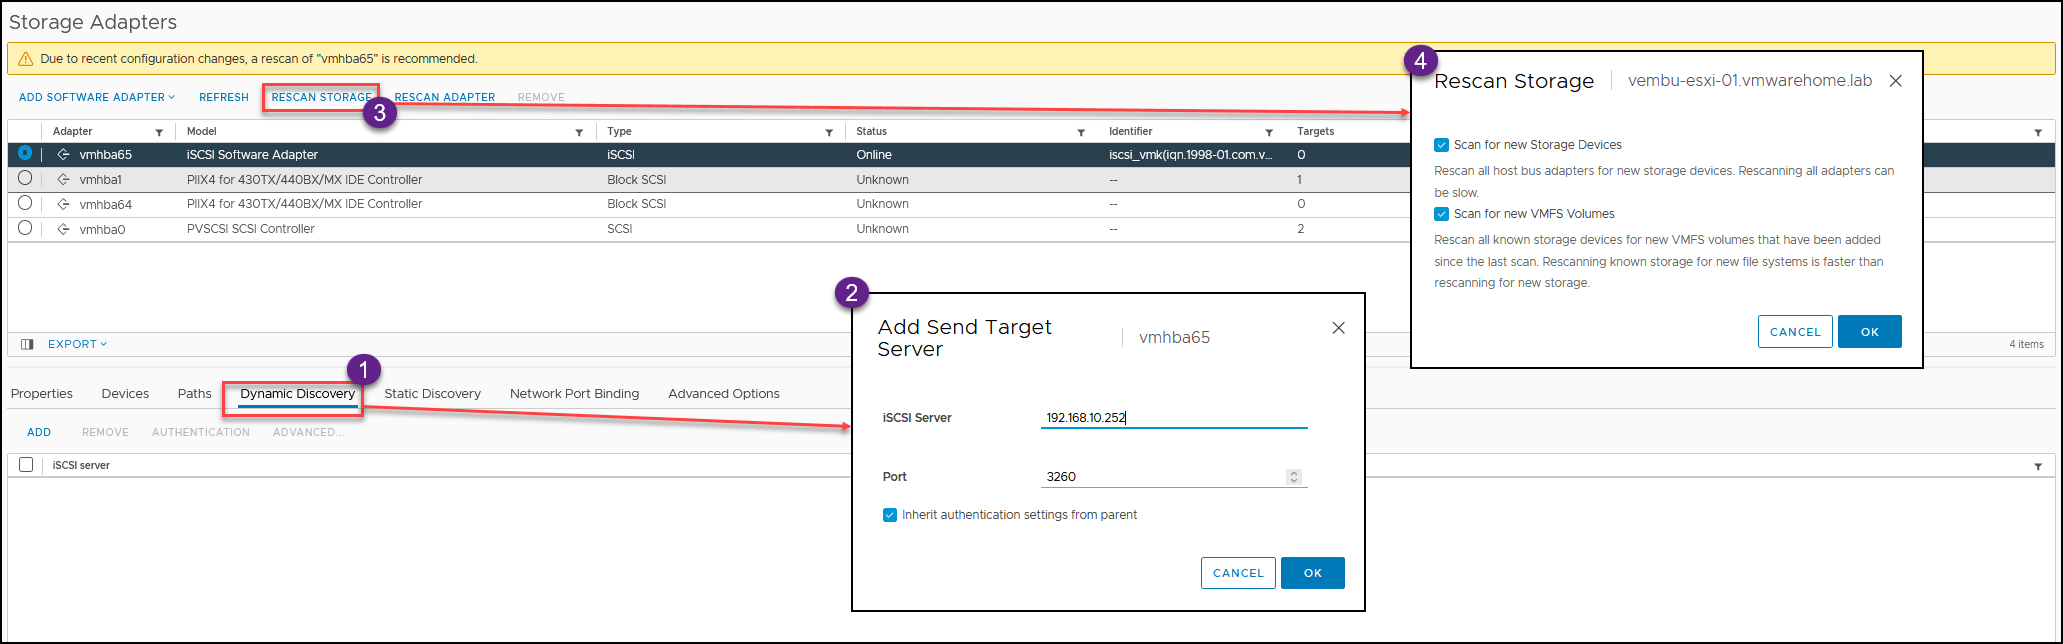
After we created our Network Port Binding, we must add our Storage device to the iSCSI Software Adapter.
- Go to Dynamic Discover and add the IP address of your Storage device
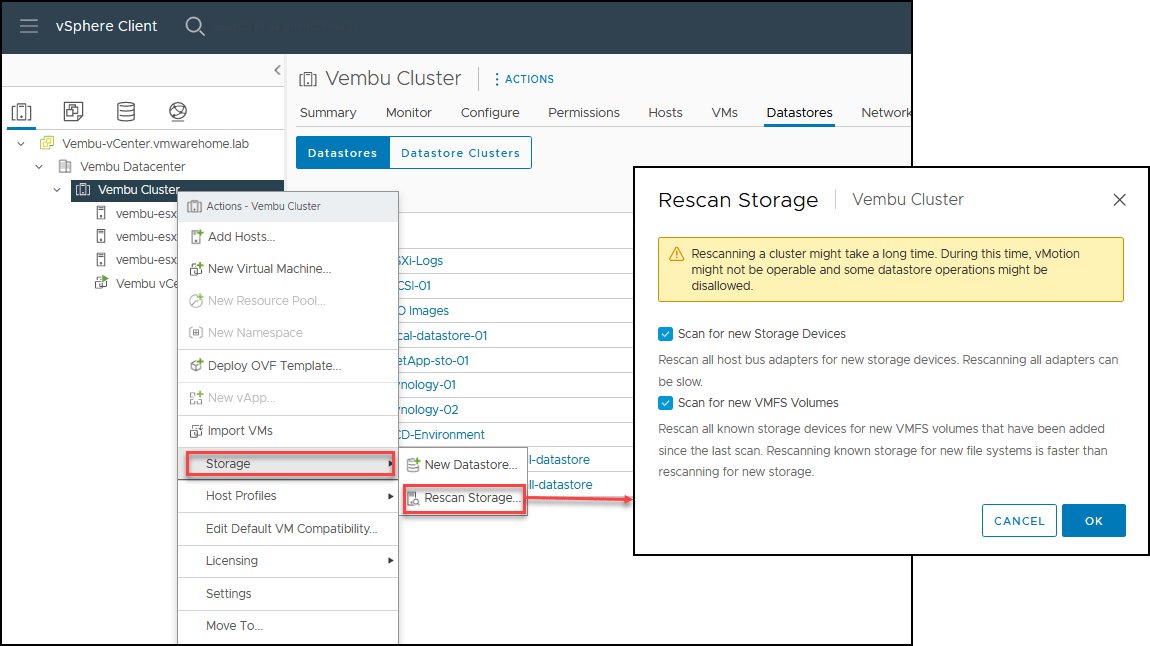
- After you create Network Port Binding and add your Storage device, click on Rescan Storage so that the ESXi host can connect to your Storage
After the rescan, and if all the configuration is correct, the ESXi host should now be connected to your Storage device.
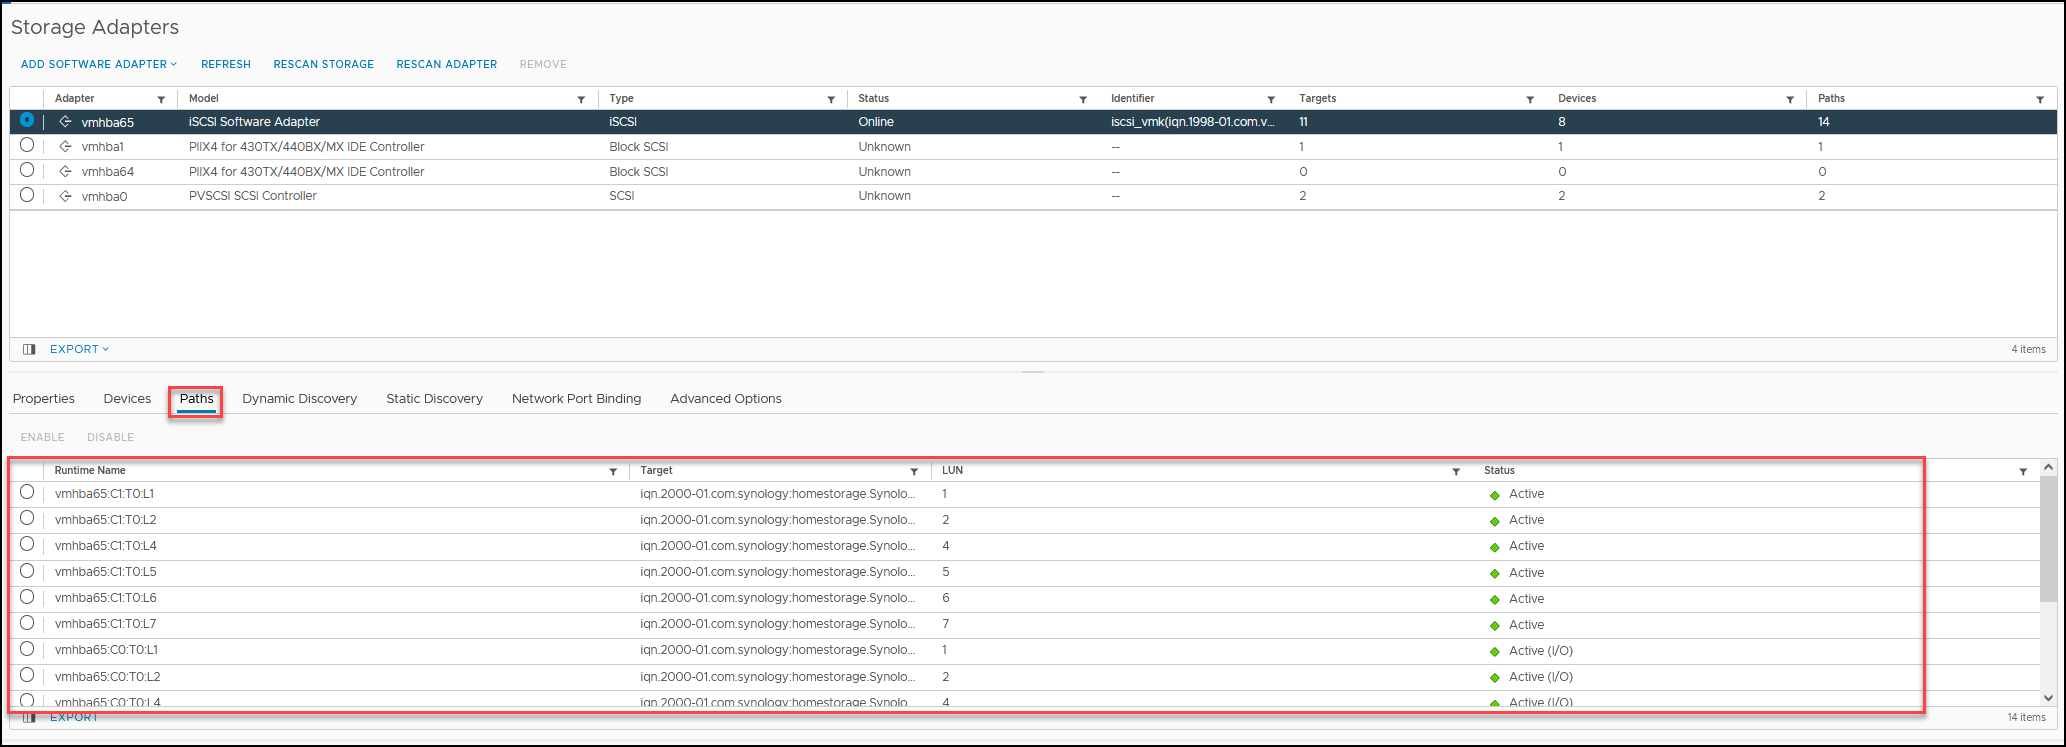
If you go to the Paths tab, you should see all the paths from your ESXi host to the Storage device.
Since we have 2 VMknernel, we will see two paths for each LUN. In my case, we see many LUNs and paths because I have several LUNS in the Storage.
All the LUNs and Target are open(no CHAP), so any ESXi host connecting to the Storage will see all the LUNs. If we added the CHAP in our iSCSI Software adapter, we only see the LUNs with the same CHAP on the source.
Using CHAP is a way to control who can see what.
Next image I show an example where I set that only these IPs can see these LUNs.
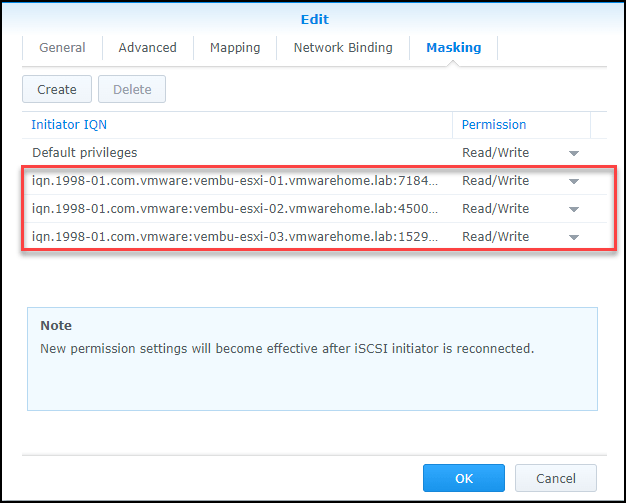
We can also restrict the connections to the LUNs from the Storage side by iSCSI Software Adapter IQN. Setting IQN, only the added IQN can connect to this LUN. These settings are done in the Storage Target.
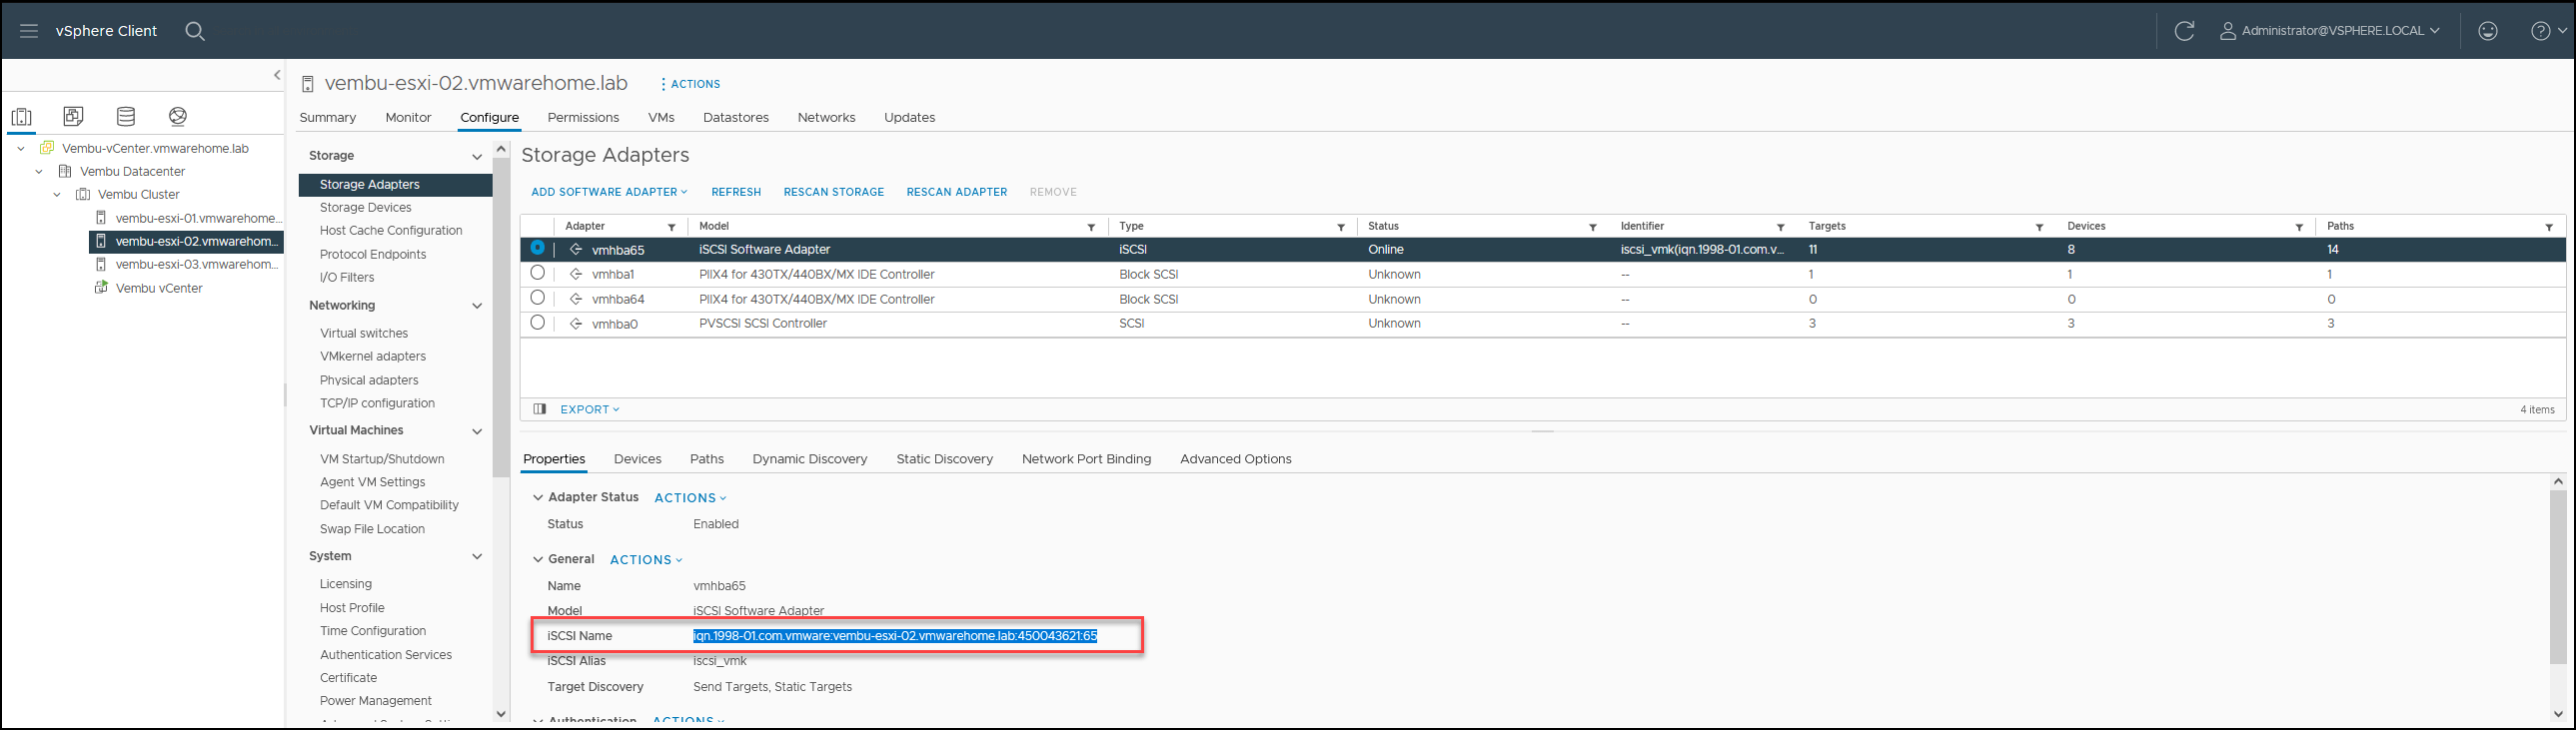
For example, using our iSCSI Software Adapter IQN names.
Check first each IQN name in the iSCSI Software Adapter and then add to your Storage Target.
Adding IQN to the Storage Target. LUNs are masked only to this IQNs.
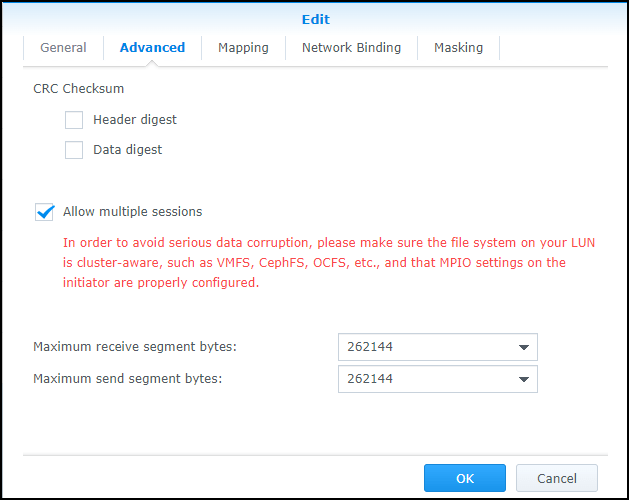
To finalize the Datastore section, do not forget to enable the option Allow multiple sessions in the Storage Target.
Since we have multiple paths, Storage needs to accept multiple sessions to the LUN. If this option is not enabled, you can corrupt the LUN, and only one ESXi host at the time can see the LUN(and consequently the Datastore).
Since now we can see our Storage and all paths are green, let us create an iSCSI VMFS Datastore.
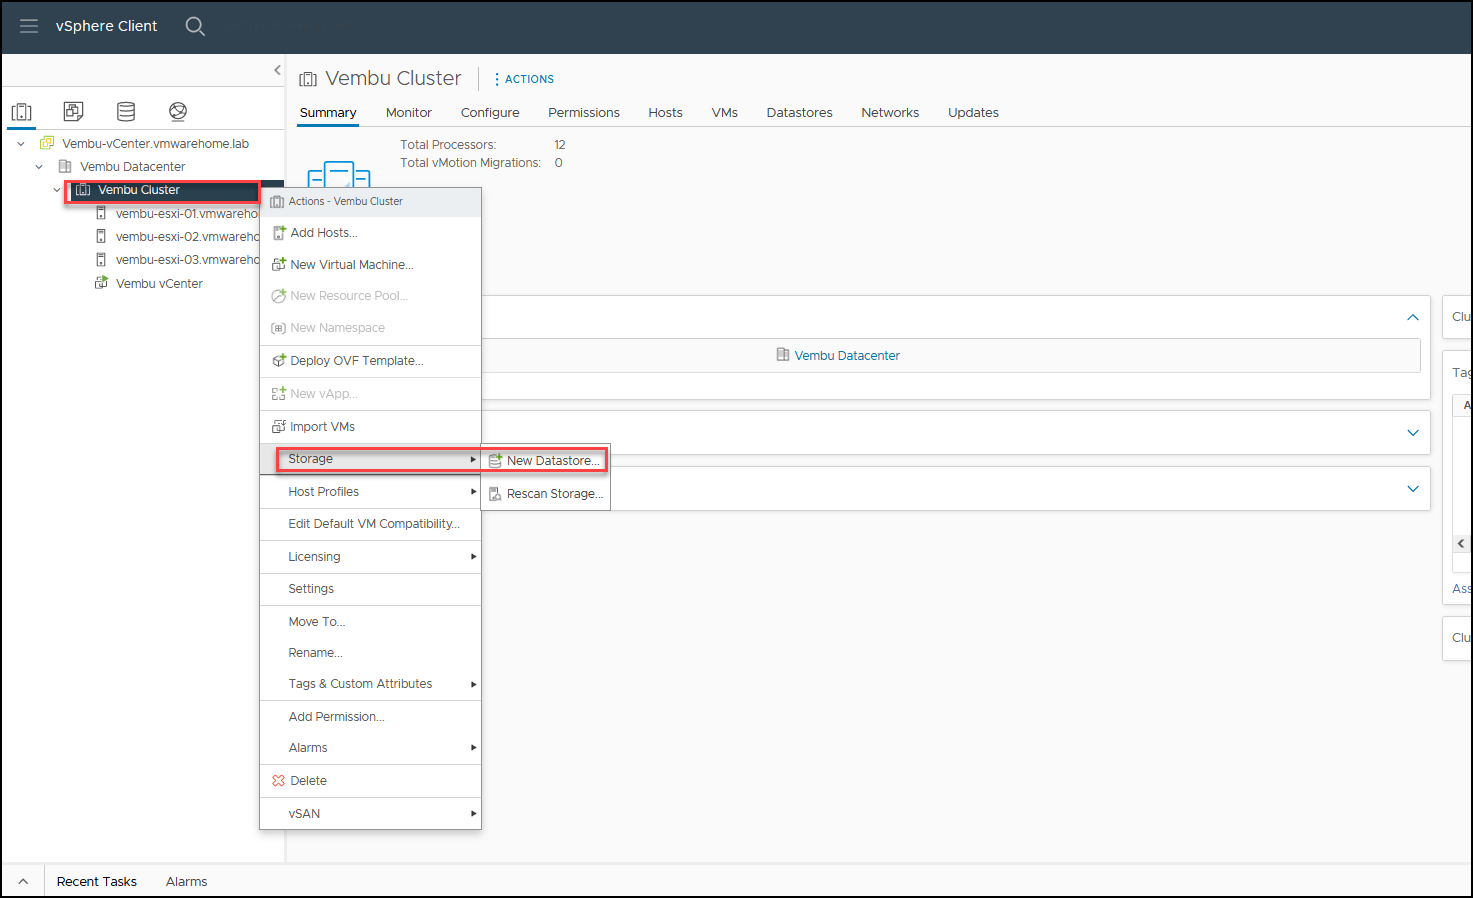
We can do this at the ESXi host level or create it at the Cluster level to automatically set it in all ESXi hosts.
I will create it in the Cluster.
- Right-click in the Cluster in the menu and select Storage and New Storage(we already learn this in previous articles but at the ESXi host level)
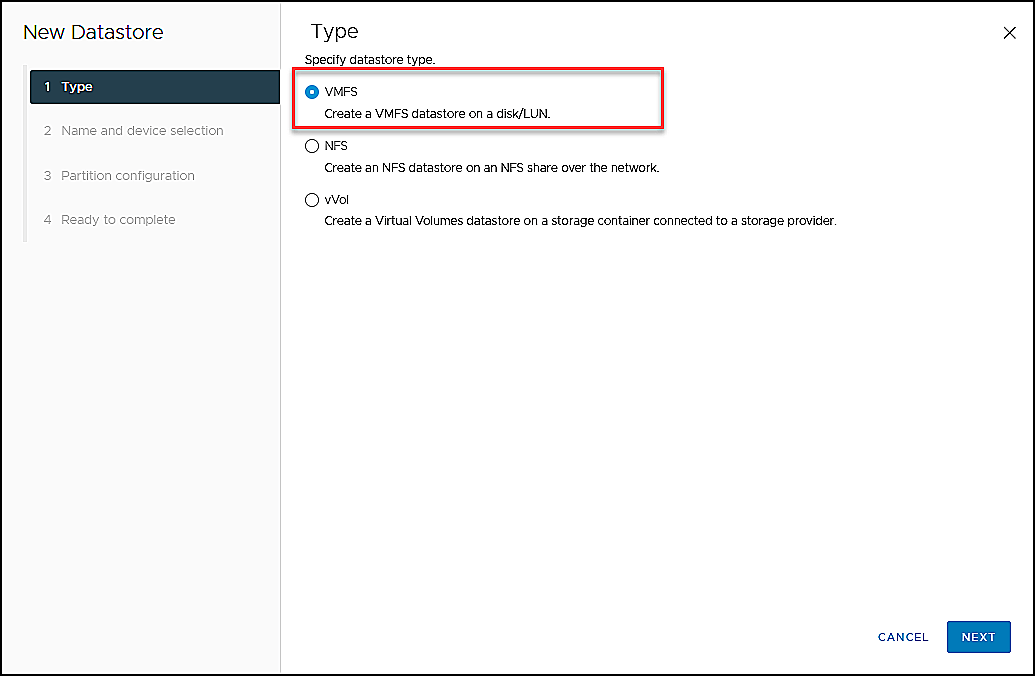
Select create VMFS Datastore.
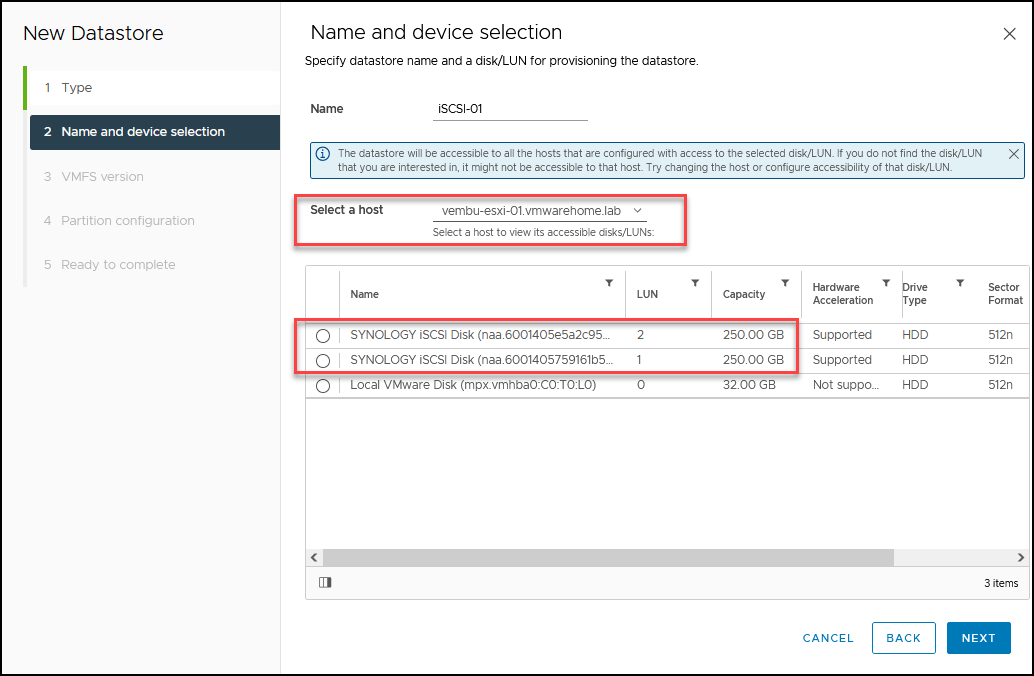
Since we are setting this at the Cluster level, we need to select one host first and then, as we can see in the next image, two new LUNs of 250Gb from my Synology.
I provided a name for the Datastore(iSCSI-01), then selected one LUN and clicked Next.
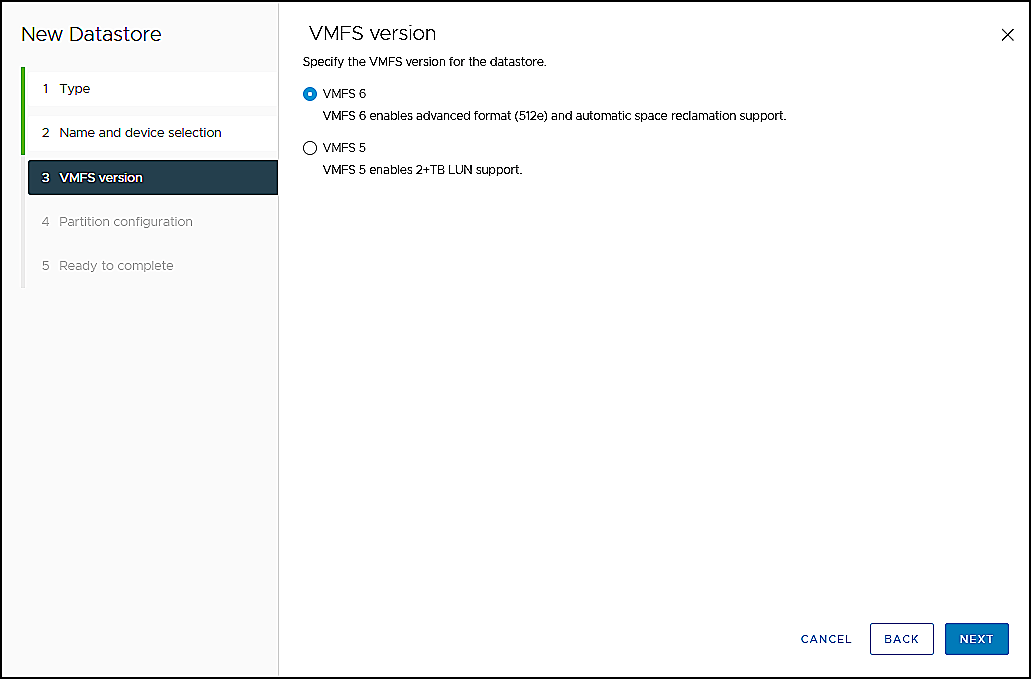
Select the VMFS version. You should always select the new version. These days, VMFS 5 is only for particular cases.
Note: VMFS 5 is not upgradeable. If you select VMFS 5 and want to upgrade to 6, you need to create a new VMFS 6 Datastore, move all VMs to the new Datastore and then delete the VMFS 5 Datastore.
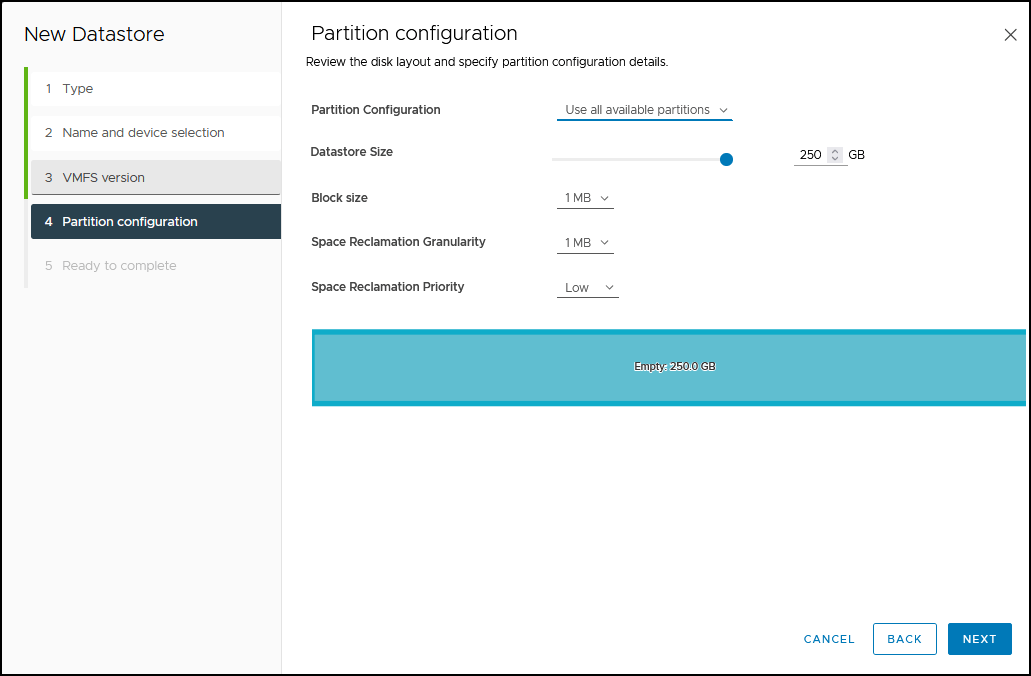
Unless you want to use only a part of the size of this LUN and want to change the Block size, leave all in default and continue.
Double-check all the information and click Finish.
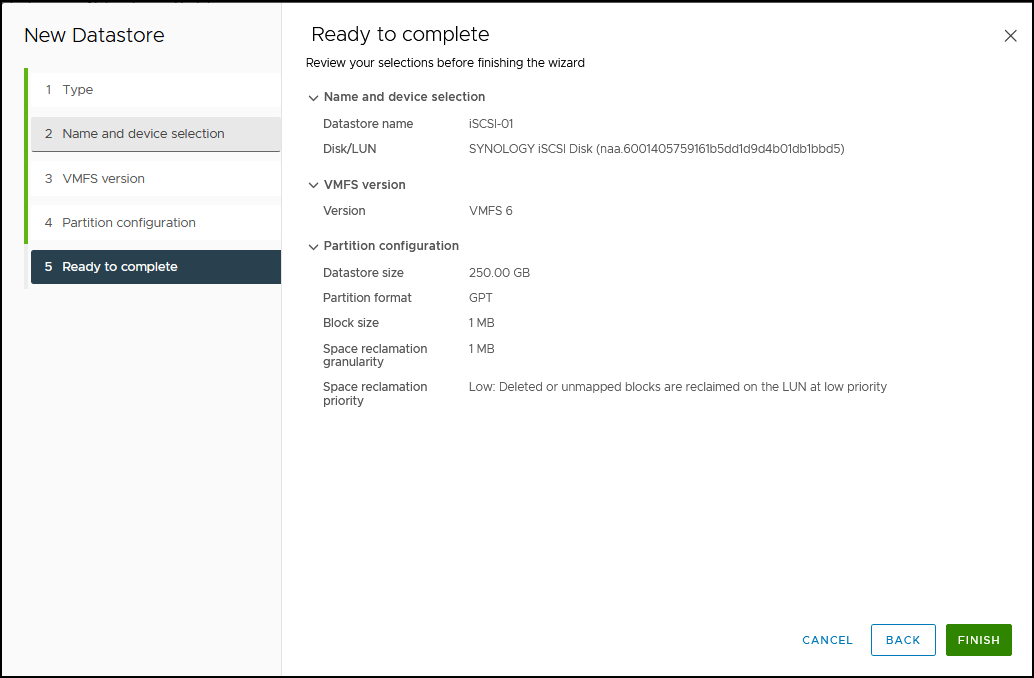
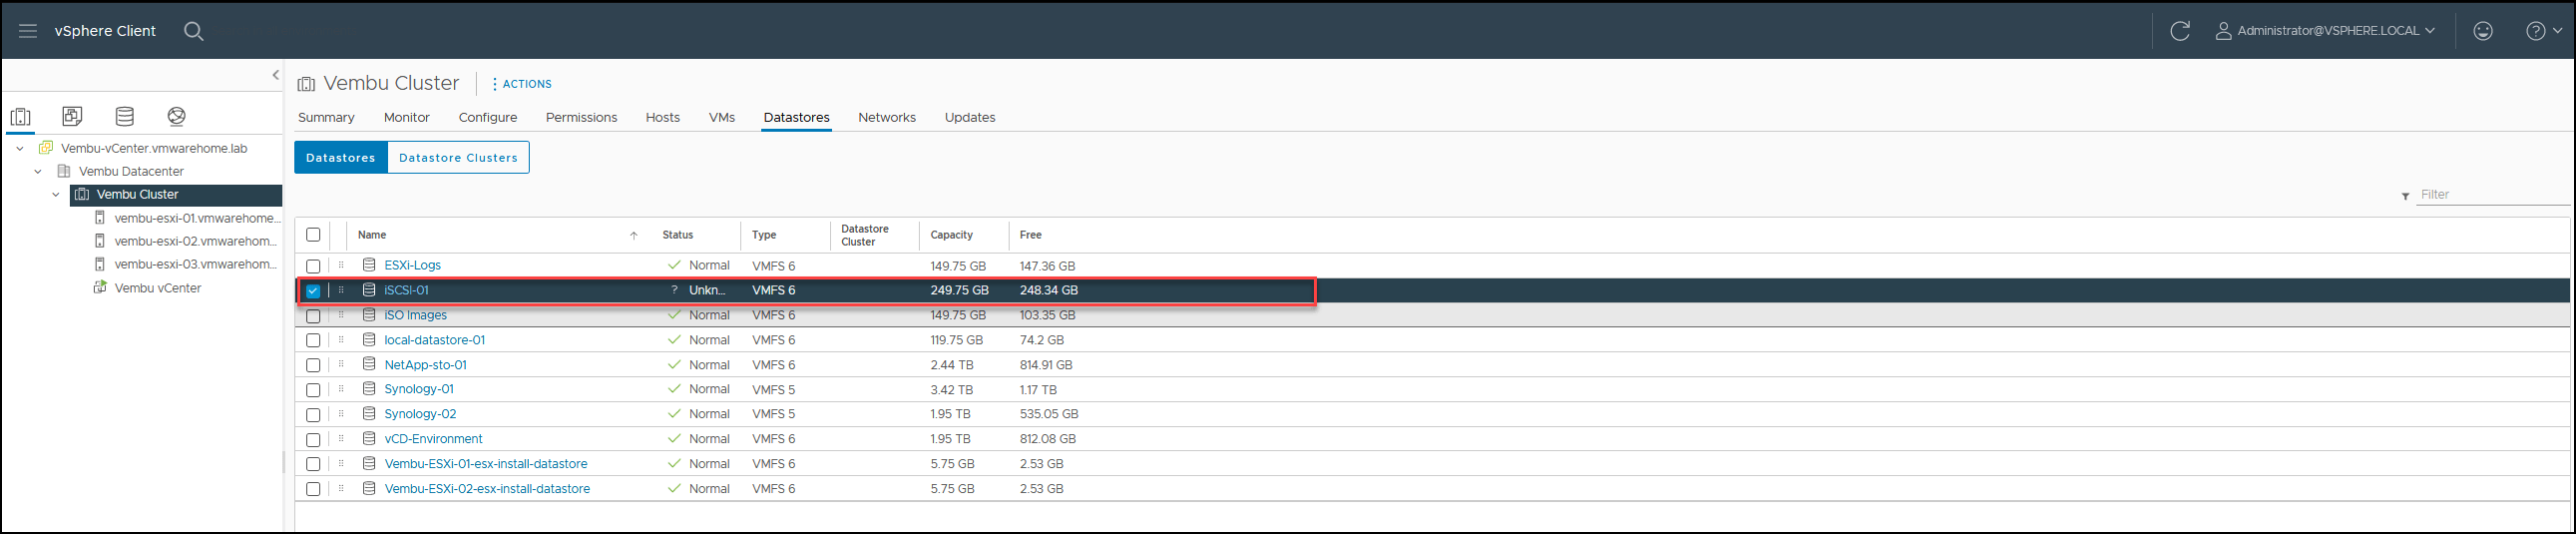
As we can see, we now have a new Datastore called iSCSI-01
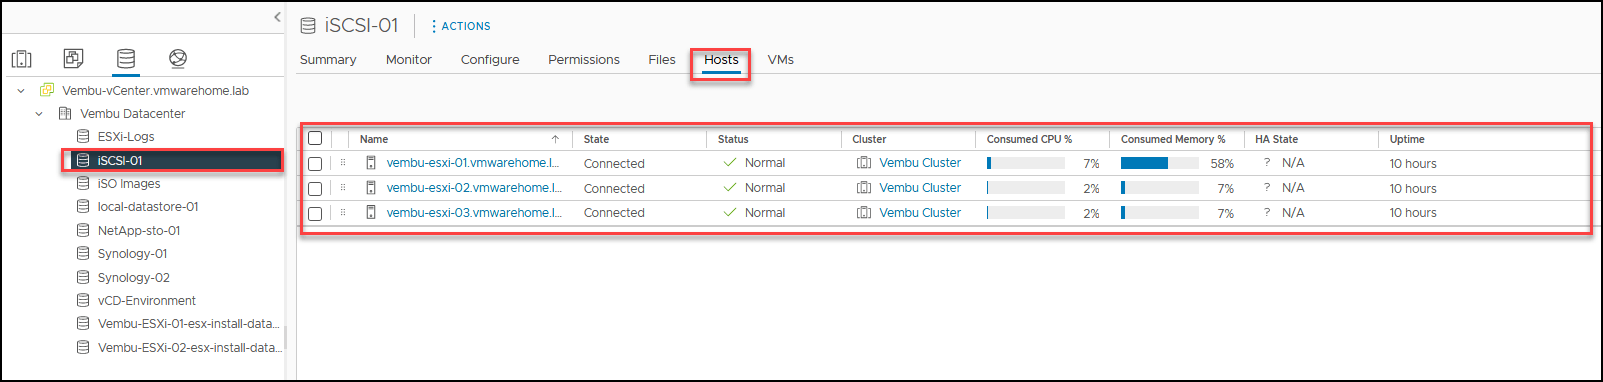
If you click on the Datastore and go to Host tab, you can see now which ESXi hosts are connected to this Datastore.
If you make any changes on the Storage side (like resizing the Datastore, changing CHAP, or adding IPs to Targer etc.,) you always need to rescan the Storage Adapter on the ESXi hosts.
Our iSCSI VMFS Datastore is created and available in all ESX hosts.
Before finishing this article, here are two quick tips when managing the VMFS Datastore.
How to delete a VMFS Datastore?
Before trying to delete the VMFS, check the prerequisites.
Prerequisites
- Remove or migrate all virtual machines from the datastore
- Unmount the datastore from all hosts
- Disable Storage DRS for the datastore
- Disable Storage I/O Control for the datastore
Make sure that the datastore is not used for vSphere HA heartbeating.
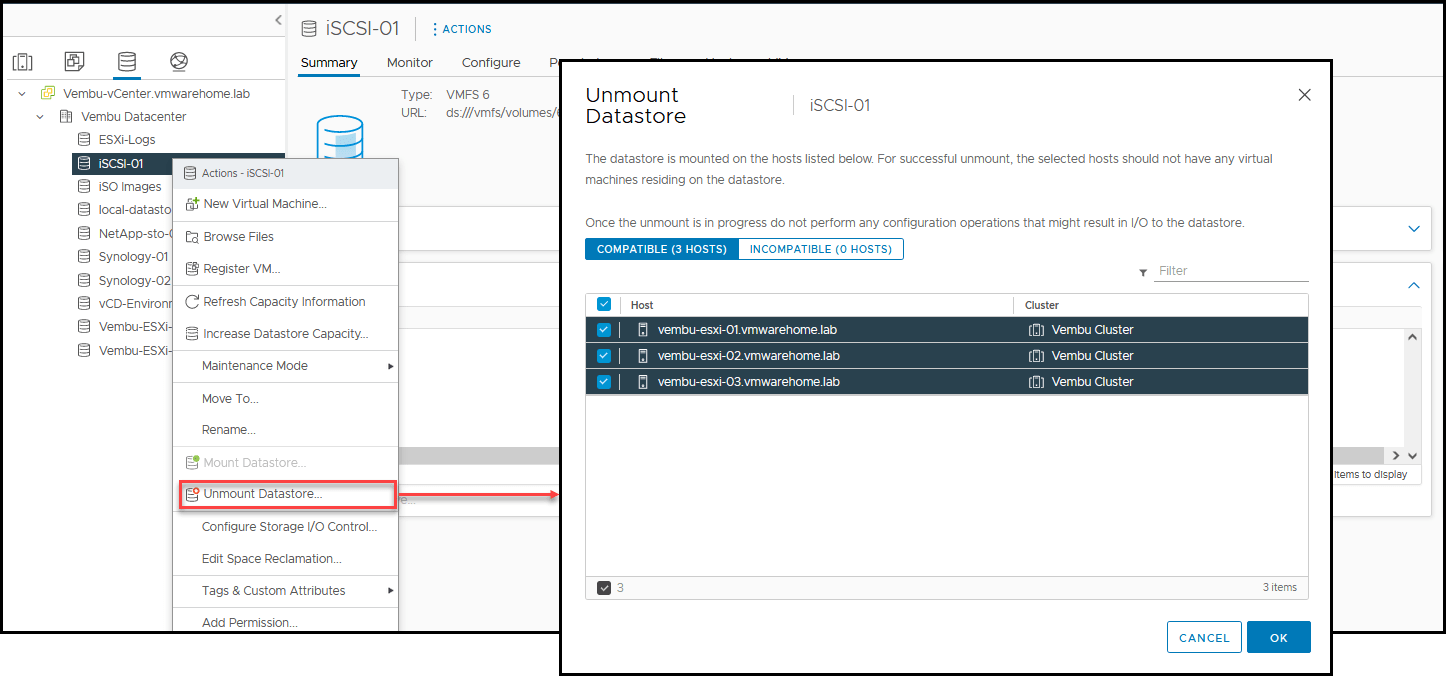
First, unmount the VMFS Datastore. Select the ESXi hosts you want to unmount(since it is to delete, we need to select all).
Note: The task may take some seconds to finish.
Then the Datastore will be Inaccessible, and you can launch the delete.
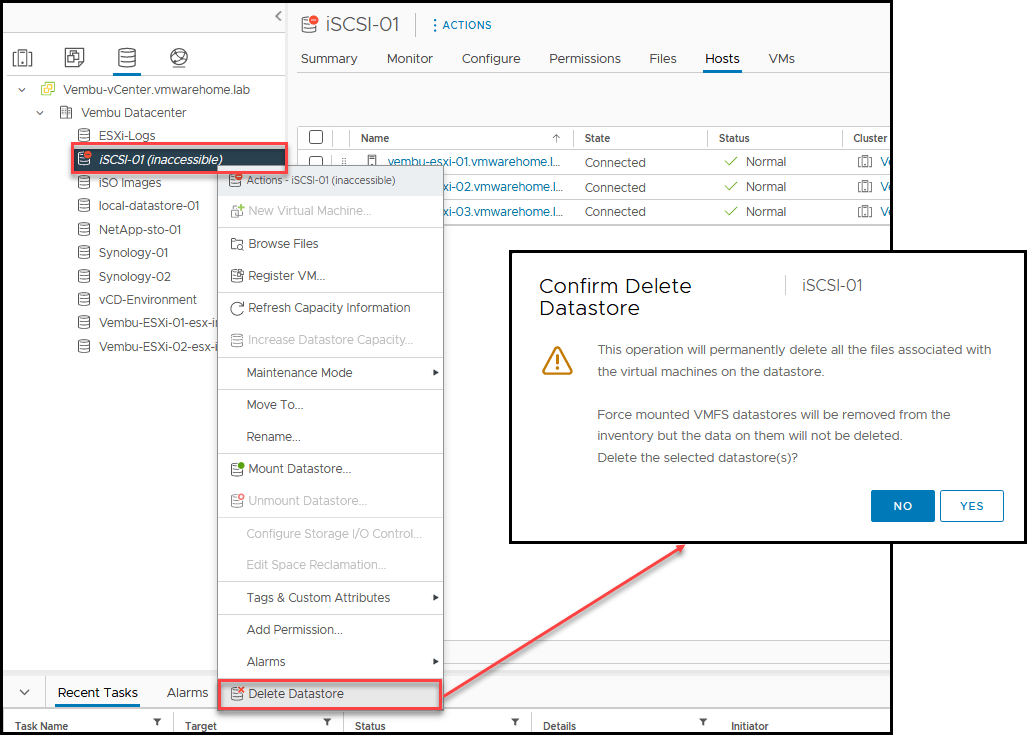
After this Datastore is deleted from vCenter and all ESXi hosts.
How to resize a VMFS Datastore?
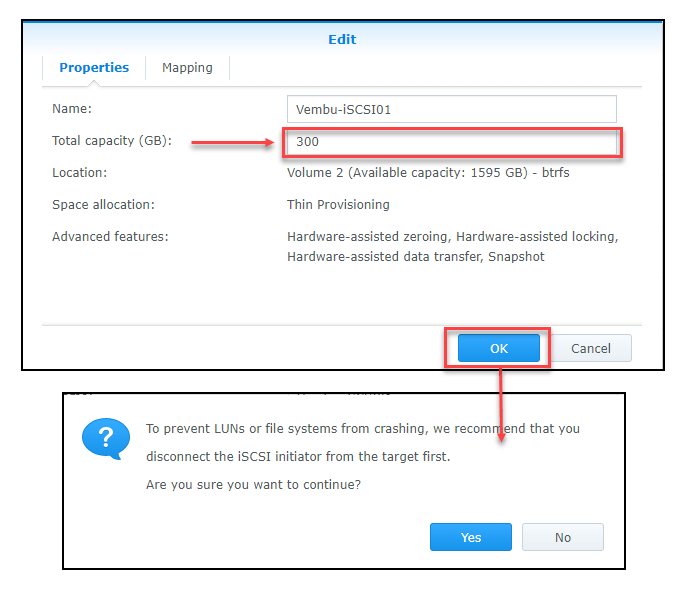
First, we need to enlarge the LUN size in the Storage device.
Always stop any VM running on this Datastore, and disconnect the iSCSI Initiator first to be on the safe side.
On the Storage device, you can temporarily disable the Target while making these changes.
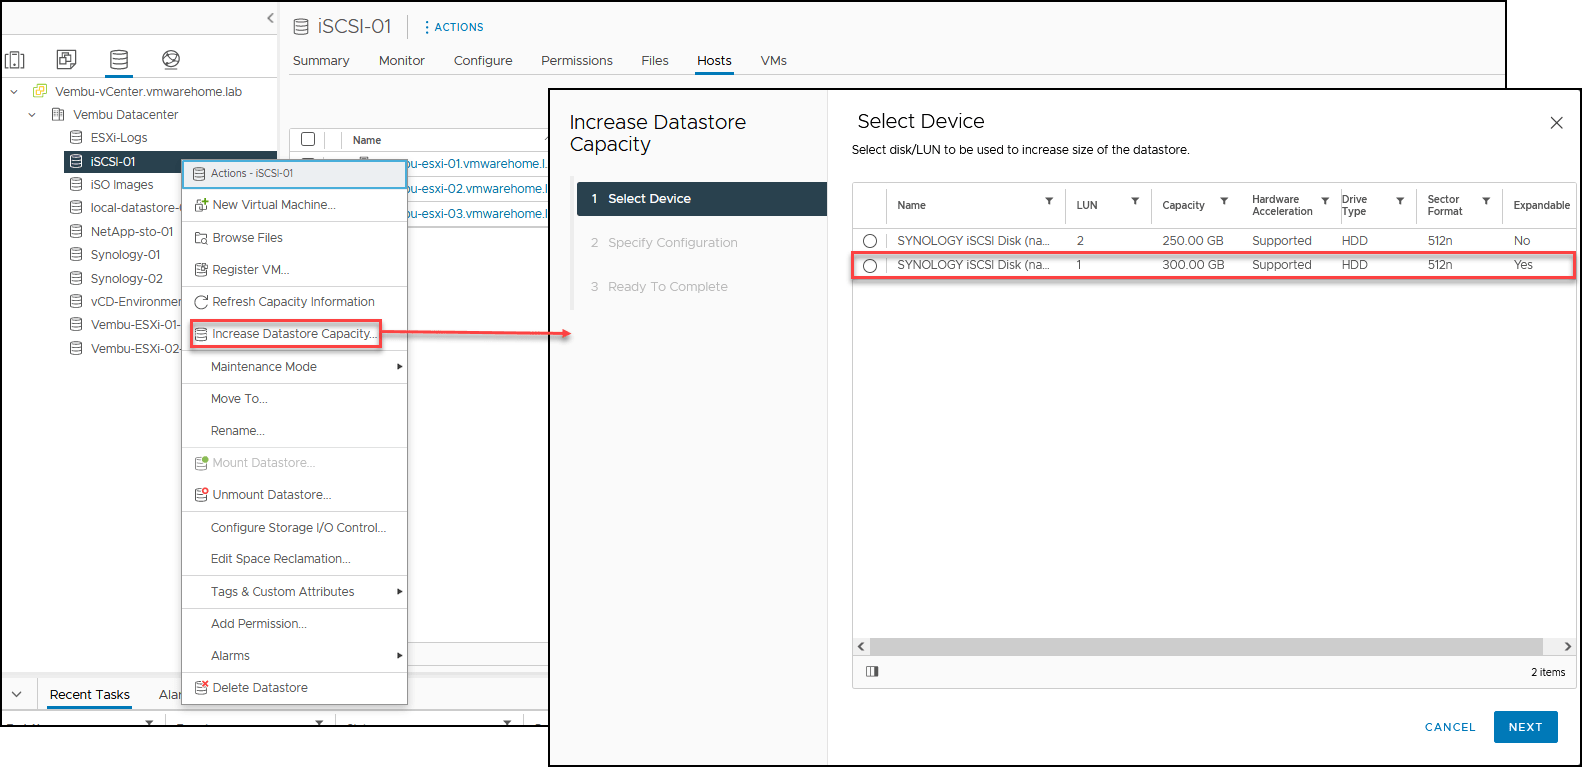
After the resizing of Storage size, go back to vCenter and do a Storage Rescan and then select the Datastore. Right-click and select Increase Datastore Capacity.
Note: If you disable the Storage Target, enable it again before rescanning.
As we can see in the next image, our LUN 1 already has 300Gb size. Select the Datastore and click Next.
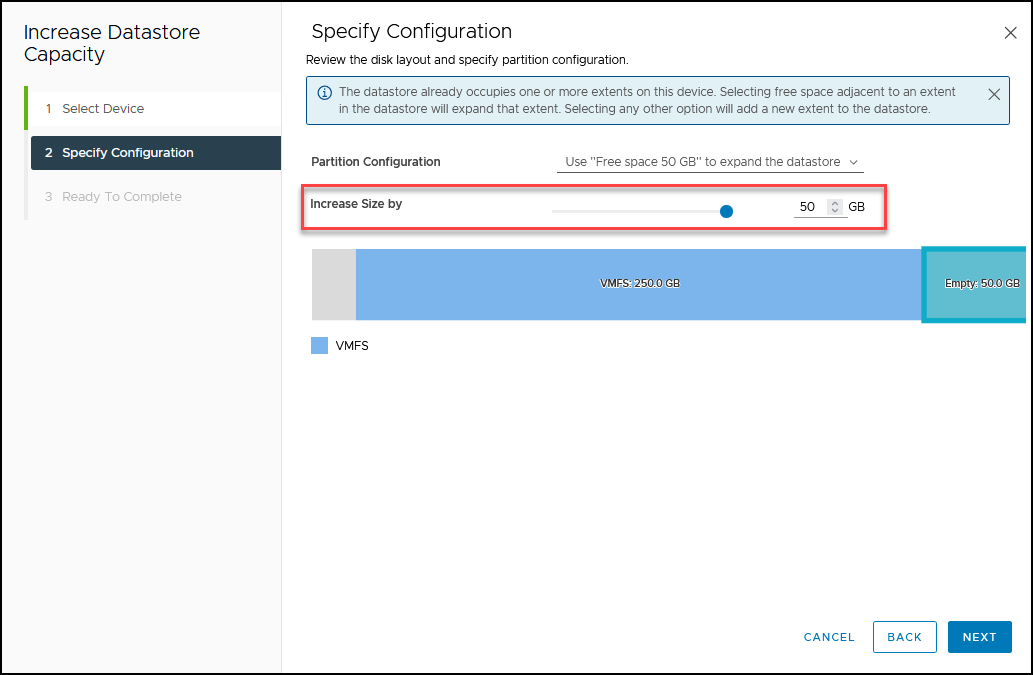
Next, choose the size you want to resize. By default, vCenter will select the full size, then click Next.
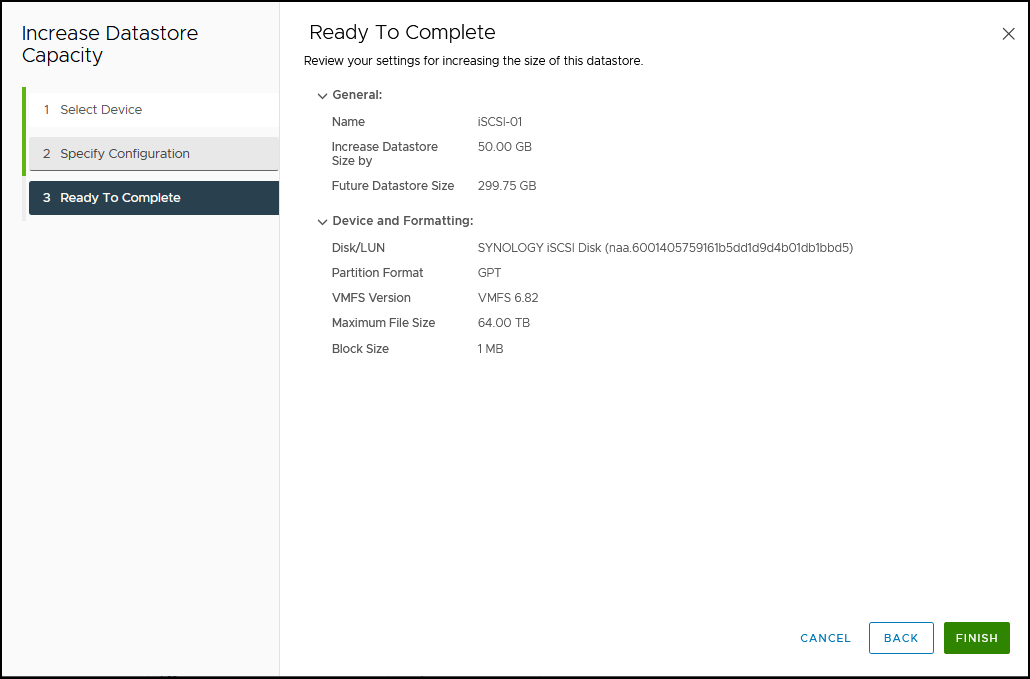
Double-check the information and then Finish.
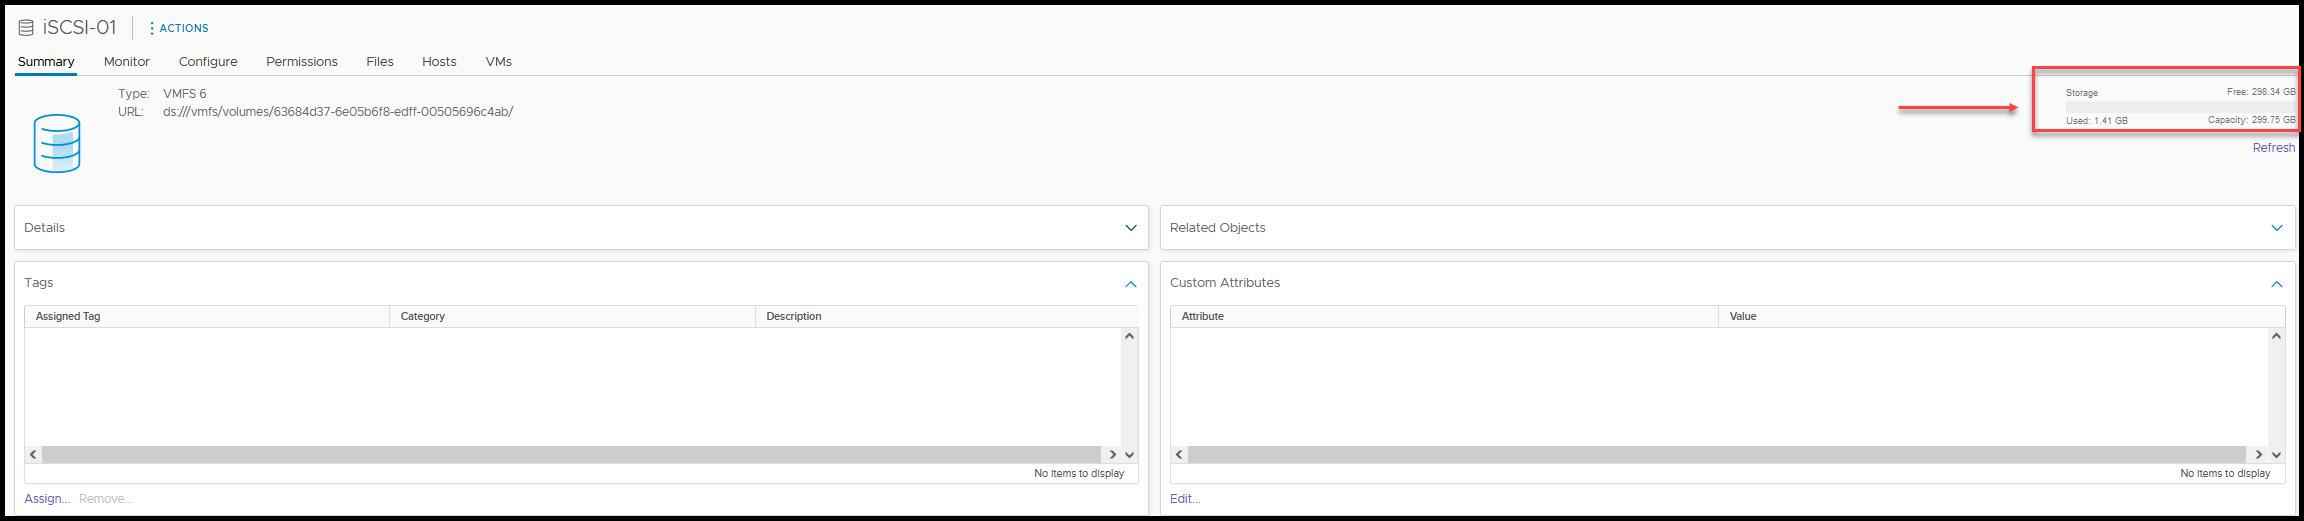
And now we have our iSCSI-01 Datastore resized to 300Gb.
Note: You may need to click the Refresh button to see the new size.
And with these two tips, we finish our article VMware for Beginners – Install iSCSI Datastores
In the next article VMware for Beginners, we will create NFS Datastores.
Follow our Twitter and Facebook feeds for new releases, updates, insightful posts and more.