
Read on:
VMware for Beginners – Overview of vSphere: Part 1
VMware for Beginners – vSphere Installation Requirements: Part 2
VMware for Beginners – How to Install vSphere: Part 3
VMware for Beginners – vSphere Networking : Part 4
VMware for Beginners – vSphere Datastores – Part 5
VMware for Beginners – vSphere Virtual Machines – Part 6
VMware for Beginners – How to Install vCenter : Part 7
VMware for Beginners – Datacenter and Clusters – Part 8
In the last VMware for Beginners article, we showed how to configure our vCenter and create Datacenters and Clusters. In this article, before we learn how to create vMotion, we will discuss how to create iSCSI and NFS Datastores since vMotion needs shared Storage.
But with all the detailed information I was trying to share about iSCSI Storage, and the article was getting very big, I decided to split the Install iSCSI Datastore article into two parts.
In this article, we will learn how to create an iSCSI Datastore and iSCSI connections (NFS Datastores will be shown in another article), the type of Storage, Multipath, and all the devices and features in it. I will try to provide the most detailed information possible.
After you have your vCenter Datacenter and a Cluster created and all ESXi hosts added to the Cluster, it is time to add a shared Storage to our ESXi host. In the following articles, we will focus on those features and settings we can use when we have central management for our ESXi hosts.

In this article, we will learn about:
- Storage concepts
- VMFS iSCSI Datastores
- iSCSI Authentication
- Creating an iSCSI Software Adapter
- iSCSI network design
- Create Virtual Switch and VMkernel for iSCSI
… and much more.
We will start by discussing some types of Datastores and Storage in the ESXi and Center.
We have already discussed a bit about Datastores in a previous article, but now we will discuss them in more detail.
We can create 4 types of Datastores in your ESXi hosts.
- VMFS Datastores
- iSCSI Storage
- Fibre Channel Storage
- NFS Datastores
- NFS (v3 and v4.1)
- vSAN Datastores
- when creating a vSAN Cluster
- vVols
- VMware vSphere Virtual Volumes (vVOLs)
In this article, we will only discuss iSCSI VMFS Datastores.
-
VMFS
ESXi makes use of Datastores to house virtual disks.
The datastores are logical containers that give virtual machines a standard paradigm for storing virtual machine files while concealing details of actual Storage from them.
The native vSphere Virtual Machine File System (VMFS) format is used by the Datastores that you deploy on block storage devices.
It is an exclusive high-performance file system format explicitly designed for storing virtual machines.
The block-based storage device your ESXi host detects can be prepared in advance by setting up the VMFS datastore using the vSphere Client.
The VMFS datastore can be expanded to cover many physical storage components, including local Storage and SAN LUNs.
You can use this functionality to pool Storage and create the flexible Datastore you need for your virtual machines.
While the virtual machines are running on the datastore, you can increase its capacity.
This feature allows you to add new space to your VMFS Datastores as your virtual machines need.
VMFS is designed for concurrent access from multiple physical machines and enforces access controls on virtual machine files.
vSphere VMFS Datastores can be used with SAN Storage (Storage Area Network) by creating iSCSI LUNs and Fibre Channel Storage Volumes at the Storage level.
I have written an article in the Vembu blog about iSCSI and NFS. Please read it to understand better both types of Storage.
How to create and configure iSCSI LUN Datastore?
You need to create your iSCSI in your SAN Storage. The creation differs from vendor to vendor, so I cannot explain all the vendors here.
Check with your Storage vendor manual on how to create an iSCSI LUN in your SAN.
iSCSI LUN needs a Target to be mounted and Initiator to connect. An initiator can be a network card(HBA) or an iSCSI Software Adapter. Since we don’t have HBA in our VMware configuration, we will use an iSCSI Software Adapter.
Also important in an iSCSI infrastructure is an iSCSI Qualified Name (IQN).
-
IQN
Each iSCSI element on an iSCSI network has a unique iSCSI name and is assigned an address for access. Each iSCSI element, whether an Initiator or Target, has a unique iSCSI Qualified Name (IQN).
The IQN is a logical name not associated with a specific IP address.
The IQN has the following characteristics:
- An IQN is always unique
- There can be no two initiators or targets with the same name
- It can have up to 255 characters
- Only numbers (0-9), letters (A-Z and a-z), colons (:), hyphens (-), and periods are permitted (.). IQN format example: iqn.yyyy-mm. naming-authority:unique name
The unique name on your IQN can be any name you want to use, such as the name of your host.
For instance, in my case, my Storage Target IQN is: iqn.2000-01.com.synology:HomeStorage.Target-1.75c007f110
It has the year, month, storage vendor, and storage domain with an ID.
I created two iSCSI LUNs in my Storage and mapped them to the Target(with an IQN), Vembu-iSCSI01 and Vembu-iSCSI02, with 250Gb each.
Storage Target and IQN:
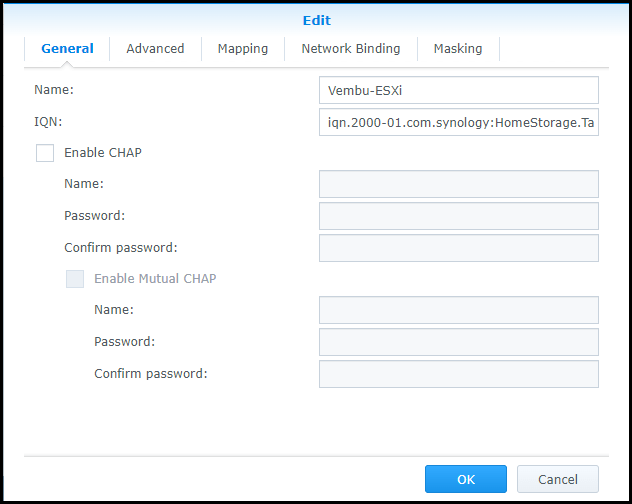
As we can see above, we have something called Challenge Handshake Authentication Protocol (CHAP) in our Storage Target.
-
CHAP
It enables the exchange of authenticated data between iSCSI initiators and targets.
CHAP user names and passwords are defined on both the Initiator and the storage system when using CHAP authentication.
If we need extra security to connect our iSCSI LUNs to our ESXi hosts, we can use CHAP by adding a user and password known from the Target and Initiator(destination). With this extra security level, we ensure that only hosts with authenticated CHAP can connect to this iSCSI LUN.
But since this is a test environment, I will not enable CHAP.
Now that we have our iSCSI LUN created it’s time to configure our ESXi hosts to connect to this iSCSI LUN and create a VMFS Datastore.
We need to create two VMkernel (we discussed in previous articles what a VMkernel is) per ESXi host for our iSCSI Network.
We can create our iSCSI Network using a Standart Switch or a Distributed Virtual Switch(vDS).
In this example, I will only use Standart Virtual Switch for the iSCSI. In a specific article for Virtual Switches, when we discuss in more detail about vCenter vDS, we will learn how to use it also for iSCSI.
Creating a VMkernel for iSCSI requires two paths: active and passive(unused). If one of the paths goes down, Initiator will automatically use the passive path(but from the other VMkernel while using Port Binding and iSCSI Multipath) to prevent Permanent Device Loss (PDL) and All-Paths-Down (APD), and we create an iSCSI Multipathing.
Note: Check this VMware KB to know more about PDL and APD.
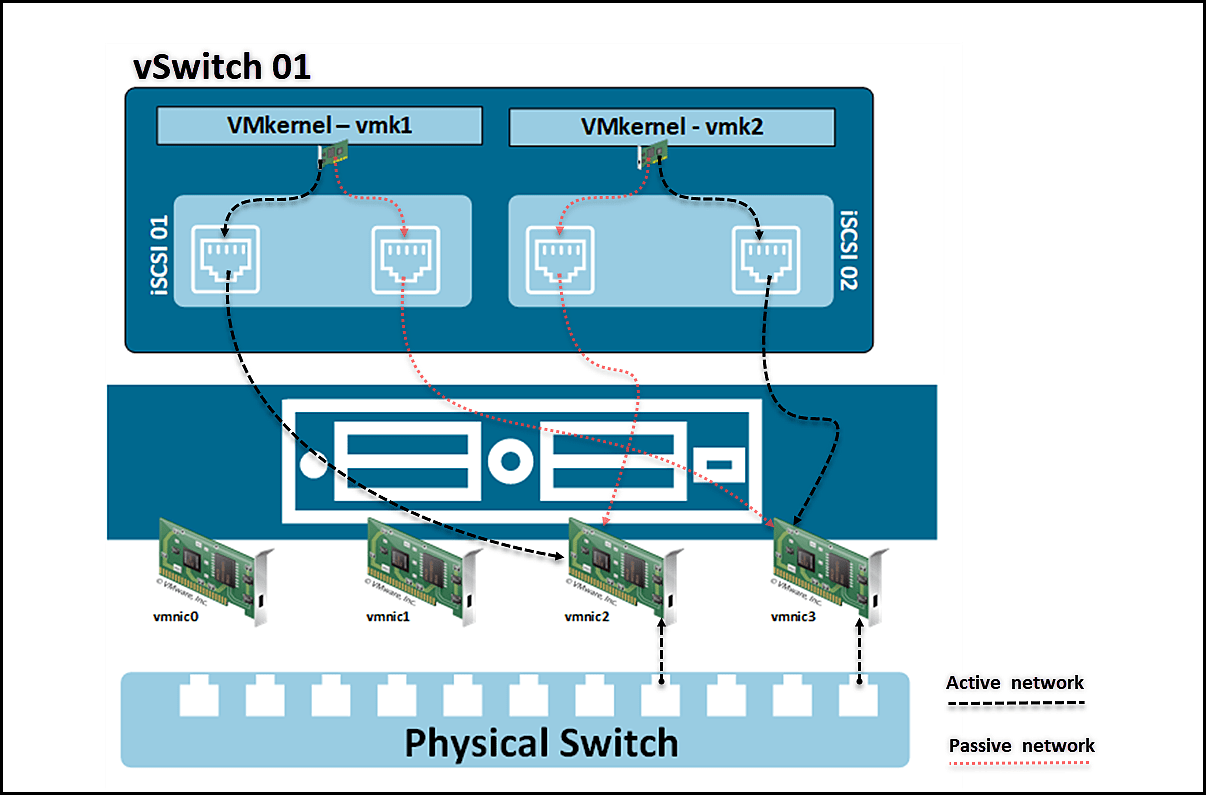
Next diagram shows:
VMkernel vmk1 is connected to vmnic2 and with a passive connection to vmnc3, and VMkernel vmk2 is connected to vmnic3 and with a passive connection to vmnc2.
Both physical cards (vmnics) will be binding with an ESXi feature called Network Port Binding. Port Binding ensures that the vmnics are aggregated to each other and connected to the target as one for High Availability.
-
Network Port Binding
When numerous VMkernel ports for iSCSI are located in the same broadcast domain and IP subnet, port binding is utilized in iSCSI to enable multiple pathways to an iSCSI array that broadcasts a single IP address.
You should keep the following in mind when utilizing port binding:
- For iSCSI communication, all VMkernel ports must be located in the same broadcast domain and IP subnet
- The same vSwitch must house each VMkernel port utilized for iSCSI communication
In the following design, we see an iSCSI Multipath example where we have 4 VMkernel using Port Binding to connect to only one Target.
There are multiple VMkernel ports, all residing in the same IP subnet and broadcast domain. In this type of design(the same one we will use in our configuration), all need to be in the same Network. If not, it will not work.
Note: We are using 4 VMkernel (and 4 vmnics), and in our configuration, we only use 2. But the configuration is the same, just fewer paths.
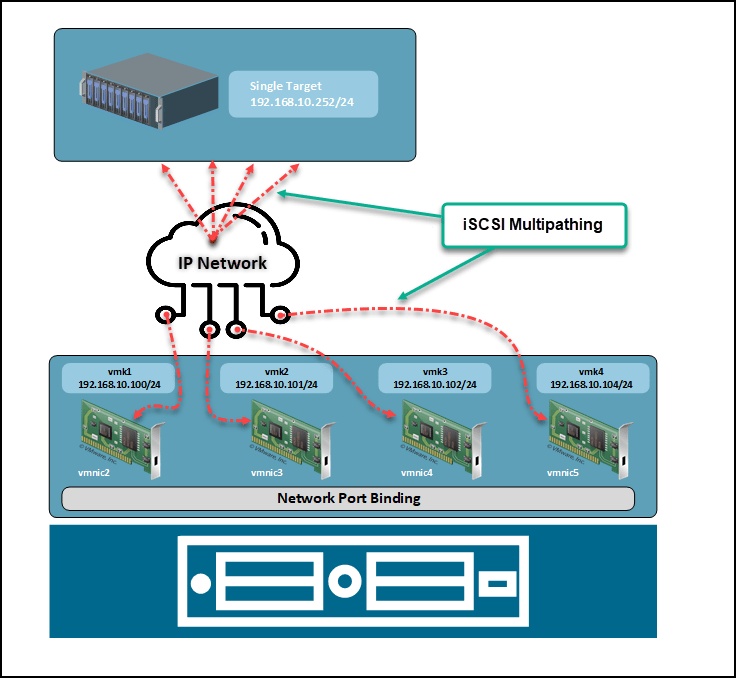
With this, we have High Availability in our iSCSI Network.
The following design shows how our configuration will be.
Let us explain how to implement the above design.
How to create an iSCSI Software Adapter?
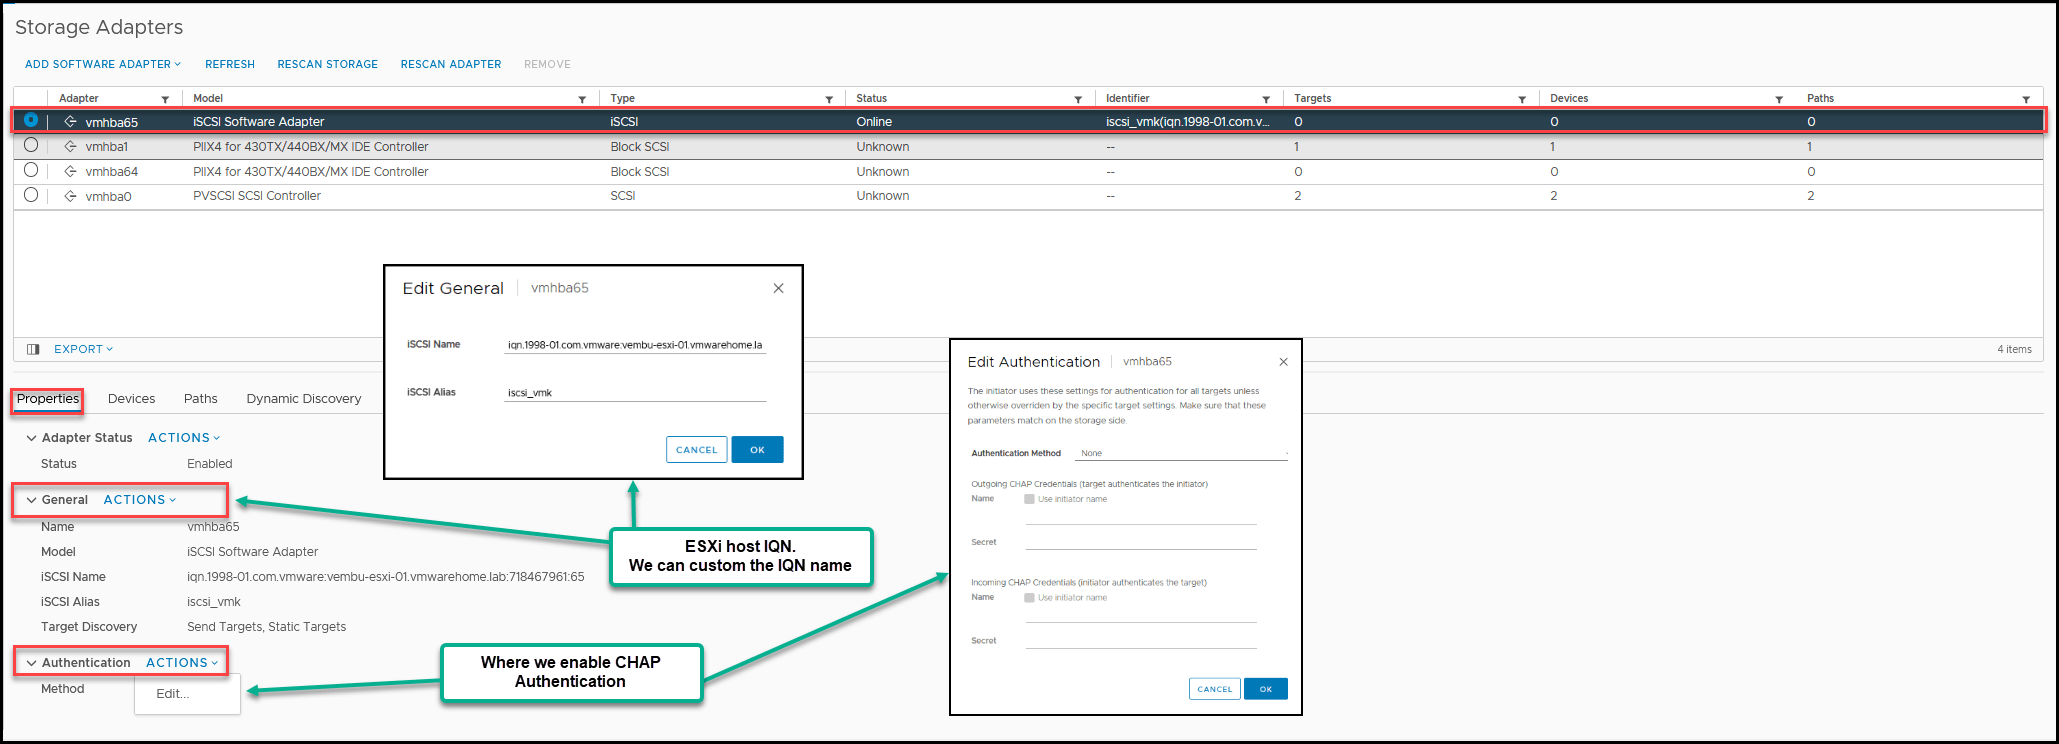
Login to vCenter, select your ESXI host, select Configure Tab, Storage Adapter and click Add Software Adapter.
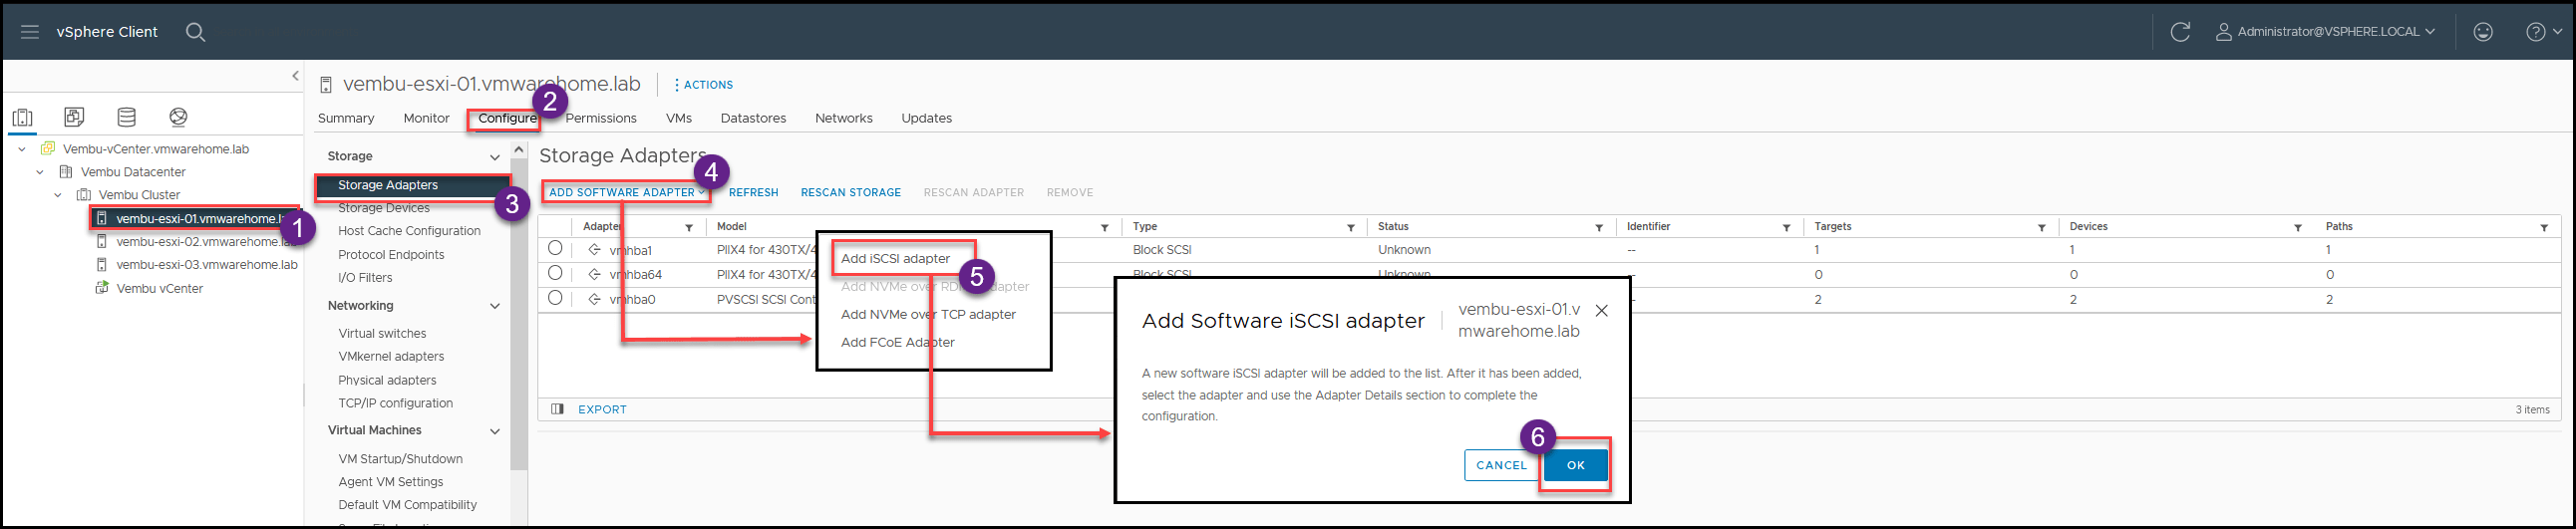
As we can see next, we now have our iSCSI Software Adapter with its own IQN.
As shown, we can edit to change the IQN name or add CHAP authentication.
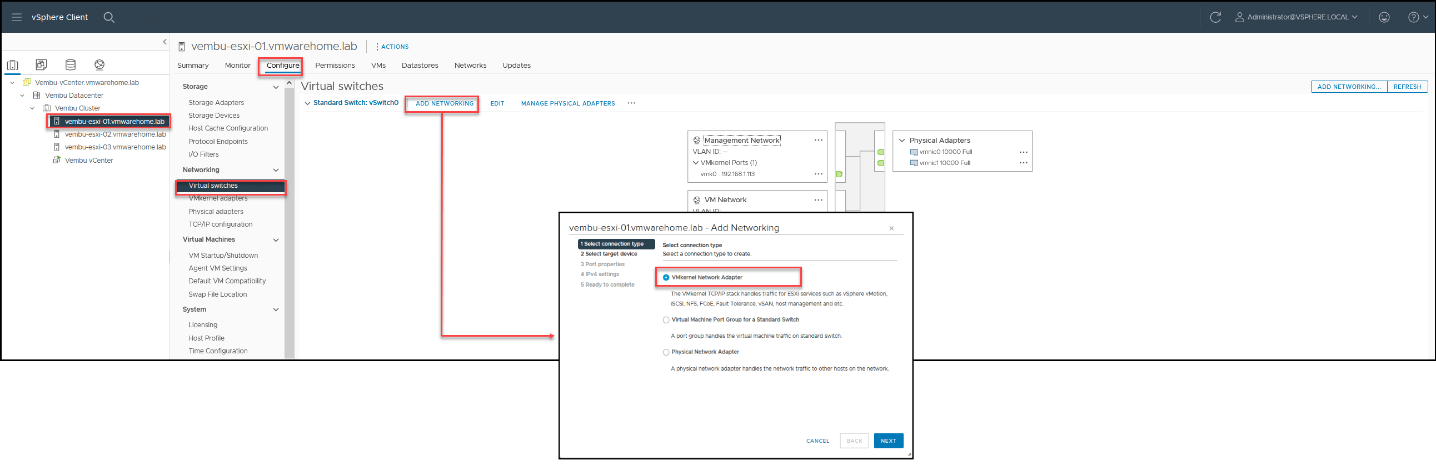
How to create an iSCSI VMkernel?
As we discussed above, since we do not have physical HBA cards for iSCSI(that would be a destination Initiator), we need to create a iSCI Software Adapter and build our iSCSI Network with that.
Select your ESXi host, select Configure Tab, Virtual Switches, and click Add Networking.
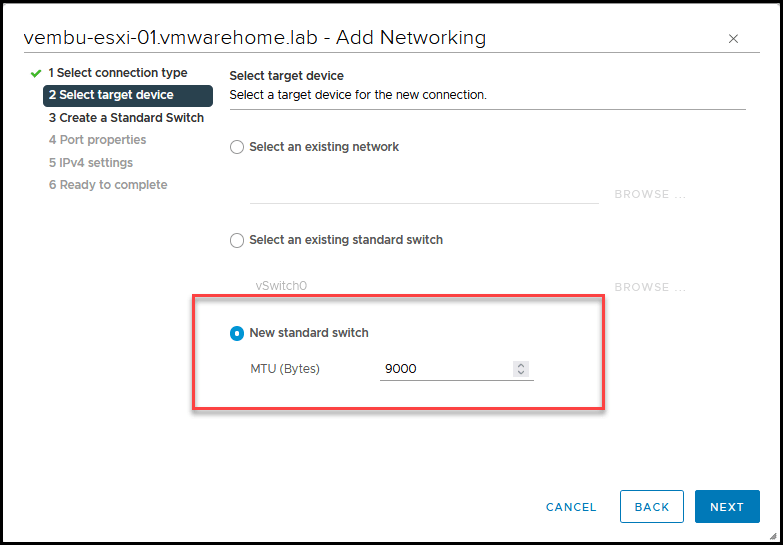
Next, select Create a New Standart Switch and set the Jumbo Frames MTU to 9000 (only use MTU if all your network devices and ports connected to this physical network interface are set to MTU 9000). If you don’t know, or it is not set to MTU 9000, leave the default 1500.
Jumbo Frames:
To allow an ESX host to send larger frames onto the physical Network, the Network must support Jumbo Frames end to end.
iSCSI Network performs much better when using jumbo frames. Therefore, use jumbo frames if your iSCSI Network has all software initiators and targets and the network switches can handle them.
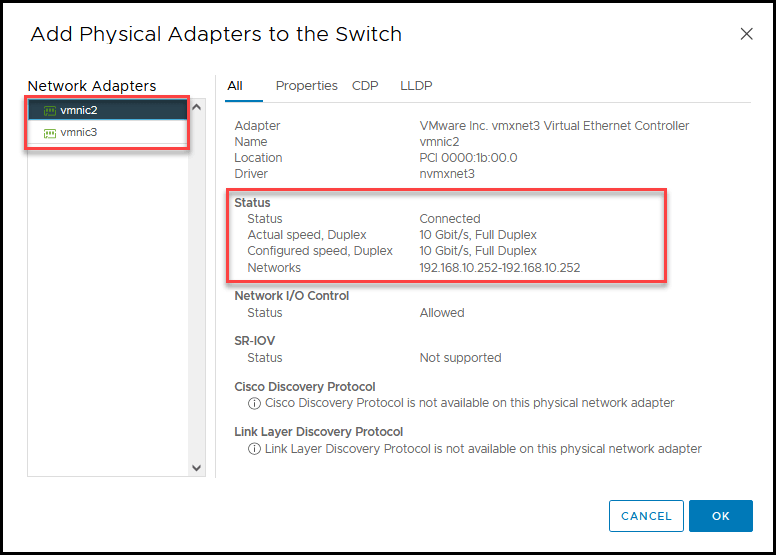
Next, we will add the physical network cards(vmnics) to our new vSwitch.
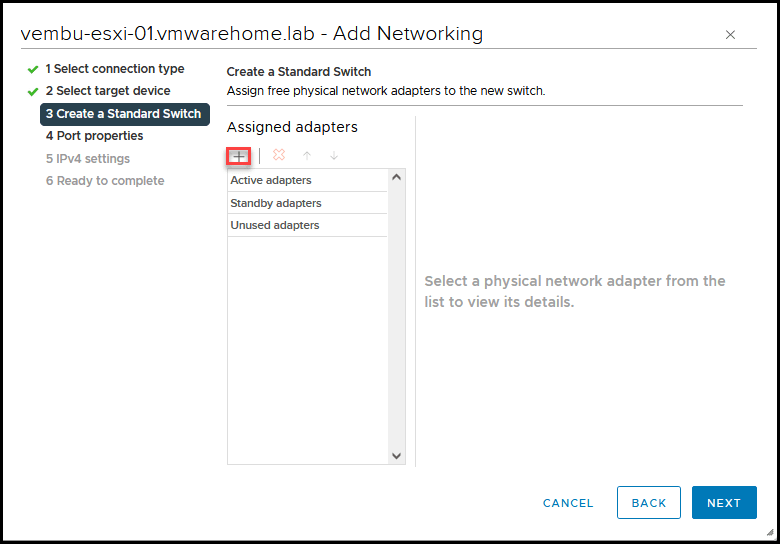
As discussed in previous articles, if you have extra network cards, use them for Storage, in this case, for iSCSI.
And if you are following the initial articles and created a nested ESXi environment, if you didn’t initially add 2 new virtual network to the nested ESXi VM.
For our case, as shown in the above design, we will use vmnic2 and vmnic3.
Note: As you can check in the image, our vmnics broadcast the subnet 192.168.10.0/24. This is because I have created a VLAN 10 for the Storage network in my physical Switch, and all connections in the ports Switch from Storage are using the same VLAN/Subnet.
Click next and continue the configuration of the VMkernel and vSwith.
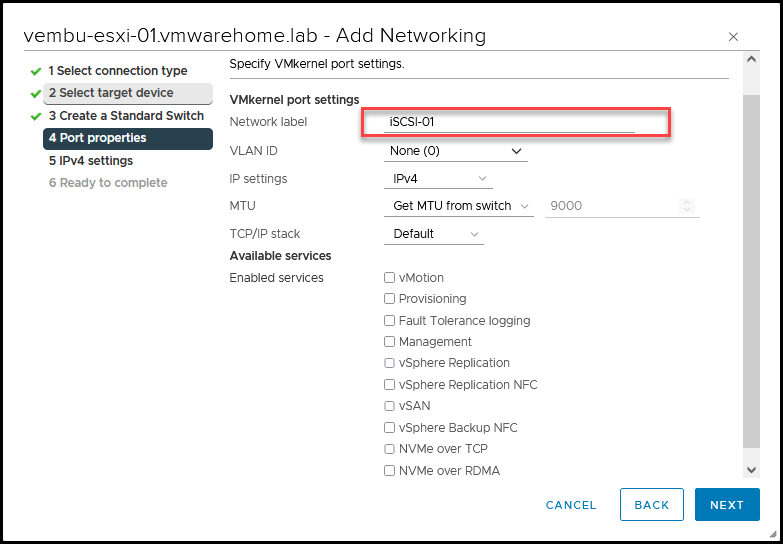
In the next step, you can change the Portgroup name(I always do this for better management and to recognize the different portgroups). If you don’t want to change, leave the default.
No need to change anything else in this section.
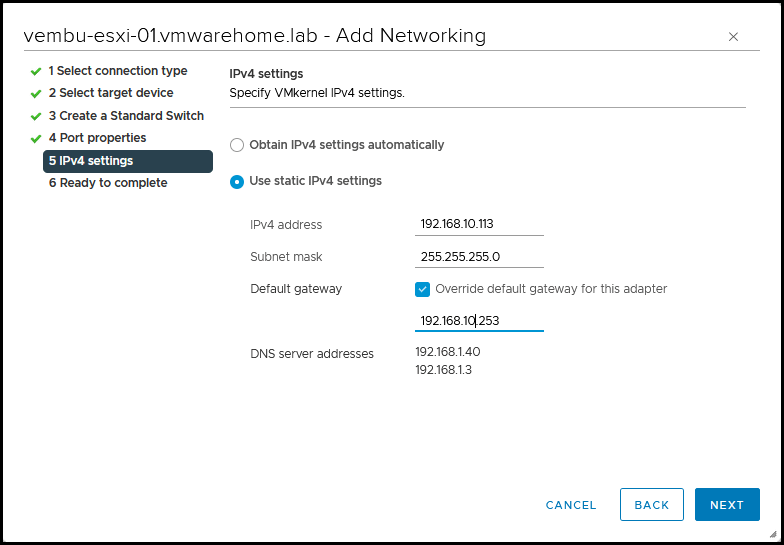
Next, add an IP address for the iSCSI VMkernel. Don’t forget that this subnet should be the same as your Storage IP Target, as shown in the first design.
Note: iSCSI doesn’t need a gateway and should never be routed. So leave the default gateway. Since I am routing my Storage between networks, I have a gateway. But this is only for particular network configurations.
Next just double-check the information and click Finish.
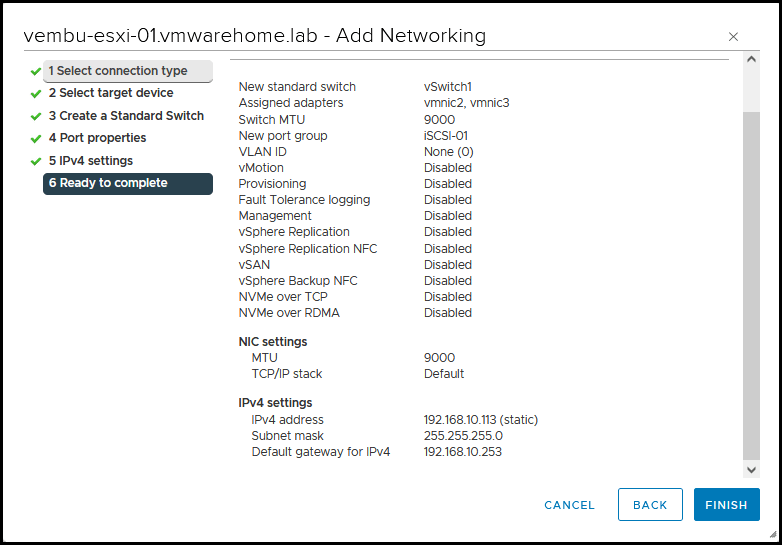
As we can see in the next image, we now have a new vSwith called vSwith1 and a Portgroup called iSCSI-01. We can also see a new VMkernel created with the IP address 192.168.10.113.
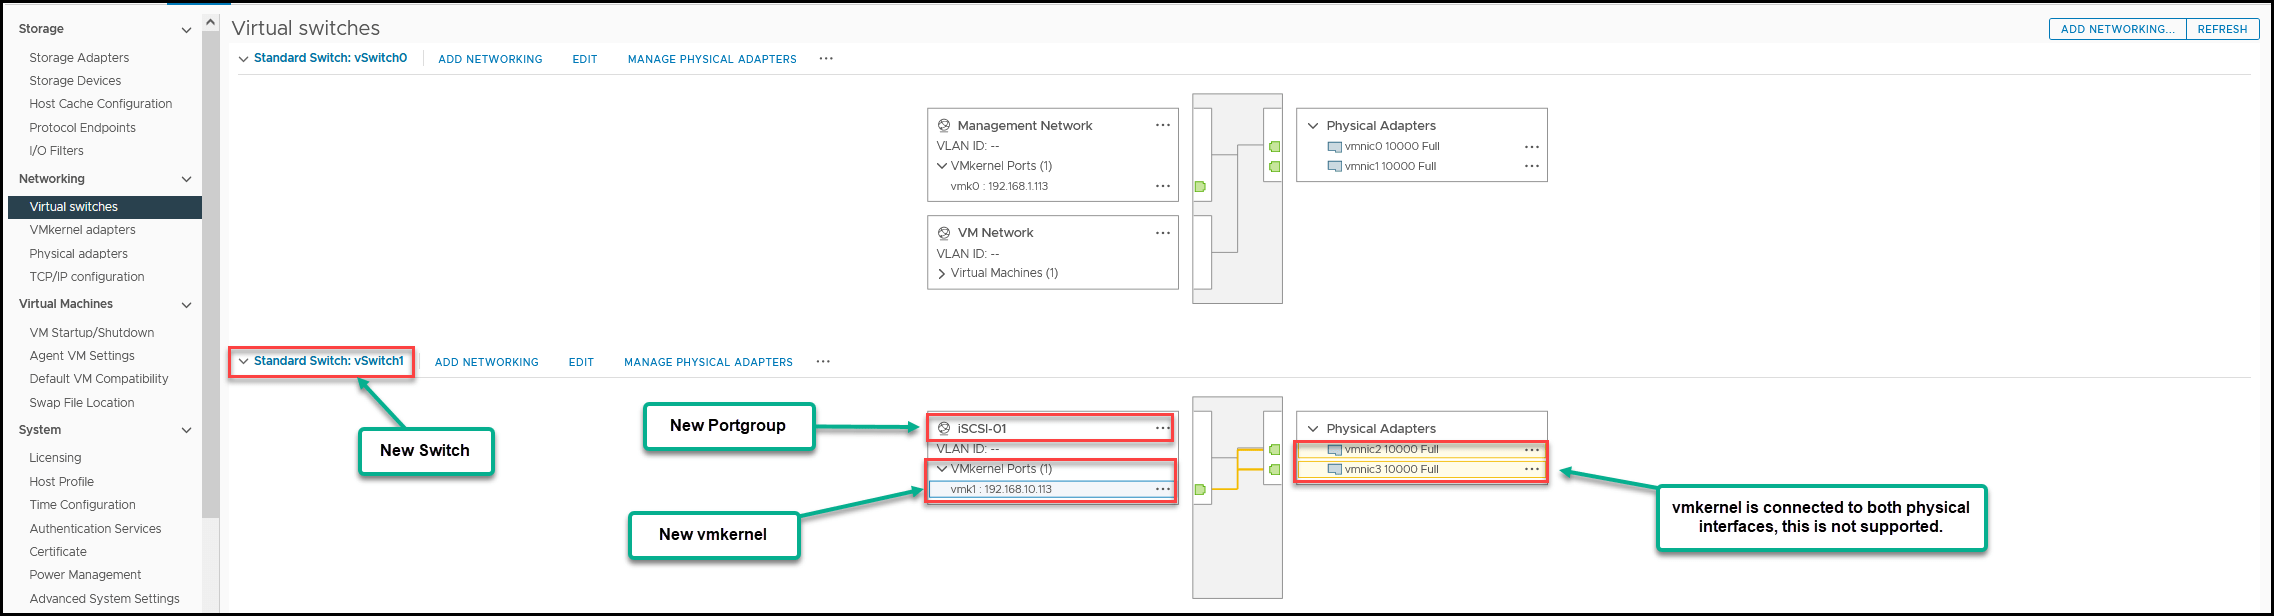
We need to make some extra changes since the article is getting a bit big we will discuss this in the next article.
In the next article, we will configure the rest of the ESXi hosts, configure the iSCSI Software Adapter to connect to our Storage, and then create the VMFS Datastores.
Follow our Twitter and Facebook feeds for new releases, updates, insightful posts and more.