
Windows Server 2016 has brought about many new and powerful features to Hyper-V. One of these powerful new features included with Windows Server 2016 Hyper-V is nested virtualization.
In all of the previous releases of Windows Server Hyper-V, this has not been a feature that was supported and has previously not been considered to be a feature that enterprise production environments would need to utilize. However, with the onset of containers and the mindset of running containers on top of Hyper-V environments, Microsoft has introduced the nested virtualization feature set to enable working with containers running inside of Hyper-V. However, this also opens up the ability to utilize nested virtualization for all the other common use cases, including lab and training environments.
- What exactly is nested virtualization?
- What are the requirements for nested virtualization in a Hyper-V environment?
- How is nested virtualization implemented?
Let’s take a look at Windows Server 2016 Hyper-V nested virtualization requirements and configuration to see what is involved to take advantage of this powerful new feature in Hyper-V.
What is Nested Virtualization and Common Use Cases?
Nested Virtualization is one of the really great features that is afforded to today’s enterprise environments running modern hypervisors. Nested virtualization is basically running a hypervisor “within” another hypervisor. In other words, in the case of Hyper-V, with Windows Server 2016, administrators can now load Windows Server 2016 with the Hyper-V role inside a virtual machine running on top of a Windows Server 2016 Hyper-V host or cluster.
For all practical purposes to the administrator connecting to the Hyper-V instance running inside a virtual machine on top of the host Hyper-V environment, the Hyper-V virtual machine host will appear to be a stand-alone Hyper-V host with all the capabilities that come along with a Hyper-V physical host.

Generally speaking, aside from the virtual machine network configuration and what is allowed from that standpoint, you will be able to connect to the “nested” instance of Hyper-V the same as the physical host with the familiar tools available such as Hyper-V manager, Failover Cluster Manager, System Center Virtual Machine Manager (SCVMM), PowerShell, etc.
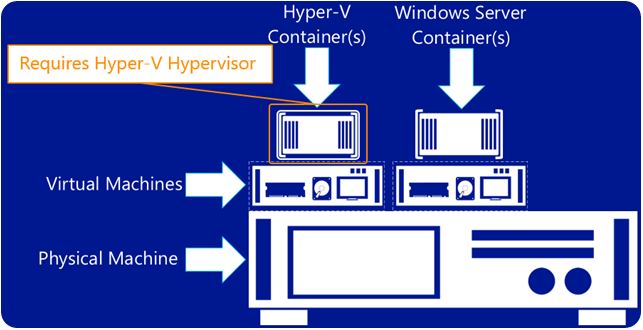
As mentioned, Microsoft has added this functionality specifically with Hyper-V containers in mind. Containers are in a general sense, an extremely lightweight VM of sorts that do not really run a guest operating system with all the overhead that incurs.
While running containers on top of Windows Server 2016 itself without Hyper-V is a supported architecture, running containers on top of Hyper-V provides added benefits from a security standpoint. Running Hyper-V containers provides even further isolation as opposed to Windows Server 2016 containers. In the case of multi-tenant environments, running containers inside of Hyper-V provides a security barrier between the container and the host kernel.
Additionally, with nested virtualization, this allows an Azure virtual machine to be able to run Hyper-V containers with the isolated feature set without running the containers on top of physical machines. The new nested virtualization functionality allows enterprise customers to have the added flexibility to run containers anywhere in their physical or virtual environments.
Nested virtualization in Azure with Windows Server 2016 was announced in 2017 – https://azure.microsoft.com/en-us/blog/nested-virtualization-in-azure/
Now, aside from the really cool new abilities related to Hyper-V containers, what else does nested virtualization allow Hyper-V administrators to do?
All of the more obvious use cases include running lab environments in Hyper-V. Let’s suppose you want to build a Hyper-V lab environment with a number of hosts to test or train on various functionality. The new nested virtualization functionality in Windows Server 2016 would allow you to create lab environments of Hyper-V hosts installed inside Hyper-V virtual machines. Even creating Hyper-V nested clusters is possible. The labbing and training possibilities are extensive when you think about utilizing the nested virtualization functionality found in Windows Server 2016 Hyper-V.
Note: Currently only Microsoft’s Hyper-V hypervisor is supported as a “nested” hypervisor inside of a Hyper-V virtual machine.
The introduction of the ability to provide nested virtualization with Hyper-V helps to even out the playing field between Hyper-V and VMware. VMware has had the ability to perform nested virtualization for quite a while. Needless to say, this is a much anticipated and requested feature that has finally been added with Windows Server 2016.
Requirements for Nested Virtualization with Hyper-V
What are the requirements for enabling nested virtualization with Microsoft Hyper-V?
The following are the requirements set forth by Microsoft for enabling nested virtualization:
- Windows Server 2016
- Hardware Assisted Virtualization needs to be present in the physical Hyper-V host (Intel VT or AMD-V) although nested virtualization is currently only supported with Intel based servers
- Data Execution Prevention enabled
- Second-Level NAT translation (SLAT) capable processor
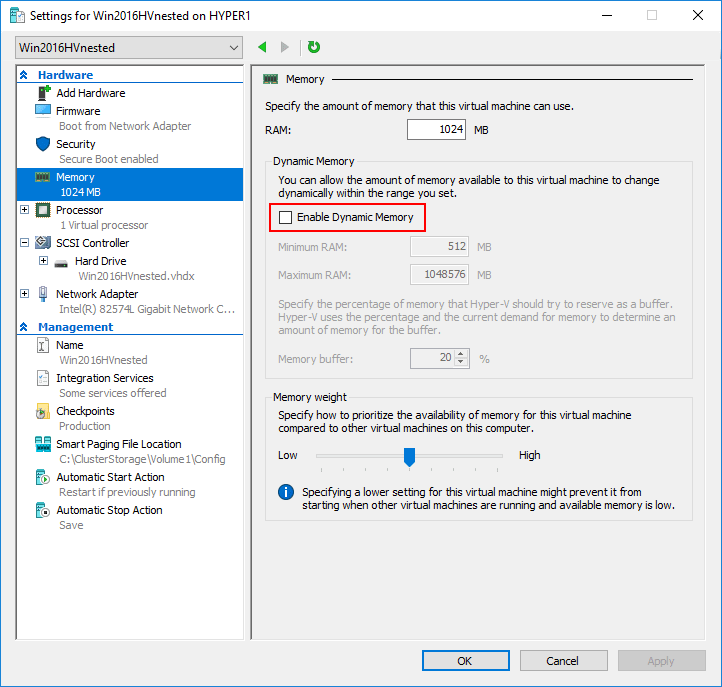
- Virtual Machine with Dynamic Memory disabled
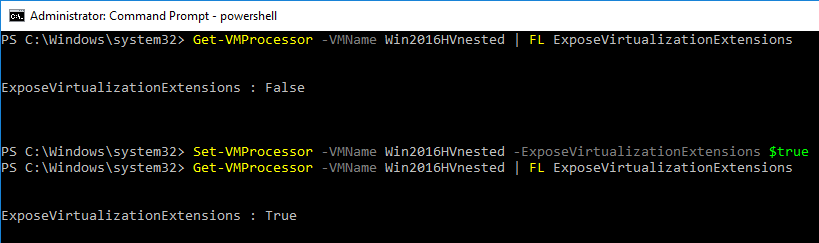
- Virtual Machine virtual CPU needs to have Virtualization Extensions exposed to the VM guest
- MAC Address spoofing needs to be enabled
Other notables when considering Hyper-V nested virtualization:
- Checkpoints are supported on the nested virtual machine running Hyper-V
- Nested virtualization VMs are also supported to run on hosts with Virtualization Based Security (VBS) including Device Guard and Credential Guard
- Live Migration of nested virtualization VMs is not supported as it may be running VMs itself which do not support live migration
- Dynamic memory is not supported configured on the nested virtualization VM
Configuring Hyper-V Nested Virtualization
Configuring a virtual machine with Hyper-V nested virtualization enabled is not too different from creating any other virtual machine in Hyper-V. However, it does require a few special settings be enabled at the virtual machine level. These include:
- Dynamic Memory
- Virtualization Extensions
- MAC address spoofing (other options are available)
First things first, create a new Hyper-V virtual machine, Generation 2, and make sure Dynamic memory is not enabled.
Next, you need to check the processor settings and ensure the virtualization extensions are presented to the guest virtual machine that will serve as the nested installation of Hyper-V. The hardware virtualization extensions are normally hidden from the guest operating system running inside of Hyper-V. However, to successfully run nested virtualization inside a virtual machine, these virtualization extensions need to be enabled and presented to the guest operating system.
Here, we use PowerShell to both check for and enable the extensions. To check to see if the setting is enabled or disabled:
Get-VMProcessor -VMName
To enable virtualization extensions, use the following cmdlet:
Set-VMProcessor -VMName
To enable network communication for the nested virtual machine inside of Hyper-V, there are a couple of ways this can be accomplished. One of the easiest ways to get network communication to the nested Hyper-V instance is to configure Enable MAC address spoofing. This can be enabled on a virtual machine as shown below under the Network Adapter >> Advanced Features >> Enable MAC address spoofing.
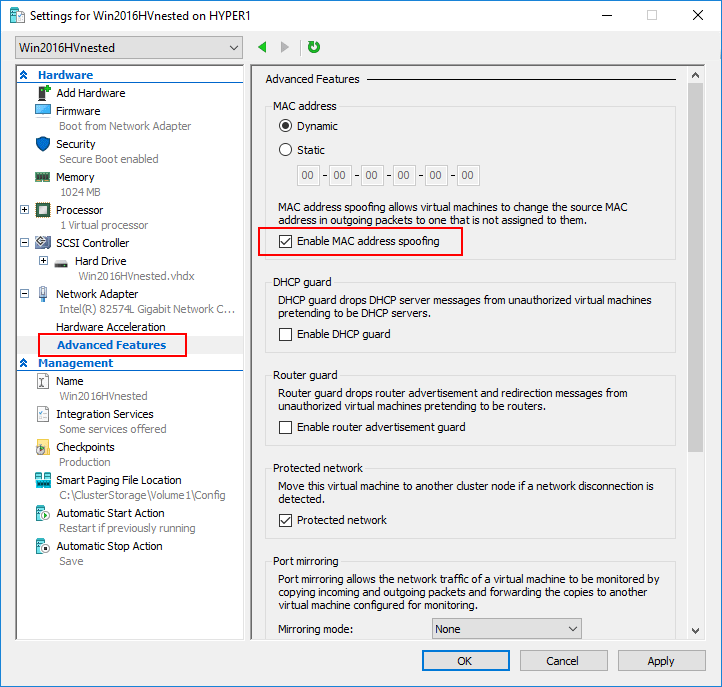
MAC address spoofing does result in security implications and can certainly be used for compromising a hypervisor environment. If MAC address spoofing is not an option due to the security risk, the other alternative is to create a virtual NAT switch and NAT the virtual machine network traffic.
Once the virtual machine is created with memory configured correctly, the correct extensions enabled, and network options enabled to support nested virtualization, you will be able to successfully created a nested installation of Hyper-V.
Concluding Thoughts
Nested virtualization within a Windows Server 2016 Hyper-V environment certainly opens up the possibility for powerful use cases in the enterprise environment. First and foremost, Microsoft has introduced nested virtualization to support the new Hyper-V containers that allow containers to be run inside a virtual machine running on top of Hyper-V. This approach bolsters containers from a security perspective since the nested virtualization isolation with Hyper-V containers provides yet another barrier to compromise.
In addition to Hyper-V containers, nested virtualization provides a great way to run lab environments, dev/test, and even training environments. This allows Hyper-V administrators to easily provision Hyper-V hosts to test configurations and other useful scenarios that are a much better fit for a lab environment than attempting things first in production. With Windows Server 2016, creating a nested Hyper-V virtual machine is easily accomplished with a few distinct settings surrounding guest memory, virtualization extensions, and network configuration to support the nested deployment.
Follow our Twitter and Facebook feeds for new releases, updates, insightful posts and more.