
This article describes how to backup SQL server databases from on-premise to Azure. Thanks to Azure Cool Storage, you can now easily back up your SQL Backup files at a low storage cost. This offers cheaper storage for infrequently accessed data to make it more economical. It means that customers can choose between Hot and Cool access tiers for different data types. So Cool Storage would be accessed less than once per month, such as backups and archival data.
In this guide, I will explain how to backup SQL Server Databases to Azure using a Cool Storage Account, and then I will explain how to use PowerShell to automate this task.
Let’s explain how Azure Blob Storage works. Below is a diagram from Microsoft Docs:
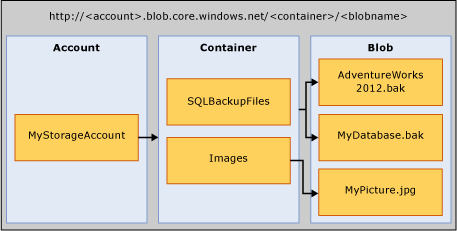
- Storage Account: The storage account is the starting point for all storage services. Here, you must create an Azure Storage account to store your data
- Container:A Container contains a set of Azure Blobs. You must have at least one Container to store at least one Blob. A Container is similar to a folder
- Blob: A blob is a simple file which can be a picture, a movie, or a .bak file
When you want to access a Blob, you must use the following URL format:

https://
.blob.core.windows.net/ /
In this guide, I will create:
- A storage account called “backupmysql”
- A Container called “Backup”
- And my blobs will be all my SQL .bak files
Don’t forget to use Vembu BDR Suite if you want to backup your Azure VMs. Vembu BDR Suite provides backup and disaster recovery solution for the IT administrators running their workloads on Microsoft Azure VMs. It helps IT administrators to securely backup the Azure VMs to other regions or to other public clouds or to their data center with RTO and RPO less than 15 minutes and minimal administration effort.
More information here https://www.bdrsuite.com/microsoft-azure-vm-backup-solution/
Backing Up a SQL Database using SSMS
When you work on SQL Server, using a .BAK file can be useful in some scenarios. So let’s imagine you want to backup your SQL Database to Azure. This .BAK file will not be accessed for a long time, right? So you will not want to pay for this storage. In this case, Microsoft advises you to use the Cool Storage instead of the Hot Storage:
- Hot Storage is dedicated to production environment and data
- Cool Storage is dedicated to data that is not used frequently or archive data
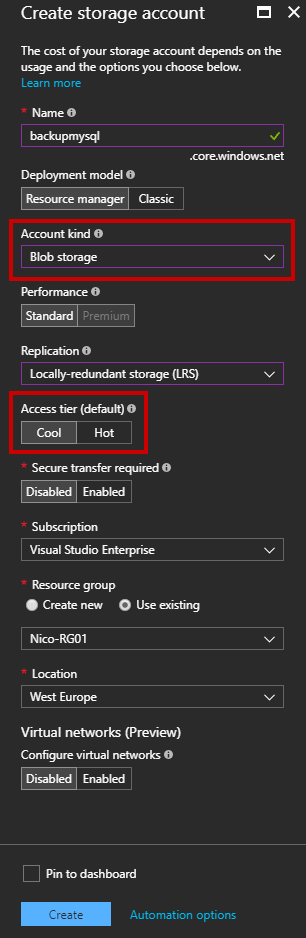
In this guide, we want to backup SQL Databases to Azure, so we will use Cool Storage. Let’s see how to create the storage account. Go to the Azure Portal and add a Storage Account. You must enter the following information:
- The Storage account name
- The Deployment model: Select “Resource Manager”
- Account kind: You must select “Blob Storage”
- Replication: Depending your needs, you can select LRS for archive data
- Access tier: Select the “Cool” option
- Select your Azure subscription
- Select a Resource Group or create a new one
- Select the location
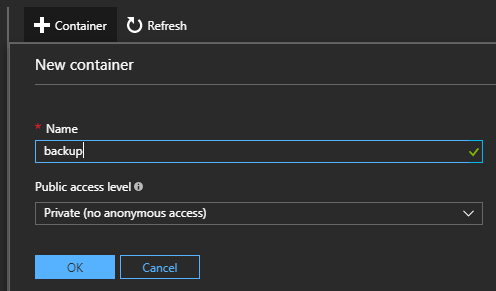
Once the Storage account is created, you must create a container which will store your archive data.

Click “+ Container” to add a new Container. Type a name and select which type of access level you want.
- Private: The container and its blobs can be accessed only by the storage account owner
- Blob: Blobs within the container can be read by anonymous, but the container data can’t be read
- Container: Anonymous can read and list the entire container content
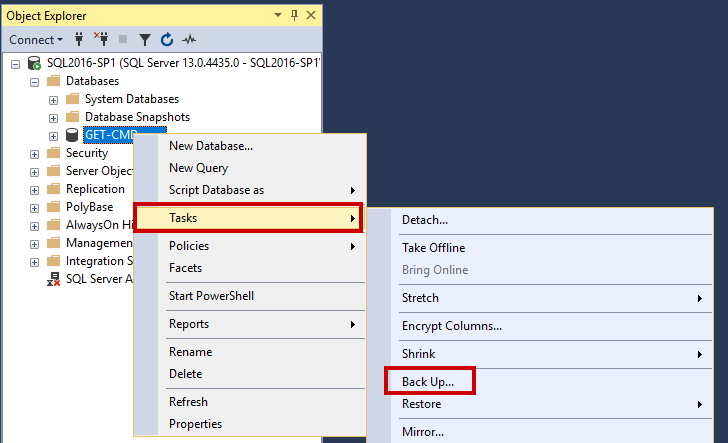
At this step, the Storage account is created, and Azure is ready to store your data. Go to your SQL Server, open the SSMS and right click on your Database -> Tasks -> Back Up…
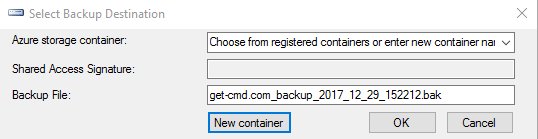
Select the backup destination. Here, you must select URL to configure your Azure Account.
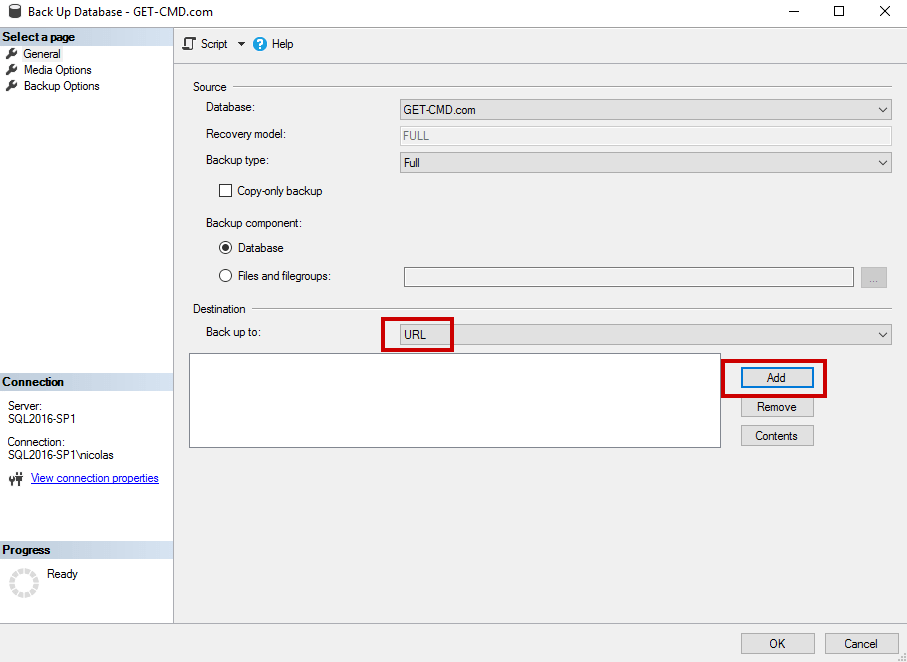
Click “New Container” to connect to Azure
In the new window that appears, click “Sign In”. You will be prompted to enter your Azure credentials:
- Select your Azure Subscription
- Select the Storage account that you previously created
- Select the Blob container in which the backup file will be stored
- To finish, generate a shared access signature by clicking “Create Credential”
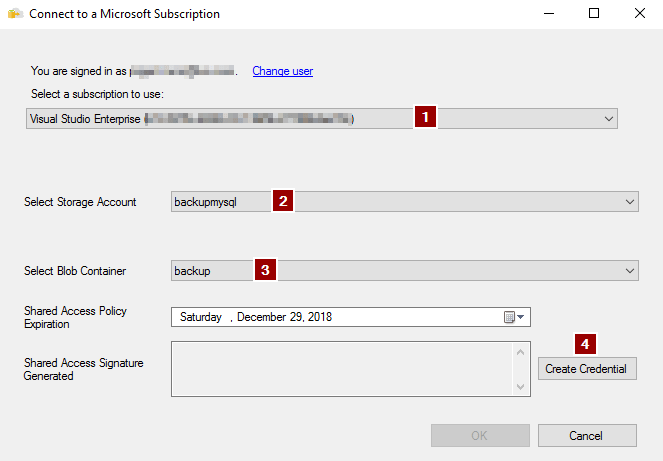
If you want to run the backup more than once, then adjust the expiration date.
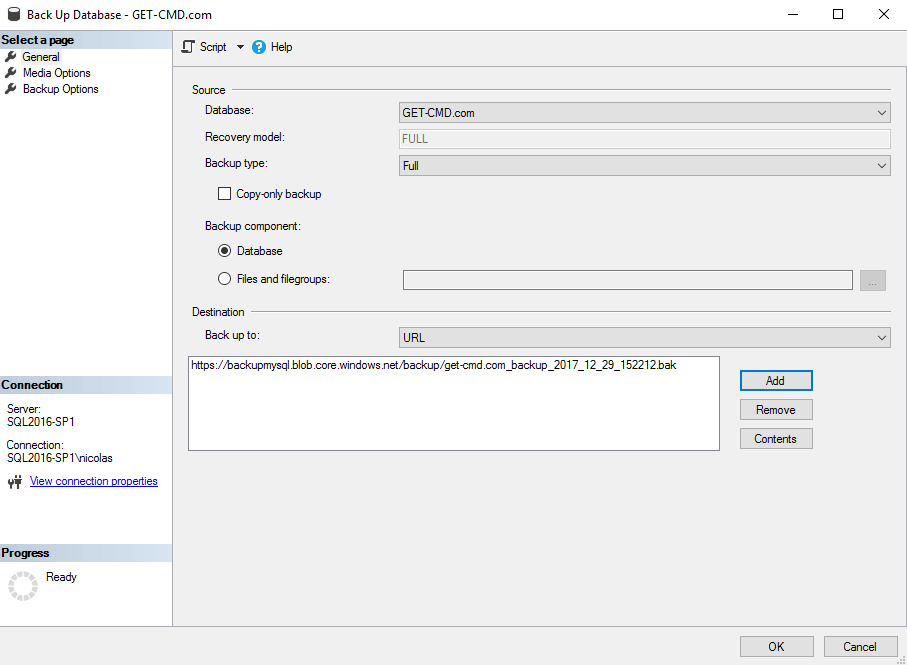
Once the connection has been established with your Azure account, notice the URL that has been generated by Azure.
- It is my Azure Storage Account
- It is my Container
- It is one of my Blobs

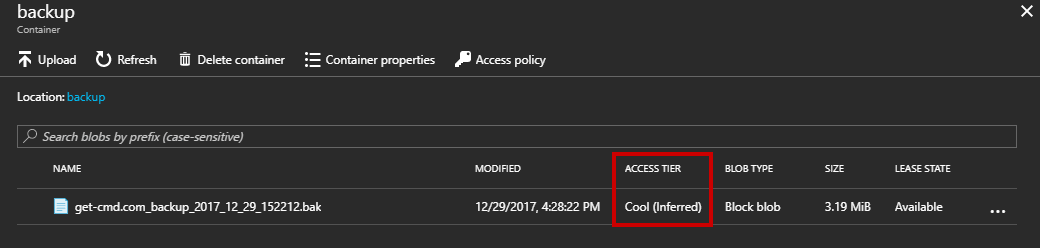
Once the backup is completed, you can check your Azure container and confirm that the backup file exists. You can also confirm the access tier type.
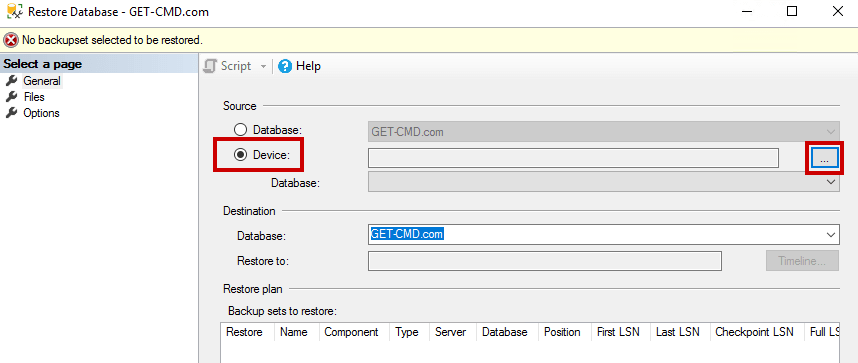
As you can see, you can easily backup your SQL Databases to Azure with a low cost Storage. Now, you can also easily restore the database from Azure. Open SSMS, run the restore wizard, and select Device:
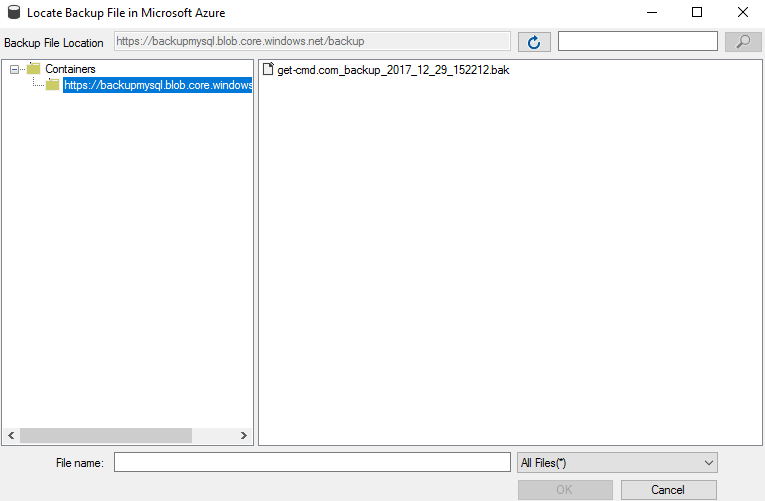
In the new window that appears, you can browse your Azure Container and select which backup file you want to use:
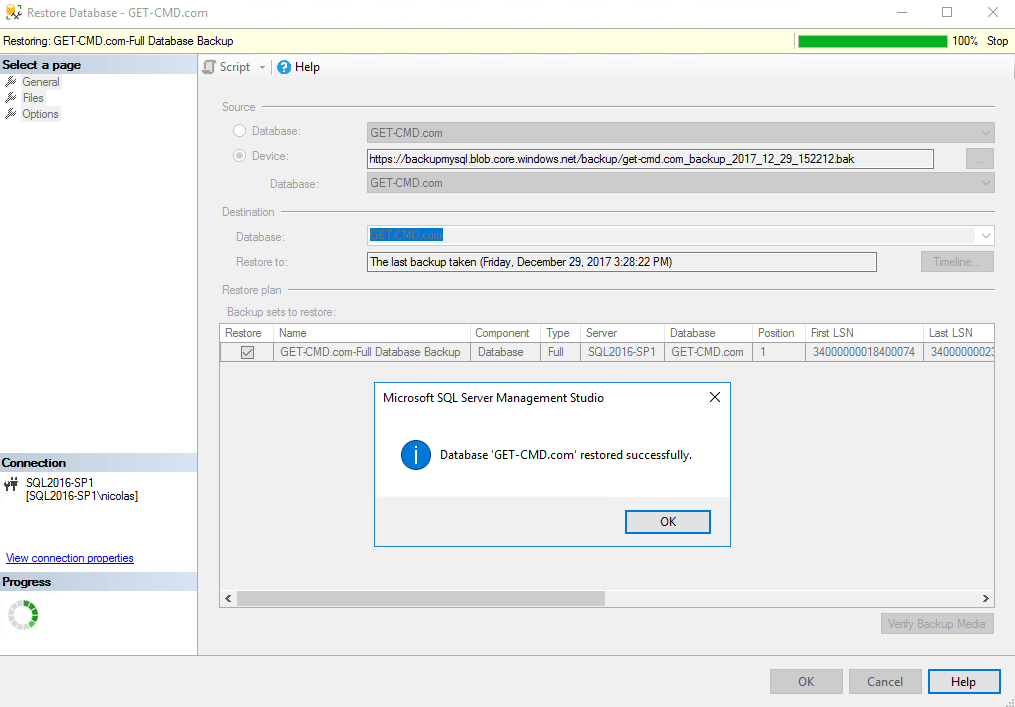
Click OK and wait until the restore finishes.
Backing Up a SQL Database using PowerShell
Backup and restore are very basic tasks that you will probably perform on a regular basis. So the GUI is very useful but when you want to automate specific tasks, Windows PowerShell must be used. Here, you can install the SQL Server PowerShell module in order to manager your DBs.
You have two ways to use the SQL Server module. Firstly, you can open SSMS, and right-click your database and select “Start PowerShell”
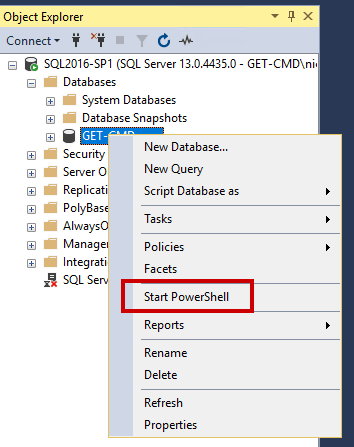
A new console will appear with the SQL Server module already loaded. If you don’t have SSMS installed, then you can install the SQL Server module through the PowerShell Gallery:
PS > Install-Module -Name SqlServer
Wait until the module is installed.

Then import it with the following command:
PS > Import-Module SQLPS
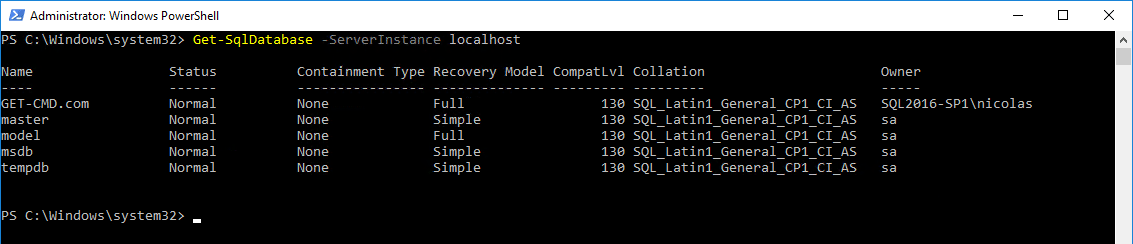
Now, you can list all the databases that exist on your SQL Server:
Finally, you can easily use PowerShell to backup a database:

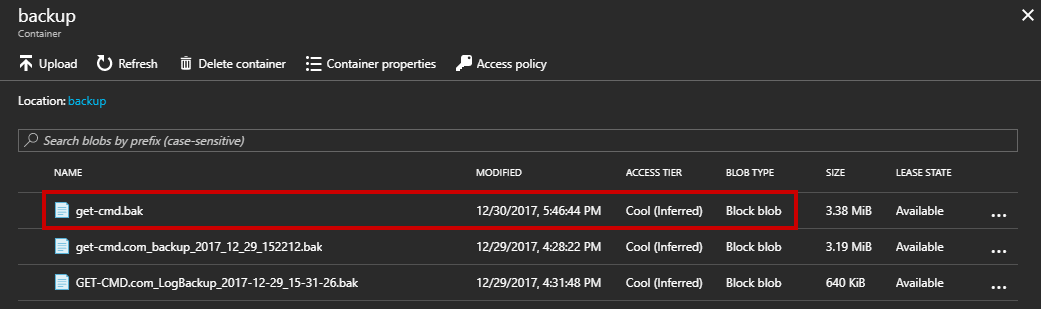
Confirm in the Azure Portal, that the backup file exists:
Backing Up a SQL Database using SQL Queries
Finally, for those of you who want to use SSMS and SQL Queries to perform a backup, you can run the following SQL query:
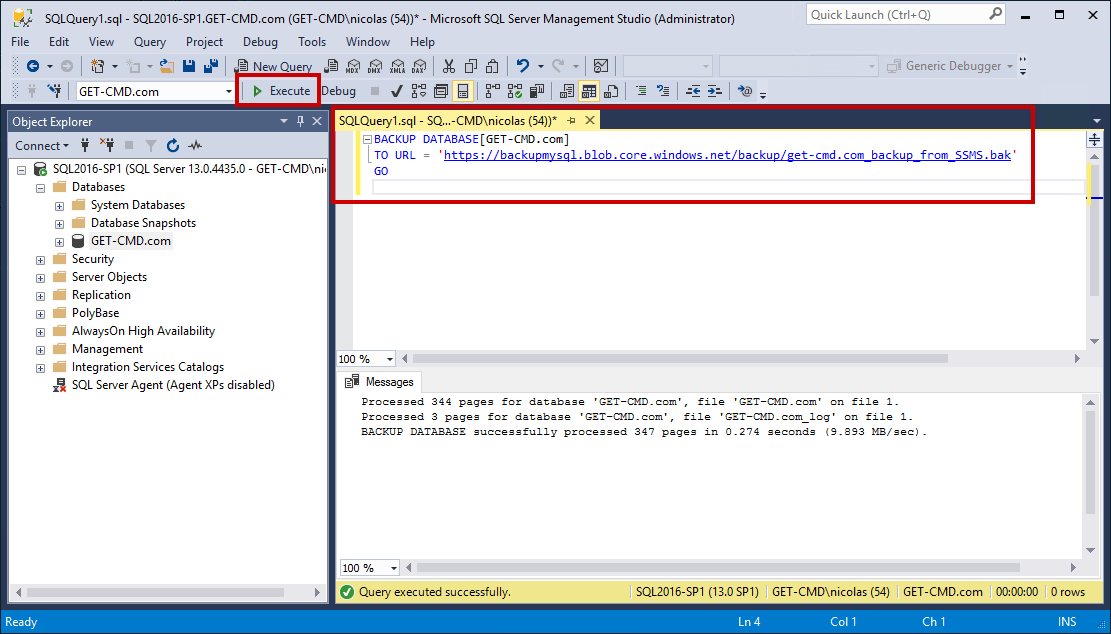
The backup is created in the Azure Container:

Conclusion
Creating and uploading a backup file to Azure is very easy, thanks to SSMS. When you create the Azure Storage Account, check the storage type, and select Cool for archive data and Hot for your production data.
You can also use the Microsoft Azure Backup Server (MABS) to backup your databases to Azure, but you must deploy a new server. Using .bak file can be useful if you don’t have the time and skills to manage MABS.
Experience modern data protection with this latest Vembu BDR Suite v.3.8.0 FREE edition. Try the 30 days free trial here: https://www.bdrsuite.com/vembu-bdr-suite-download/
Follow our Twitter and Facebook feeds for new releases, updates, insightful posts and more.