
What is Microsoft Exchange Online Protection (EOP)?
Microsoft Exchange Online Protection (EOP) is the cloud-based filtering service that helps protect your organization against spam and malware. EOP is included in all Microsoft 365 organizations with Exchange Online mailboxes.
Using EOP service, all Inbound and Outbound mail for Exchange online Mailboxes are bound for a scanning process against viruses, spam, malware, and any malicious content on user mails. Even if you use a third-party scanning service or route mail through an OnPremise Exchange server, enabling and configuring EOP service is necessary.
Table of Contents
- Malware filter
- Creating a new Anti-malware policy
- Notifications
- Blocklists
- Allow lists
- Advanced options
- Conclusion
Although for all Office 365 subscriptions and Exchange online Subscription EOP is enabled by default, further configurations are required to enhance the EOP service to protect all users’ emails.
In this Howto, we are describing most of the configuration options required to enhance the EOP service engine, it is an ongoing process to strengthen your security levels against these malicious attacks. So proper configuring and reviewing periodically harden your EOP service.
Access URL : https://outlook.office365.com/ecp/

A global administrator or an assigned role administrator or Exchange administrator can log in to Exchange Admin Center and can choose the “protection” section to configure EOP. There are seven configuration options available in Exchange Admin Center viz
- Malware filter
- Connection filter
- Spam filter
- Outbound Spam
- Quarantine
- Action center
- DKIM
Malware filter
This section allows you to create your own anti-malware policy. A default policy is already implemented with a necessary action plan summarised in the default policy page itself. In case additional or change of action plans are required, an administrator can create his own new policy.
Creating a new Anti-malware policy
On the malware tab in the protection section, you can create a new policy by clicking the + sign
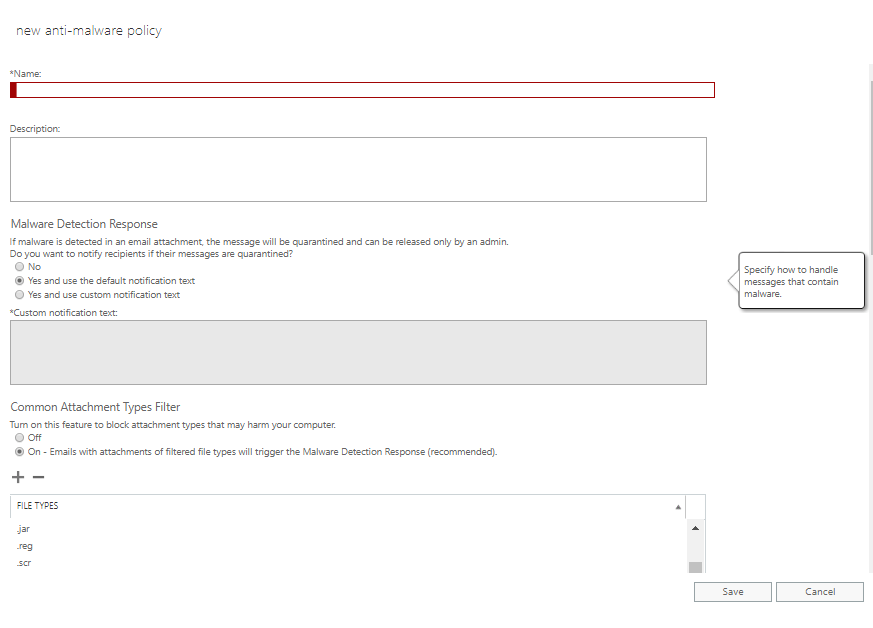
Provide a name for the new-malware policy with description.
Malware detection response – If malware is detected in an email attachment during the EOP scan, the message will be quarantined, and the message will be released only by the administrator.
During this section, the recipient notification will be controlled by three options.
No – You can disable the notification
Yes and use the default notification text
Yes and use the Custom notification text ( If select provide the Custom notification text in the provided box.
Common attachment type filter – Turn on this feature to block attachment types that may harm your computer.
Off – Turn off this feature
ON – Emails with attachments of the filtered file type will trigger the Malware detection response (Recommended setting)
On clicking + sign you can add the file type manually.
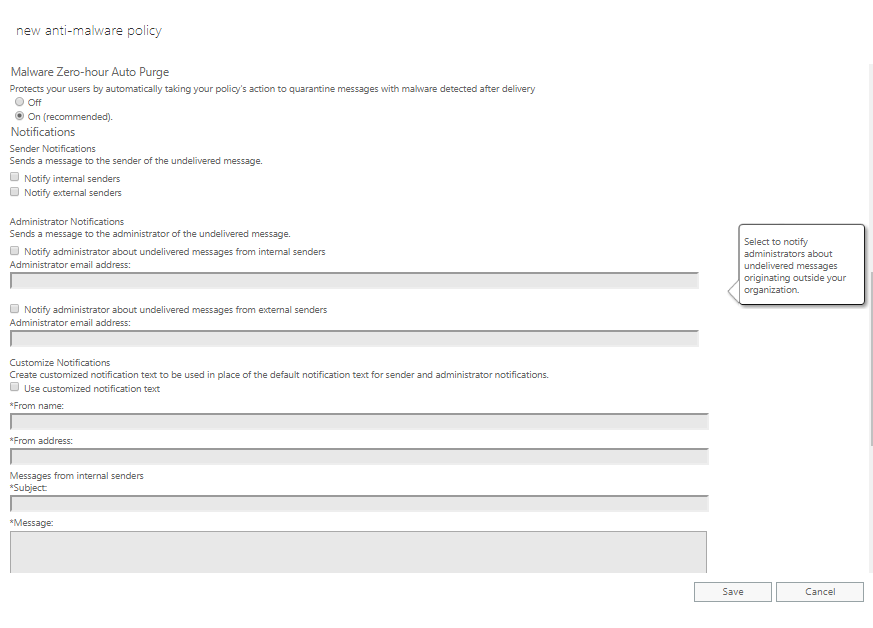
Malware Zero-hour auto purge – This setting protects your user by automatically taking your policy action to quarantine messages with malware detected after delivery.
Off – disable this feature
ON – enable this feature ( Recommended )
Notifications
Sender notifications – will send a message to the sender of the undelivered message. Here you can enable either Internal / External or both senders.
Administrator notifications – send a message to the administrator of the undelivered message.
Notify administrator about undelivered messages from the internal sender – When enabling, you can include the administrator email address in the box provided
Notify administrator about undelivered messages from the external sender – When enabling, you can include the administrator email address in the box provided
Customize notifications – Create customized notification text to be used in place of the default notification text for sender and administrator notifications
Use customized notification text – When enabled, provide From Name, From Address, separate Subject, and Message body text for internal senders and external senders.
Applied To – This settings check the condition for whom this policy applies by creating recipient based rules by specifying users, groups, or domain names.
These settings check for three conditions ( add conditions )
The recipient is ( user email address )
The recipient domain is ( company domain names )
The recipient is the member of ( email groups in a domain )
You can also set exception conditions for the same conditions above.
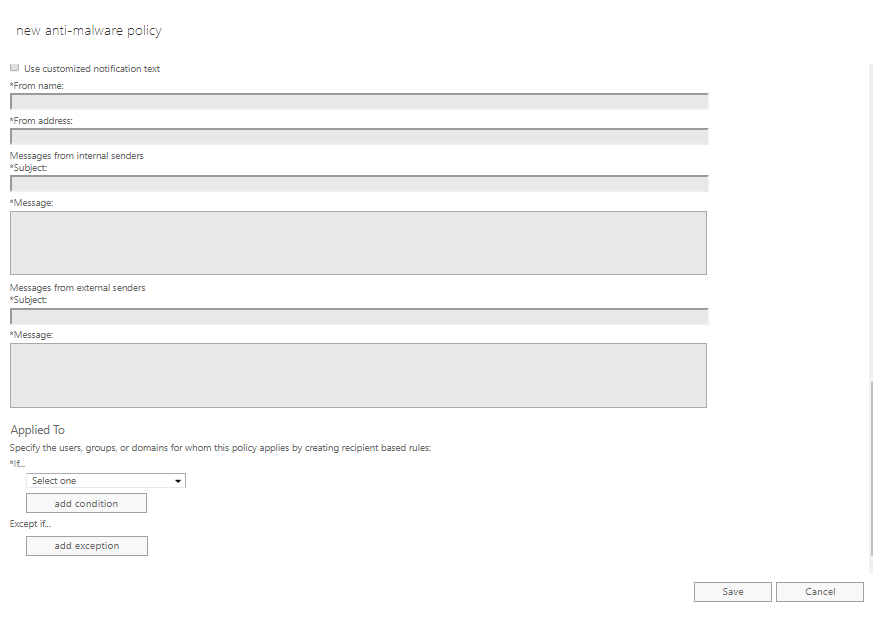
After changing all the above settings for creating a new anti-malware policy click Save to change effect.
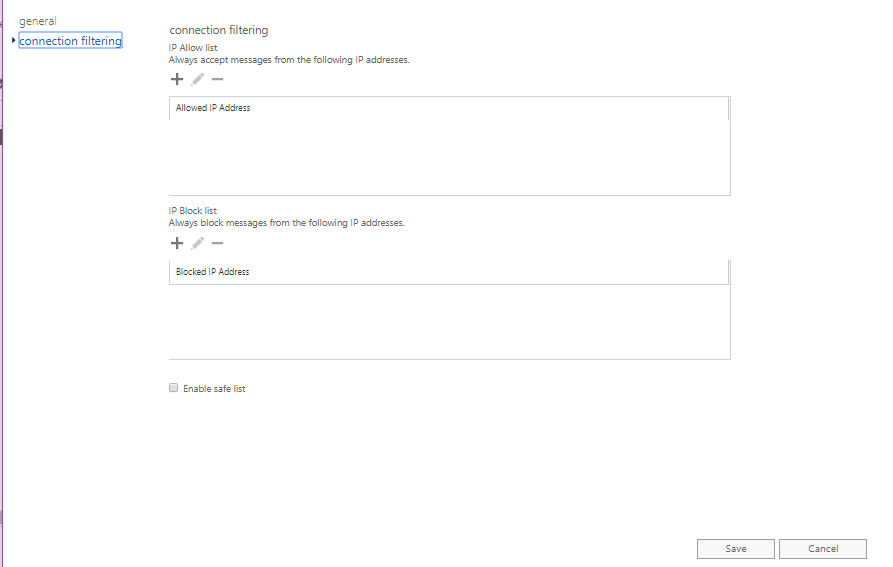
Connection filter – This service Identifies good and bad email source servers early in the inbound email connection through the IP Allow List, IP Block List, and the safe list maintained in the policy. There is a default policy with an empty IP Allow list and IP Block list. The administrator has to edit the default policy and enter the Incoming server’s IP to allow or block mail delivery separately in the corresponding boxes.
Enable safe list – Microsoft subscribes to various third-party sources of trusted senders. Enabling this safe list feature skips spam filtering on messages sent from these senders ensuring that they are never mistakenly marked as spam.
Click save after adding the IPs in the boxes to change effect.
Spam Filter – EOP anti-spam and anti-phishing technology is applied across all of Microsoft’s email platforms to provide users with the latest anti-spam and anti-phishing tools and innovations throughout the network. The goal for EOP anti-spam service is to offer a comprehensive and usable email service that helps detect and protect users from junk email, fraudulent email threats (phishing), and malware. Exchange administrators can use EOP’s default anti-spam policy or can create their own new anti-spam spacy depending on their environment requirement.
Global administrators or Exchange administrators can create a new spam filter policy by clicking the + sign in the spam filter section.
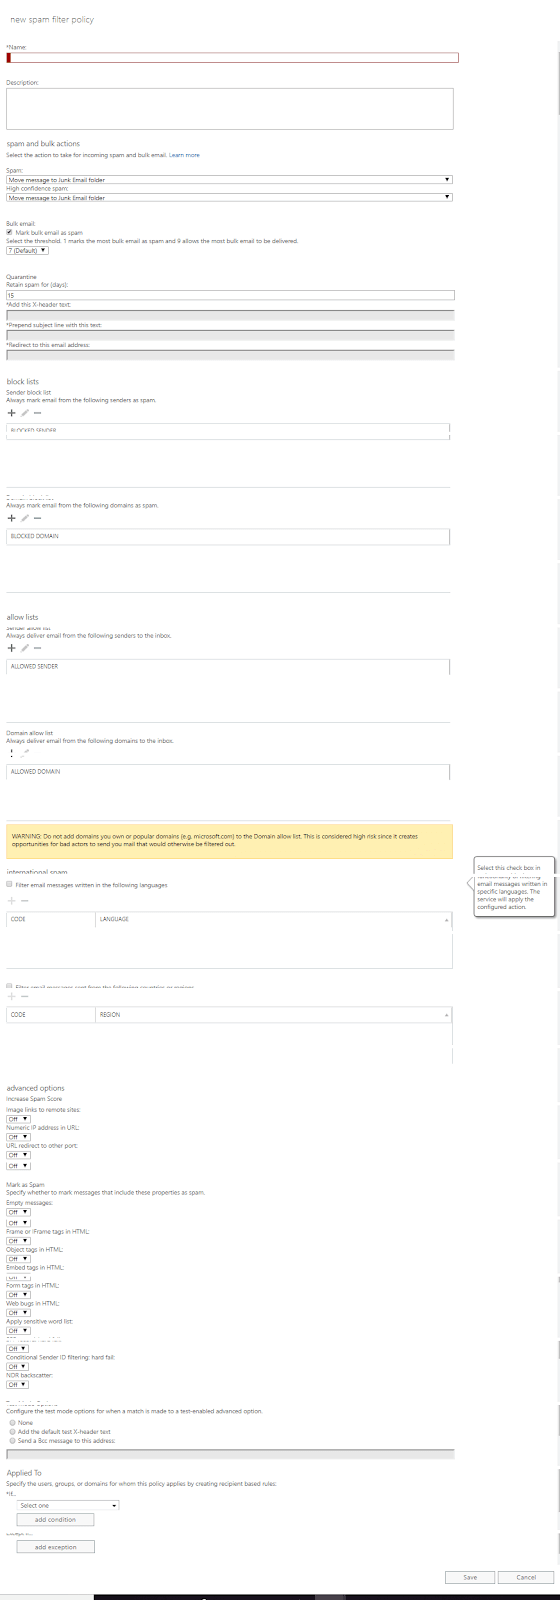
Provide a name for the new spam filter policy, description for the policy is optional
Spam and bulk actions – Select the action to take for incoming spam and bulk email
In the case of Spam, below are the various actions to be carried out, and can select anyone
- Move message to a Junk email folder
- Add X header – Administrator has to add the X header text in a given box
- Prepend Subject line with text – Administrator has to add the custom text in a box
- Redirect message to an email address – Administrator should provide a valid email address
- Delete message
- Quarantine message
In the case of High confidence spam, you can carry out any one of the same recommended actions above.
Bulk email: In case of bulk email delivery, administrators can set a threshold from 1 to 9 ( 7 default ). 1 marks the most bulk email as spam and 9 allows the most bulk email to be delivered
When you lower the threshold more bulk email is marked as spam. However this may also increase the chance that email users want in their inbox will be marked as spam. To help prevent this, inform your users to add sender to their safe sender list in Outlook or Outlook web
Quarantine – Settings for retaining the spam email for days. Administrators can specify the no of days to keep the spam email under quarantine after that those emails will be deleted automatically. In this setting, administrators can add the text for X header and Subject and prove a valid email address for redirect depending on the previous settings selection.
Blocklists
Senders Blocklist – Always mark as Spam when the sender address matches this list. Administrators can add multiple email addresses one by one in the given list by clicking the + sign.
Domain Blocklist – Always mark as Spam when any senders in the domain matches. Administrators can add multiple domain names one by one in the given list by clicking the + sign.
Allow lists
Senders Allow list – Always deliver email from the following email address added in the list. Administrators can add multiple email addresses one by one in the given list by clicking the + sign
Domain allow list – Always deliver email from the following domains added in the list. Administrators can trust a domain by adding each domain in the list one by one by clicking the + sign.
International spam – Settings handling emails from multiple languages for marking as Spam or allowable for delivery
Administrators can enable/disable settings functionality of filtering email messages written in specific languages. Administrators can also filter email messages from a specific country by selecting the available countries list.
Advanced options
Increase Spam Score – Specify whether to increase the spam score for messages that include these types of links or URLs.
Image links to remote websites – When this setting is enabled, any message with image links to remote websites will receive an increased spam score. Here you have the option to enable or disable or test the condition
Numeric IP addresses in URL – When this setting is enabled, any message that has numeric-based URLs (most often in the form of an IP address) will receive an increased spam score. Here you have the option to enable or disable or test the condition
URL redirect to other port – When this setting is enabled, any message that contains a hyperlink that redirects the user to ports other than port 80 (regular HTTP protocol port), 8080 (HTTP alternate port), or 443 (HTTPS port) will receive an increased spam score. Here too you have the option to enable or disable or test the condition
URL to biz or info websites – When this setting is enabled, any message that contains a .biz or .info extension in the body of a message will receive an increased spam score. You have the option to choose to enable or disable or test the condition
Mark as Spam – Specify whether to mark messages that include these properties as spam.
Empty messages – When this setting is enabled, any message in which the body and subject line are both empty, and which also has no attachment, will be marked as spam. You have the option to choose to enable or disable or test the condition
Javascript or VB script in HTML – When this setting is enabled, any message that uses JavaScript or Visual Basic Script Edition in HTML will be marked as spam. You have the option to choose to enable or disable or test the condition.
Frame or iFrame tag in HTML – When this setting is enabled, any message that contains the “Frame” or “IFrame” HTML tag will be marked as spam. These tags are used on websites or in HTML messages to format the page for displaying text or graphics. You can ON / OFF / Test conditions.
Object tags in HTML – When this setting is enabled, any message that contains the “Object” HTML tag will be marked as spam. This HTML tag allows plug-ins or applications to run in an HTML window. You can ON / OFF / Test conditions.
Embed tags in HTML – When this setting is enabled, any message that contains the “Embed” HTML tag will be marked as spam. This HTML tag allows varying data types to be embedded into an HTML document. Examples include sounds, movies, or pictures. You can ON / OFF / Test conditions.
Form tags in HTML – When this setting is enabled, any message that contains the “Form” HTML tag will be marked as spam. This HTML tag is used to create website forms. Email advertisements often include this tag to solicit information from the recipient. You can ON / OFF / Test conditions.
Web bugs in HTML – When this setting is enabled, any message that contains a Web bug will be marked as spam. A Web bug is a graphic that is designed to determine whether a Web page or email message has been read. You can ON / OFF / Test conditions.
Apply sensitive word list – When this setting is enabled, any message that contains a word that’s included in the sensitive word list will be marked as spam. You can ON / OFF / Test conditions.
SPF Record: hard fail – When this setting is enabled, messages that hard fail an SPF check will be marked as spam (SPF filtering is always performed). Turning this setting on is recommended for organizations that are concerned about receiving phishing messages. (In order to avoid false positives for messages sent from your company, make sure that the SPF record is correctly configured for your domains.) You can set ON / OFF
Conditional senderID filtering: hard fail – When this setting is enabled, any message that hard fails a conditional Sender ID check is marked as spam. Turning this setting on is recommended for organizations that are concerned about phishing, especially if their own users are being spoofed. This option combines an SPF check with a Sender ID checks to help protect against message headers that contain forged senders. You can set ON / OFF
NDR Backscatter – When this setting is enabled, any message that matches the non-delivery report (NDR) bounce characteristics will be marked as spam. It is not necessary to enable this setting if your organization uses Exchange Online Protection to send outbound mail. You can set ON / OFF
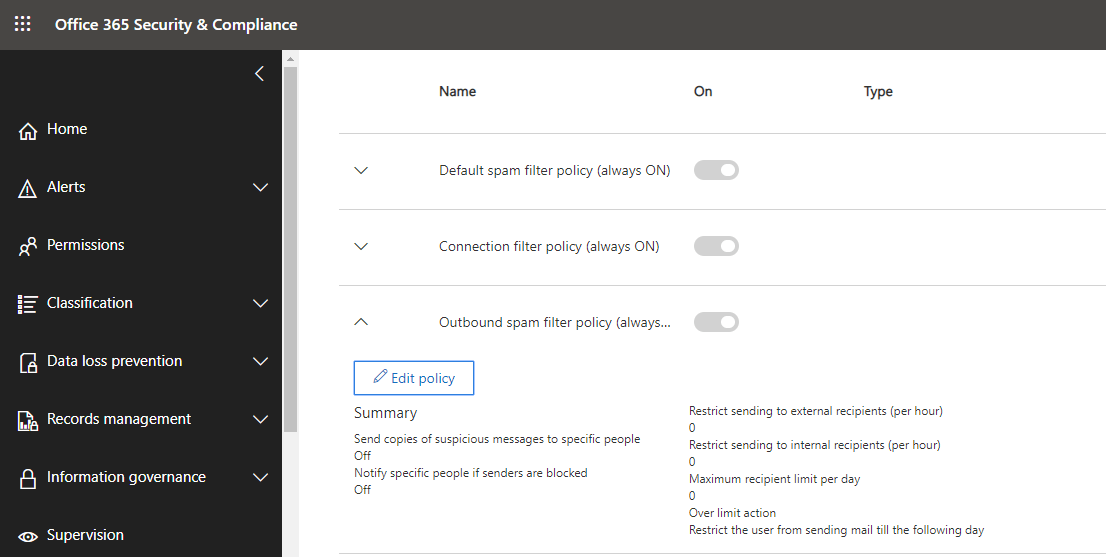
Outbound SPAM policies – This service now moved to a new revamped and improved security and compliance center – antispam page. Administrators can create an outbound policy to control outgoing messages including sending limits, and settings to control spoof intelligence. Below image shows Office 365 Security and Compliance center for creating Outbound policy
Access URL – https://protection.office.com/antispam
Quarantine – Can review items in quarantine queue, when enabled spam delivery to quarantine for a period of days. Administrators can selectively take an email message in a quarantine queue to release the message. Currently, this service is moved to new improved security and compliance center
Action Center – Now action center has a new name and a new home. Now it is changed to “restricted users page” in Microsoft 365 Security and Compliance center. EOP protection systems find any user exceeds one of the outbound sending limits as specified in the service limits or in outbound spam policies, the user is restricted from sending an email, but they can still receive the email. Such users will be displayed in the restricted user’s page.
Access URL: https://protection.office.com/restrictedusers

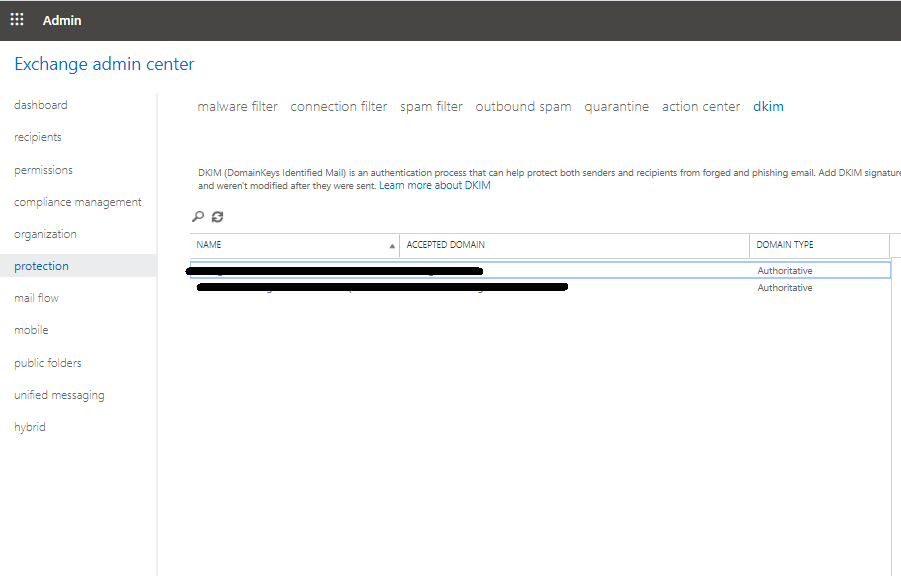
DKIM – DKIM ( Domain keys Identified Mail ) is an authentication process that can help protect both senders and recipients from forged and phishing emails. Add DKIM signatures to your domains so recipients know that email messages actually came from users in your organization and weren’t modified after they were sent.
Conclusion
Enhancing EOP features available with Exchange Online and Microsoft 365 subscriptions help to protect any Organization against unknown malware and viruses by providing robust zero-day protection, and includes features to safeguard any organization by not allowing receivers any harmful links in real-time. Also administrators can safeguard their senders to not allow any malicious data to the outside world.
Download Vembu Backup for Microsoft Office 365 and Protect your Office 365 Data!
Download the full-featured 30-day free trial of our latest version Vembu BDR Suite v4.2.0 and experience modern data protection for your Office 365 environment.
- Backup your Mails, Contacts, Calendars, and OneDrive items
- Recover data anywhere and anytime
- Restore domain or user-level data
- Store your data on-premise or in Vembu Cloud
Learn more and get started with Vembu Backup for Microsoft Office 365 here
Follow our Twitter and Facebook feeds for new releases, updates, insightful posts and more.