
One of the strengths of Powershell is the flexibility it offers. My favorite is that most of the time you don’t need to get the syntax 100% right compared to a lot of scripting languages (looking at you Bash…). It also provides, among many other things, the possibility to personalize your environment to fit your requirements and your day to day tasks at the best. Customizing the profile and having home-made modules is probably the easiest though best way to feel at home whenever you open a Powershell Prompt, and it’s great!
This article will provide insight into the following procedure:
- How to change the looks of the Prompt?
- How to have your own commands available at all times without having to load a module or dot-source a script?
Session customization
That one will be the visual one and you can go pretty far in the customization. Though we will keep it to a sensible level of modification here and try to bring some useful information that isn’t available by default. We will first create the profile if it doesn’t yet exist and make the changes afterward.
Profile creation
A PowerShell profile consists of a .ps1 file stored on the right path in the current user’s folder. Here is how Microsoft describes it:
A PowerShell profile is a script that runs when PowerShell starts. You can use the profile as a login script to customize the environment. You can add commands, aliases, functions, variables, snap-ins, modules, and PowerShell drives. You can also add other session-specific elements to your profile so they are available in every session without having to import or re-create them.

By default when you start Powershell the profile does not exist so you have to create it. However the path to the (yet inexistent) .ps1 file is stored in the $Profile variable. Note that this variable points to the profile available in the current session. More info on profiles here. If you test the path to the file it will not work obviously.
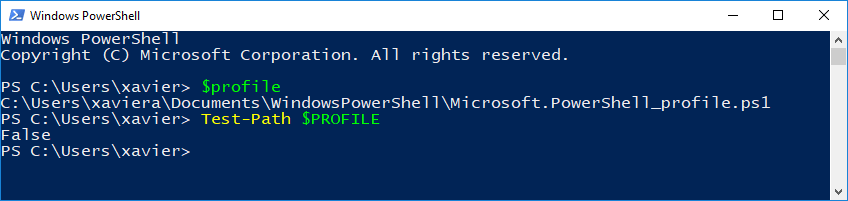
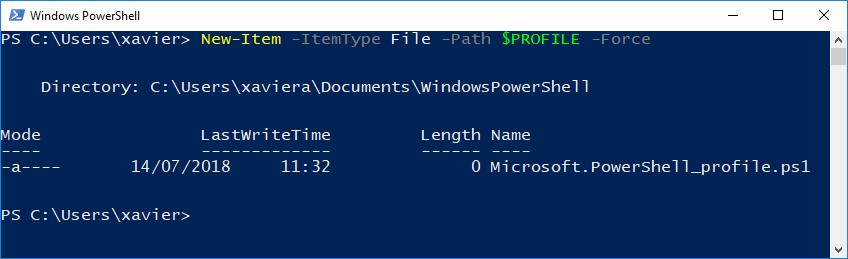
To create your profile, run the following command:
New-Item -ItemType File -Path $profile -Force
Now to start editing your profile, go to your profile’s folder and open the script in Powershell ISE (right-click > Edit). Keep in mind that every command in this file will run whenever you start a Powershell session with your current user. Meaning you don’t want to put commands that take too long to run otherwise it will become annoying waiting for the Prompt.
Title bar
Let’s start with the title bar. By default it is set to Windows Powershell, we are going to configure it to tell us at what time the session was started and if the session is elevated. Remember that the Profile script runs at the start of the session. Of course you can put something else that is more relevant to you but that will be a good first example. We will use the UI.RawUI subproperty of the automatic $Host variable to do so.
Add the next few script blocks to your profile file in this order. First we save the date and time of the moment we started the session in a variable:
$TitleDate = get-date
You may also want to know if you are currently in an administrator session or not as you may have started it a while ago. To do so we create a function to check for the privileges and populate a variable with a string that will be appended to the date.
function Test-Administrator {
$user =
(New-Object Security.Principal.WindowsPrincipal $user).IsInRole([Security.Principal.WindowsBuiltinRole]::Administrator)
}
if (Test-Administrator) {$Elevated = ” (Elevated)”}
Now we replace the title of the window by our customized information.
Below you can see the title of the windows that it specifies (Elevated) for the administrator session.


Prompt
Let us now move over to customizing the Prompt. The Prompt is whatever displayed on screen while the shell is waiting for your input. By default it is “PS Current directory>” like in the screenshots above. There are a lot of cool things that can be done to make your “Powershell life” easier. In order to replace the default Prompt we must create a Function called Prompt in the profile. Whatever command is in this function it will be executed every time Powershell finishes the execution of a command and comes back to waiting for your input. The commands you put in this function must not take more than a few milliseconds to execute in order to avoid making Powershell unusable (unless you are pranking someone of course…).
For this part we are taking my profile as an example. I have nothing too fancy in it but I like it this way. Here is what I want for my Prompt:
- Clear separation between commands. (The default layout is a bit messy)
- Who am I?
- Where am I?
- What machine am I on?
- When did the last command finish? (useful for timing)
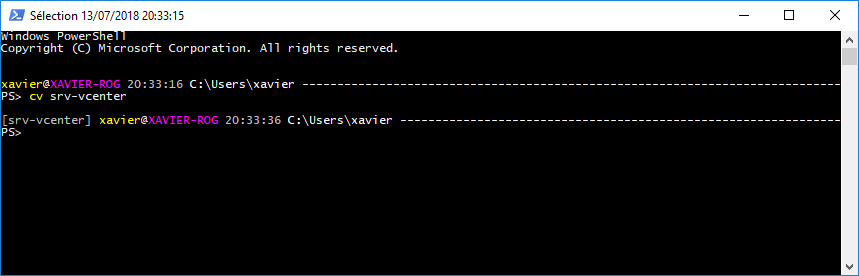
- [PowerCLI] What vCenter or ESXi host am I connected to? (It is big one for me as I have several vCenter servers and switch between them regularly)
As you can see below there is nothing incredible in the customized Prompt but it is a lot clearer to look at thanks to the separation. The input is always on the left of the window regardless of the location which gives a lot more space for one-liners. The devil is in the details.

Start by creating a Function called Prompt in your profile file. All the commands that we will describe later will go into this function.
# Whatever must run when Powershell comes back to waiting for user input.
}
Dash line
This part is the tricky one and we are explaining it first because it will appear in the other commands. To achieve a line of dash characters (or whatever you like) we need to find the width of the window in number of chars, subtract from that value the number of characters used by the info at the start of the line (user@machine date current directory), subtract from that value an offset to avoid the dash munching the next line. Once we have the number of characters we just add this many dashes to the line.

- Width of the window : $Host.UI.RawUI.WindowSize.Width
- Characters used : $ContentToDisplay.length
- Offset : 3
Now that the logic is down let’s get to putting it together.
Write-Host “”
$DashOffset = 2
# [vCenter]
IF ($global:DefaultVIServer) {
$vc = “[$($global:DefaultVIServer.name)] ”
Write-Host $vc -NoNewline -ForegroundColor gray
$DashOffset = $DashOffset + $vc.Length
}
# username@Machine
$DashOffset = $DashOffset + “$($env:USERNAME)@$($env:COMPUTERNAME) “.Length
Write-Host $env:USERNAME -ForegroundColor Yellow -NoNewline
Write-Host “@” -NoNewline
Write-Host “$env:COMPUTERNAME ” -ForegroundColor Magenta -NoNewline
# Date
$DashOffset = $DashOffset + ((Get-location).Path).Length + ((get-date -Format T).length)
Write-Host “$(get-date -Format T) ” -ForegroundColor Gray -NoNewline
# Current directory and dashes
$Width = ($Host.UI.RawUI.WindowSize.Width – $DashOffset)
Write-Host “$((Get-location).Path) $(‘-‘ * $Width)” -ForegroundColor White
“PS> ”
}
We use Write-Host with the –NoNewLine parameter to allow for different colours on a single line.
Try changing the value of $DashOffset at the beginning to visualize what it does.
Of course this is only my interpretation of a “good” Prompt but yours may very well be different and if so you should definitely look at improving it and use the above as an example to build your own to your liking.
Here we conclude the introduction to customizing your profile. We are now going to look into how you can optimize the user experience as a Powershell admin by having all your favorite functions available at all times, whether it was written by yourself or by a fellow Powershell Admin.
Powershell Modules
Modules are a really interesting part of the Powershell world as it opens a whole lot of possibilities to better utilize the shell and better organize your scripts. In this case a module is defined as a collection of functions that you want to make it available whenever you need to load it. It is just another Powershell file except it uses the .psm1 extension, not .ps1 like for regular scripts.
Module Auto-loading
In Powershell V3, Microsoft introduced the auto-loading feature. Whenever you call a function present in one of your modules that are not loaded, Powershell will search the files in the $env:PSModulePath environmental automatic variable for the command you typed and load the module in which it finds it. This feature is great because it makes the whole thing really flexible and you no longer have to load the modules in your profile, it will pick them up automatically. Two conditions must be met though:
- Only put functions in your .psm1 files. Otherwise whatever command that is not “wrapped’ in a function block will be executed when the module is auto loaded. Unless you want some output like “Module XXYY loaded” but I don’t really see the point of it
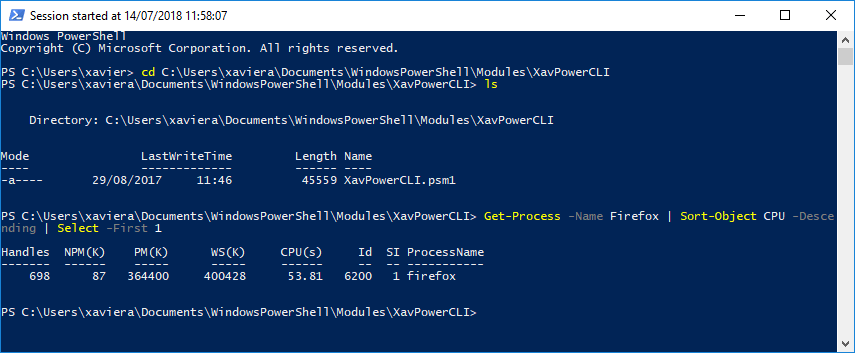
- The module must be placed in a folder with the same name, itself located in your profile folder. Like so:
%userprofile%\WindowsPowerShell\Modules\MyNetworkModule\MyNetworkModule.psm1
%userprofile%\WindowsPowerShell\Modules\MyVMwareModule\MyVMwareModule.psm1
The paths mentioned above represents your user’s modules. If you want to make them available to all users on the machine you can use the shared module folder path. Look into $env:PSModulePath to find it. Though we only focus on the user here.
Example
The following quick and easy exercise will demonstrate how to use modules with auto-loading.
- Create this folder: %userprofile%\WindowsPowerShell\Modules\MyNewModule\
- Create a file called MyNewModule.psm1 in the above folder
- Edit the file and write a simple function in it like so and save the file
Write-Host “Hello World!”
}
Now go to Powershell, start typing “Myt” and autocomplete (Tab key). Magic the command is here. If you run it you will get the good old “Hello World!”.
This is the most basic demonstration but it is pretty much it. I hope this gives you a better idea of how to use these modules and what you can do with it. Your creativity is the limit now.
A few utilities
In this section I will simply mention a few functions that can be interesting to have available in your sessions, at least they are for me. I will paste the code of the first one as it is a short one. The longer ones will probably be the topic for future articles where there will be details on how they work.
Connect to a vCenter or ESXi system in seconds
I use this function literally ALL the time. Instead of typing the whole Connect-VIServer PowerCLI cmdlet with all the parameter, I just type CV, enter my password and that’s it I’m connected. This is a short function so here it is.
param(
[parameter(position=0)]$Server = “srv-vcenter”,
[Parameter(Position=1)]
[PSCredential]$Credential = “administrator@vsphere.local”,
[String]$Protocol = “https”
)
$params = @{Server = $Server ; Protocol = $Protocol}
if ($Credential) {$params.Add(‘Credential’,$Credential)}
Connect-VIServer @params 3>&1 | Out-Null
}
Get extended information about datastores
The PowerCLI built-in cmdlet Get-Datastore display a bunch of information about the datastores but a custom function can give access to extra interesting details: Number of VMs, Provisioned GB, Provisioned Percent, Expandable or not.
Advanced network diagnostic tool
Ping is great but it’s only ping. If you want to check a TCP port on a remote IP from a Windows machine you can use the Test-NetConnection cmdlet which takes ages to run or enable the telnet client feature which is a bit old school. With a nice custom function in a module you can check for ports just like you would with a traditional ping. Paired with a port listener function it becomes a good tool for troubleshooting network issues.
Bring up a file browser from within Powershell
I’m not sure why this is not included by default but it can be useful to open a file browser to select a file. IT has the same effect as a Get-Item but a lot fancier!
Again these are just a few examples and you will probably think of others that would be relevant for you to have available in Powershell at all times. Feel free to share your own favorite functions and your ideas in the comments section!
Conclusion
Having a well-customized profile will save you a lot of time as it will get you the info a lot quicker. As you know this was merely an introduction to customizing your profile but it should get you started and allow you to build your very own control center. Once you go down that rabbit hole, you can never go back to the default profile and you will look at improving it regularly. Have a good customization!
Follow our Twitter and Facebook feeds for new releases, updates, insightful posts and more.