
In today’s blog, we’ll be seeing as how to setup a Software Defined Private Network in AWS cloud environment.
Using this protocol one can access the AWS cloud resource hosted at its Private Network from any device anywhere.

What are all the components involved in this topology –
- OpenVPN Access Server Appliance [In the form of : AMI]
- OpenVPN Client Software
- VPC Configuration hosted at AWS
Licensing:

OpenVPN Access Server licensing comes pre-bundled with your Amazon EC2 instance providing the flexibility of hourly billing with no upfront costs or long-term investments i.e in one word : Pay As You Go.
Let’s dive into creating the setup:
Let’s assume that you already have a basic hands-on experience in AWS cloud services like hosting VPC and launching instances.
Section 1: Launching the OpenVPN Access Server Appliance from AWS marketplace.
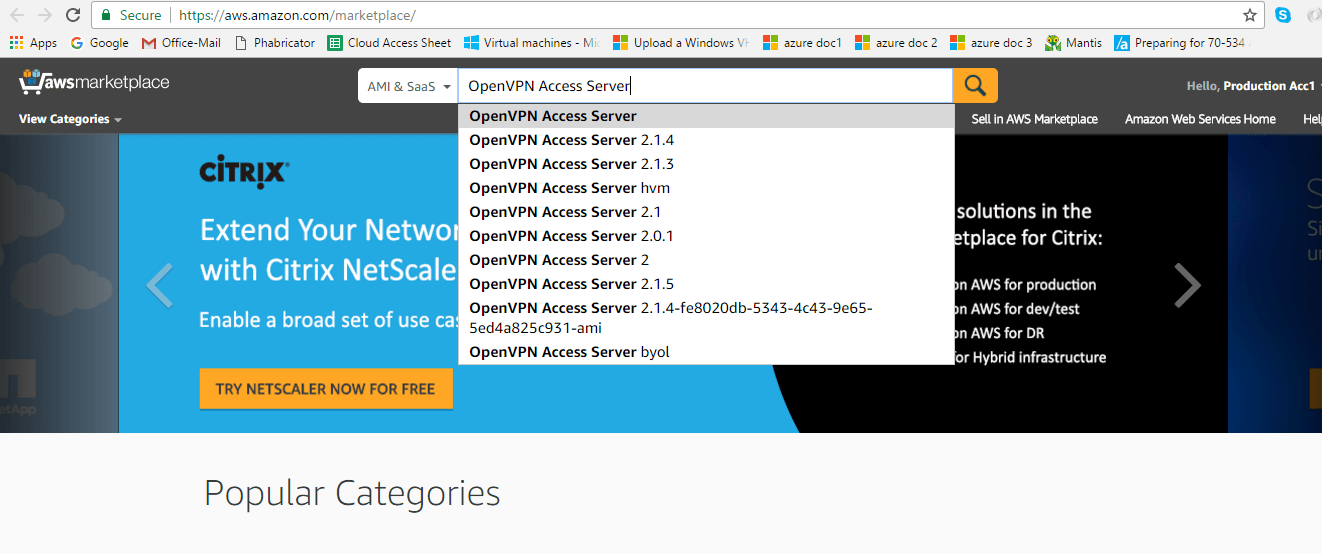
Login to Amazon Marketplace by clicking here. In the search bar, enter OpenVPN Access Server in the search window, and press Enter.
For convenient instance activation, select instances that contain the connected devices suffix.

Click Continue to launch the instance.

For a simple launch process, choose “1-Click Launch” option and proceed with default option, However user can always have flexibility to make fine adjustments like Changing AWS “Region”,EC2 Instance Type, VPC Settings and security group information.
Note : Note choose the available keypair, if the keypair is not created -please create one and choose it here.
Click “Launch with 1 click” button after you have confirmed all of the selected options are correct.
To confirm that the instance has successfully launched, watch the Instances section for status. You should see something similar to the following as your instance is being launched:

Though its option, you should allocate a static IP address for your appliance so the IP address can be reclaimed in case of AWS machine failure/shutdown/reboot. To do so, visit the Elastic IPs section in the left navigation panel.

Now its time to configure your OpenVPN Access Server Instance,
Once your new instance is successfully launched and running, you will need to SSH into the console using a SSH client software and the private key pair you have used/created previously.
When login screen is prompted, use openvpnas as the username, and then press Enter. (NOTE: If you are using previous versions of our appliance, the username used is root instead of openvpnas)
If the private key you have specified was correct, you should now be logged in and the OpenVPN Access Server Setup Wizard should now be started. Follow the instructions below to begin configuring your server.
Read through the EULA, and enter yes to indicate your agreement.
> Will this be the primary Access Server node?
Default: Yes, Press Enter to accept the default setting. Otherwise, if you are setting up your failover node, change this to say no.
> Please specify the network interface and IP address to be used by the Admin Web UI:
Default : 2, Choose 1 – “all interfaces: 0.0.0.0” to listen in all interface.
> Please specify the port number for the Admin Web UI.
Default: 943, It is usually safe to leave this at the default port unless customization is desired.
> Please specify the TCP port number for the OpenVPN Daemon
Default: 443, It is usually safe to leave this at the default port unless customization is desired.
> Should client traffic be routed by default through the VPN?
Default: No, If you only have a small network you would like your remote users to connect over the VPN, select no. Otherwise, if you would like everything to go through the VPN while the user is connected (especially useful if you want to secure data communications over an insecure link), select yes for this option.
> Should client DNS traffic be routed by default through the VPN?
Default: no, If you would like your VPN clients to able to resolve local domain names using an on-site DNS server, select yes for this option. Otherwise, select no. Do note that if you selected yes for the previous option, all traffic will be routed over the VPN regardless what you set for this setting here.
> Use local authentication via internal DB?
Default: yes, If you would like OpenVPN Access Server to keep an internal authentication database for authenticating your users, select yes for this option. When this option is turned on, you will be able to define and/or change username and passwords within the Admin Web UI.
> Should private subnets be accessible to clients by default?
Default: yes, This option defines the default security setting of your OpenVPN Access Server. When Should client traffic be routed by default through the VPN.
> Do you wish to login to the Admin UI as “openvpn”?
Default: Yes, This defines the initial username in which you would use to login to the Access Server Admin UI area. This username will also serve as your “lock out” administrator username shall you ever lock yourself out of your own server. If you would like to specify your own username, select no. Otherwise, accept yes for the default.
> > Please specify your OpenVPN-AS license key (or leave blank to specify later):
Explanation: If you have purchased a license key for your OpenVPN Access Server software, enter it here. Otherwise, leave it blank. OpenVPN Access Server includes two free licenses for testing purposes.
>> Create password for the OpenVPN admin user, invoking the below command.
sudo passwd openvpn
Enter new UNIX password:
Retype new UNIX password:Last thing we need to do before we can connect to the admin area and to our VPN is disable the Source/Destination check in AWS. Without doing this we would not be able to access our private subnets. To change this go to the EC2 console in AWS, select your instance, choose *Actions>Networking>Change Source/Dest. Check* as seen below. Choose “Yes, Disable” on the next screen.
Section 2: Launch a test instance in the private subnet of the same VPC.
1. To be able to verify and test our VPN connection into our AWS account, we will first setup a simple EC2 instance in the private subnet.
Login to your AWS account and navigate to the EC2 Dashboard and click “Launch Instance” on the left.
Press “Select” next to the top item *Amazon Linux AMI*
2. Leave on t2.micro and click “Next: Configure Instance Details.”
3. Make sure to set your subnet into your private subnet mentioned in the prerequisites. Then click “Review and Launch” as defaults for everything else are fine for this test. *note: this will create a SG for you open to the world make sure you understand this.*
4. Shows you the review of your new instance. Click “Launch” to select your key-pair and then launch the instance.
Section 3: Install the OpenVPN client and connect to the instance running in the private subnet.
In your web browser enter the ElasticIP from your OpenVPN Access Server https://elastic-ip-here:943 Note: On your first attempt to connect you will be warned by your browser that the SSL certificate cannot be validated. This is OK for our demo but in a real world you will want to setup a real SSL certificate in your setup.
On the screen enter “openvpn” for the Username and the password you created for the user.
After your credentials are accepted you will see the screen below. Go ahead and click “Click here to continue” which will download the OpenVPN client installer to your machine.

Once the installation OpenVPN client installation got completed, it will automatically connected to OpenVPN server, where you can see the below screen in the browser. Now all we have left to do is SSH into the EC2 instance we launched earlier into our private subnet. This will validate our VPN’s connectivity into our AWS VPC
Conclusion:
If successful you will be logged into the instance that resides in your private subnet of your VPC.
Follow our Twitter and Facebook feeds for new releases, updates, insightful posts and more.