
In this blog, we’ll discuss how the network layer is protected in the cloud.
In traditional networks, the inbound network traffic is usually traversed via a firewall which acts like a protected medium to network, and based on the rules set at the firewall – the inbound/bound packets will be allowed or denied.
Now we have a basic idea about how the firewall protects the data packets in the traditional on-premises network.
Table of Contents
- Network Security Group in AWS
- What are all the components involved in the Security Group?
- Best Practices for creating a security group in AWS
- How to Associate a Security Group with AWS Instances
- How to update existing rules in the Security Group?
- Security group associated with the VPC network – Limitations
- Security group associated with the EC2 Classic network – Limitations
- Network Security Group in Azure
- Level of NSG Association
- Azure Security group has the following limitations
- Best Practices for Azure Network Security Group
- Wrapping up
Let’s talk about how this traditional firewall is used or replaced by a different medium in the cloud infrastructure for two leading cloud service providers: AWS and Azure. In general, instead of having a dedicated network entity like a firewall in the cloud, each individual server is associated with a security policy.
Network Security Group in AWS
In AWS, the usual network entity: FIREWALL is replaced by the terminology called Security Group

Whenever we create an instance, it has to be associated with either default security group or custom security group by defining the proper inbound and outbound rules for the instance. An instance can be attached to one or more security groups and multiple instances can use the same security group.
Security groups are stateful, which means if you add an inbound rule for port 80, it is automatically allowed out. By default, everything is denied in security groups and you have to add rules to allow. A security group is order less, which means it will evaluate all the rules before allowing traffic.
AWS offers two types of network,
- AWS Classic Network
- AWS VPC Network
In this post, we’ll primarily discuss the security group associated with the VPC network. However, with respect to a security group, there won’t be much difference between Classic & VPC networks other than their limits. So on a high level, the below details apply to the classic network as well.
What are all the components involved in the Security Group?
There are four major components involved in each security group.
- Type
- Protocol
- Port Range
- Source
I believe that the first three components can be simply understood for what they were intended for. So let’s talk about ‘Source’.
Source is allowed to configure a specific IP Address/ Range or even the same or different security group.
So what happens if I provide a security group as the input at the source?
This means every instance associated with the provided security group [say: SG1] is allowed to access the instance running at this security group [Say: SG2], that is: AWS provides the ability to create one security group as a source of another security group for a group to group communication which will be efficient in case of auto-scaling setup.
Best Practices for creating a security group in AWS
The first thumb rule here is don’t go with the default security group for your instance. Always set your baseline security group which can be used across the instances for generic purposes like Remote Desktop and SSH etc. Once you are ready with the baseline security group, create a role-based security group like website security group, database security group, and application security group.
How to Associate a Security Group with AWS Instances
There are two ways:
- Associate a Security Group while launching an Instance
- Associate a Security Group after the instance is launched
We will discuss them one by one in detail.
1. Associate Security Group while Launching Instance,
Associating Security Group at the time of the new instance launch is quite simple.
Click the “Launch Instance” button from the AWS management portal and proceed with on-screen instructions.
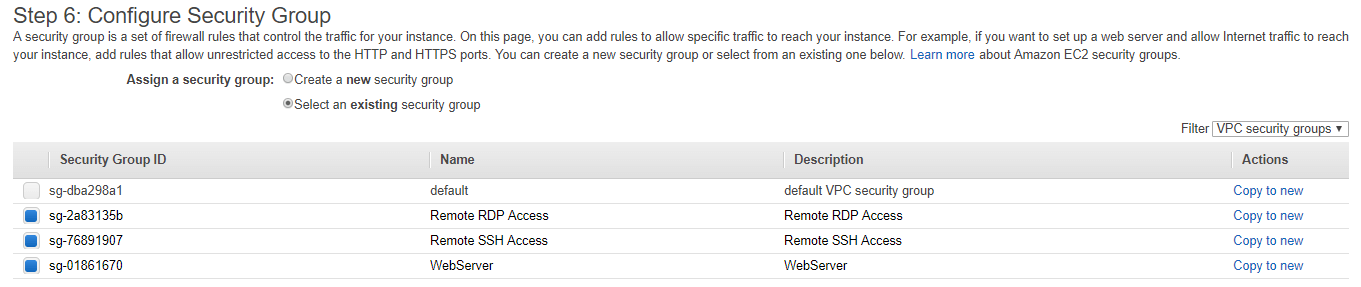
On the “Configure Security Group” page, choose the required security group or create a new security group. As we outlined in the best practices, always plan and create the required security group prior to your instance launch, so that it will save your time at the instance launch wizard.
2. Associate Security Group post Instance launch or for already running Instance
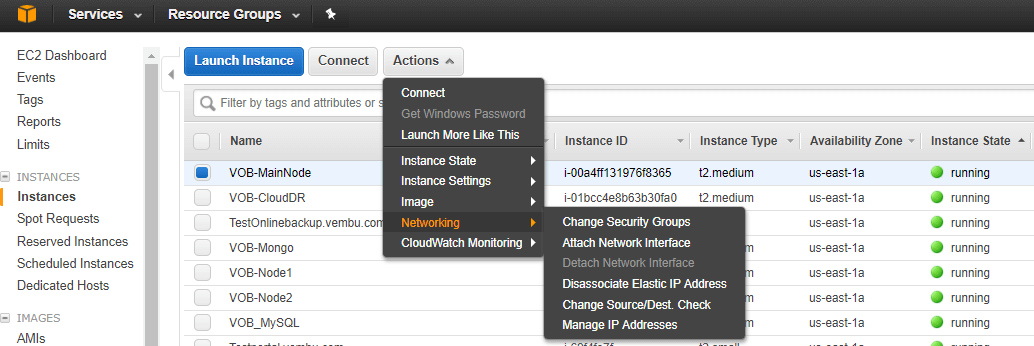
Select the required instance and select Action -> Networking -> Change security group. Then select add a new security group or remove the existing security group from the list.
Note: You can only add security group associated available in the same VPC.
How to update existing rules in the Security Group?
In general, the user can have a question how can I update existing rules like adding or deleting new rules to it? This use case will be applicable when there is a need of allowing new application port to the existing security group.
- Open AWS console, click “EC2” service
- Navigate to “Security Group” section on the left pane
- Search and select the required security group
- On the inbound tab choose, “Edit” button to reconfigure your existing rules
- For type either choose the default Type like: SSH, RDP, SFTP etc.. or choose “Custom rule”, select TCP/UDP as the protocol and provide the required port which is need to allowed and define source parameter: Allow all/My IP or custom with respective IP address to it
Security group associated with the VPC network – Limitations
- 500 is the default number of maximum security group one can create per VPC [per region], however one can increase this limit by contacting AWS support
- 50 is the default number of limits applied to Inbound and Outbound rules per security group, which means 100 combined inbound and outbound rules, one can contact AWS support to increase this inbound and outbound limit
- 5 is the default number of limits applied to per network interface, one can contact AWS support to increases this default limit
Note: Multiples of security groups per network interface and the number of rules per security group should not exceed 250.
Example: If the user wants 10 security groups per network interface, then the number of rules per security group is decreased to 25.
Security group associated with the EC2 Classic network – Limitations
If your AWS network is in EC2-Classic, maximum cap limit of 500 security groups in each region for each account. Also, one can associate an instance with up to 500 security groups and add up to 100 rules per security group.
Network Security Group in Azure
Azure Network Security Group [NSG] is similar to AWS as all the network principles are applicable here too. NSG holds the list of security rules that will allow or deny network traffic to the network.
Unlike the AWS security group which is always associated with an instance, Azure NSG can be associated with three different entities:
- NSG can be associated with the subnet
- NSG can be associated with the VM (Classic)
- NSG can be associated with the network interfaces (NIC) attached to VMs (Resource Manager)
Azure Security Group supports both allow and deny rules which lets you take a more granular decision. Since it supports both allow and deny rules, rules ordering matters here.
Let’s discuss this with a simple use case example.
If your rule #3 says to allow all SSH traffic and your rule #10 says don’t allow SSH traffic from IP address 10.0.2.156, it’s not gonna work, because rule #3 has already allowed traffic. A solution to handle this case: Have the deny rules first in NACL followed by ‘allow’ rules.
Every NSGs haves its default rules. The default rules cannot be deleted, but they are assigned the lowest priority, hence they can be overridden by the rules that you created.
NSG created under one region cannot be applied to resources that are available in different regions. Eg: If you create your NSG in West US then this NSG is eligible to associate with the resource available in West US only.
Azure also supports Access Control List (ACL), but ACL and NSG are not supported on the same VM instance. If ACL is already in place and you do want to use NSG, then remove the ACL first before associating the NSG to it. NACLs are stateless, so you need to explicitly call both inbound and outbound rules.
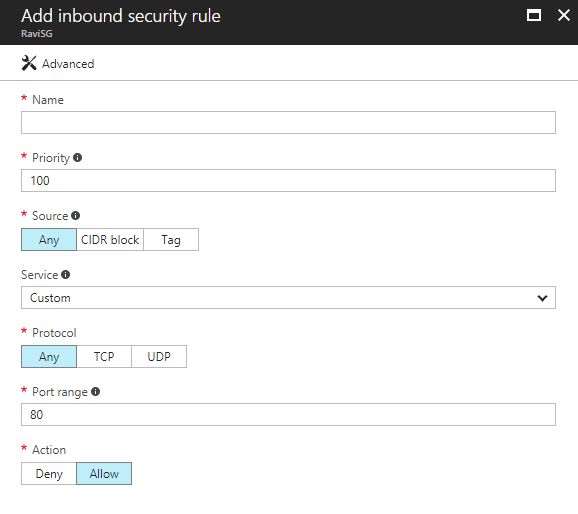
What are all the components involved in the Network Security Group?
- Name
- Priority: Rules are processed in priority over, lower the number higher the priority
- Source: Source can be any like IP address range, IP address range that will be either allowed or denied based on the rule
- Service: You can choose a predefined service like: RDP, SSH or SFTP etc
- Protocol: This specifies TCP or UDP
- Port range: You can provide single port number or between range like 1024-65535
- Action: Allow/Deny
Each NSG has below three default rules:
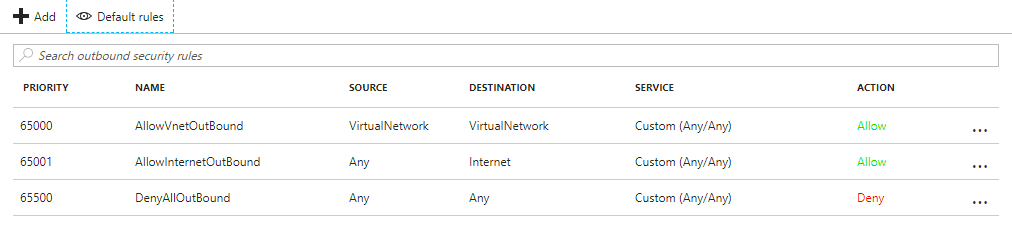
Virtual Network: Source and destination traffic in a virtual network is allowed both in inbound and outbound directions.
Internet: By default all outbound traffic is set to allow, but inbound traffic is blocked.
Load balancer: Allow Azure load balancer to monitor the health of your VMs. If you are not using a load balanced setup you can override this rule.
Level of NSG Association
NSG can be applied to VMs, NICs and Subnets, this depends on the deployment model.
Azure offers two types of deployment models.
- Classic
- Resource Manager
If it’s a classic deployment,
- Security rules are applied to all traffic to/from the VM
- Security rules are applied to any traffic to/from any resources connected to the VNet
If its the Resource Manager deployment model,
- Security rules can be applied to all traffic to/from the NIC where the NSG is associated
- Security rules are applied to any traffic to/from any resources connected to the VNet
Security rules available in the NSG are applied by priority in the following order:
Inbound traffic
If NSG is applied to the subnet and has a matching rule to deny traffic, the packet is dropped.
If NSG is applied to NIC (Resource Manager) or VM (classic) has a matching rule that denies traffic, packets are dropped at the VM\NIC, even when the subnet NSG has a matching rule that allows traffic.
Outbound traffic
NSG applied to NIC (Resource Manager) or VM (classic) has a matching rule that denies traffic, packets are dropped.
NSG applied to subnet: If a subnet NSG has a matching rule that denies traffic, packets are dropped, even if a VM\NIC NSG has a matching rule that allows traffic.
Azure Security group has the following limitations
The following limits apply only for networking resources managed through Azure Resource Manager per region per subscription.
Network Security Groups (NSG) default limit is 100 and can be increased up to 400.
Best Practices for Azure Network Security Group
The best practices that we’ve already covered for AWS also apply to Azure.
Wrapping up
Before deploying your cloud setup, it’s always good to plan your security policy keeping the scale-out setup in your mind.
Related Posts:
AWS for Beginners: Creating and managing IAM groups: Part 9
AWS for Beginners: What are EC2 Placement groups: Part 13
How-to Guide: Create and use Azure Virtual Network & Resource group
How to configure Hyper-V advanced virtual machine network
Hyper-V Networking Configuration Best Practices
Virtualization Trends Series: Network Virtualization: Transforming the World of Networking : Part 7
Follow our Twitter and Facebook feeds for new releases, updates, insightful posts and more.