
Hyper-V Storage Management is one of the most important areas in a Hyper-V environment. Regardless of the Storage vendor that we are using, Hyper-V Best Practices configurations should always be followed. Also the Best Practices from Storage vendor.
In this article, will not only discuss the Best Practices for Hyper-V Storage Management but also go through some of the devices and components that work directly with Storage in the Hyper-V.
When talking about Hyper-V Storage Best Practices, administrators always need to think about the type of storage that could be used in their environment. Depending on your requirements and budget, administrators can use almost any type of Storage in Hyper-V.
The type of Storage that you can add to your Hyper-V is from Local Storage (for non-Cluster Hyper-V), iSCSI or Fibre Channel, SMB 3.0 shares, Shared VHDX drives or NTFS and ReFS.
Since Hyper-V is a Windows Server, regardless of your Storage type, you need to add the Storage to your Server as a Windows Disk device and format as NTFS or ReFS (recommended, accelerated VHDX operations and enables creating of fixed VHDX almost instantly).

Unless your storage vendor has a different recommendation disks used for VMs files should be formatted using ReFS and should use 64K formatting (Allocation Unit Size)
Note: Microsoft finally launched a patch to fix some of the ReFS issues. With this new patch, Microsoft is fixing some of the issues that users have encountered while using ReFS. Particularly in large volumes and Backups.
Table of Contents
- New files in Windows 2016
- Hyper-V Storage Best Practices
- Type of Virtual Disk
- Resuming
- Storage Quality of Service (QoS)
- Other Storage Best Practices
- How to run BPA
You can also add Storage directly to your VMs to create a Virtual Machine using the pass-through disk. I do not recommend administrators to use pass-through disk configurations unless they see a good reason to use it (in some cases of significant data volumes for specific applications or mandatory by the vendor that still sticks to the old legacy way of working).
Maybe in previous Windows versions, the pass-through disk could be an option, but today with Microsoft and Storage improvements, it is not anymore.
Also, pass-through disks should be avoided due to the limitations introduced with virtual machine migration scenarios.
Let us just have a quick review of VM files.
Hyper-V VMs consists of four type of files: vhdx, avhdx, vmrs, vmcx.
New files in Windows 2016.
VHDX – Virtual Hard Disk File: This is the virtual hard disk file. The size of this file depends on the type of disk created (full HD size, or HD dynamic size).\
AVHDX – Advanced Virtual Hard Disk File: Files used these differencing disks for virtual machine snapshots. All VMs updates/changes are saved in this file after a snapshot.
VMRS – Runtime state file: This file contains the memory of a VM, and if the VM is power off, this file is reduced to a standard size (48k). When VM is power on the file size is equal to the memory set in the VM settings (always be aware where this file is located and Storage free space).
VMCX – Configuration File: Contains Virtual Machine configuration details. This file did replace the XML file from previous Microsoft 2016 versions.
Note: In folder \VM Location\Snapshots there is an additional file VMRS and VMCX. These files give the user the possibility to change VM settings after a creating a checkpoint/snapshot and rollback the VM state with initial VM settings configuration before the snapshot.
Same files type but from previous Windows versions:
VHD = VHDX, AVHD = AVHDX, XML = VMCX, Checkpoint (VSV = VMCX, BIN = VMRS)
Note: Except for Virtual HD files, all files names are always with the GUID used to identify the virtual machine or snapshot in question internally.
Hyper-V Storage Best Practices
Memory and Dynamic Memory

Virtual Machine’s memory depends on the Storage space to work and save the file VMRS.
Always provide enough space in Storage for these files. Additionally, if using Dynamic Memory (that extend automatically Guest OS memory), administrators carefully need to plan Storage allocation, particularly in the over time.
Over time, many changes happen on those VMs and Volumes. Files are copied to it (ISO files as an example) VHD grows, more VMs are created, and VMs memory changed.
By default, Dynamic Memory is disabled, when enable is set by default to a minimum 512Mb to a maximum of 1024 GB (users should change the maximum values). So if you have a VM that consumes much memory, then there is a possibility that a VM could consume 1Tb of Storage (never seen this, but is physically possible).
Example: You have a volume with 2Tb and 20 VMs with one VHD with 75Gb and 2Gb of memory when all VMs are Power On use 1,540Gb of Storage space. At this point is acceptable you have planned for your Storage Volumes to allocate this space. Meanwhile, you have Dynamic Memory enable in 10 VMs, and extra 2Gb was added to each VM, this is more 20Gb if we include some snapshots and files that will be copied to the Volume. Then quickly you have a full volume then
your VMs will not start. So carefully plan your Storage Volumes and always do an estimate of what you think will provisioning in 3 to 6 months.
Note: Hyper-V hosts performance can degrade if VMs attempt to use memory from multiple NUMA nodes. So if in Virtual Environment the use of NUMA memory and performance is a significant an issue, then you should not use dynamic memory.
Virtual Disks
Your Virtual HD should always be VHDX. If you have any old VMs from previous Hyper-V versions (before 2012) with VHD disk, you should always convert to the newer Virtual Disk type.
Location of VM files

Always be aware Hyper-V by default allocate VMs location in c:\. If you did not change the VMs location in the Hyper-V initial configuration, you should do it afterward.
Some administrators like to slip all VMs locations (configuration files in one type of Volume and Virtual Hard Disks in another Volume), I prefer all in the same location.
Unless you have a slow Storage or small Storage (can be a SAN or Local Storage) for hold all VMs in the same location and you need to split the files, for the type of Storage that exists today, there is no performance reason to do this. Maybe this was necessary with old Storage and could be useful, but in these days, I do not see a reason to do this just for standard VMs.
Personally, I like to stack all VMs in the same location for better management.
Note: Some applications, Exchange/email Servers, or DBs may need that VM files (mainly Virtual Hard Disks) need to be split into different Volumes. For those individual cases, you should check vendor best practices together with Storage Best Practices.
Type of Virtual Disk
Hyper-V has three type of Virtual Disks (Fixed Size, Dynamic Expanding, and Differencing).
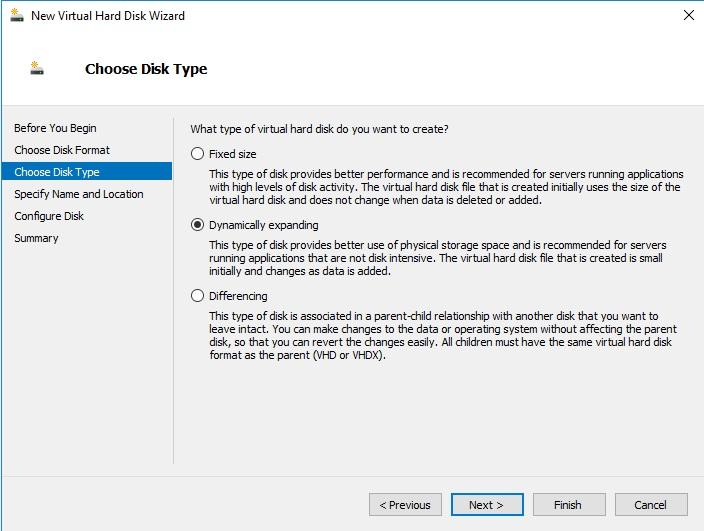
In this Virtual Disk type, has pre-allocated space when the VHD is created. Performance in this type of disk is better (even some opinions may differ here). The I/O is reduced throughput a single I/O and split into multiple I/Os. Is recommended for servers running application with high-level disk activity.
The size of this virtual hard disk is flat, do not change when data is created or deleted. It means, if you create a 50Gb Virtual Disk, this is the data size that consumes in your Storage, regardless of the amount of data that you have inside in your Guest OS.
Note: This type consumes more space in your Storage, but if you are using a SAN using deduplication can reduce the data usage in Storage.
Dynamic Expanding disks
This type of this Virtual Hard Disk space is allocated on demand. It means if you create a 50Gb Virtual Disk the initial file size is around 4Gb. The file size grows as data is added.
Note: Downside of this type of Virtual Disk type is that blocks in this type of disk initially are unallocated blocks. When data is written in the Virtual Disk (and first block), and metadata is changed disk I/Os writes increase and sequentially CPU usage also increases.
Differencing disks
This type of disk doesn’t have any particular features to file size, other than you have the double of size space saved in a disk file. Since Differencing disks work with a rule of parent-child relationship with another Virtual Disk that you want to leave intact.
Example: You create a Differencing disk from a fixed disk source. The original Fixed is 50Gb, which is a Virtual Disk that will not be touched anymore and all the changes afterward are created in the Differencing disks and be saved in this new Virtual Disk.
Reads and Writes to this type of Virtual Disk can consume more CPU and result in more I/Os than a fixed disk file.
Resuming:
Choosing the type of Virtual Disk always depends on the type of VM and what is the VM performance needed. However, my proposal is if you are not sure what type to use, always use Dynamic Disks.
Using dynamic disk type offers space savings and only allocating space when is needed.
If you have a Storage that is not actively monitored to ensure that sufficient disk space is present while creating dynamic disks and expanding those disks (manually or while data is added), then you should consider using Fixed Disk type.
Microsoft has a useful document regarding disk IO Performance, Hyper-V disks and blocks size considerations HERE.
Storage Quality of Service (QoS)
Storage QoS requirements are: Scale-Out File Server (SOFS) or CSVs on a Hyper-V cluster
With Storage QoS, administrators can set a minimum or a maximum IOPS in a VM Virtual Hard Disk. By setting a Storage I/O, an administrator can protect Storage performance and do not affect other VMs.
Storage QoS it can be used to accomplish the following:
- Set maximum IOPS allowed for a VM and the Virtual Hard Disk (QoS is set by per each Virtual Hard Disk)
- Monitor storage-related metrics through the virtual machine metrics interface
- Monitor end to end storage performance
- Mitigate noisy neighbor issues
- Manage Storage I/O per workload business needs

Storage QoS is a very complex process to explain here just in a few words you can check all details a process of Storage Quality of Service in Microsoft documentation HERE.
Other Storage Best Practices
Next, is a list of some configurations options that you can implement to add better performance to your Hyper-V Storage.
- If running Hyper-V 2016 and have any Virtual Disks from previous Hyper-V versions, you should convert to the new VHDX to use the new Virtual Disk Type features
- Do not create just one substantial Volume to hold all VMs. For performance, and if need Live Migration, is better to split Volumes in more than one Volume (in Windows Hyper-V a Disk Drive)
- The only Storage Features or services that should be installed on the Hyper-V host are Failover Cluster Manager (if the host becomes part of a cluster), iSCSI initiator / Multipath I/O (if the host is connecting to an iSCSI SAN, Spaces and/or Fibre Channel)
- The default path for any Virtual Disk Type should always be a non-system drive (like default path c:\). Using a system drive, there is a risk of disk latency, more critical; your system drive is out of disk space. Then you have a Hyper-V failure
- Keep snapshots/checkpoint chain short is essential to maintain a good disk I/O performance. When creating snapshots, a differencing file disk is created to save writes to disks. Only a one or two snapshots can have an impact on Hyper-V CPU usage with more Storage writes I/Os
- Jumbo frames should be turned on and set for 9000 or 9014 (depending on your hardware) for CSV, iSCSI and Live Migration networks. This can significantly increase throughput while also reducing CPU cycles
- Network Interfaces used for iSCSI Storage network should have all Network protocols unchecked except for Manufacturer’s protocol (if applicable), Internet Protocol Version 4, and Internet Protocol Version 6
- Enabling the above protocols to help Storage Network Interfaces only to use iSCSI traffic
- NIC Teaming (like LACP) should not be used in Network Interfaces used for iSCSI Storage network. To create multipath use MPIO
- When using ReFS Volumes (recommended), the recommendation is that drive formatted with 64 KB allocation unit size, which is best for Hyper-V
In addition to what we have discussed above, administrators can and should use, Best Practices Analyzer (BPA) on Hyper-V role. Run Best Practices Analyzer Scans and Manage Scan Results, to check Microsoft Best Practices to Hyper-V. BPA provides a list of all policy, operation or configurations that should be changed to meet Microsoft Best Practices.
How to run BPA:
Start Server Manager, select Hyper-V scroll down to BPA section and in tasks “Start BPA Scan”

Afterword BPA provides a report with issues and problems in your Hyper-V configuration and provides you the resolution. Just select the issue and will display the details of the selected issue.

Best Practices Analyzer can also run through Windows PowerShell cmdlets, check here Microsoft BPA site for full BPA options.
Disclaimer: Not all above Best Practices or recommendations can be applied, or even should be applied. Best Practices from Microsoft or Hardware Vendors are general guidelines, should be used as must be followed. Therefore, administrators should apply Best Practices carefully, but determine if it fits in your Virtual Infrastructure.
Enhance the security of your Hyper-V environment with ease by obtaining BDRSuite: Download BDRSuite
Explore the impressive capabilities of Hyper-V backup using BDRSuite and experience its effectiveness firsthand: Hyper-V Backup with BDRSuite
Follow our Twitter and Facebook feeds for new releases, updates, insightful posts and more