
Table of Contents
- How to create a virtual hard disk to share
- Online Resize of Shared VHDX
- Conclusion
- BDRSuite for Hyper-V
- BDRsuite for Hyper-V – Feature Highlights
Starting from Windows Server 2012 R2, Hyper-V makes it possible to share a virtual hard disk file between multiple virtual machines. Sharing a virtual hard disk file (.vhdx) provides the shared storage necessary for a Hyper-V guest failover cluster.
Multiple VMs can connect to a single VHDX file (that is connected via the SCSI controller in a VM and stored on a CSV volume ), that could act as a shared/cluster storage.
Some of the feature restrictions have been lifted in Windows Server 2016, and some important shared VHDX functionalities are now available like:
- Resize dynamically (resizing while VMs are running)
- Backup at the host level
- Support for Hyper-V Replica
These following step shows how to create and share a virtual hard disk that is available in the .vhdx file format. Do this step for each shared .vhdx file that you want to add. Example, you might want to add few shared disks that will act as data disks, and a separate shared disk that you can be as the disk witness for the guest failover cluster.
How to create a virtual hard disk to share
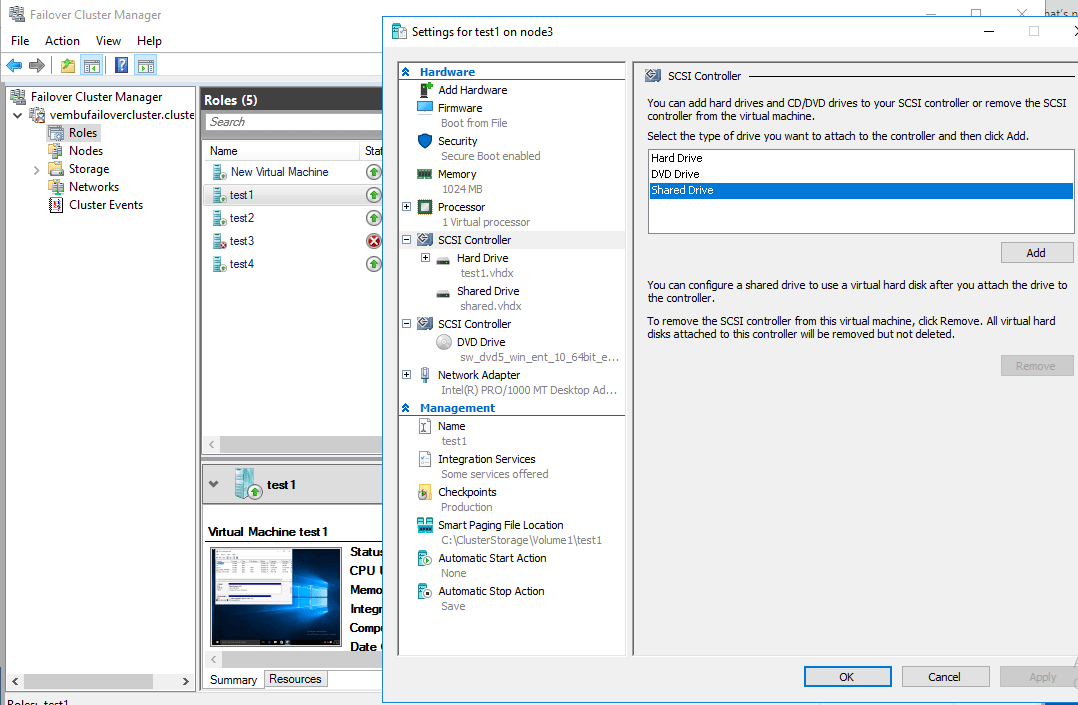
- In Failover Cluster Manager, expand the cluster name, and then click on Roles
- In the Roles pane, right-click the virtual machine on which you want to add a shared virtual hard disk, and then click Settings
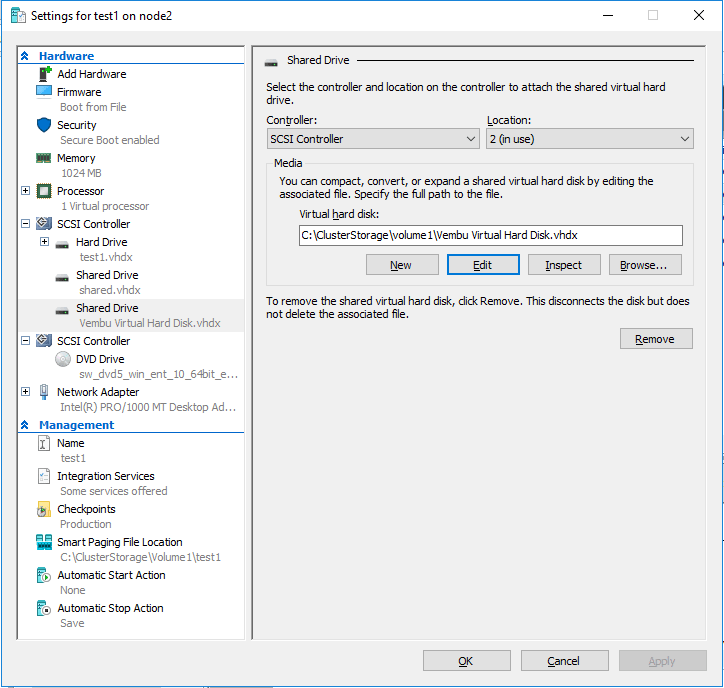
- In the virtual machine settings, under Hardware, click SCSI Controller
- In the details pane, click Shared Drive, and then click Add
- Click on New In the Shared Drive pane, which is shown under Virtual hard disk
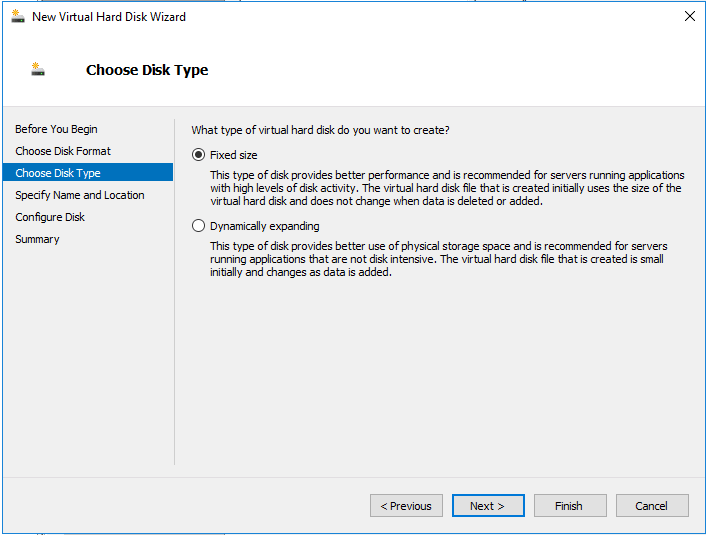
- The New Virtual Hard Disk Wizard opens
- On the Before You Begin page, click Next
- On the Choose Disk Format page, accept the default format of VHDX, and then click Next
- On the Choose Disk Space page select Fixed Size and click next
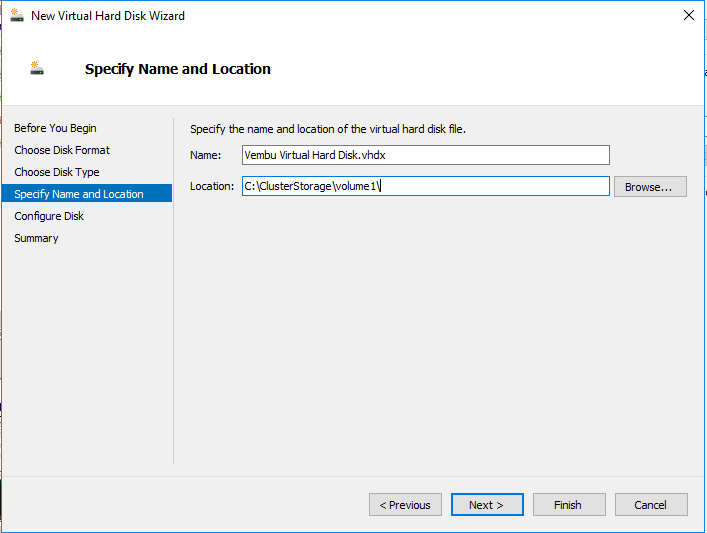
- On the Specify Name and Location page, do the following:
- In the Name box, enter the name of the shared virtual hard disk
- In the Location box, enter the path of the shared storage location
- Example 1, where the shared storage is a CSV disk, enter the path:
- C:\ClusterStorage\VolumeX, where C:\ is the system drive, and X is the desired CSV volume number
- Example 2, where the shared storage is an SMB file share, specify the path:
- \\SMBServerName\ShareName, where ServerName is the client access point for the Scale-Out File Server, and ShareName is the name of the SMB file share
- Here we are going to use CSV disk so, We are going to see Example 1 here
- Click Next
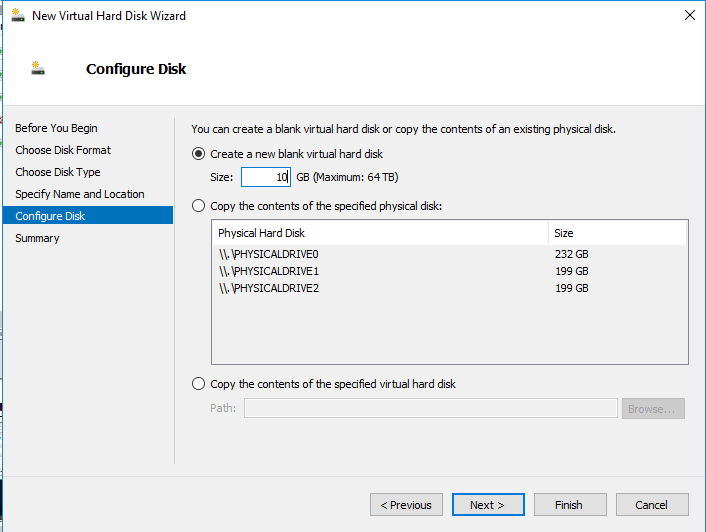
- On the Configure Disk page, keep the default option of Create a new blank virtual hard disk, specify the desired size, and then click Next
- Click on Finish after reviewing
- Add the virtual hard disk to each virtual machine that will use the shared .vhdx file


Online Resize of Shared VHDX
Online Resize of Shared VHDX is new feature which is introduced in Windows Server 2016 along with shared VHDX. To increase the actual size of a shared VHDX follow these steps:
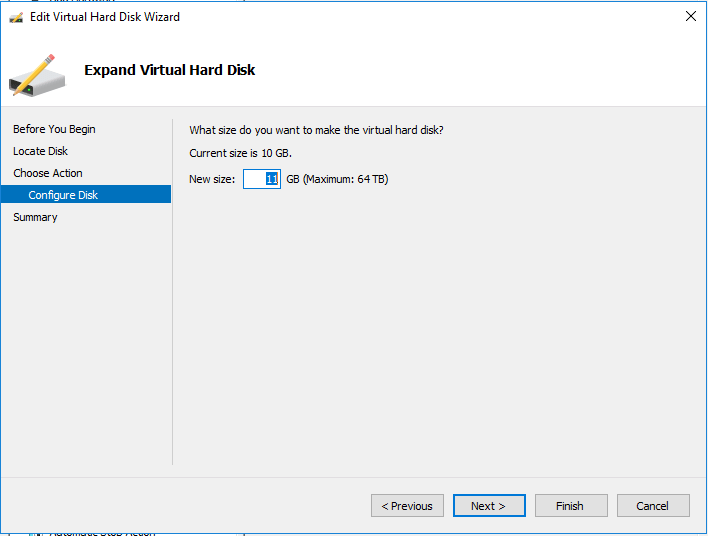
- Go to settings on a VM which has the shared VHDX select the shared drive and click edit
- Click next on Locate Virtual hard disk page
- Choose Expand and click next
- Specify the new size in this page and click next
- On completing the edit virtual hard disk page,verify the changes and click finish
- Now go to the disk management on the VM and expand the volume to add the additional space to the shared drive
Conclusion
Starting with Windows Server 2012 R2, you can create a Hyper-V guest failover cluster that is not tied to your storage structure. A shared virtual hard disc, Fiber Channel, Server Message Block (SMB), Storage Spaces, or iSCSI storage solutions can be used to construct a guest failover cluster.
Using a shared virtual hard disk would be ideal for the following scenarios:
- SQL Server database files
- File server services running within a virtual machine
- Database files that reside on shared disks
BDRSuite is a one-stop solution for the Backup & DR needs of diverse IT environments that include VMware VMs, Hyper-V VMs, physical servers, and workstations – Windows, Linux, Mac, AWS EC2 instances, Microsoft 365 and Google Workspace.
BDRSuite for Hyper-V
BDRSuite for Hyper-V is a Secure, Scalable, and Reliable Backup & DR solution for Microsoft Hyper-V VMs. With BDRSuite for Hyper-V, you can back up all the virtual machines in your Hyper-V servers without installing an agent on each VM.
BDRsuite for Hyper-V – Feature Highlights
- Agentless VM Backup & Replication for Hyper-V Standalone Hosts and Cluster Servers
- Ensure RPO, RTO < 15 minutes
- Backup copy feature to store data both on-premise and cloud
- Application-aware backups with Log Truncation
- Resilient Change Tracking (RCT) based incremental backups
- Instant Boot VM with Live Migration
- Instant file & application-item level recovery
- Instantly restore individual files and folders without restoring the entire VMs
- Granularly restore the application items such as Microsoft Active Directory, SQL, Exchange, and SharePoint
- without restoring the complete image
- Supports Hyper-V Cluster, CSV, S2D and SMB share
- Automated Backup Verification to verify the recoverability of the backup
- Supports Cross-Hypervisor migration (V2V)
- VM replication to replicate your Hyper-V VMs from one host to another
- Centralized Monitoring tool and License Management portal
- Built-in AES 256-bit Encryption for backup data security
- Built-in Compression & Deduplication for efficient use of backup storage
- Offsite Replication for disaster recovery
These features allow extremely efficient and effective data protection for your Hyper-V environment.
With BDRSuite for Hyper-V, you can back up and protect Unlimited Hyper-V VMs. BDRSuite also offers BDRSuite for Hyper-V -Free edition. This free edition includes all product features for up to 10 VMs and limited features for the rest of the VMs.
To learn more about BDRSuite for Hyper-V click here
Download BDRSuite – Free Edition and try it for yourself. Experience modern data protection for your environment.
You can also follow and share our Hyper-V series for Beginners below:
Beginners’ Guide for Microsoft Hyper-V: Overview of Hyper-V Part 1
Beginners’ Guide for Microsoft Hyper-V: How to Install Microsoft Hyper-V Using Server Manager – Part 2
Beginners’ Guide for Microsoft Hyper-V: How to Install Microsoft Hyper-V with PowerShell – Part 3
Beginners Guide for Microsoft Hyper-V: How to Install Microsoft Hyper-V in Windows Server Core – Part 4
Beginners Guide for Microsoft Hyper-V: Remote Management of Hyper-V – Part 5
Beginners Guide for Microsoft Hyper-V: How to Install Hyper-V Server – Part 6
Beginner’s Guide for Microsoft Hyper-V: What is Azure Stack HCI – Part 7
Beginner’s Guide for Microsoft Hyper-V: Windows Admin Center Hyper-V Management – Part 8
Beginner’s Guide for Microsoft Hyper-V: Configuration of Hyper-V Networking Best Practices – Part 9
Beginner’s Guide for Microsoft Hyper-V: Hyper-V Storage Best Practices and Configuration – Part 10
Beginner’s Guide for Microsoft Hyper-V: How to build a Virtual Lab with Hyper-V – Part 11
Follow our Twitter and Facebook feeds for new releases, updates, insightful posts and more.