
Table of Contents
- How to convert VMware to Hyper-V
- Convert VMware to Hyper-V using Microsoft Virtual Machine Converter (MVMC)
- How to install Microsoft Virtual Machine Converter
- Our conversion scenario
- Starting the conversion
- Conversion Destination
- Conversion Source
- Conclusion
Companies are always looking to move their systems to a more stable and, typically to a Virtual Environments that license is less costly. Hyper-V at this point is receiving more customers since it is stable and getting much better as a Hypervisor, and mainly because of license cost. Since nowadays Hyper-V is a more stable environment companies are now deciding, that is safe and worthy to move to Hyper-V.
As we have discussed in a previous blog post about Top Hyper-V Features Explained
With the customers increasingly moving from VMware environment to Hyper-V, planning that move is very important. Mainly how to convert those VMware Virtual Machines to a different hypervisor.
In this blog, I will show an example of how to move Virtual Machines from a VMware environment to a Hyper-V environment.
How to convert VMware to Hyper-V
To perform Virtual-to-Virtual (V2V) migration or even a Physical-to-Virtual (P2V) migration you need a converter tool. Alternatively, if you are converting V2V, you can export and import VM using an OVF file from a different Hypervisor to Hyper-V.

There are many conversion tools on the market. If you google you would find many tools that can migrate from different Hypervisor to Hyper-V, but for this article, we will use proper Microsoft tools and processes.
For this article, we will discuss three conversions examples that we will divide into three parts:
- Part I : Convert using Microsoft Virtual Machine Converter (MVMC)
Convert VMware to Hyper-V using Microsoft Virtual Machine Converter (MVMC)
In this first part, we will discuss how to convert a VMware virtual machine as a Hyper-V virtual machine using Microsoft Virtual Machine Converter.
Regarding MVMC, Microsoft had decided to remove this tool (EOL was June 2017) and was supposed to be available only through System Center. However, after many customers complain about this decision, Microsoft decided to continue to deliver the tool-free as a stand-alone tool but supporting only while using and included in the Microsoft System Center.
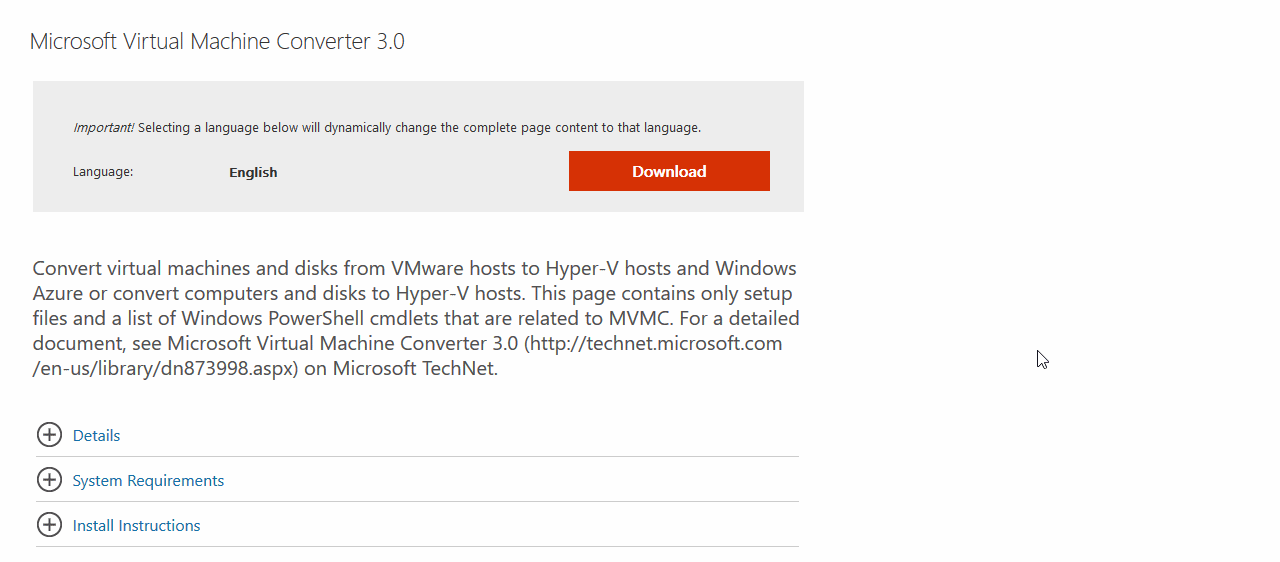
The free tool MVMC can be downloaded from the Microsoft site HERE.
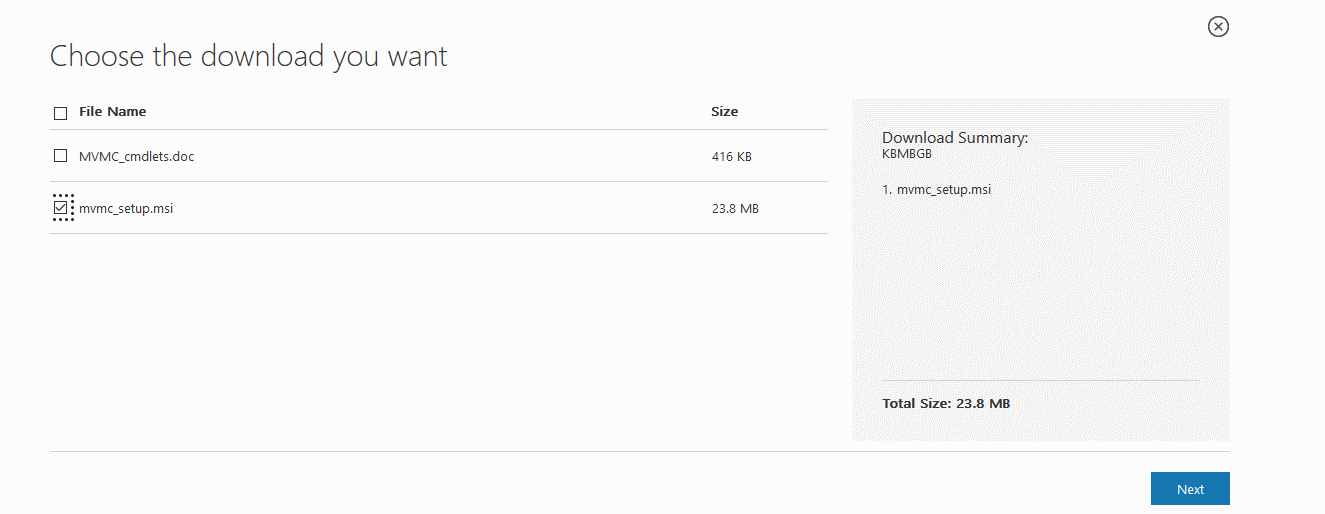
With the converter tool download, you can also download the document MVMC_cmdlets.doc. As the name says, is a document with the commands on how to perform all conversion tasks using Powershell commands without the need to use the conversion GUI tool.
These are the requirement to install this tool and supported Operations Systems:
Supported Operating System
Windows Server 2008 R2 SP1, Windows Server 2012, Windows Server 2012 R2
- Before you install Microsoft Virtual Machine Converter (MVMC), you must install the following software on the computer on which you want to run MVMC:
- Windows Server 2012 R2, Windows Server 2012, or Windows Server 2008 R2 SP1 operating systems
- Microsoft .NET Framework 3.5 and .NET Framework 4 if you install MVMC on Windows Server 2008 R2 SP1
- Microsoft .NET Framework 4.5 if you install MVMC on Windows Server 2012 or Windows 8
Note: Although MVMC installs on all of these versions, using the Windows PowerShell cmdlets that are released as part of MVMC requires Windows PowerShell Runtime 3.0, and the cmdlets function only on Windows Server 2012 R2, Windows Server 2012, Windows 8.1, or Windows 8 - Install Feature Bits Compact server
- Visual C++ Redistributable for Visual Studio 2012 Update 1
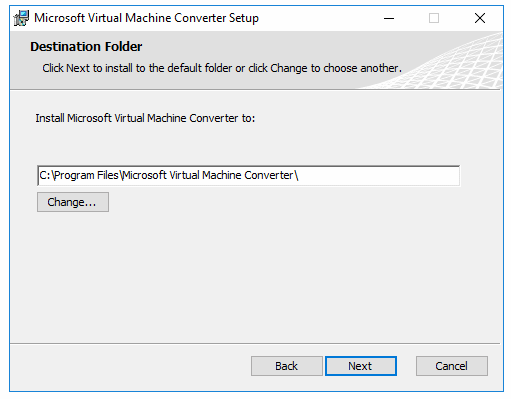
How to install Microsoft Virtual Machine Converter
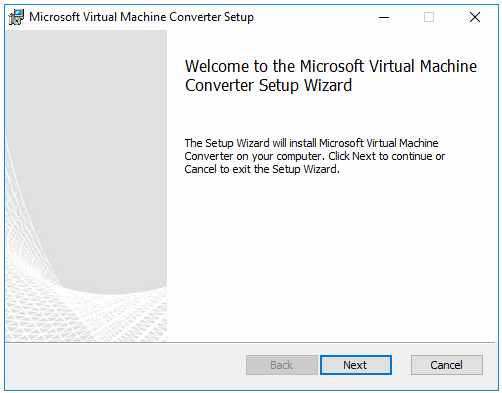
The installation of MVMC is very straightforward. Install the stand-alone MVMC in a workstation or server that has access to both source and destination.
Important: Keep in mind that the location of MVMC should have enough disk space for temporary files from the conversion. Disk space size is the same size as the Source Virtual Machines Virtual Disks.
Preventing network stress during conversion, the use of local disk is recommended to store conversion temp files.
Note: It is recommended not to install the tool in the source or at the destination. So if possible, always use a different location to install MVMC.
Start running the file downloaded from Microsoft site: mvmc_setup.msi
MVMC is installed and ready to start the conversion process.
Before starting the process some considerations to bypass some issues that may block the conversion.
Firewall
If Hyper-V hosts have Windows firewall enabled, check if firewall rules (particularly in Hyper-V destination) are set to allow the converter to migrate the VM into the Hyper-V.
If not, use this Powershell commands to add a rule to your Hyper-V:
New-NetFirewallRule -DisplayName “HyperV-Setup” -Direction Inbound -Action Allow -EdgeTraversalPolicy Allow -Protocol TCP -LocalPort 139,445
Check if the rule was created:
Get-NetFirewallRule -DisplayName “HyperV-Setup” | Select DisplayName, Profile, Enabled, Direction, Action | Format-Table -AutoSize
If you want to remove the rule after the conversion is finish:
Remove-NetFirewallRule -DisplayName “HyperV-Setup”
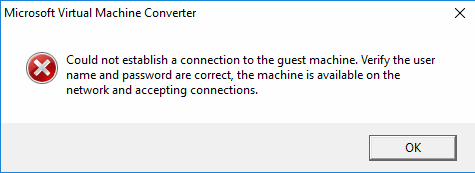
If the firewall is blocking the conversion, you could get something similar.
VMware Tools
Sometimes when doing a VM Hot migration and with VMware Tools is installed on the Virtual Machine, you may get same above error. So uninstall VMware Tools before the conversion.
In a Cold Migration, disable VMware Tools before power on Virtual Machine on the destination. This task can be done with PowerShell.
This command disables services, drivers, and programs associated with VMware Tools for the specified VHDX.
Example:
Disable-MvmcSourceVMTools -DestinationLiteralPath “Hyperpathfolder\VHD\VirtualMachineName.vhdx”
For one of our example was:
Disable-MvmcSourceVMTools -DestinationLiteralPath “C:\ClusterStorage|E:\Hyper-V\Virtual hard disks\SCCM Test – Win10.vhd”
Note: After Virtual Machine is Power on, you can safely uninstall VMware Tools.
Supported OS
If you try to convert a not supported System Operation, a similar warning is displayed.
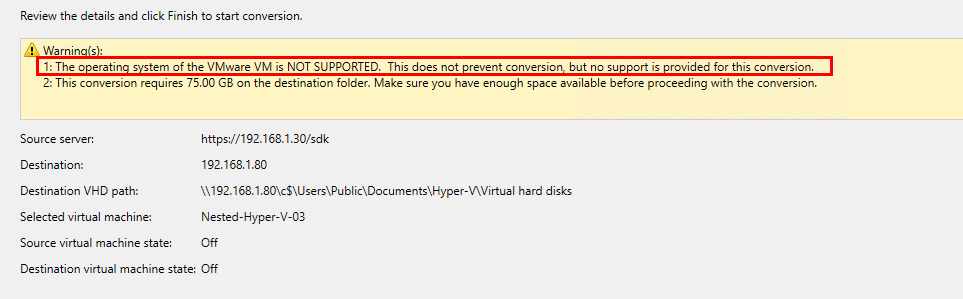
Even MVMC 3.0 tool doesn’t list Microsoft Server 2016 and Windows 10 in the supported Operations Systems; however, as a test for this article, we were able to convert those Operation Systems without any issues. However, be aware that Microsoft while using this tool does not support this. Mainly if converting critical servers from your environment.
Full information about this tool and supported systems can be found HERE.
When converting a Virtual Machine, or Physical Server, it can be done with OS power on (MVMC uses Volume Shadow Copy Service -VSS) called Hot migration, or power down called Cold Migration.
Note: If you are converting with the source Virtual Machine power on, do not forget to disable the power on after conversion option. Therefore, you do not have source and destination Virtual Machines power on in your network. MVMC will not uninstall VMware tools from Power off converted VMs. You need to uninstall after the conversion.
Our conversion scenario
VMware: vCenter v6.0 (with two ESXi hosts)
Hyper-V: Hyper-V Cluster (with three Windows 2016 Server)
Converting a Virtual Machine with Windows 7 installed.
Note: For this article and test purposes was also converted a Windows 2016 and a Windows 10.
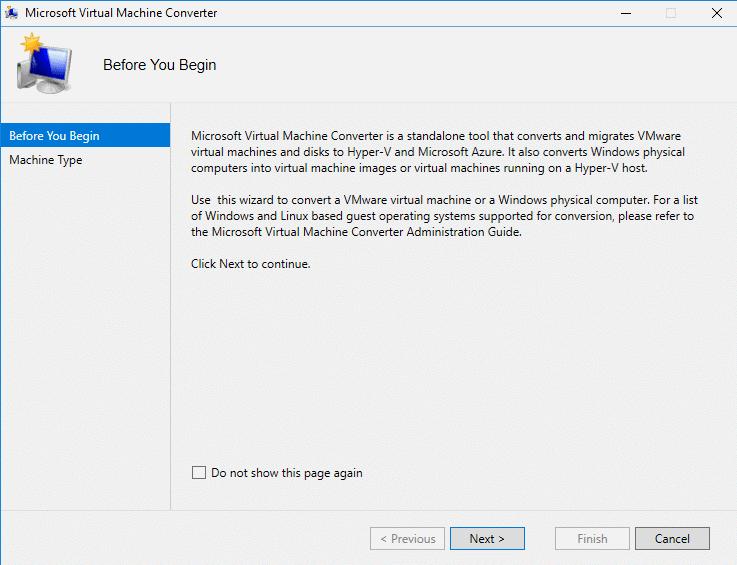
Starting the conversion
Start the Microsoft Virtual Machine
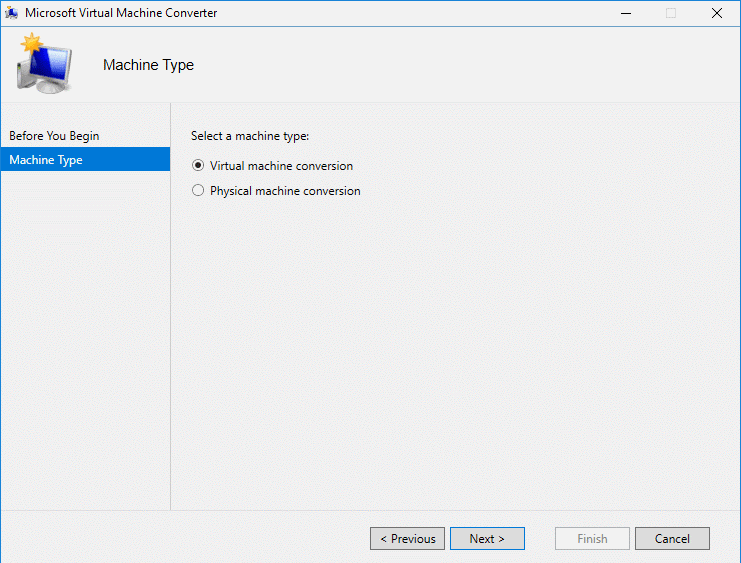
In this case, the process is a V2V. Select Virtual Machine Conversion option.
You have the option to convert your VM into a Microsoft Azure environment or to a Hyper-V.
This case is Migrate to Hyper-V option.
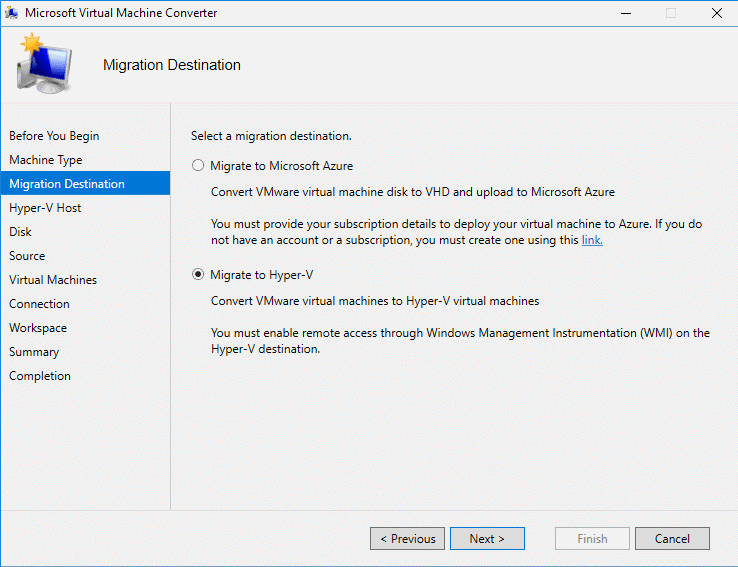
Note: Enable remote access through Windows Management Instrumentation (WMI) on the Hyper-V Server destination.

Conversion Destination
First, add the Hyper-V destination (FQDN or IP Address) for this Virtual Machine.
User name should be a local, or admin administrator on the destination Hyper-V.
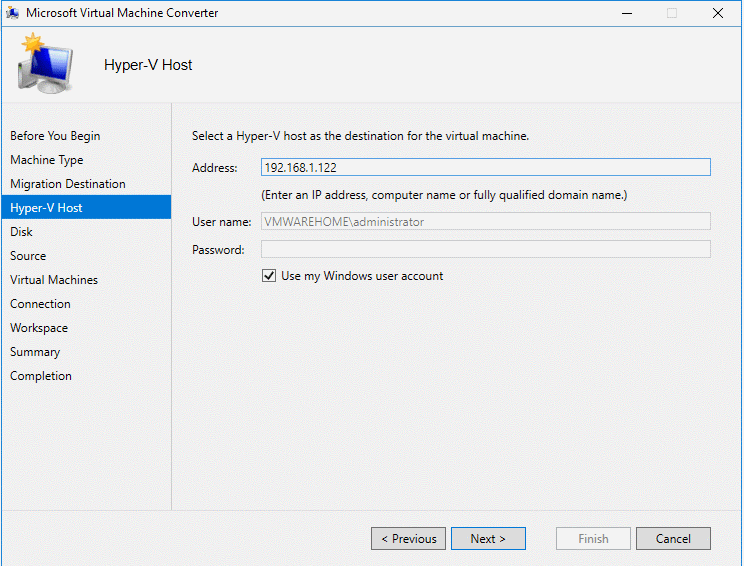
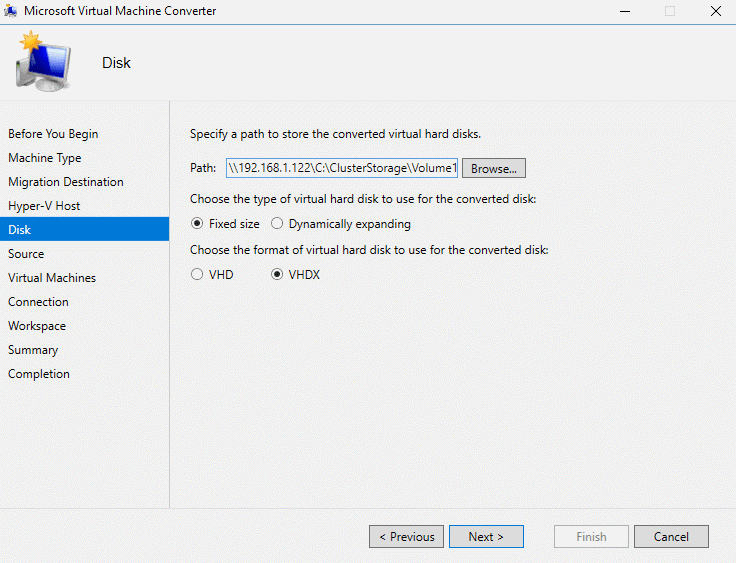
Next, you should add the destination path in the Hyper-V to store the converted Virtual Machine.
In this case, is a Hyper-V that is part of a Hyper-V cluster and the path is ClusterStorage:
\\192.168.1.122\C$\ClusterStorage\Volume1\Hyper-V\Virtual hard disks\Virtual Hard Disks
Note: To make sure MVMC location can access this shared pass, copy this into the File Explorer and make sure the folder is accessible from the conversion location.
For the type of Virtual Disk, you have the option to choose Fixed Size or Dynamically expanding. Meaning is a Thick Disk or a Thin Disk.
On the format of Virtual Disks, you should select the new version VHDX with more features.
Note: You can read more HERE in one of our articles about Hyper-V Best Practices and format disk types.
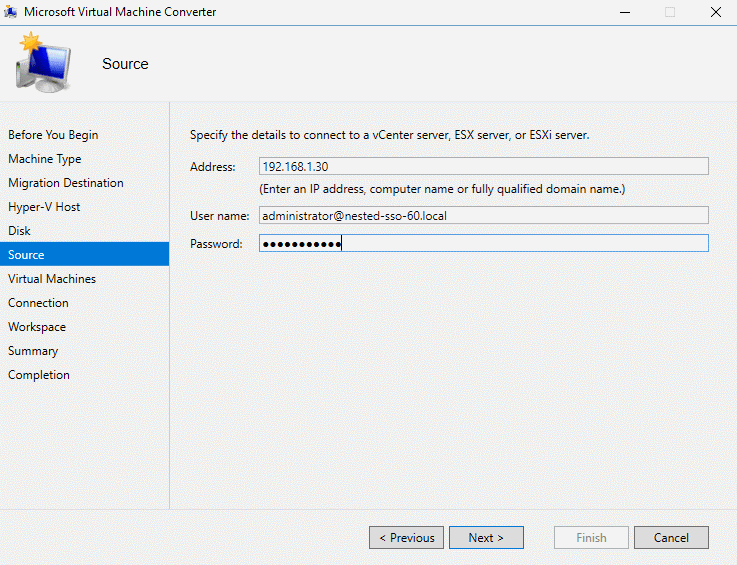
Conversion Source
The conversion source can be a vCenter or an ESXi host (FQDN or IP Address).
Again, user name should always be a local or a vCenter domain admin (root for ESXi hosts).
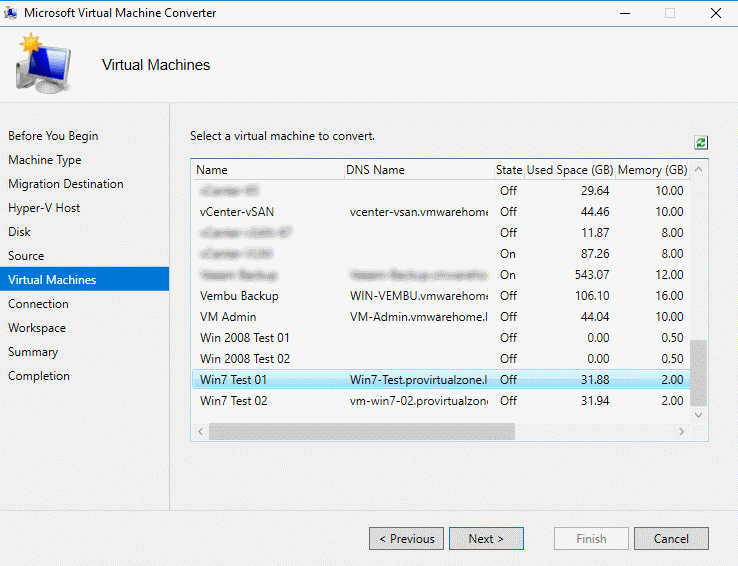
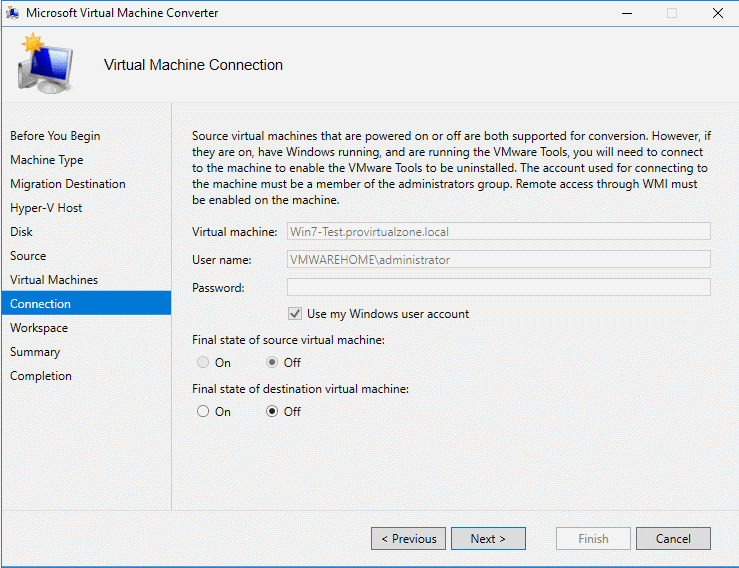
After entering the details and click next, MVMC automatically connects to our vCenter/ESXi host and display all VMs available. Now you can select the Virtual Machine for the conversion (for this example is the Win7 Test 01).
It is essential to be aware of the user permissions that is used in MVMC.
Used destination admin has permissions on the destination Hyper-V, but could not have in the Virtual Machine Guest OS.
In a Hot Migration, you need to add a local/domain admin for the VM Guest OS Domain (not the domain of your Hyper-V. Can be different). If is in the same AD Domain then you can enable “Use my Windows user account.”. Only needed if is a Hot Migration, Cold Migration don’t need access to Guest OS.
Power on, Power off destination and source always depends on the type of Conversion (Hot or Cold).
This example is a Cold Migration, so both options are off.
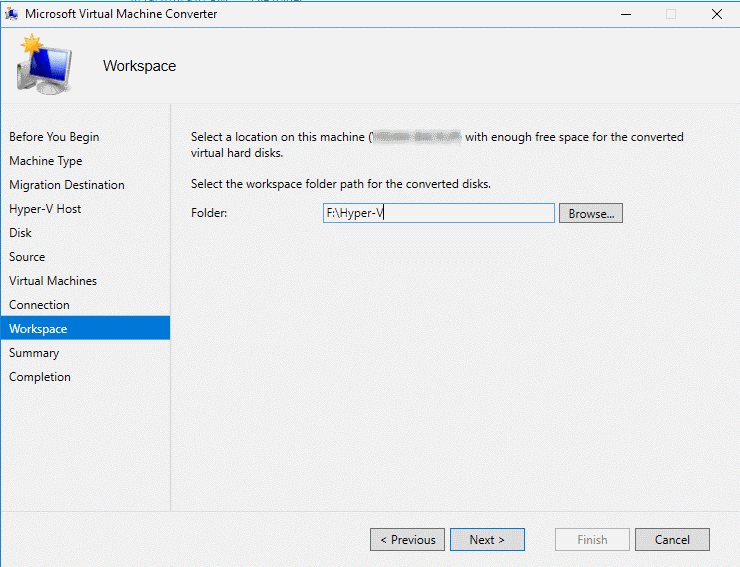
In the next option, add the folder where the converted files should be stored temporarily.
Note: For a better, performance this should be a local folder on local disk.
Then the conversion process starts.
The time of this process, it depends on the size of the Virtual Machine that we are converting, but also on your infrastructure. For this example, for a 30Gb, it took 3h (this is a mix of a nested and physical-virtual environment).
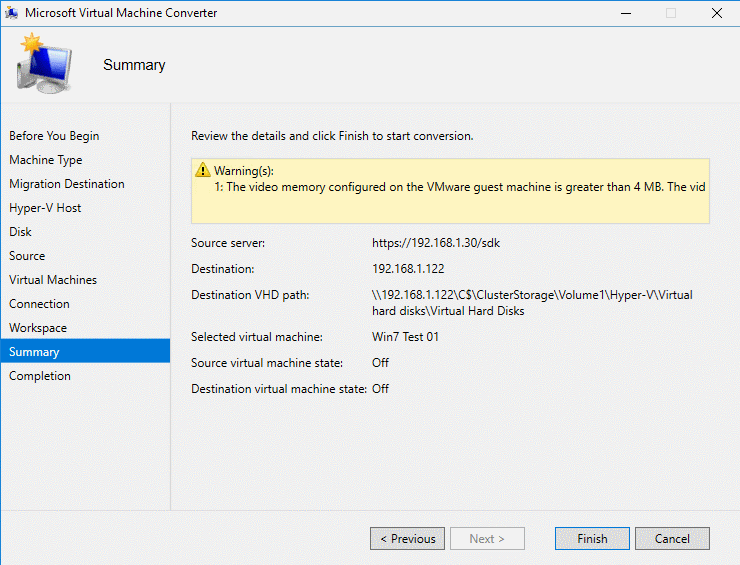
You could get a final warning regarding Virtual Machine video memory, you can ignore this warning and click “Finish” to start the conversion process.
Note: If video memory is essential in the converted Virtual Machine, then you need to fix it, by changing in the Hyper-V converted Virtual Machine.
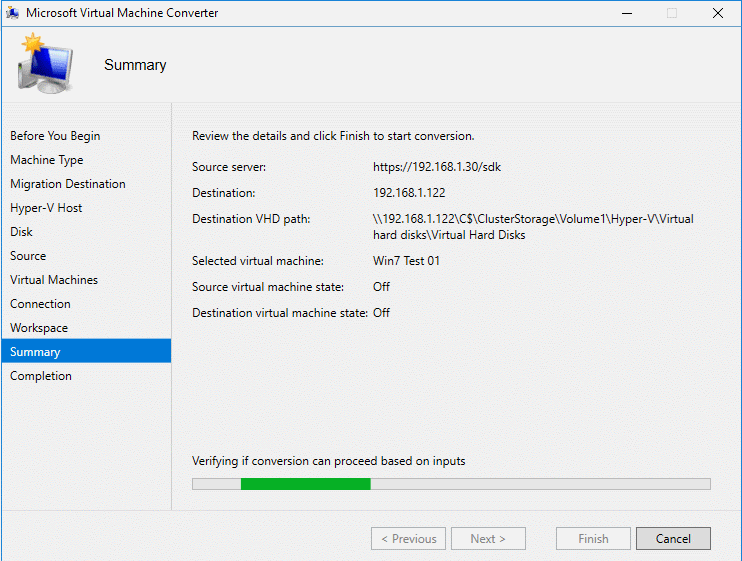
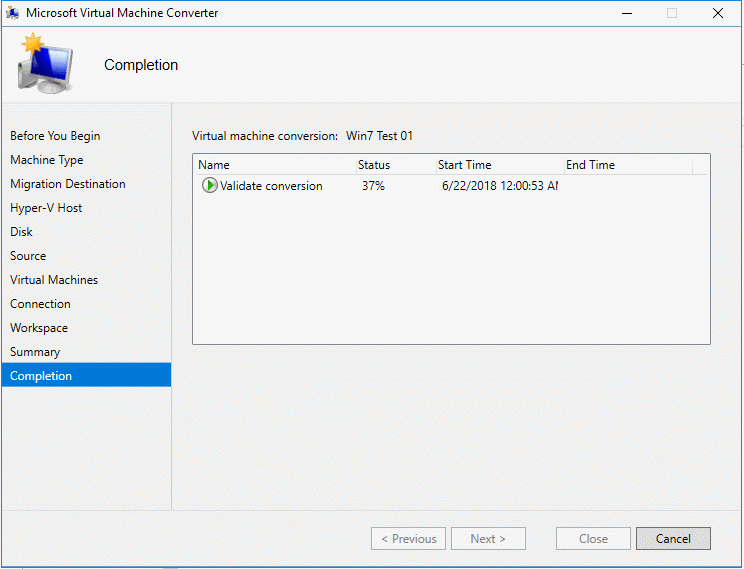
After you have finished all conversion details from source and destination, the process starts
The conversion process is done in four steps:
- Validate Conversion (validation of all source and destination details)
- Converting Disks (converting vmdk disks to vhdx disks in the temporary folder)
- Analyze Disks (analyzing converted disks and looking for any errors)
- Copy Disks (copy Virtual Disks into destination Hyper-V folder)
- Provision Hyper-V Guest (create Virtual Machine in your Hyper-V destination)
After the conversion is finished, you get the report for each task in the conversion.
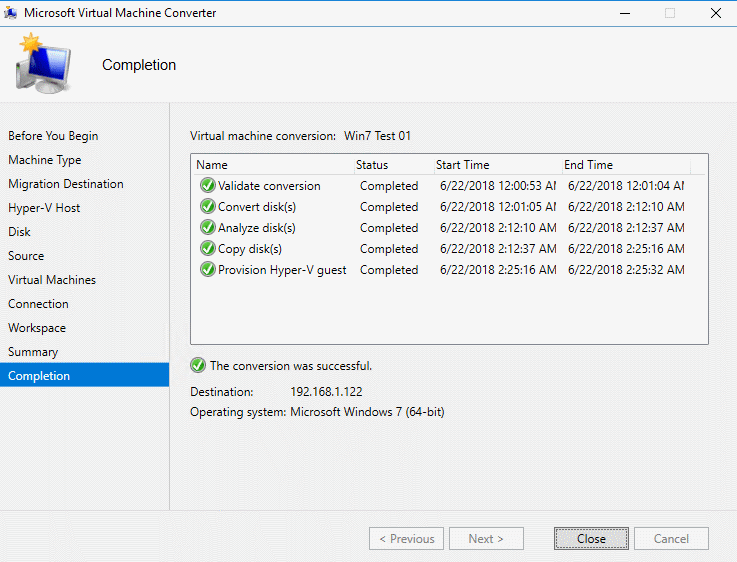
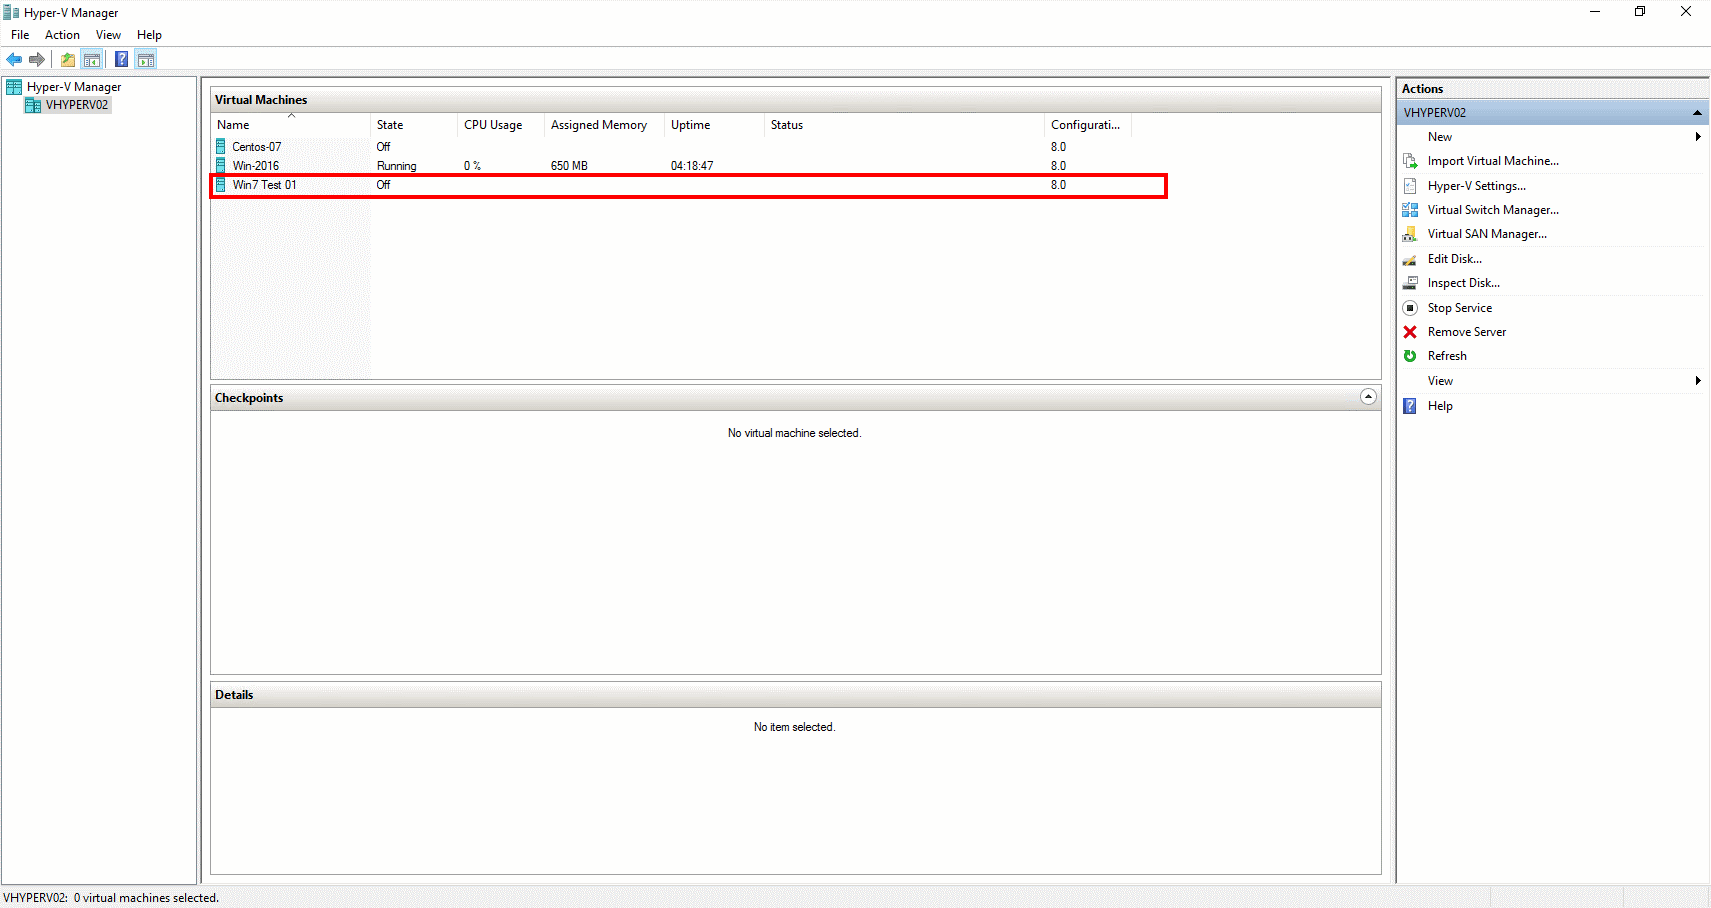
After conversion, you can now check your new converted VM in your Hyper-V.
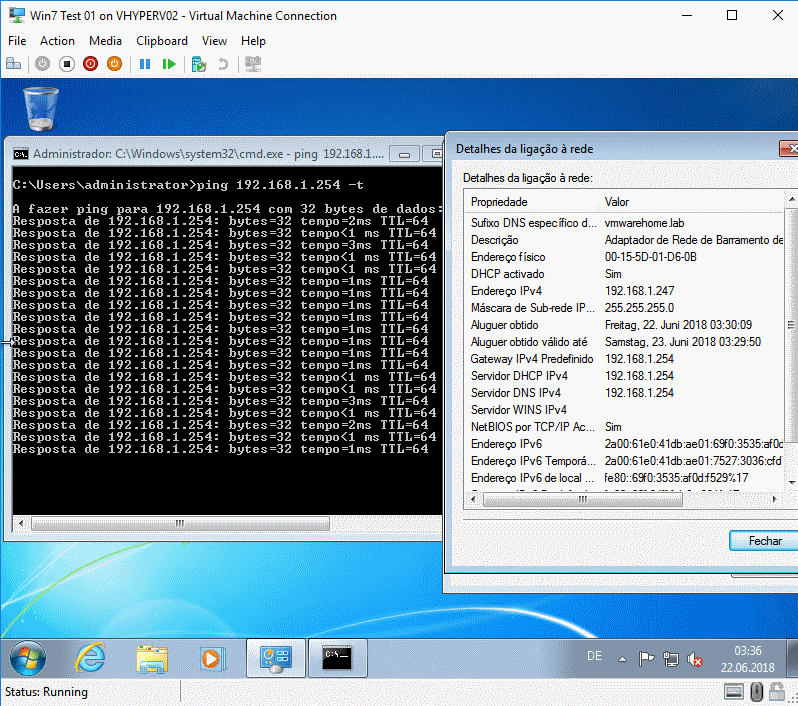
After disabling the VMware Tools start the Virtual Machine.
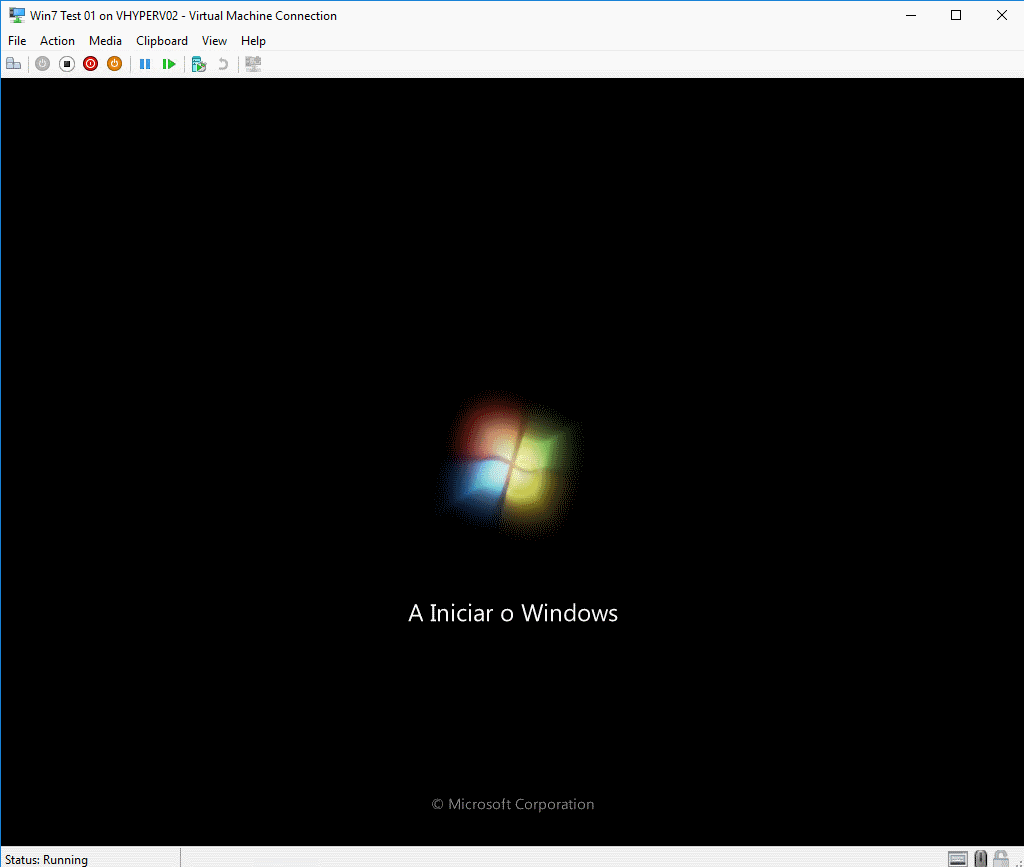
Since now the converted Virtual Machine is running in a different Network and Hypervisor, you need to enable the network and add to the proper network in your Hyper-V Network environment.
Edit your new converted Virtual Machine and in the Network section, select the proper network adapter.
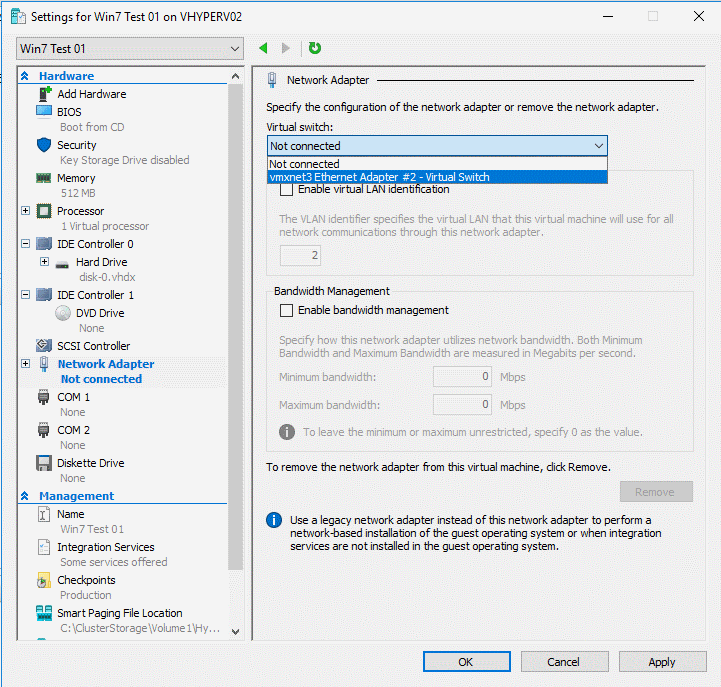
After adding the proper network adapter into the Virtual Machine, we have a network and a fully working Guest OS.
Conclusion
Microsoft Virtual Machine Converter is an old tool (and outdated) from Microsoft for Hyper-V but is still very useful for isolated conversion(physical or virtual). Like we have stated in the article, even Microsoft doesn’t support the latest Windows Versions, is possible to convert a Windows 2016 or Windows 10 VM without any issues.
Also is recommended (not mandatory) to install MVMC in a third server (not source or destination) and use the internal network for the conversion.
Also, is recommended (not mandatory) store convert temp files in local disks where MVMC is installed. Try to avoid network shares. However, always check if you have free space in your local temp converter folder to store temporary files for the conversion.
Disable on destination or pre-uninstall on source VMware Tools from the Virtual Machine that is to be converted.
Now that we have seen the process of converting VMware VM to Hyper-V using Microsoft Virtual Machine Converter (MVMC), we will see using System Center 20160 – Virtual Machine Manager (VMM) in the part 2 of this series.
Follow our Twitter and Facebook feeds for new releases, updates, insightful posts and more.