
Table of Contents
- What is GSuite Data Migration Service?
- What GSuite editions supported the Data Migration service?
- Prerequisites and considerations
- Configuring Data Migration service
- Additional migration settings
- How to add the Application Impersonation role to an Exchange admin in Office 365?
- Calendar Migration
- Conclusion
- Download Backup for G Suite and Protect your G Suite data now!
What is GSuite Data Migration Service?
GSuite offers the Data Migration Service that helps you easily import your data over to your G Suite account from Microsoft Exchange and other legacy environments. The data migration service is a free product offered by Google that helps you migrate email, calendar, or contact data from other platforms. G Suite administrators can use the Google Admin console to migrate this data to G Suite.
Administrators don’t need to install any applications on any of the machines, they can directly use the GSuite Admin console and control data migration from the console itself. GSuite will connect the source server or platform directly using the source server credentials and migrate your data, mail, calendars, and contacts automatically. It is a fairly, straightforward, and simple migration process.
What GSuite editions supported the Data Migration service?
The data migration service supports GSuite Essentials and G Suite Enterprise, Business, Basic, Education, and Nonprofits accounts. If you have G Suite Essentials, you can only migrate contacts. You can’t migrate email or calendar data.
The data migration service migrates content for a maximum of 100 users at a time, and you can initiate another migration process for additional users. So you can use this migration process in batches, based on your no of users to migrate.

Prerequisites and considerations
Migration occurs from a single source or a server at a time. Meaning you can’t perform data migration from two different platforms to a GSuite subscription at a time.
In a single migration from an Exchange source, you can migrate email, calendar, or contact data, but you can’t migrate 2 or more of them at the same time. Migrate them individually in a separate migration process.
Before migrating the data, your destination user under the new domain must exist. GSuite will not create users during the migration. The data migration service only transfers the data across the users during the migration.
The data migration service requires your source environment to have a TLS certificate. A third-party root certificate authority must sign and trust the certificate. If your email server has a self-signed certificate, you cannot use the data migration service, and hence you need to purchase and install the certificate before migrating data.
If you’re migrating from Exchange or Exchange Online, you need to open the Exchange Web Services (EWS) ports on your source environment
If you’re migrating from Exchange, Exchange Online, or an IMAP server, you must set up a role account on the mail server you’re migrating from. You might also need to grant impersonation rights to allow you to use the permissions associated with another user’s Exchange account.
GSuite Migration Service has one limitation. It does not support migrating shared or public IMAP email folders.
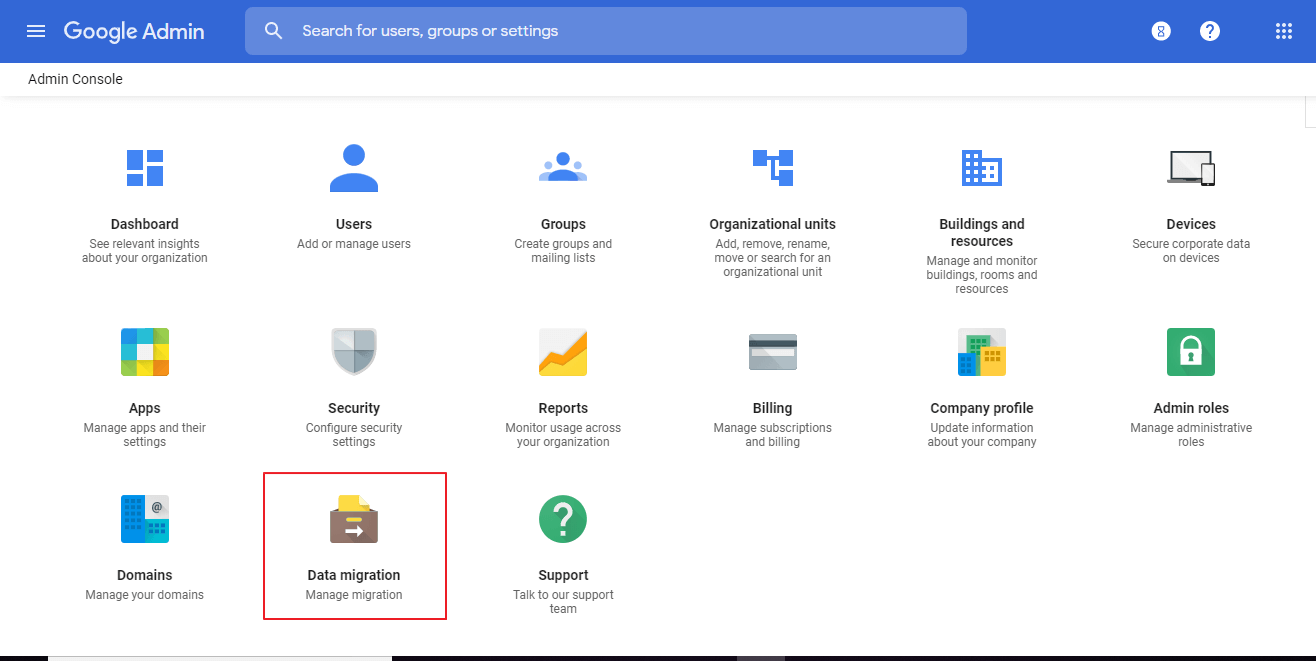
Configuring Data Migration service
Login to GSuite Admin console with an administrator account. Select Data Migration on the Admin console.
Click “SET DATA MIGRATION UP” to continue the migration process
This configuring data migration service consists of two steps
- Source Connection settings
- Additional Migration settings
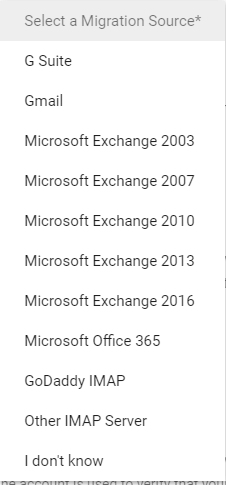
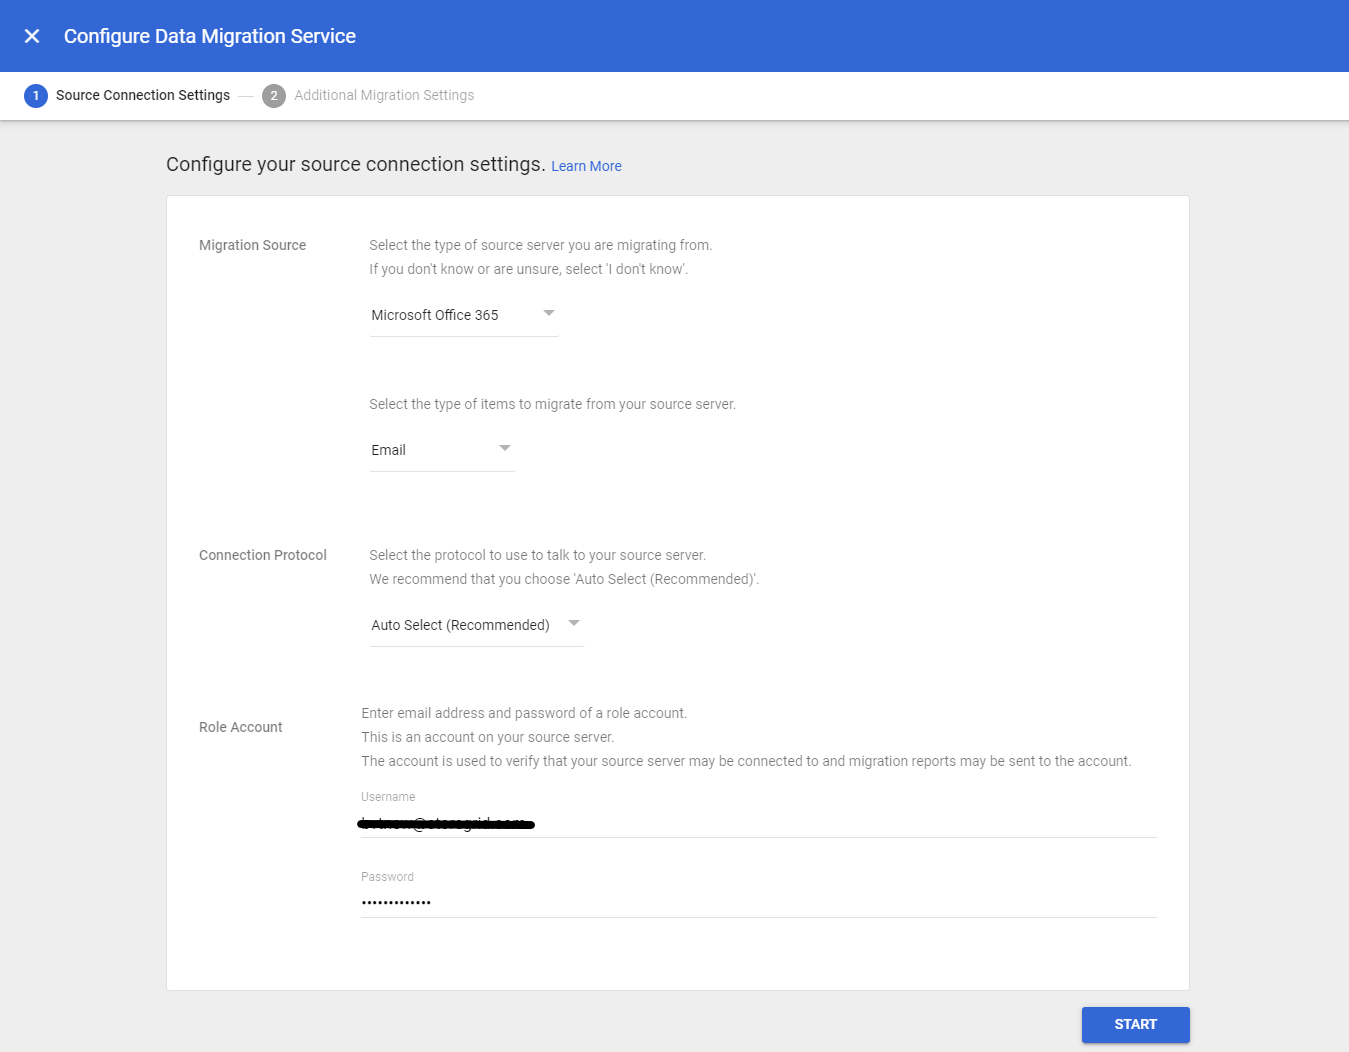
Configure your source connection settings.
Step 1:
You need to select the migration source. The available supported migration sources are given below in the picture. In our example, we are choosing Microsoft Office 365 as our source.
Step 2:
Select “Data Type” i.e. the items you are going to migrate from source user to the newly created GSuite user. Calendar, Contacts, and Email are available items for migration when Microsoft Office 365 is selected as a source environment. In our example, we are migrating Email data.
Step 3:
Connection Protocol, the protocol used to connect and talk to the connecting server. Available protocols for selection are IMAP, Exchange Web Services, and Auto Select. GSuite recommends Auto Select for this configuration.
Step 4:
Role account, provide an exchange admin role account username and password exist in the source Office 365 subscription and click Start to start the migration process.
On this stage, you will be notified if the connection is successful to the source server ( Here Office 365 cloud ).
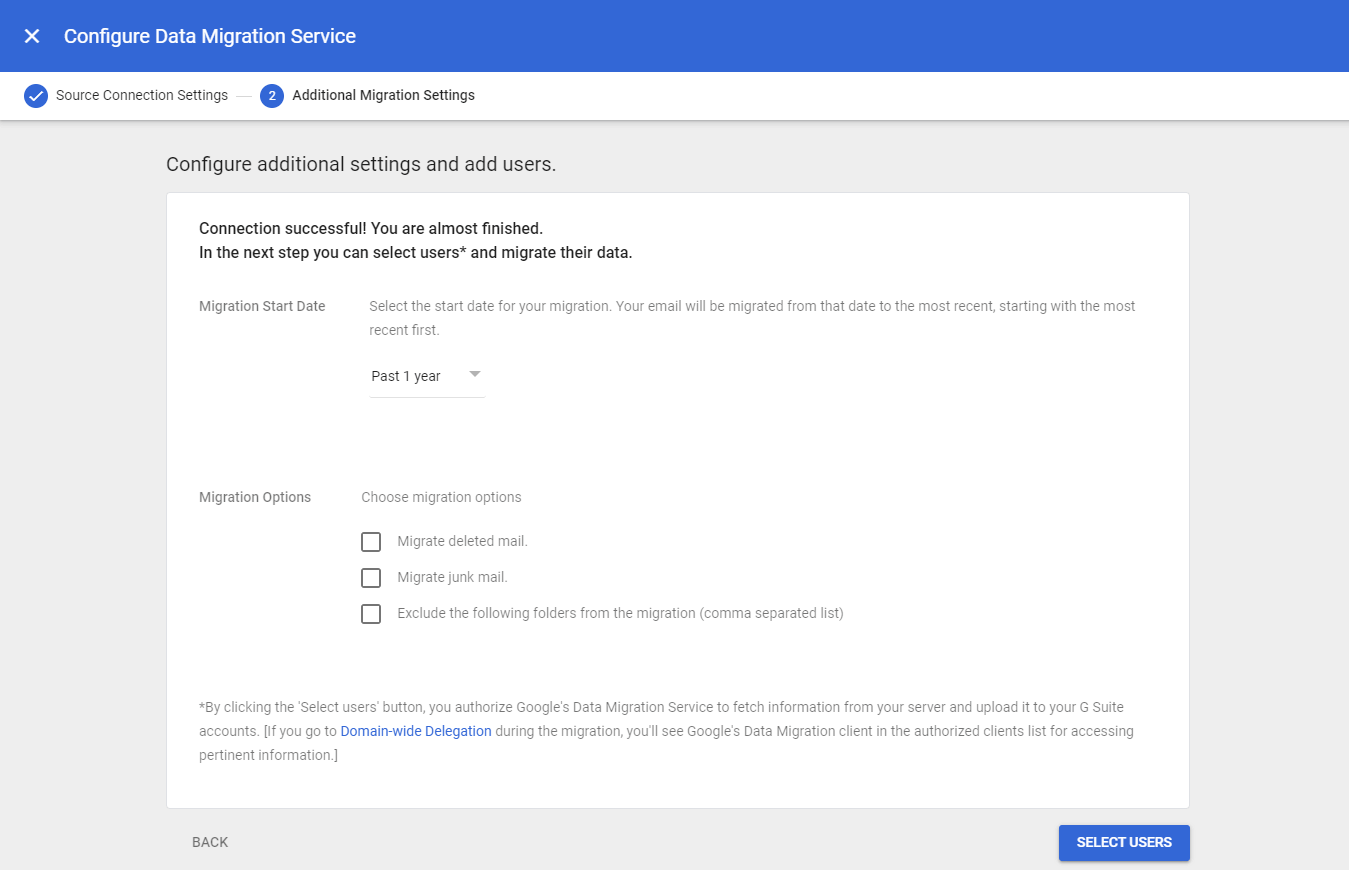
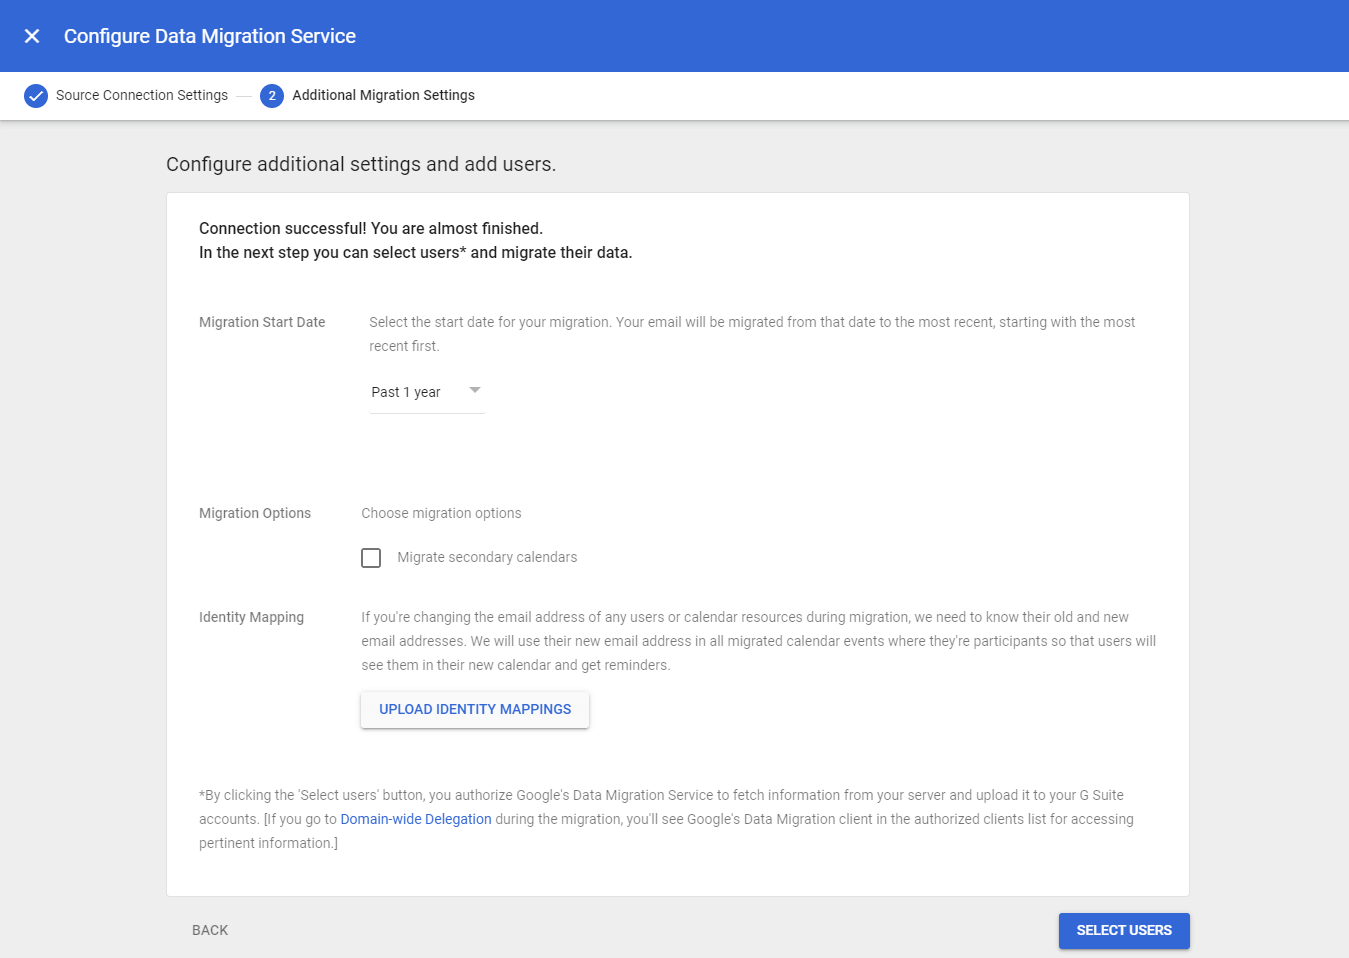
Additional migration settings
Here comes the second step, which will provide the migration start date, date from which the email content migration starts to the most recent date. All your emails will be migrated from that date to the most recent, starting with the most recent first. Here we are selecting the period “Past 1 year”
Additional Migration options, which you can enable if required. You can enable or discard
- Migrate Deleted email
- Migrate Junk email
- Exclude the following folders from the migration ( You need to provide the folder details in CSV format )
Finally, Click Select Users to continue the migration process
Here you can select a user or Bulk upload with a CSV ( for multiple users ). Here for an example, we are migrating a single user and hence providing source and destination GSuite email address for migration as below
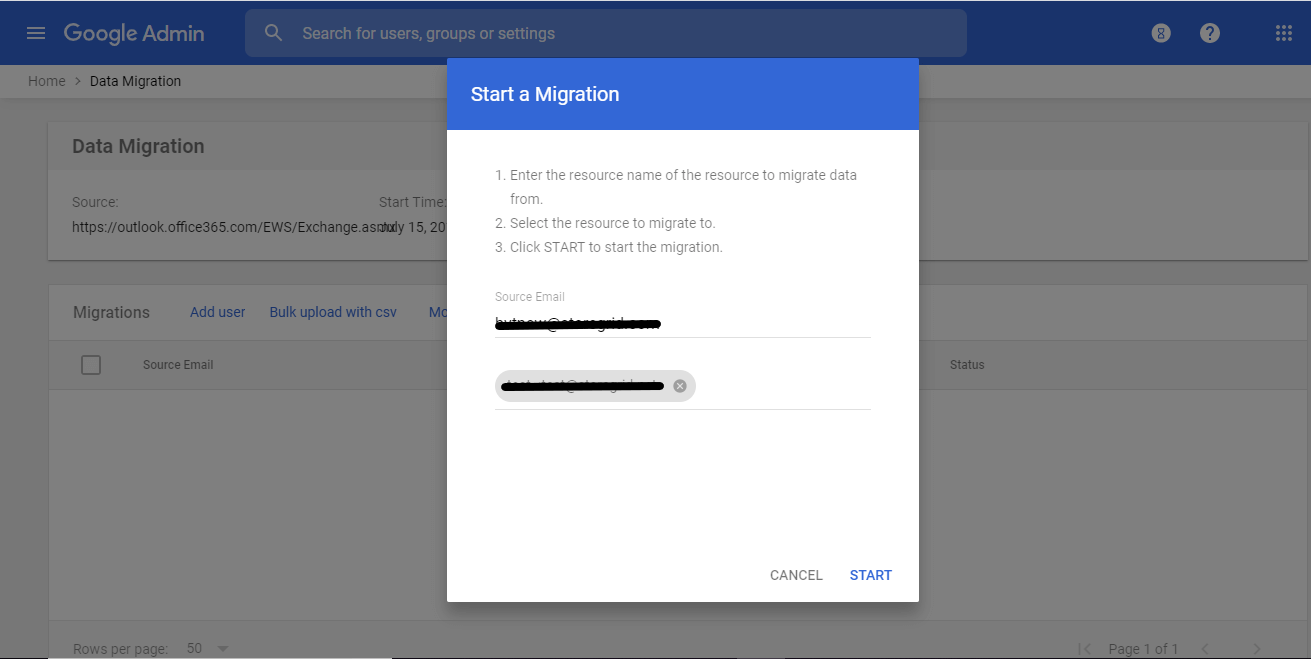
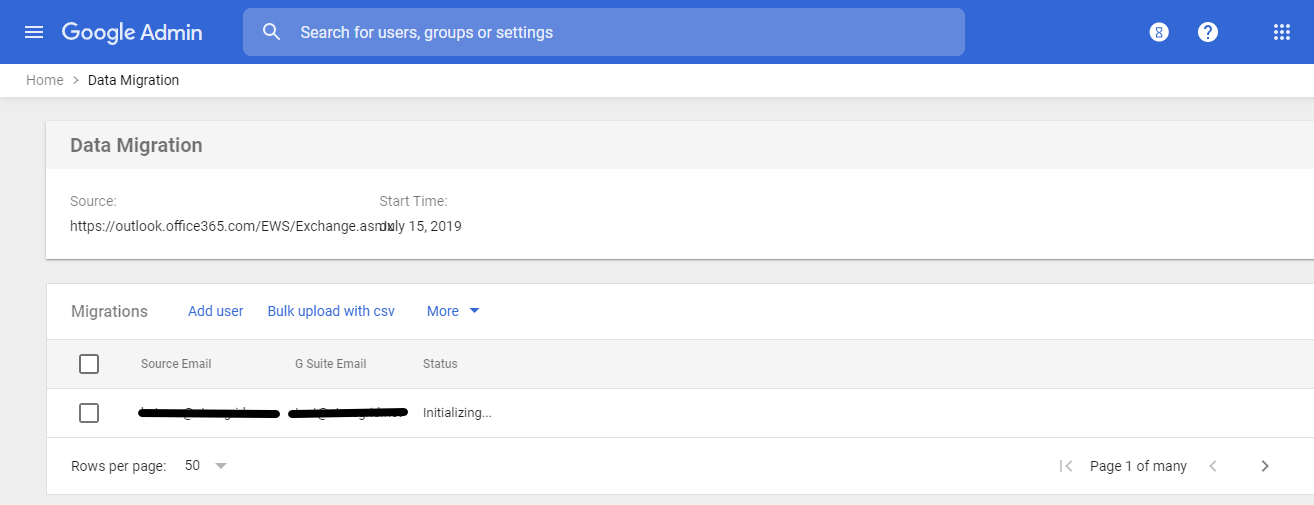
Click Start to migration, you will get an Initializing status
In most of the cases, You may get error messages as shown below in status during migration.
Error (Retrying)
Exchange Impersonation error. Unable to open the user mailbox due to impersonation error. Please make sure the impersonation is set properly. (11021)
The error message says the connecting user even if it is an Exchange admin role enabled user, the exchange admin should have been added to the ApplicationImpersonation role separately. This role enables applications to impersonate users in an Organization in order to perform tasks on behalf of the user.
How to add the Application Impersonation role to an Exchange admin in Office 365?
- Login to Exchange Admin portal
- Select Admin roles under Permissions
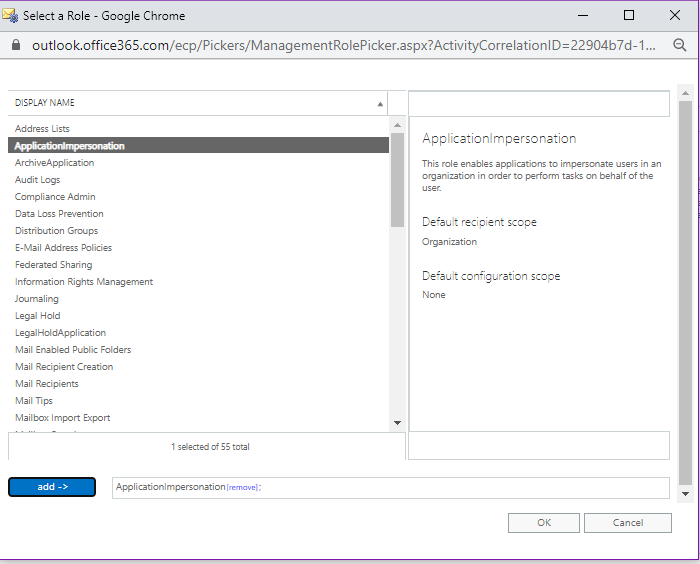
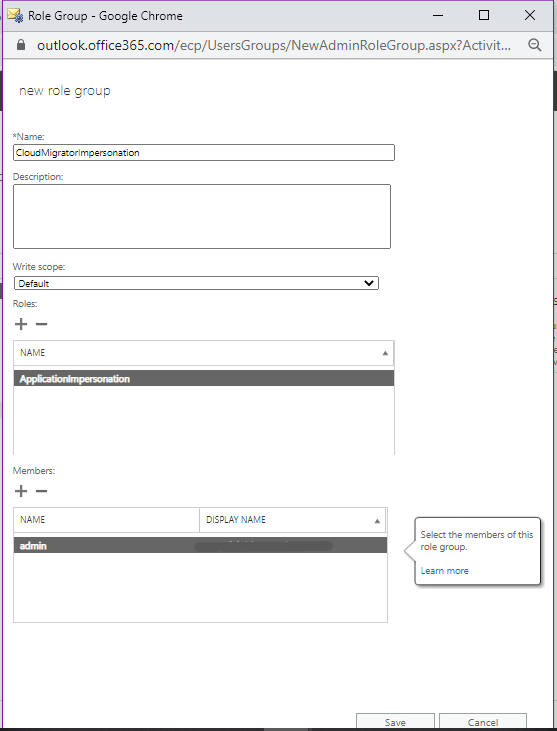
- Add a new role group, provide the name “CloudMigratorImpersonation” for the role group
- Click + sign for add a role and select ApplicationImpersonation as shown in the below screenshot
- Click OK to come to the main page, then click + sign under Members to add the user / Exchange admin to the ApplicationImpersonation role.
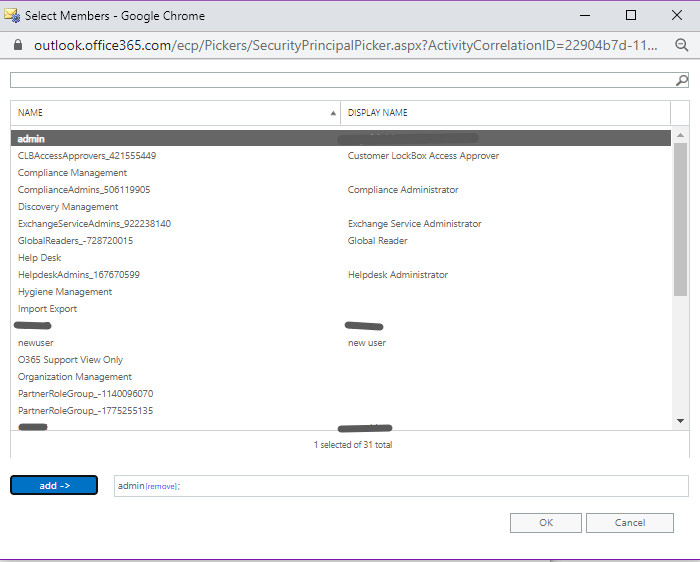
Click add, after selecting the user to which the ApplicationImpersonation role to be added, and click OK. Now verify the newly created role Group CloudMigrationimpersonation has the role ApplicationImpersonation role and admin user is added to the role group, after clicking Save button.
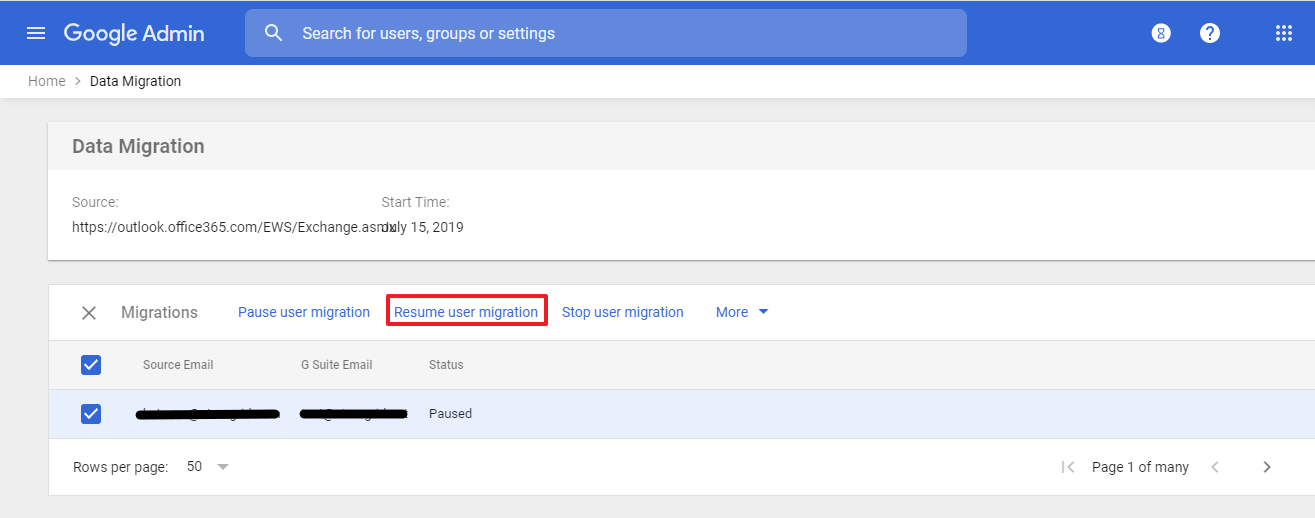
Now the Exchange admin has the ApplicationImpersonation role, so we are resuming the migration process again from the Data migration page in Google Admin console.
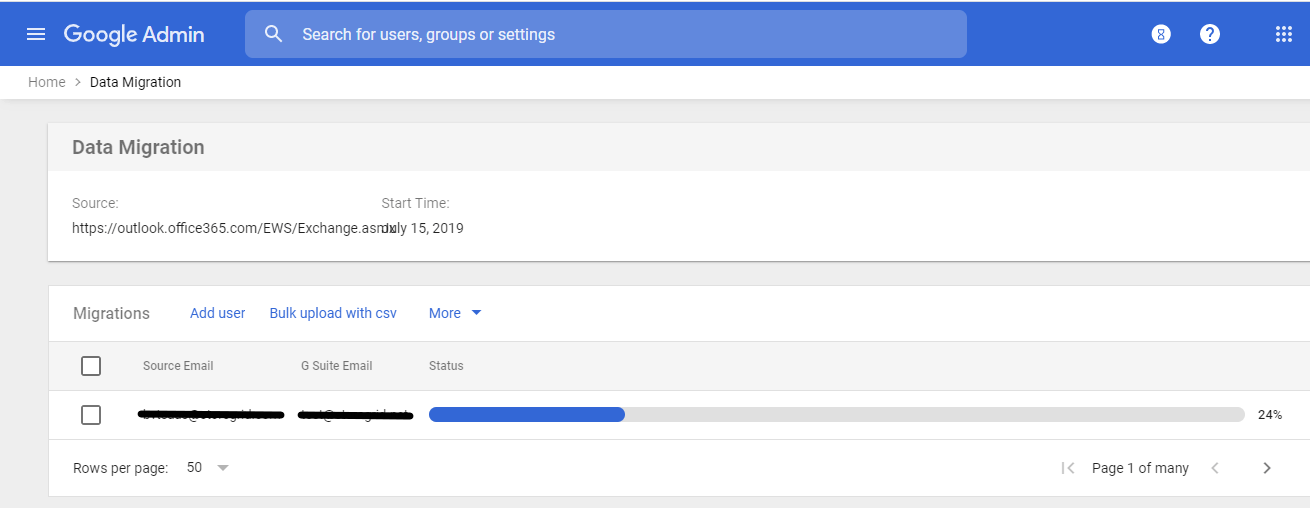
Once the migration starts, verify the status bar shows the percentage of migration completed. This migration process time depends on the volume of data ie mail content
Finally, you find the migration status as Complete. Verify all email contents are migrated into the destination user properly. You can also download an error report for the migration process completed. In this way, you can schedule a migration for each Data type – Email, Contact, and Calendar for all users. For bulk users migration, create a CSV file for source and destination users details and upload.
You can migrate multiple entities at once by uploading a CSV file with no headers.
Use the following format:
< G Suite Email >, < Source Email >
Note: The source email address is only needed if it is different from the G Suite email address.
Calendar Migration
In calendar migration, the same settings will be followed, and on the second step Additional migration settings, migration options differ and you can choose or discard the migrating secondary calendar for all users. Additionally, you will be asked to upload an Identity mapping CSV file if you’re changing the email address of any users or calendar resources during migration, Google data migration service needs to know their old and new email addresses. Google data migration service will use their new email address in all migrated calendar events where they’re participants so that users will see them in their new calendar and get reminders.
Conclusion
In this blog, we have explained the GSuite Data migration service and provided steps for a Microsoft office 365 email box migrating to GSuite mailbox. It’s pretty easy and straightforward to do the migration from other environments. But GSuite Data migration service has limitations and disadvantages. This free GSuite Data migration service will be helpful for less than 100 users. But Google recommends using GSMME ( GSuite Migration for Microsoft Exchange ) or GSuite Migrate Beta if you are migrating 100+ or 1000+ users.
Download Backup for G Suite and Protect your G Suite data now!
Google Workspace data now!
Download the full-featured 30-day free trial of our latest version BDRSuite Backup for G Suite and experience modern data protection for your G Suite environment.
- Backup your Mails, Contacts, Calendars, and Drive items
- Recover data anywhere and anytime
- Restore domain or user-level data
- Store your data on-premise or in Vembu Cloud
Follow our Twitter and Facebook feeds for new releases, updates, insightful posts and more.