
Introduction
As we have mentioned in previous blog posts in the Hyper-V beginner series, one of the best ways to learn Hyper-V is to get your hands on the hypervisor. Therefore, creating a Hyper-V lab is a great way to gain experience with Hyper-V. So, what is the best way to create a Hyper-V lab? What factors should be considered when creating a lab environment regarding hardware and software? Let’s look at creating a Hyper-V lab for beginners, covering these questions and more.
Table of Contents
- Why create a Hyper-V lab?
- Physical or virtual?
- What is nested virtualization?
- Hardware considerations
- License considerations
- Wrapping Up
Why create a Hyper-V lab?
Creating a lab environment when learning any technology is one of the best ways to learn the service, application, or other solution. Hyper-V is no exception and is a great candidate to get into a lab environment to gain experience with the platform.
When you build your own lab environment, you must perform the same tasks as in a production environment, including installing the hypervisor and configuring the networking, storage, virtual machines, and other configurations. By installing, configuring, and managing a Hyper-V lab server, you will often encounter many of the same issues, challenges, and necessary troubleshooting required in production data centers running critical workloads on top of Hyper-V.
Performing these tasks and various workflows provides valuable hands-on experience when working in production environments in the enterprise data center. The added benefit of creating a lab environment for learning is you can do things in a lab that wouldn’t be possible in production. Breaking things on purpose for learning is a great way to “see what happens” when enabling certain configuration settings, etc.

Playing around with settings on your Hyper-V host is not something you would do on a production server. However, a lab environment affords this opportunity. Lab environments can be configured, torn down, and rebuilt again, testing various configurations and use cases for learning purposes.
Physical or virtual?
One of the advantages of creating a lab environment today is there are many ways you can do this effectively with minimal hardware and by using virtual machines. Yes, you can create a Hyper-V lab with virtual machines acting as Hyper-V hosts. Arguably, this is the easiest and most effective way to create a Hyper-V lab environment.
It allows taking advantage of the features and capabilities of virtual machines, such as snapshots for your Hyper-V hosts running inside virtual machines, such as snapshots. When running Hyper-V hosts as virtual machines, taking snapshots on the Hyper-V host VMs provides an easy way to roll back to a known good state if you want to try different things, configurations, etc.
Building out a Hyper-V lab inside virtual machines uses something called nested virtualization to accomplish. So what is nested virtualization, and what do you need to get started?
What is nested virtualization?
Nested virtualization is essentially running a hypervisor inside another hypervisor. It means you have a hypervisor running inside a virtual machine. Nested virtualization means you can run a virtual machine nested inside the hypervisor running inside a VM. The VM running inside the nested hypervisor doesn’t know it is nested.
The main requirement for running nested virtualization is to have a CPU with physical hardware virtualization built into the CPU, specifically Intel VT or AMD-V. Hypervisors that allow running VMs with nested virtualization can pass through the hardware virtualization capabilities directly to the VM, allowing the VM to take advantage of the virtualization capabilities built into the CPU, making nested virtualization possible.
What hypervisors allow nested virtualization? Hyper-V itself allows you to run nested virtualization. So, if you have Hyper-V running on a physical host, you can enable nested virtualization and run additional Hyper-V hosts inside VMs running on your physical Hyper-V host.
To enable nested virtualization capabilities in Hyper-V, this is accomplished using a simple PowerShell one-liner:
Set-VMProcessor -VMName
-ExposeVirtualizationExtensions $true
Also, it may seem counterintuitive, but you can also use another hypervisor to create a Hyper-V lab. For instance, if you already have access to a VMware vSphere-based lab, you can easily create Windows Server virtual machines and enable the Hyper-V role.
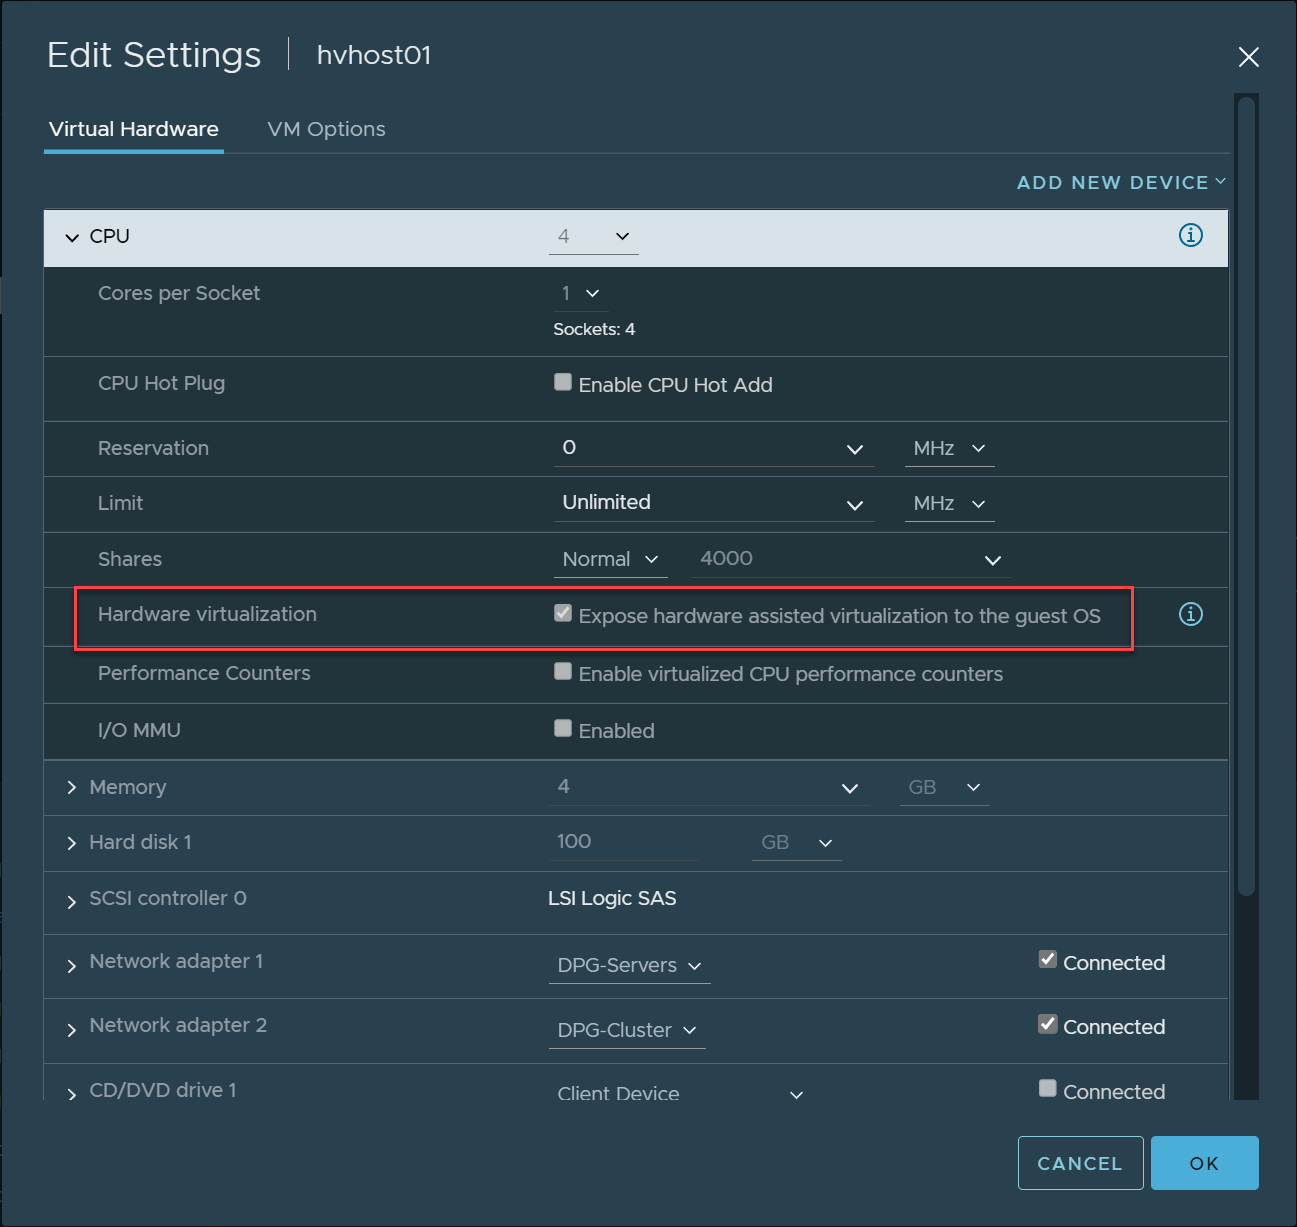
With VMware vSphere, you can enable nested virtualization with a simple checkbox on the CPU properties of the virtual machine. Note the setting under the Virtual Hardware tab in the properties of a VMware vSphere virtual machine. The setting is called Expose hardware assisted virtualization to the guest OS
You can also use VMware Workstation and other Type 2 hypervisors to run virtualization labs for Hyper-V.

Hardware considerations
As documented by Microsoft, you will need to have hardware that supports the following:
- A 64-bit processor with second-level address translation (SLAT) – To install the Hyper-V virtualization components such as Windows hypervisor, the processor must have SLAT. However, this feature is not required to install Hyper-V management tools like Virtual Machine Connection (VMConnect), Hyper-V Manager, and the Hyper-V cmdlets for Windows PowerShell
- VM Monitor Mode extensions
- Enough memory – plan for at least 4 GB of RAM – This is a bare minimum, and most will find they need more memory than this to have an acceptable experience. The more virtual machines you want to run, the more memory you will need
- Virtualization support turned on in the BIOS or UEFI:
- Hardware-assisted virtualization. This is available in processors that include a virtualization option – specifically processors with Intel Virtualization Technology (Intel VT) or AMD Virtualization (AMD-V) technology.
- Hardware-enforced Data Execution Prevention (DEP) must be available and enabled. For Intel systems, this is the XD bit (execute disable bit). For AMD systems, this is the NX bit (no execute bit)
For Hyper-V labs, many have been successful using workstation-class hardware. Some find cheap hardware that results from hardware refresh cycles in enterprise data centers, where old hardware is replaced with new hardware. Others may purchase cheap servers from eBay or other second-hand dealers.
License considerations
What about licensing? You can still get your hands on Hyper-V Server 2019, free to download and run. You can also get your hands on licensing from the Microsoft Evaluation Center, where Windows Server versions can be downloaded and used for 180-day evaluation periods. Since these labs are generally temporary, running evaluation copies of Windows works out well for both hosts and guest virtual machines.
Wrapping Up
Creating a Hyper-V lab is a great way to get acquainted with running, configuring, managing, and troubleshooting Hyper-V. In addition, it allows gaining real-world experience with the platform that easily transitions to production environments in the enterprise data center.
As we have discussed, there are many great ways to provision a Hyper-V lab, including nested virtualization. In addition, running Hyper-V inside virtual machines allows taking advantage of virtual machine capabilities, such as snapshots. There are also great resources to acquire the hardware and software needed for running a Hyper-V lab, including the Microsoft Evaluation Center and purchasing second-hand server hardware.
Read on:
Follow our Twitter and Facebook feeds for new releases, updates, insightful posts and more.