
Read on:
Beginners’ Guide for Microsoft Hyper-V: Overview of Hyper-V Part 1
Beginners’ Guide for Microsoft Hyper-V: How to Install Microsoft Hyper-V Using Server Manager – Part 2
Beginners’ Guide for Microsoft Hyper-V: How to Install Microsoft Hyper-V with PowerShell – Part 3
Beginners Guide for Microsoft Hyper-V: How to Install Microsoft Hyper-V in Windows Server Core – Part 4
Beginners Guide for Microsoft Hyper-V: Remote Management of Hyper-V – Part 5
Beginners Guide for Microsoft Hyper-V: How to Install Hyper-V Server – Part 6
Beginner’s Guide for Microsoft Hyper-V: What is Azure Stack HCI – Part 7
Beginner’s Guide for Microsoft Hyper-V: Windows Admin Center Hyper-V Management – Part 8
One of the most critical aspects of any virtualized environment is networking. The networking capabilities and features of modern hypervisors allow businesses to run traditional virtual machines and modern applications in a way that secures and connects traffic to critical network resources in the data center. Microsoft Hyper-V provides robust virtual networking capabilities allowing organizations to easily design, configure, and manage virtual networks. This post will look at Hyper-V networking for beginners and see how to get started creating and configuring Hyper-V networks.
Hyper-V virtual switches
Hyper-V provides the ability to create virtual switches. Virtual switches allow connecting your virtual machines to different types of networks for different use cases. There are three different Hyper-V virtual switch types:
- External – The external Hyper-V virtual switch is the most common type of virtual switch since it allows connecting Hyper-V virtual machines to the local area network outside of the Hyper-V host itself. External networks allow Hyper-V virtual machines to communicate with other hosts and clients on the physical network. Physical network cards must back the Hyper-V External switch in the Hyper-V host uplinked to physical network switch ports. Many Hyper-V beginners may confuse the external in the name to mean it is intended for public Internet access. It is not the case. When you think of external in the context of Hyper-V virtual switches, think external to Hyper-V
- Internal – The internal switch has one important difference between it and the external switch. It does not have any physical network cards attached to the virtual switch. It means that any virtual machines connected to the internal virtual switch can communicate with one another and with the management operating system, but not with the external local area network. For example, machines could be connected to external networks using a router with a connection to the internal virtual switch and an external virtual switch. However, virtual machines are part of their own segmented network outside of this configuration
- Private – The private virtual switch takes the internal switch one step further and prevents even the Hyper-V host from communicating with virtual machines on the private virtual switch. The private virtual switch is a good choice for a completely isolated network with no communication, even with the Hyper-V host
Hyper-V NAT’ed virtual network
A special type of virtual switch configuration in Hyper-V allows for a NAT’ed IP configuration. What is a NAT’ed network?
A NAT stands for Network Address Translation. It allows connecting multiple clients behind a single IP address, making it an efficient way to enable traffic using a single IP address. All traffic coming from behind the NAT will appear to be coming from a single IP address, even though there may be hundreds of clients behind the NAT’ed IP address.

In Windows Server 2016 and Windows 10, Microsoft added NAT’ed functionality to the Internal virtual switch configuration so you can easily configure a NAT’ed design for all clients connected to a particular virtual switch on a Hyper-V host.
With the NAT’ed virtual switch configuration, VMs attached to the NAT’ed virtual switch access network resources using the Hyper-V host’s IP address and a port through the internal Hyper-V virtual switch. One thing to note with the Hyper-V NAT’ed virtual switch configuration is that you can only configure this using PowerShell. You cannot configure the NAT’ed network using the Hyper-V Manager GUI.
You can create the NAT’ed Hyper-V virtual switch configuration in a few steps.
- Create the internal switch used to house the virtual machines
- Configure the NAT Gateway IP address using Powershell
- Create the NAT gateway
- Configure the NAT network
New-VMSwitch -SwitchName “SwitchName” -SwitchType Internal
New-NetIPAddress -IPAddress <NAT Gateway IP> -PrefixLength <NAT Subnet Prefix Length> -InterfaceIndex <ifIndex>
New-NetIPAddress -IPAddress 192.168.0.1 -PrefixLength 24 -InterfaceIndex 24
New-NetNat -Name <NATOutsideName> -InternalIPInterfaceAddressPrefix <NAT subnet prefix>
After following the steps above, connect your Hyper-V virtual machines to the new internal switch configured with the NAT’ed configuration.
Creating a Hyper-V virtual switch
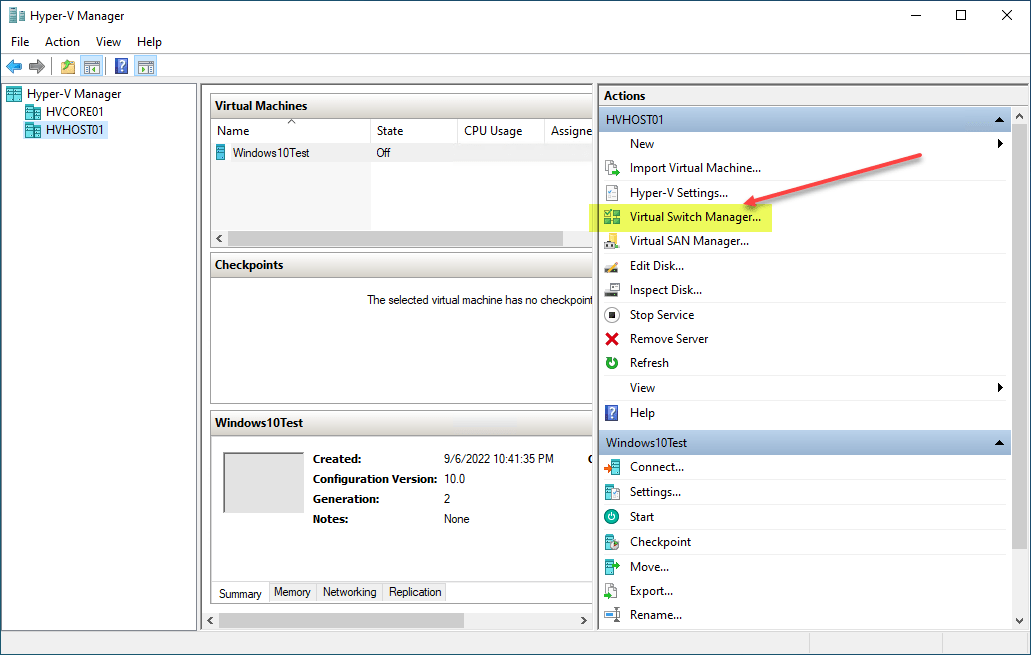
Creating a Hyper-V virtual switch is easily accomplished using either the Hyper-V Manager GUI or PowerShell. After launching the Hyper-V Manager GUI, click the Virtual Switch Manager in the right-hand pane.
It will launch the Virtual Switch Manager for your Hyper-V host. Then, select the type of virtual switch you want to create on the New virtual network switch configuration dialog. As mentioned earlier, you have three selections to choose from: External, Internal, and Private.
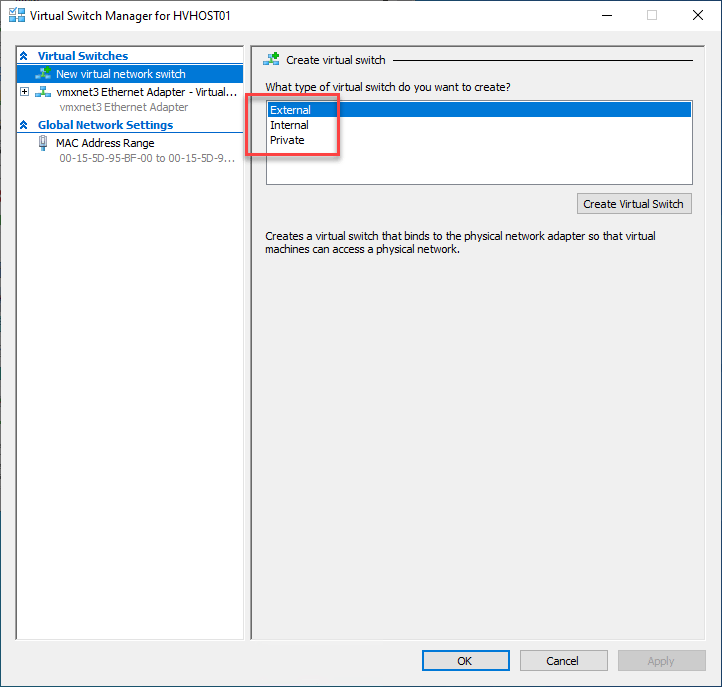
On the virtual switch properties page in Hyper-V Manager, you can see other configuration options. For example, you can choose the network adapter you want to use for an external network to connect the external switch to the physical network. You can allow the management operating system to share this network adapter.
Also, you can assign a VLAN ID to the management operating system traffic to segment this traffic from other traffic traversing the Hyper-V external switch.
Connecting a virtual machine to a Hyper-V virtual switch
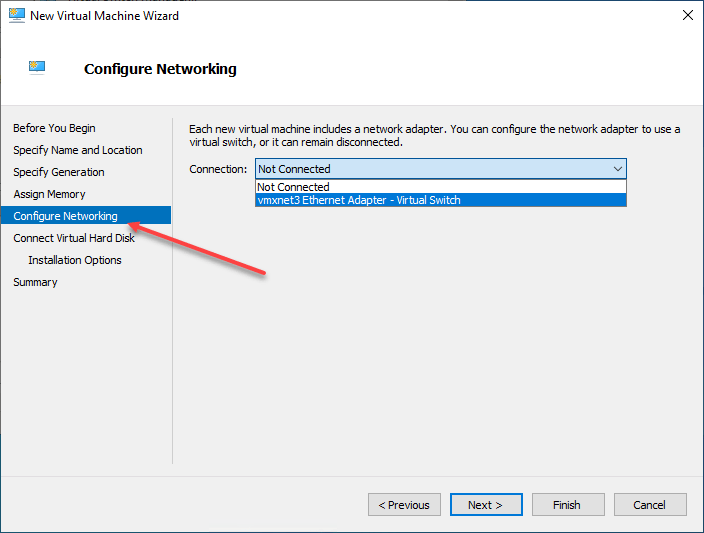
Connecting a Hyper-V virtual machine to a Hyper-V virtual switch is straightforward and part of the process of creating a Hyper-V virtual machine. In the New Virtual Machine Wizard, the Configure Networking screen provides the ability to connect your Hyper-V virtual machine to a specific Hyper-V virtual switch. You can also choose the Not connected option if you want to edit the virtual machine and connect it to a network later.
Wrapping up
Hyper-V provides robust virtual networking capabilities allowing organizations to connect traffic as they need in the local area network and enable virtual machines to communicate with servers and clients on the physical network. The three types of Hyper-V virtual switches provide different connectivity options and allow admins to control how VMs can communicate with the outside world and the Hyper-V host itself.
The NAT’ed virtual switch configuration provides an interesting possibility of placing all VMs behind a single IP address, conserving IP addresses on the external network, and easily allowing VMs to have connectivity. By leveraging these and other capabilities, Hyper-V admins can effectively route traffic in and out of the Hyper-V host. Hyper-V beginners do well to spend a fair amount of time learning the various Hyper-V networking configurations as it is an important building block in Hyper-V virtualization.
Follow our Twitter and Facebook feeds for new releases, updates, insightful posts and more.