
What is Kubernetes?
Kubernetes (K8s) is an open-source container platform for automating deployment, scaling, and management of containerized applications. Kubernetes is an open-source giving you the freedom to take advantage of on-premises, hybrid, or public cloud infrastructure, letting you effortlessly move workloads to where it matters to you. It was originally designed by Google and is now maintained by the Cloud Native Computing Foundation.
Kubernetes Service in AWS
AWS makes it easy to run Kubernetes in the cloud with scalable and highly-available virtual machine infrastructure. Kubernetes manages clusters of Amazon EC2 compute instances and runs containers on those instances with processes for deployment, maintenance, and scaling. Using Kubernetes, you can run any type of containerized applications using the same toolset on-premises and in the AWS cloud.
Accessing EKS from AWS console
For creating Kubernetes instances or Kubernetes clusters in AWS, you can use Amazon Elastic Kubernetes Service ( EKS ) from the AWS management console under Services → Containers → Elastic Kubernetes Service. Or you can access through the below URL directly.
https://console.aws.amazon.com/eks/home
In this blog, we are going to describe how to create an EKS cluster from the AWS console. Login to AWS Console and navigate to the Elastic Kubernetes Service under the Containers section.

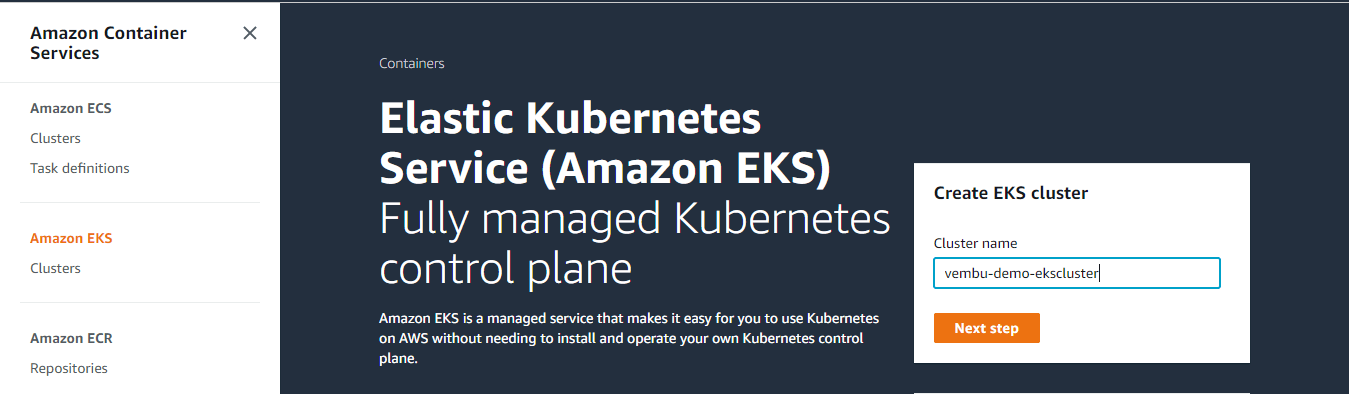
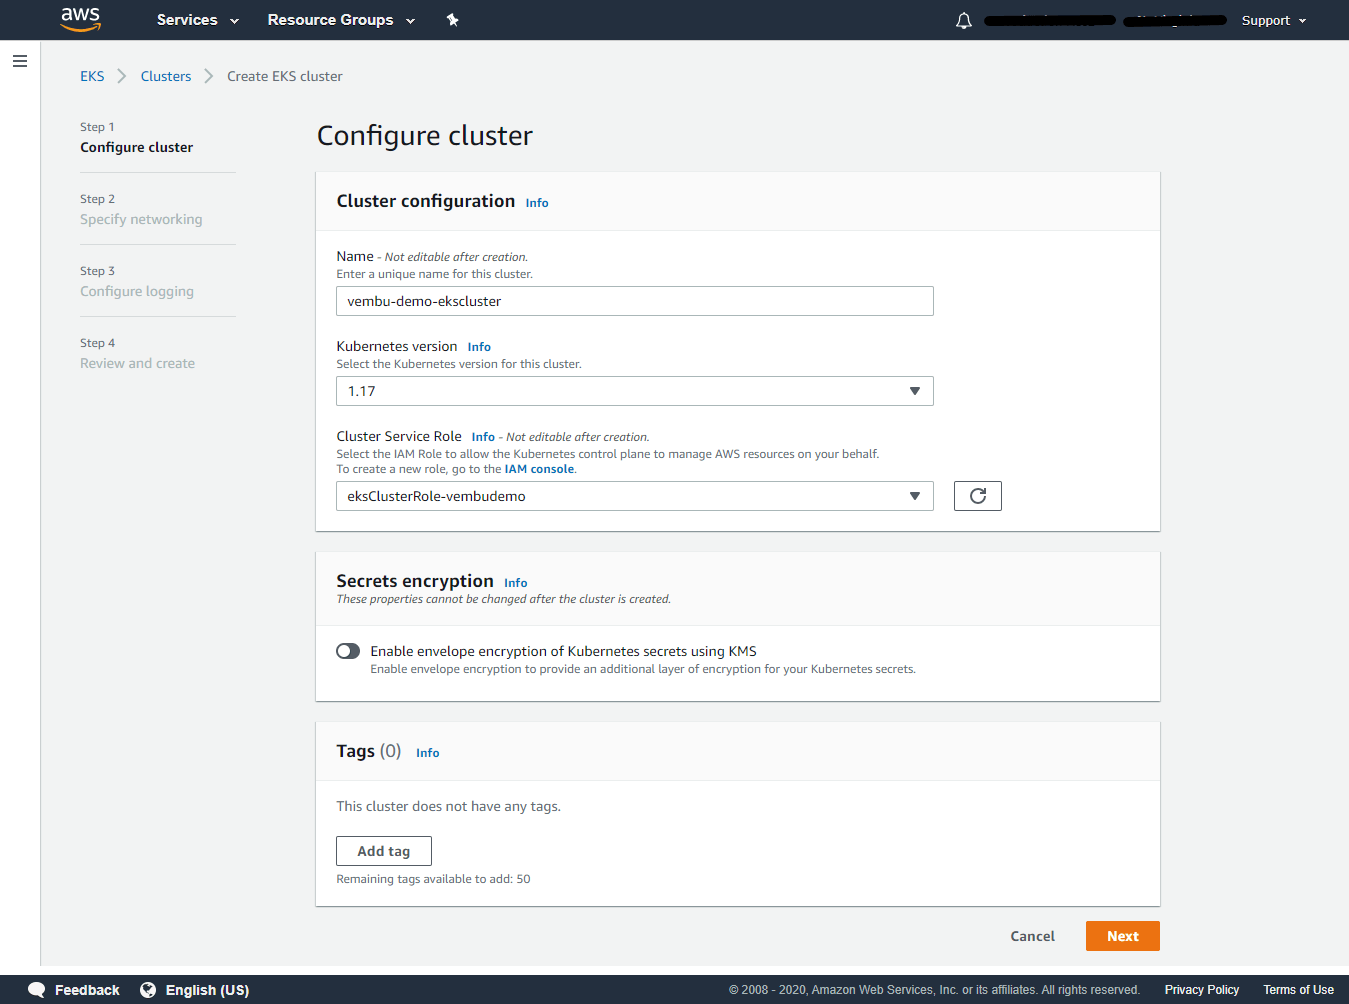
Provide a Cluster name under Create EKS cluster. In our example cluster name is vembu-demo-ekscluster. Click the Next step to continue.
Creating an EKS cluster involves four steps.
- Step 1 – Configure cluster
- Step 2 – Specify networking
- Step 3 – Configure logging
- Step 4 – Review and create
Step 1 – Configure cluster
Cluster configuration –
An Amazon EKS cluster consists of two primary components:
- The Amazon EKS control plane
- Amazon EKS worker nodes that are registered with the control plane
The Amazon EKS control plane consists of control plane nodes that run the Kubernetes software, such as, etc, and the Kubernetes API server. The control plane runs in an account managed by AWS, and the Kubernetes API is exposed via the Amazon EKS endpoint associated with your cluster. Each Amazon EKS cluster control plane is single-tenant and unique and runs on its own set of Amazon EC2 instances.
Name – Enter a unique name for the cluster
Kubernetes Version – The Kubernetes project is rapidly evolving with new features, design updates, and bug fixes. The community releases new Kubernetes minor versions (1.XX), as generally available approximately every three months, and each minor version is supported for approximately nine months after it is first released.
Unless your application requires a specific version of Kubernetes, AWS recommends that you choose the latest available Kubernetes version supported by Amazon EKS for your cluster. Currently, 1.17 version is the latest available version and is the default.
Cluster Service role – An Amazon EKS cluster has multiple IAM roles that define access to resources.
- The Cluster Service Role allows the Kubernetes cluster managed by Amazon EKS to make calls to other AWS services on your behalf.
- The Amazon EKS service-linked role includes the permissions that EKS requires to create and manage clusters. This role is created for you automatically during cluster creation.
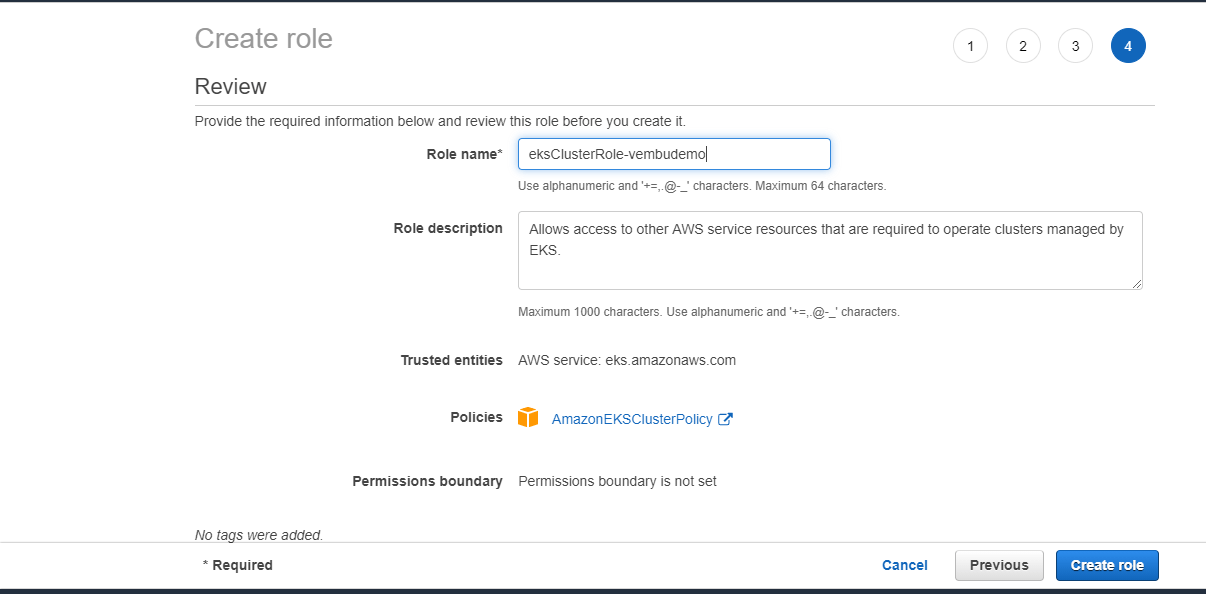
In this step, additionally, we need to create an IAM role using the IAM console. To create your Amazon EKS cluster role in the IAM console follow the below steps
- Open the IAM console at https://console.aws.amazon.com/iam/.
- Choose Roles, then Create a role.
- Choose EKS from the list of services, then EKS – Cluster for your use case, and then Next: Permissions.
- Choose Next: Tags.
- (Optional) Add metadata to the role by attaching tags as key-value pairs. For more information about using tags in IAM, see Tagging IAM Entities in the IAM User Guide.
- Choose Next: Review.
- For Role name, enter a unique name for your role, in our case, the role name is eksClusterRole-vembudemo, then choose to Create role.
Secrets encryption – Enabling secrets encryption allows you to use AWS Key Management Service (KMS) keys to provide envelope encryption of Kubernetes secrets stored in, etc for your cluster. This encryption is in addition to the EBS volume encryption that is enabled by default for all data (including secrets) that is stored in etc as part of an EKS cluster.
Using secrets encryption for your EKS cluster allows you to deploy a defense in depth strategy for Kubernetes applications by encrypting Kubernetes secrets with a KMS key that you define and manage. In our case, we are not going to use this secret encryption and can use only the default EBS volume encryption.
Tags – Tags enable you to categorize your clusters. For example, you can define a set of tags for your Amazon EKS clusters to help you track each cluster’s owner and stack level. Since we are creating clusters for demo purposes, we are not using any tag here.
Click Next to continue to Step2
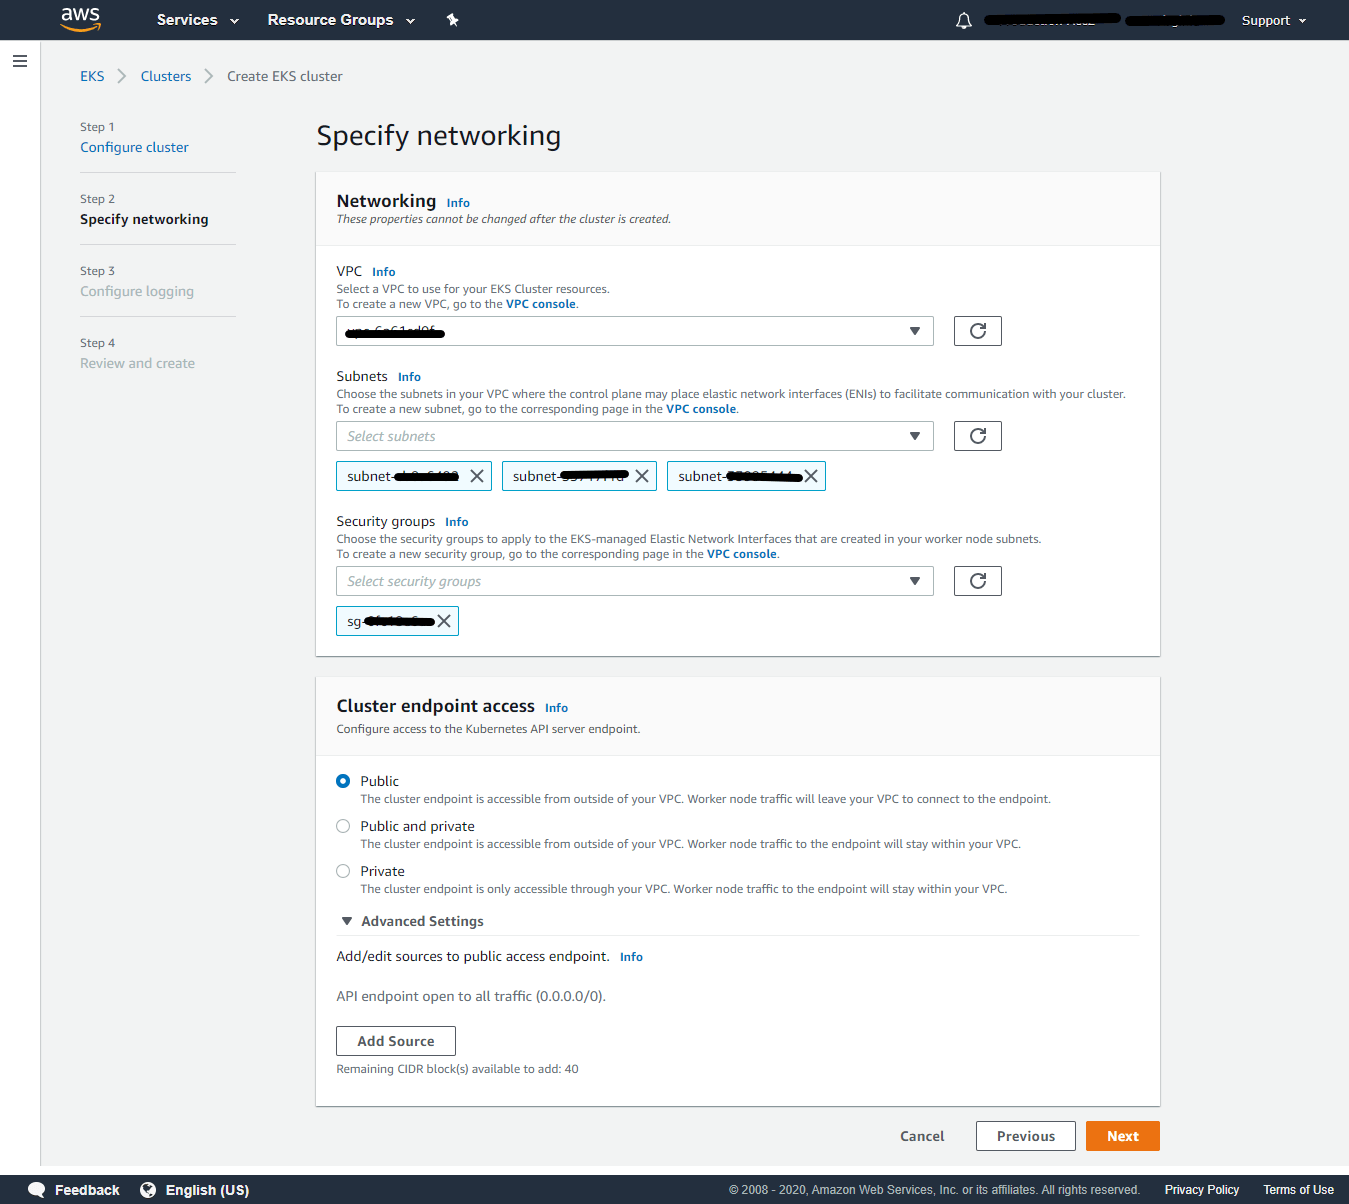
Step 2: Specify networking
VPC – Select a VPC to use for your EKS Cluster resources.If you don’t have a VPC create a new VPC using the VPC Console. In our example, we already have a VPC and selected that VPC.
Subnets – Choose the subnets in your VPC where the control plane may place elastic network interfaces (ENIs) to facilitate communication with your cluster. To create a new subnet, go to the corresponding page in the VPC console. In our example, the associated subnets for the selected VPC are shown automatically.
Security groups – Choose the security groups to apply to the EKS-managed Elastic Network Interfaces that are created in your worker node subnets. To create a new security group, go to the corresponding page in the VPC console. In our example, we have chosen an already created security group and is selected from the dropdown list.
Cluster endpoint access – Amazon EKS creates an endpoint for the managed Kubernetes API server that you use to communicate with your cluster (using Kubernetes management tools such as kubectl). By default, this API server endpoint is public to the internet, and access to the API server is secured using a combination of AWS Identity and Access Management (IAM) and native Kubernetes Role-Based Access Control (RBAC).
It provides three options – Public only, Public & Private, and Private only. Here we are choosing public, and hence the cluster endpoint is accessible from outside of your VPC. Worker node traffic will leave your VPC to connect to the endpoint.
Additionally in advanced settings, you can add/edit the source network traffic to reach the Kubernetes service, so that you can limit the network traffic from the internet. By default, API endpoints are open to all traffic (0.0.0.0/0). Click Next to continue to Step 3
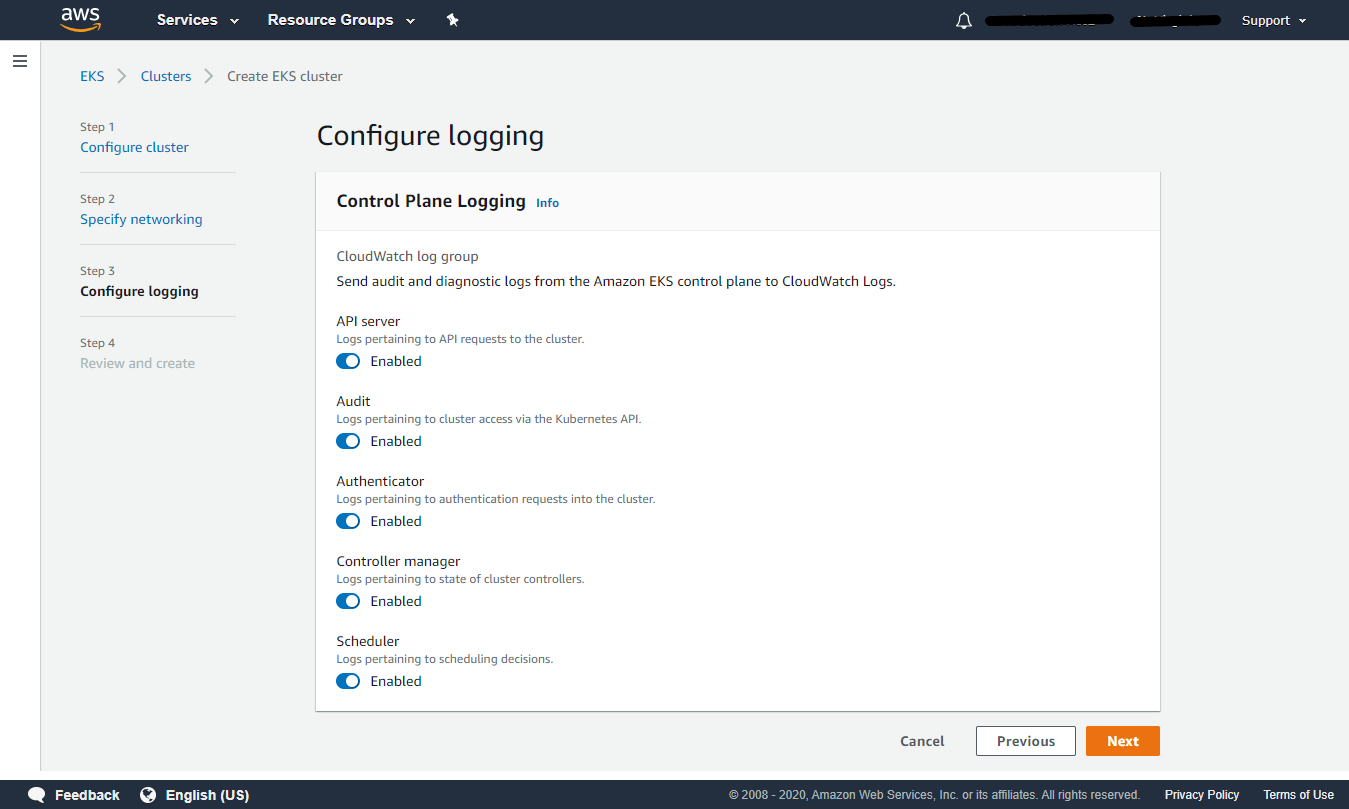
Step 3: Configure logging
Control Plane Logging – Amazon EKS control plane logging provides audit and diagnostic logs directly from the Amazon EKS control plane to CloudWatch Logs in your account. The following cluster control plane log types are available. Each log type corresponds to a component of the Kubernetes control plane.
API Server – Your cluster’s API server is the control plane component that exposes the Kubernetes API. You can enable/disable the logs pertaining to API requests to the cluster.
Audit – Kubernetes audit logs provide a record of the individual users, administrators, or system components that have affected your cluster. You can enable/disable the logs pertaining to cluster access via the Kubernetes API.
Authenticator – Authenticator logs are unique to Amazon EKS. These logs represent the control plane component that Amazon EKS uses for Kubernetes Role-Based Access Control (RBAC).
(RBAC) authentication uses IAM credentials. You can enable/disable the logs pertaining to authentication requests into the cluster.
Controller manager – The controller manager manages the core control loops that are shipped with Kubernetes. You can enable/disable the logs pertaining to the state of cluster controllers.
Scheduler – The scheduler component manages when and where to run pods in your cluster. You can enable/disable the logs pertaining to scheduling decisions.
Here all logging is enabled. Click Next to continue to Step 4
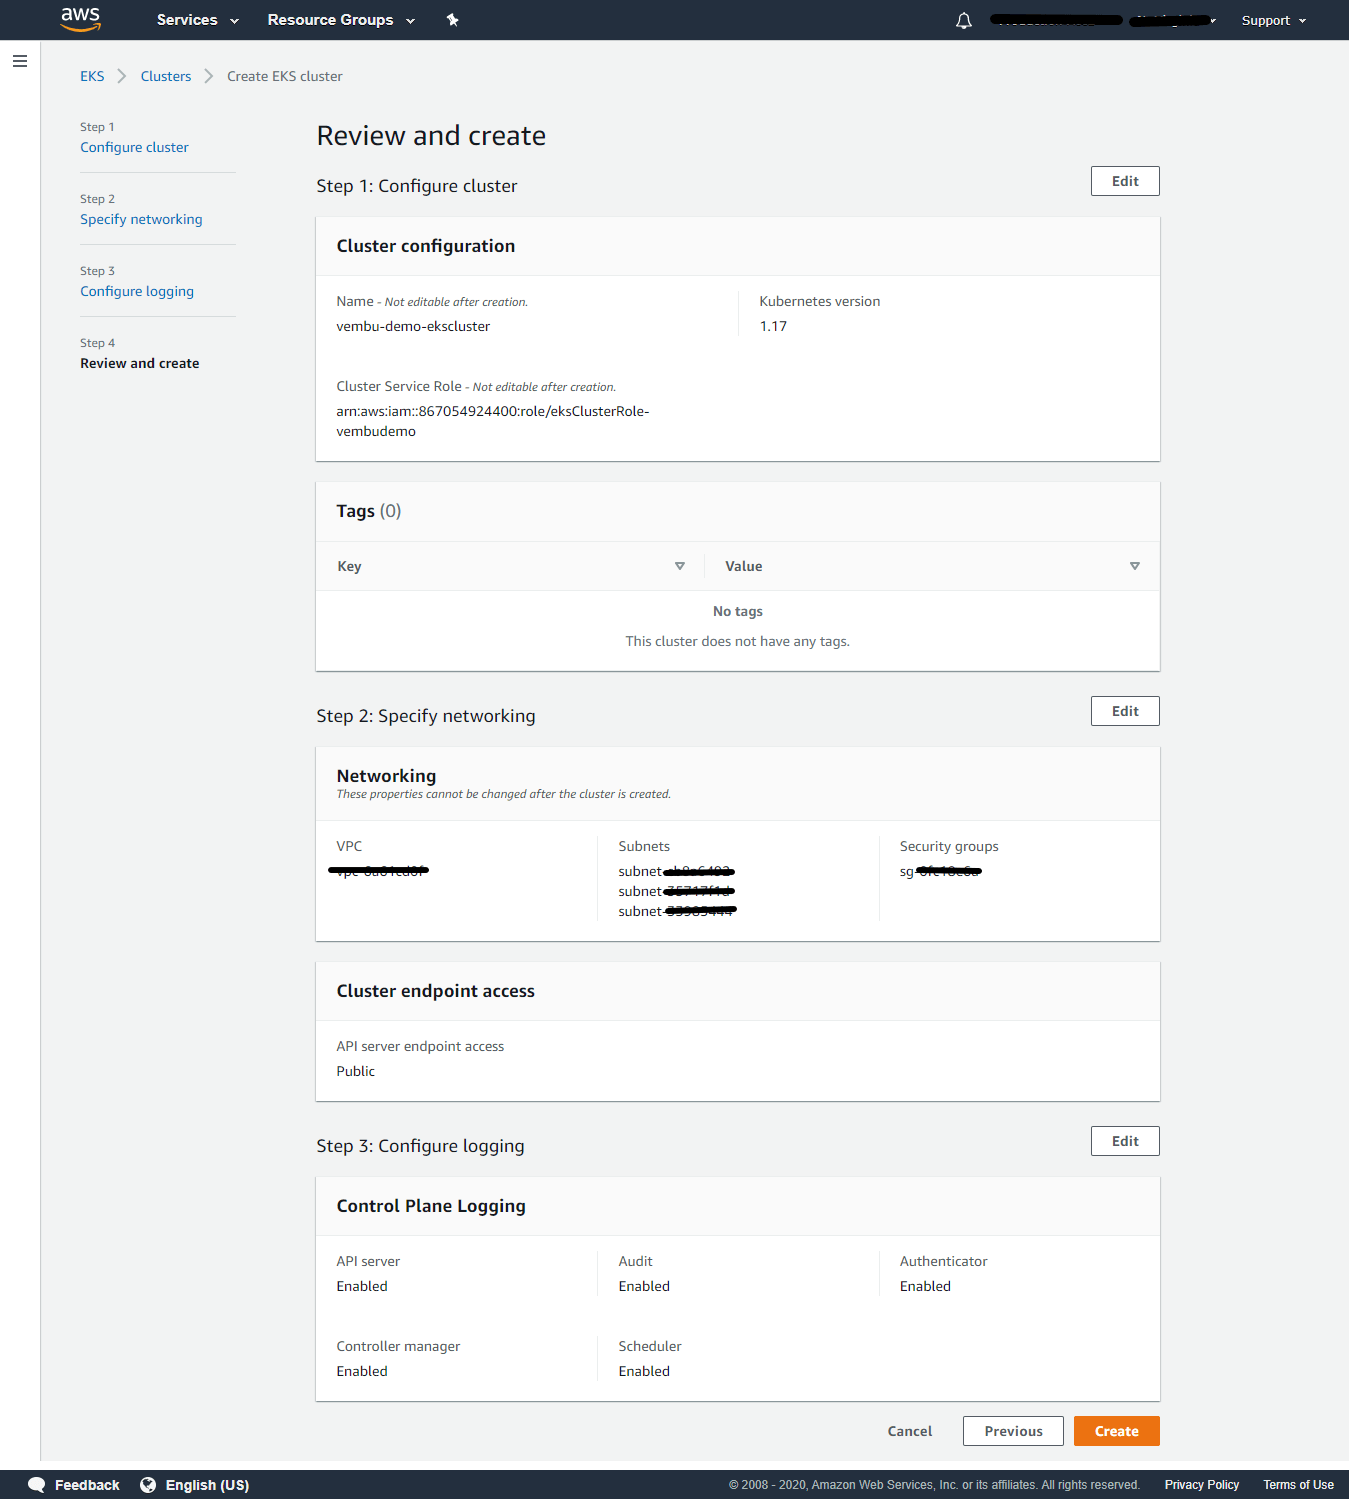
Step 4: Review and Create
On this final step, you can edit any settings of all the above steps. Click create to proceed further.
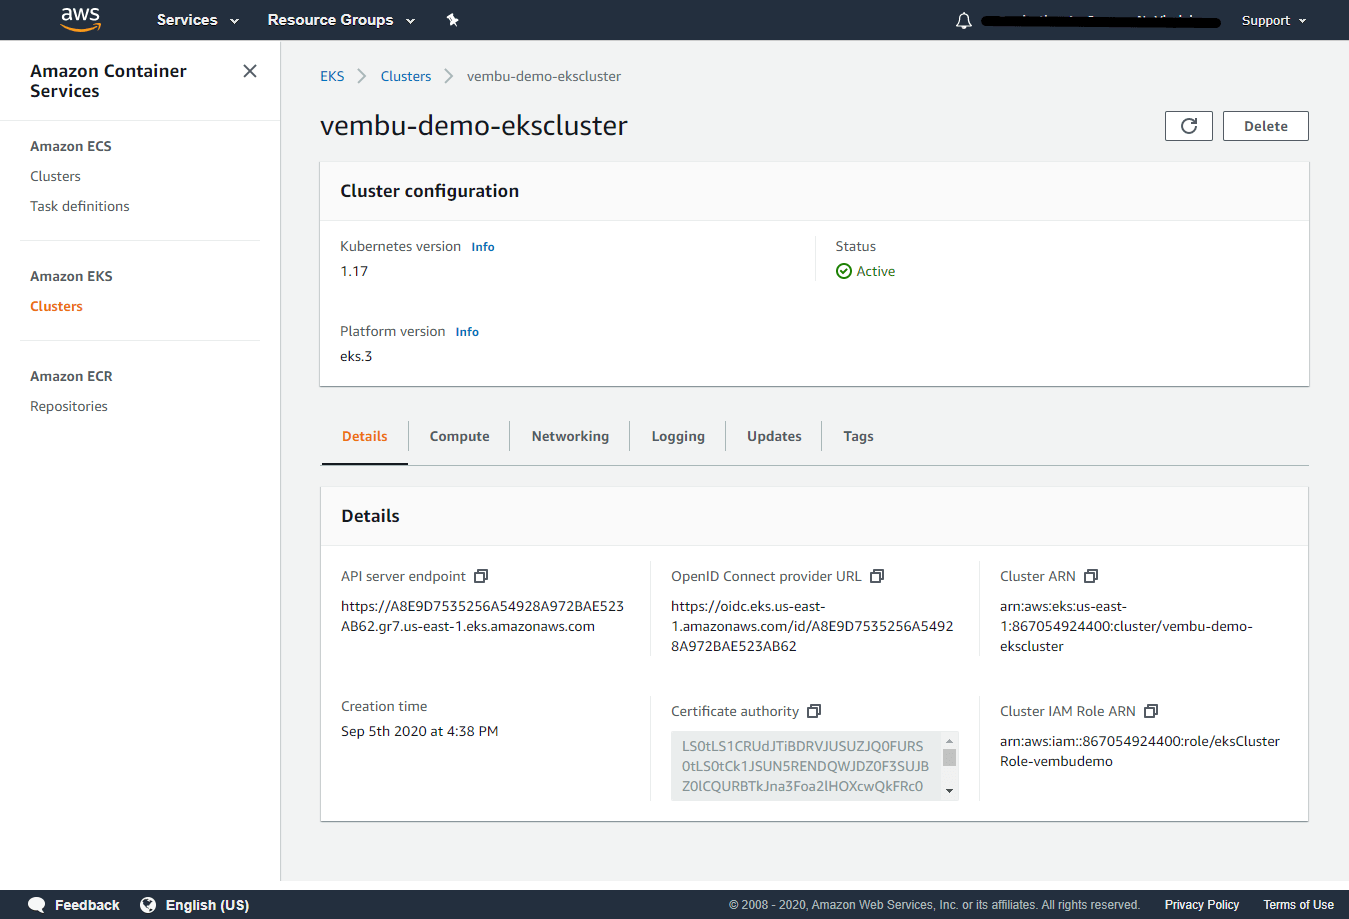
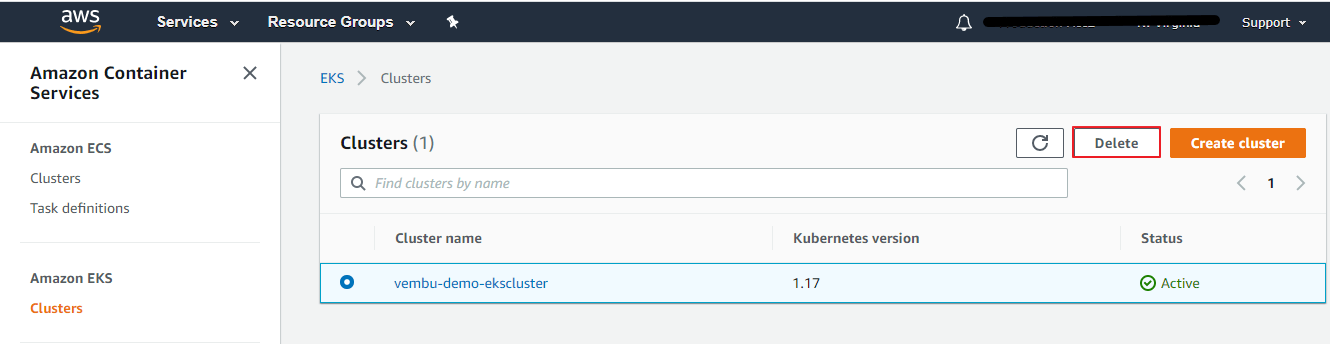
This may take a few minutes to create the EKS cluster. Once created, you can see the status as Active, and can see six tabs, used to configure your EKS cluster further depending on your requirements.
In the Details tab, you can view
API server endpoint URL – Amazon EKS creates an endpoint for the managed Kubernetes API server that you use to communicate with your cluster (using Kubernetes management tools such as kubectl).
OpenID Connect provider URL – IAM OIDC identity providers are entities in IAM that describe an external identity provider (IdP) service that supports the OpenID Connect (OIDC) standard, such as Google or Salesforce. You use an IAM OIDC identity provider when you want to establish trust between an OIDC-compatible IdP and your AWS account. This is useful when creating a mobile app or web application that requires access to AWS resources, but you don’t want to create a custom sign-in code or manage your own user identities.
Cluster ARN – The Amazon Resource Name (ARN) that identifies the cluster. The ARN contains the arn:aws:ecs namespace, followed by the Region of the cluster, the AWS account ID of the cluster owner, the cluster namespace, and then the cluster name.
Cluster IAM Role ARN – The Amazon Resource Name for the cluster IAM Role.
Creation time – The cluster created time showed
In the Compute tab, you can view,
Node Groups – Amazon EKS managed Node Groups make it easy to provision compute capacity for your cluster. Node Groups consist of one or more EC2 instances running the latest EKS-optimized AMIs. All nodes are provisioned as part of an EC2 autoscaling group that is managed for you by Amazon EKS and all resources including EC2 instances and autoscaling groups run within your AWS account. You can configure add/delete Node groups in this tab.
A Node Group is a group of EC2 instances that supply compute capacity to your Amazon EKS cluster. You can add multiple Node Groups to your cluster.
Fargate profiles – Fargate Profiles let you use Fargate to run Kubernetes pods without needing to change your pod specification or re-deploy your apps. First, create a profile that matches the namespace and labels defined as part of your pod. When new pods are started, they will run on Fargate using the execution role and subnets defined in your profile.
In the Networking tab, you can modify the networking settings when you created the cluster. By clicking Manage Network, you can change the cluster endpoint access you already configured. Also, you can edit sources to access the endpoint, by adding the CIDR of your network to allow the endpoint access.
In the Logging tab, shows the current status of logging enabled for Amazon EKS control plane to CloudWatch Logs in your account.
Deleting an EKS Cluster
To delete an Amazon EKS cluster with the AWS Management Console
- List all services running in your cluster – “kubectl get svc –all-namespaces”
- Delete any services that have an associated EXTERNAL-IP value. These services are fronted by an Elastic Load Balancing load balancer, and you must delete them in Kubernetes to allow the load balancer and associated resources to be properly released – “kubectl delete svc service-name”
- Delete all node groups and Fargate profiles.
- Open the Amazon EKS console at https://console.aws.amazon.com/eks/home#/clusters.
- In the left navigation, select Clusters, and then in the tabbed list of clusters, select the name of the cluster that you want to delete.
- Select the Compute tab, select a node group to delete, select Delete, enter the name of the node group, and then select Delete. Delete all node groups in the cluster.
- Delete all self-managed node AWS CloudFormation stacks.
- Open the AWS CloudFormation console at https://console.aws.amazon.com/cloudformation.
- Select the node stack to delete and then choose Actions, Delete Stack.
- On the Delete Stack confirmation screen, choose Yes, Delete. Delete all self-managed node stacks in the cluster.
- Delete the cluster.
- Open the Amazon EKS console at https://console.aws.amazon.com/eks/home#/clusters.
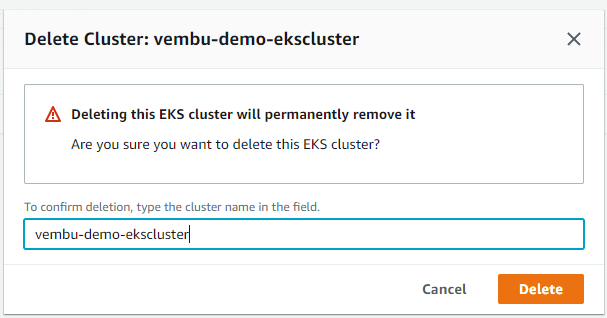
- Select the cluster to delete and choose Delete.
- On the delete cluster confirmation screen, choose Delete.
- (Optional) Delete the VPC AWS CloudFormation stack.
- Select the VPC stack to delete and choose Actions and then Delete Stack.
- On the Delete Stack confirmation screen, choose Yes, Delete.
A new deletion window will open, to confirm the deletion, type the cluster name in the field, and choose delete.
Conclusion :
Amazon Elastic Kubernetes Service (EKS) has quickly become a leading choice for machine learning workloads. It combines the developer agility and the scalability of Kubernetes, with the wide selection of Amazon Elastic Compute Cloud (EC2) instance types available on AWS with highly loaded memory and CPU, Kubernetes clusters withstand enterprise-level workloads. Since EKS on AWS is easily setup and supports a wide range of API tools, with development knowledge, the user can automate his workloads easily.
Follow our Twitter and Facebook feeds for new releases, updates, insightful posts and more.