
VMware vSphere Replication configuration
In the previous post, we discussed how vSphere Replication works, and types of replication scenarios where we can use and implement replication.
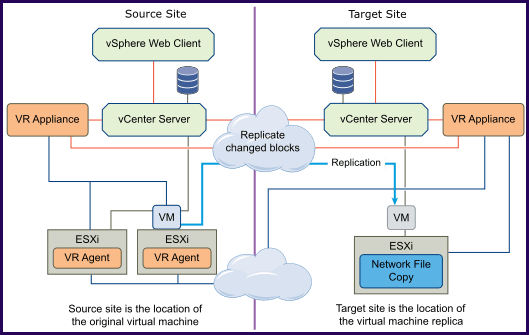
In this vSphere Replication part 2, we’ll focus on how to install vSphere Replication (VR) and setting up vSphere replication between two sites with vSAN. It provides the means of replicating a virtual machine between two sites, creating point-in-time instances of virtual machines for site-level resiliency.
Table of Contents
- Connecting vSphere replication between two vCenter Servers
- Supported versions of vCenter Server, ESXi, and vSAN
- Upgrade scenarios
- Download vSphere Replication appliance from VMware
- Installing the OVF
- vSphere Replication System Requirements:
- Lab environment setup
- Install vSphere Replication Step by Step
- How to register vSphere Replication in Center
- How to create a Replication for a virtual machine
- Create VMs Replication
- Final thoughts
Connecting vSphere replication between two vCenter Servers
Keep in mind for configuring vSphere Replication to use vSphere Replication between two sites managed by different vCenter Server instances, you must configure a connection between the two vSphere Replication appliances
Supported versions of vCenter Server, ESXi, and vSAN
The latest version of vSphere Replication is 8.5, which can be used to replicate the following versions of:

- Supports vCenter Server 7.0 U3, 7.0 U2, 7.0 U1, 7.0, 6.7 U3, 6.7 U2, 6.7 U1, 6.7.0
- Supports ESXi 7.0 U3, 7.0 U2, 7.0 U1, 7.0, 6.7 U3, 6.7 U2, 6.7 U1, 6.7.0
- Supports vSAN 7.0.3, 7.0.2, 7.0.1, 7.0, 6.7.3, 6.7.2, 6.7.1, 6.7
In this article, we are going to see about vSphere Replication 8.2. It can be used for replicating virtual machines with the following:
- Supports vCenter Server 6.7 U2, 6.7 U1, 6.7.0, 6.5 U3, 6.5 U2, 6.5 U1, 6.5.0, 6.0 U3
- Supports ESXi 6.7 U2, 6.7 U1, 6.7.0, 6.5 U2, 6.5 U1, 6.5.0, 6.0 U3
- Supports vSAN 6.7 U2, 6.7 U1, 6.7, 6.6.1 U3, 6.6.1 U2, 6.6.1, 6.6, 6.5
Check vSphere Replication matrix HERE
Upgrade scenarios
Upgrade to this 8.2 version can be done from 6.5.x, but only using ISO. It’s not possible from the VMware Update Repository from the VAMI of the vSphere Replication appliance.
Upgrade path and order
Upgrade path is the following order: 8.2 – 8.1.2 – 8.1.1 – 8.1 – 6.5.1
Just a quick look of what is new in this version 8.2.
- VMware vSphere Replication 8.2 adds compatibility with VMware vSphere 6.7 Update 2
- Support for VM encryption:
- Minimize security risks by enabling network encryption:
- Enhancements to the Site Recovery user interface:
- vRealize Operations Management Pack:
- vRealize Orchestrator Plug-In for vSphere Replication 8.2. For information about new workflows, see VMware vRealize Orchestrator Plug-In for vSphere Replication 8.2 Release Notes
You can replicate encrypted virtual machines if you are using VMware vSphere 6.7 Update 1 or later.
You can enable encryption of replication data transfer in VMware vSphere Replication 8.2 if you are using VMware vSphere 6.0 or later.
With vSphere Replication 8.2, you can monitor target datastores in the replication details pane of the Site Recovery user interface, and use vSphere Replication reports that display transferred bytes per virtual machine and per hour.
The new vRealize Operations Management Pack for vSphere Replication 8.2 provides increased visibility into the status of your vSphere Replication environment, RPO violations, and other details. For more information, see VMware vRealize Operations Management Pack for vSphere Replication 8.2 Release Notes.
Download vSphere Replication appliance from VMware
vSphere Replication can be downloaded from your VMware account HERE
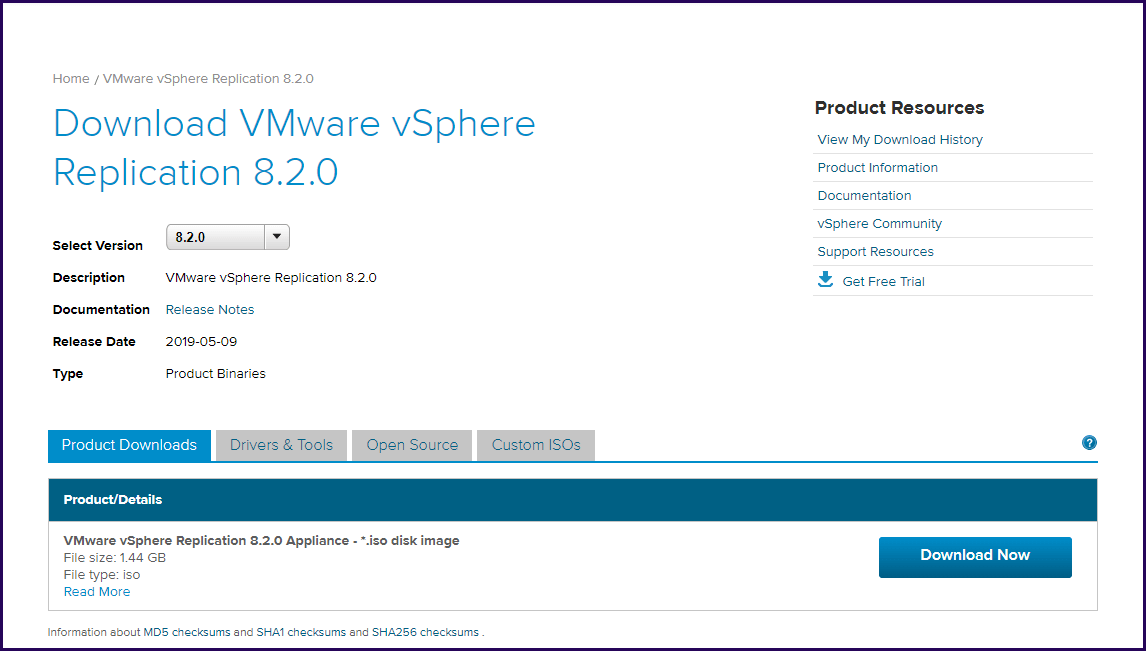
The file is an ISO (no boot), so you can mount in a VM, or you can extract the ISO. Then deploy as an OVF in your vCenter Server.
You can backup your VMware VMs for free with no feature restriction. Download BDRSuite Now
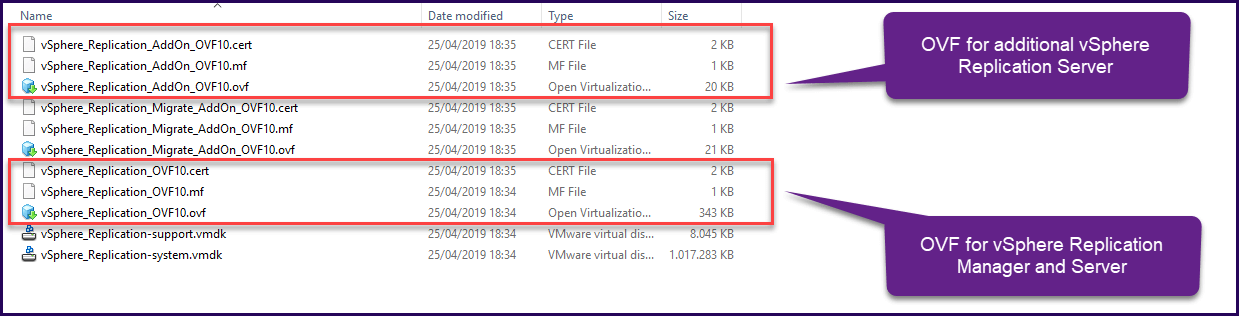
Installing the OVF
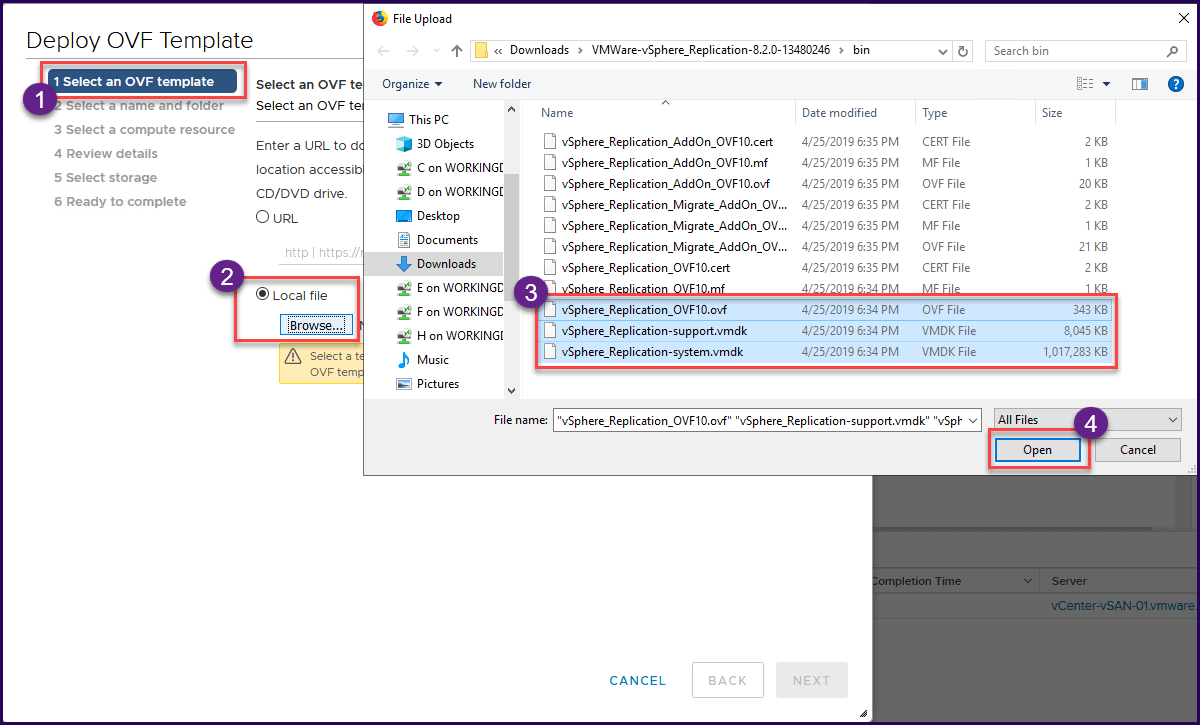
To install vSphere Replication appliance (that includes Manager and Server), we need to select the files vSphere_Replication_OVF10.ovf. If is to install an additional vSphere Replication Server, then we need to select and deploy vSphere_Replication_AddOn_OVF10.ovf.
In both cases, select the vmdk files so that the import of the OVF can start.
First, let us check what are the requirements to install vSphere Replication:
vSphere Replication System Requirements:
Besides the supported versions for 8.2, vSphere Replication doesn’t have any special resource requirements.
Two implementation sizes
vSphere Replication has two types of implementation:
- Smaller: VR with 2vCPU with 8Gb Memory and 26Gb of Virtual Disk
- Large: VR with 4vCPU with 16Gb Memory and 26Gb Virtual Disk
Depending on the amount of VMs to replicate, be aware that vSphere Replication consumes negligible CPU and memory on the source host ESX.
Replication and resource considerations
Too many replications can consume a lot of resources on your source ESXi hosts.
One of the most critical requirements for your vSphere Replication implementation is network bandwidth, mainly if you are replicating between two different locations. But also between your virtual environment and your Storage System.
Storage and network considerations
The storage and network traffic of vSphere and vCenter Server can be stressed during replication.
When you plan your deployment, be aware of the following levels of traffic:
- Between the host running the replicated virtual machine and the vSphere Replication server
- Between the vSphere Replication server and a host with access to the replication target datastore
- Between the host and storage
- Between storage and the host during redo log snapshots
The link speed between the two sites is essential.
As we know, vCenter only uses 70% of the network link, this means that if you have a 100Mb link between locations, vSphere Replication has a replication speed around 30Gb per hour. The link speed between the sites is very important to have an efficient replication of your VMs.
Check VMware documentation regarding Calculation Bandwidth for vSphere Replication
Note: vSphere Replication also consumes CPU on the Guest OS of the replicated virtual machines. So count also some CPU usage on your VMs during replication.
Lab environment setup
Environment for this vSphere Replication deployment
For this scenario, we use the following versions in both sites:
- vSphere Replication 8.2
- vCenter Server 6.7.0.31100 Build 13843380
- vSphere 6.7. 201906002 build 13981272
- vSAN 6.7 Express Path 10 build 13981272
Install vSphere Replication Step by Step
Let’s step through getting the vSphere Replication appliance up and running for management.
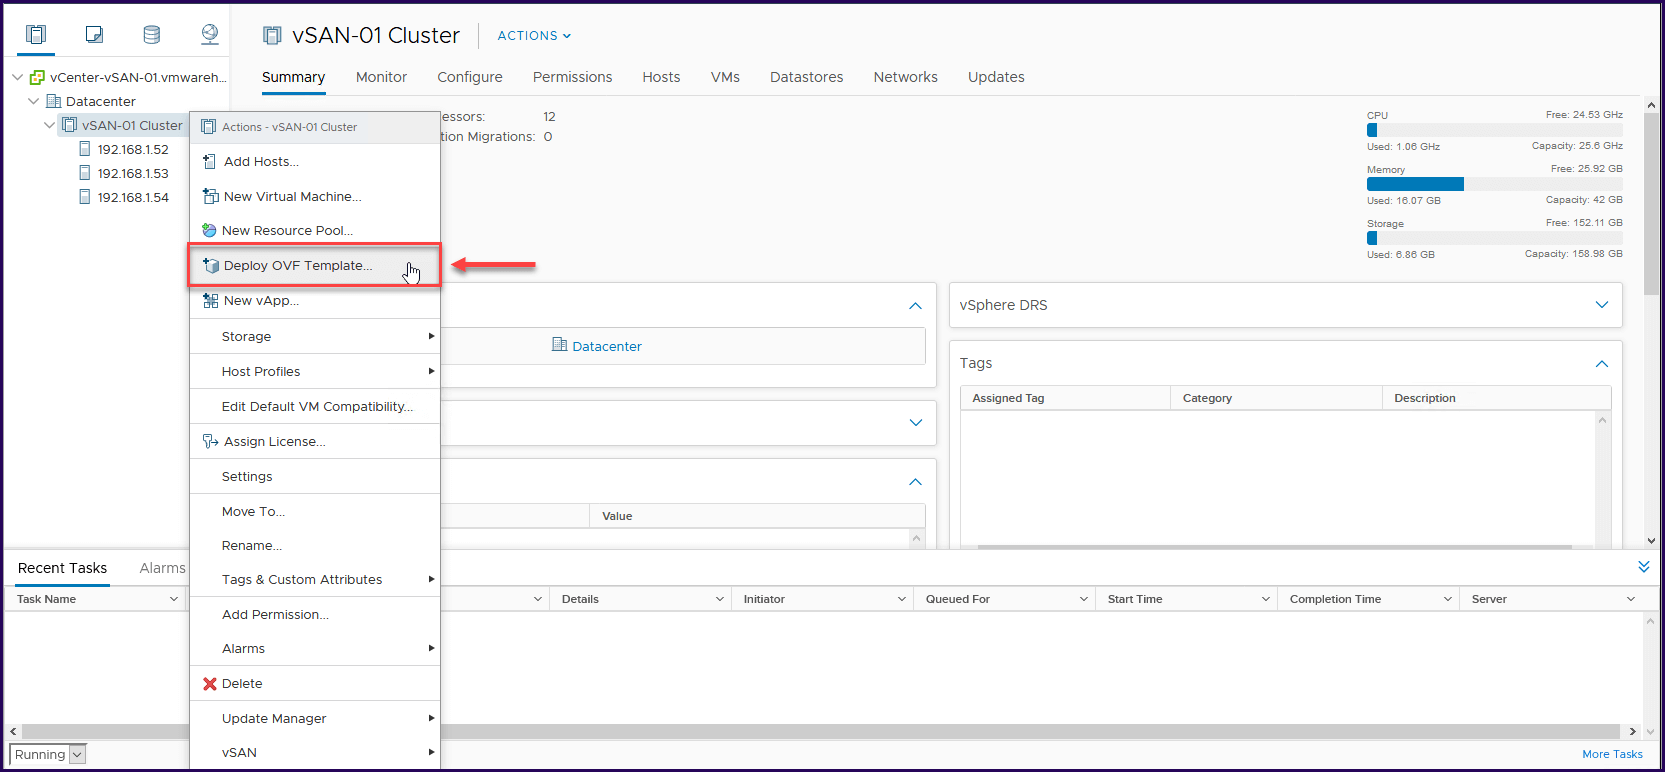
1. Login to your vCenter vSphere web client in site 1 and deploy the vSphere Replication OVF. The appliance provides the VMware vSphere replication administration interface after you deploy OVF template resources using the vSphere client.
2. Next, select the files to import and use in the OVF.
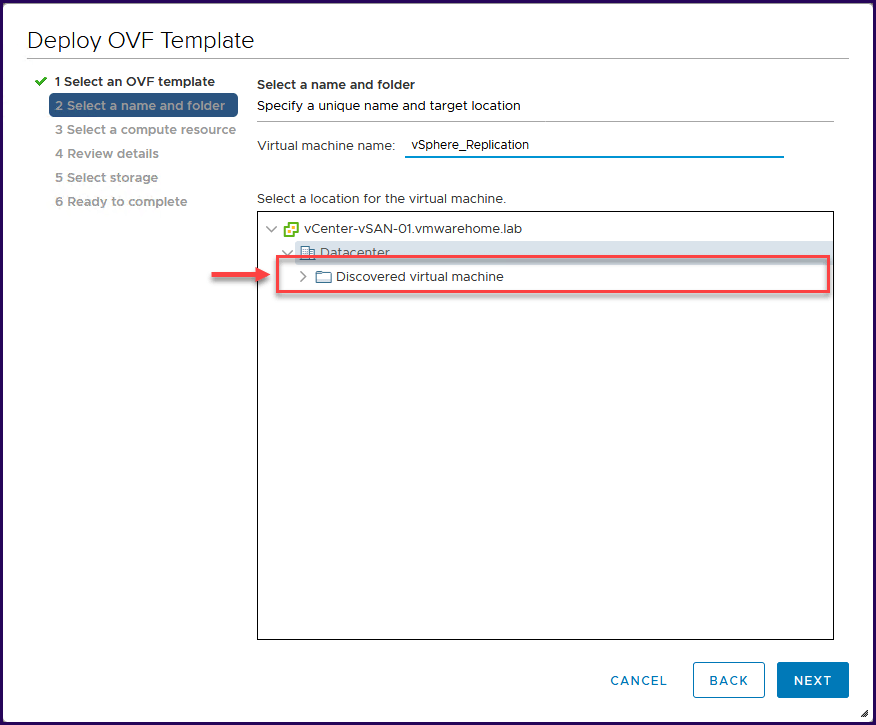
3. Select the folder location for the OVF.
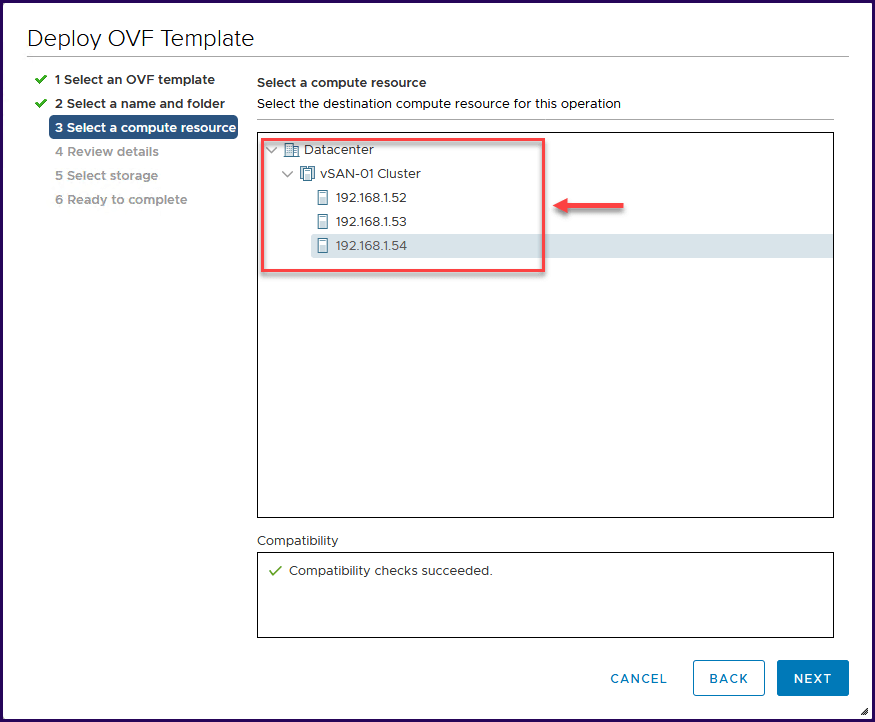
4. Next, select the Cluster (if DRS is enabled) or ESXi host where the vSphere Replication appliance will work.
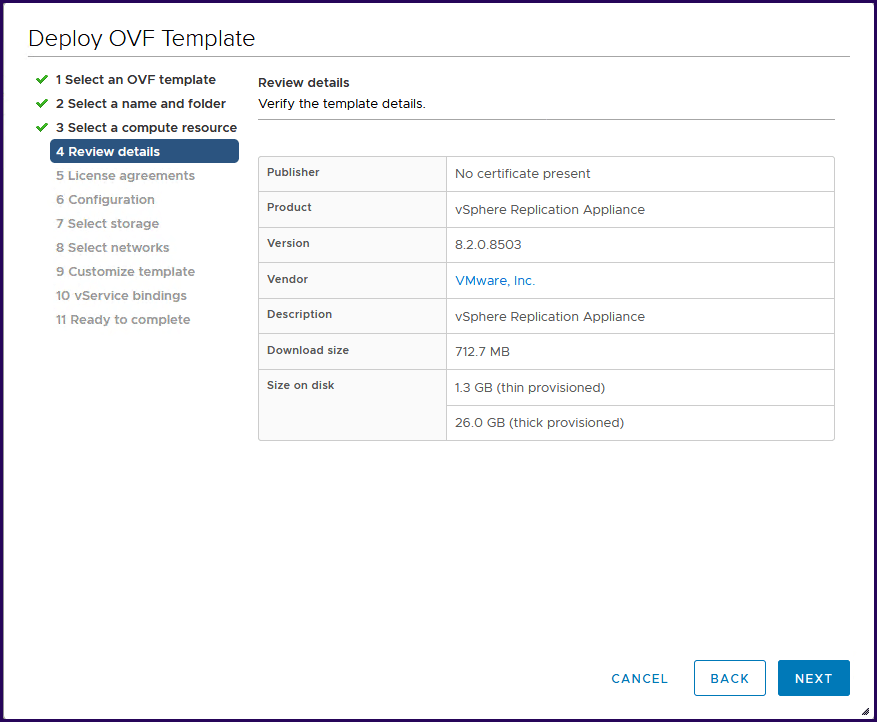
5. Next, accept the license agreement and continue to Review details tab.
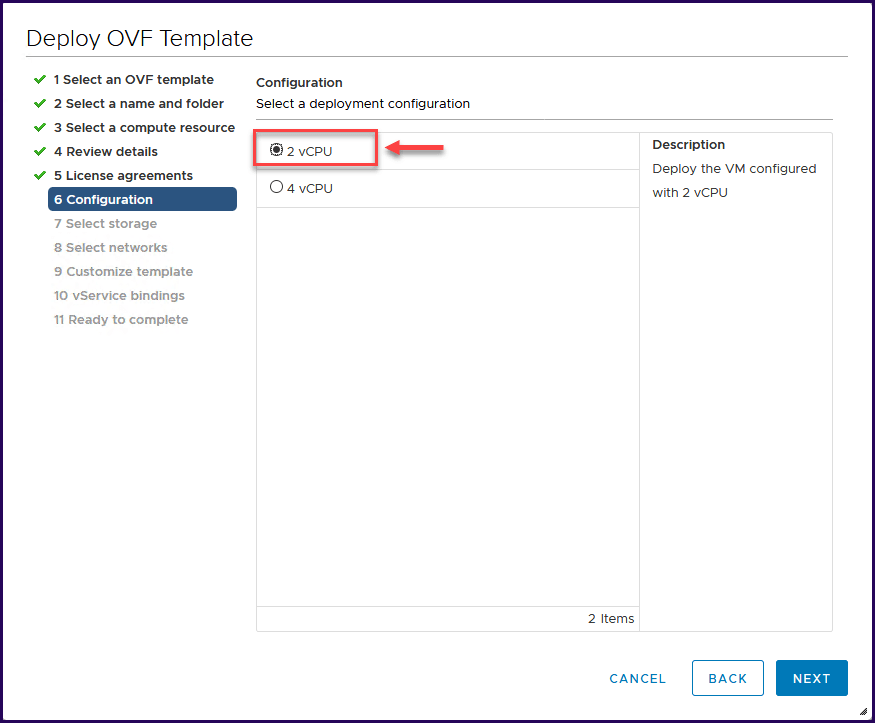
6. Next, we need to select the size of our vSphere Replication Appliance.
Depending on the size of your environment, you need to select the size of our vSphere Replication Appliance. By default, the deployment selects large 4 vCPU.
7. If you have a small environment (example 3 or 4 hosts and just a few VMs), then the small version works.
In this case, since it is a small environment and a test environment, we select the small version.
Note: Be aware that VMware doesn’t recommend changing the size or any configurations on the appliance after been deployed. So choose wisely.
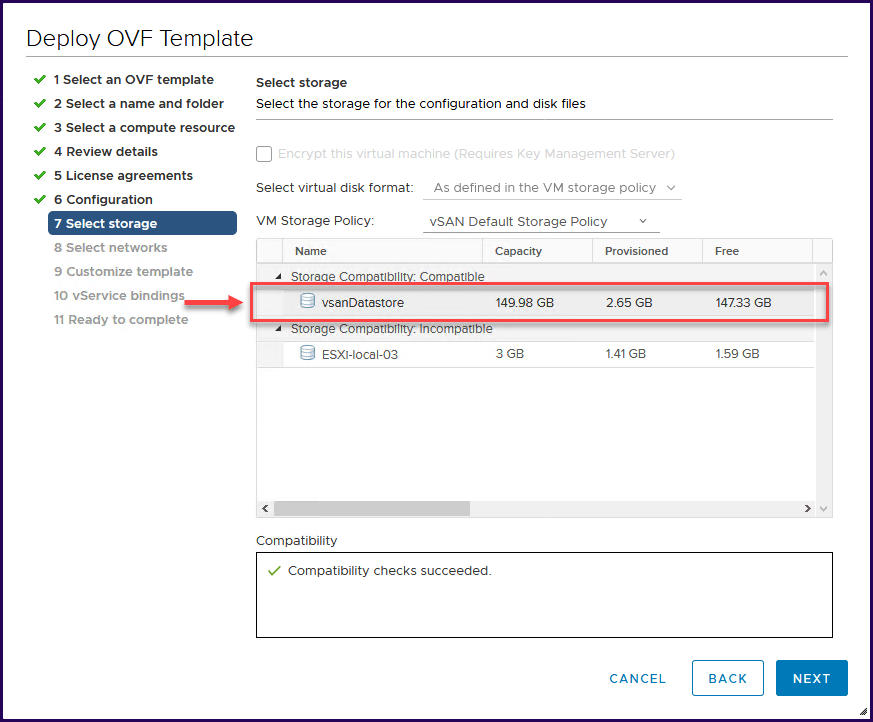
8. Next, select the Datastore for the appliance. Since we are installing vSphere Replication in a vSAN, the Datastore is from the vSAN.
9. Next, select the virtual network that the appliance will use.
In the IP Allocation setting, you can use IPV4 or IPV6. Using both is not supported.

By default, vSphere Replication Appliance deployment only uses one network interface for all traffic, such as:
- Management traffic between vSphere Replication Management Server and vSphere Replication Server
- Replication traffic from the source ESXi hosts to the vSphere Replication Server
- Traffic between vCenter Server and vSphere Replication Management Server
- NFC (Network File Copy) traffic, which is the traffic from the vSphere Replication Server appliance at the target site to the destination datastores
In our example, we will not change the default. However, it is possible to add additional network interfaces to vSphere Replication Appliance and configure them in VR VAMI.
10. We can do this to isolate the traffic or balance the traffic. So that vCenter/ESXi hosts are not affected by the replications.
You can backup your VMware VMs for free with no feature restriction. Download BDRSuite Now.
For that, we need to create an additional VMkernel Adapter and reserve a VMkernel NIC in each ESXi for each VMkernel Adapter created for vSphere Replication.
Next is an example of how to create a VMkernel Adapter for vSphere Replication.
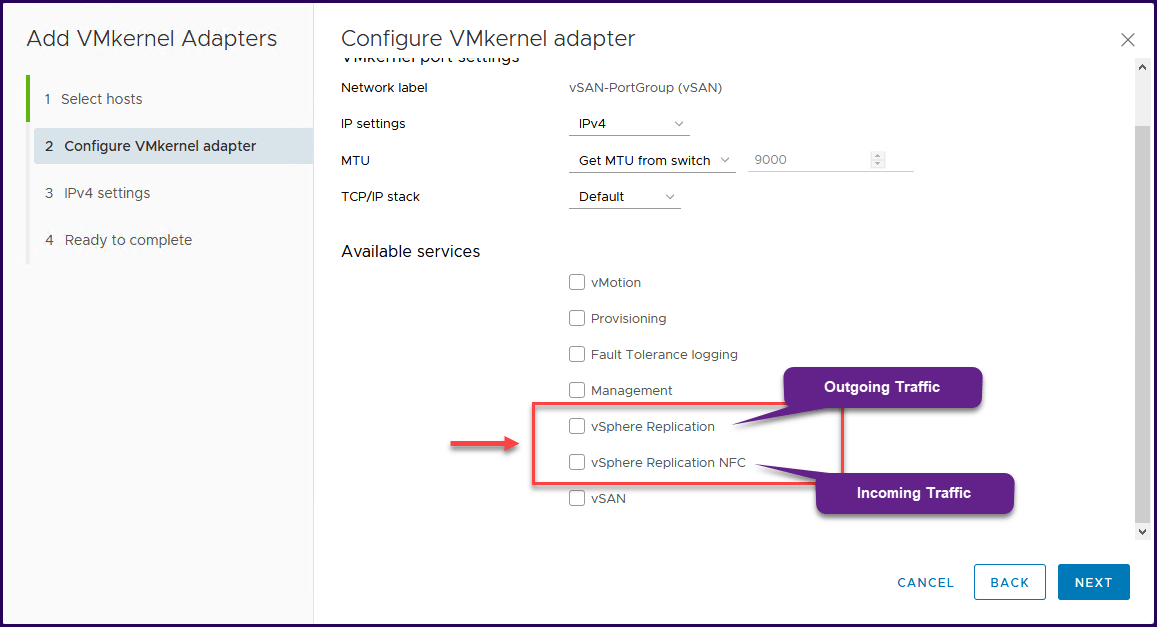
Creating an isolated network for vSphere Replication (outgoing and incoming connections) have more configurations and many changes at ESXi level and VR Appliance level.
Showing all the process of how to create a vSphere Replication isolated network would need an independent article and cannot fit on this one.
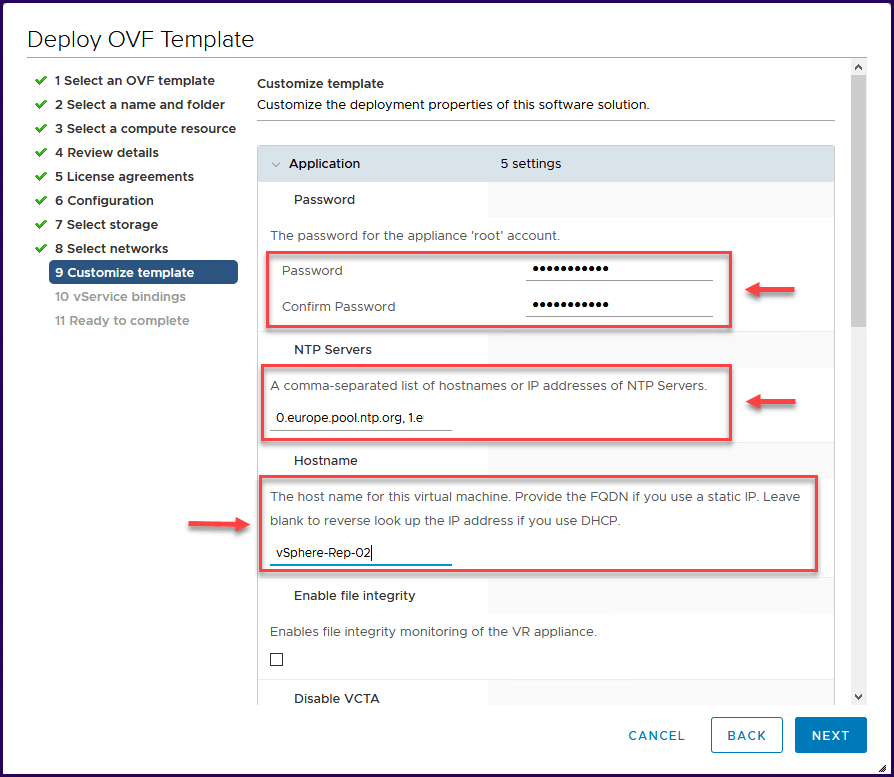
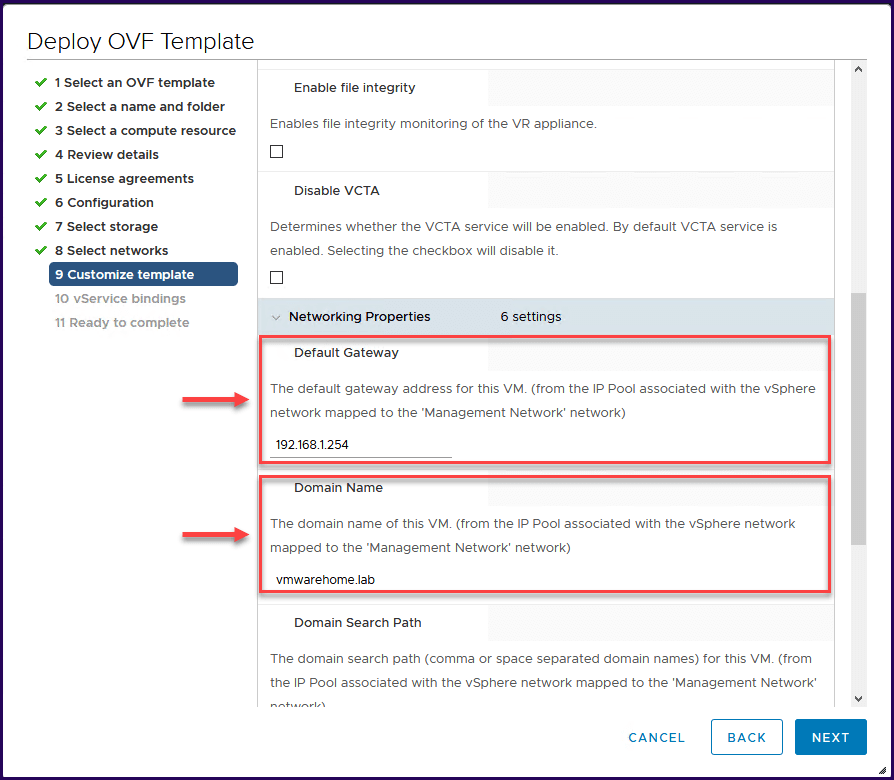
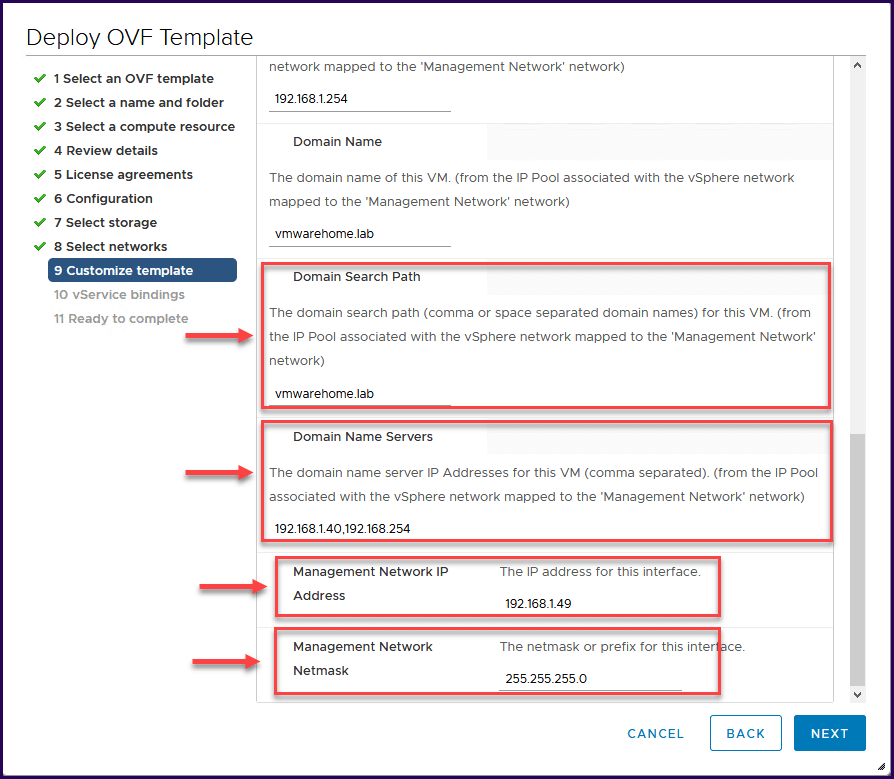
11. After we configured the vSphere Replication Appliance Network, we need to enter the values for customization (IP address, Gateway, DNS Name, NTP Server, DNS Server, Domain).
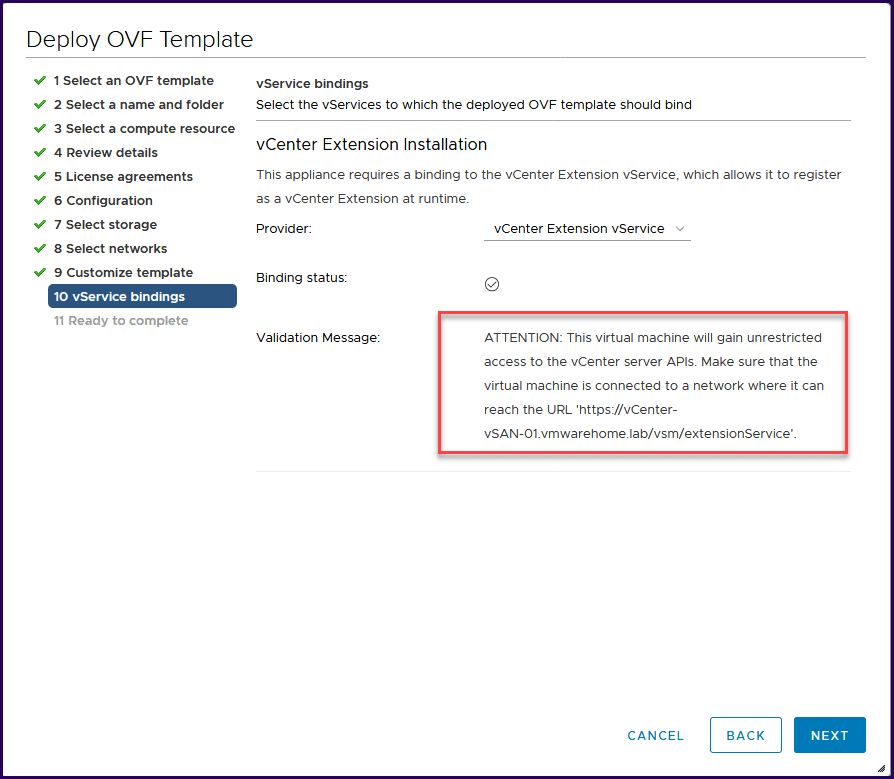
12. Next, we need to select the binding service where vSphere Replication Appliance will bind to vCenter service and as it says in the validation message, make sure both(VR and vCenter or PSC) are in the same network, and both can reach each other.
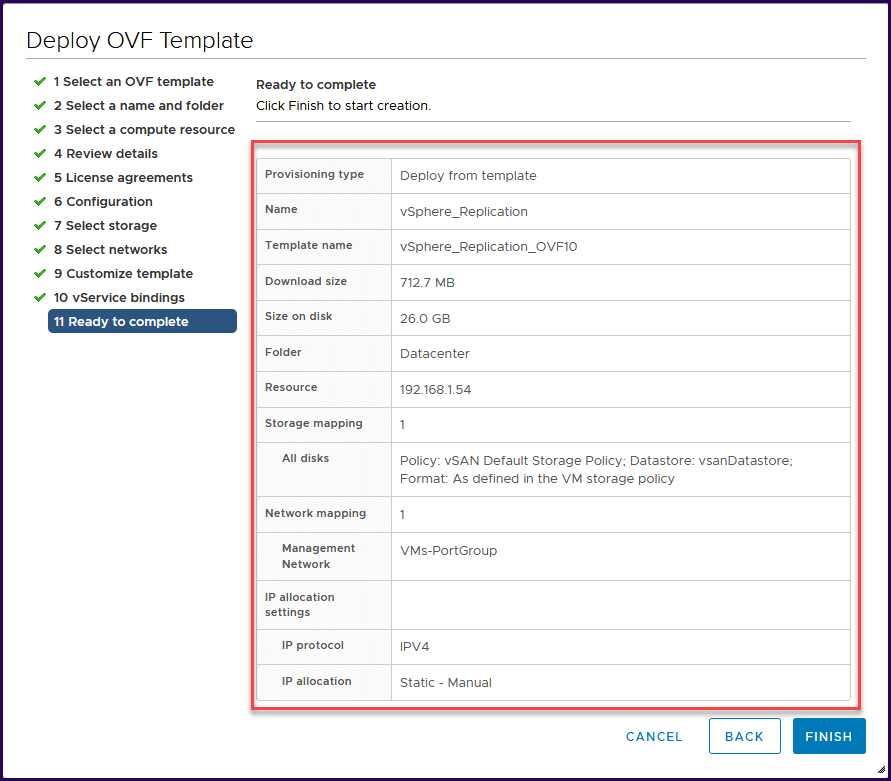
13. Next, check the details, and if all the details are correct, click Finish to start the deployment.
14. Next, vSphere Replication deployment is finished and is ready to configure.
How to register vSphere Replication in Center
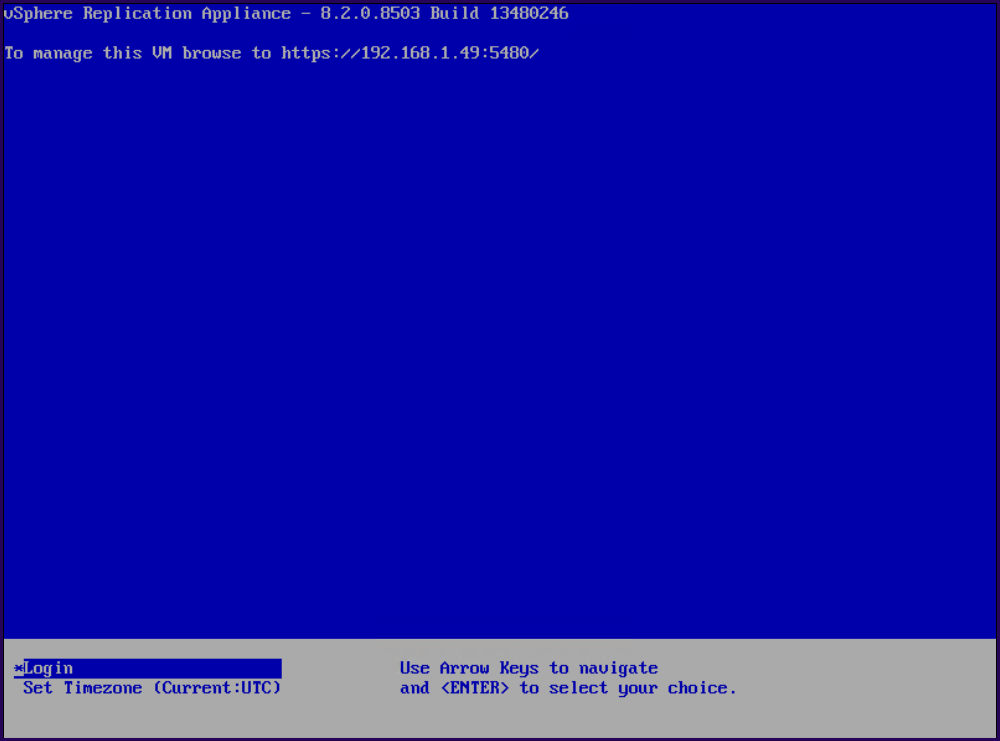
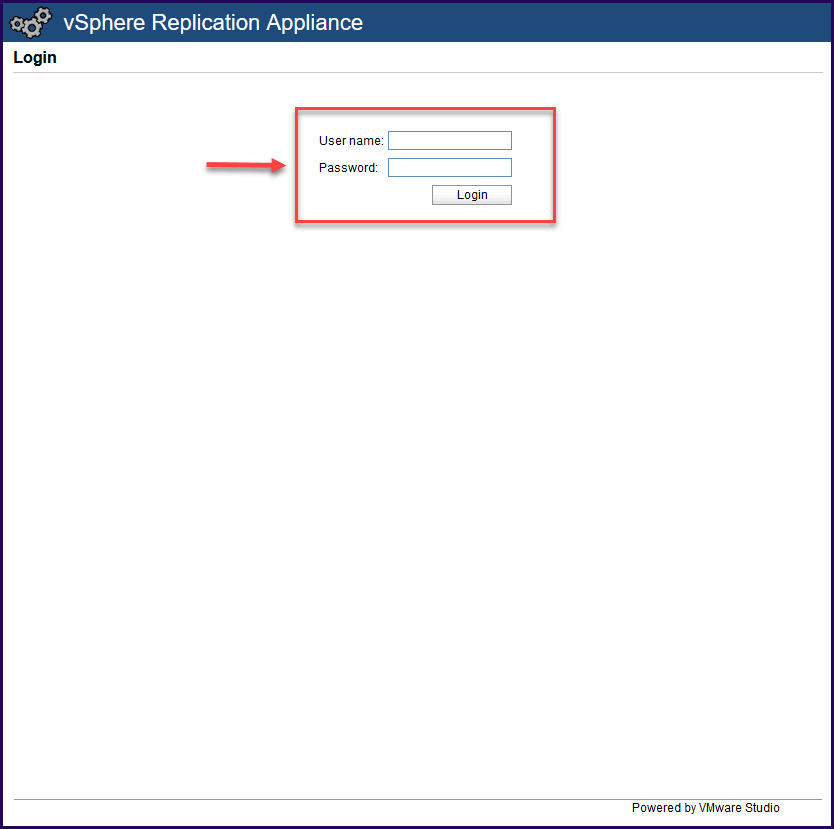
1. To register vSphere Replication appliance in vCenter, we need to enter Appliance VAMI using https://IP-Address:5480
Enter the VAMI with the credentials:
User: root, Pass: the password that was set in the deployment (step 9)
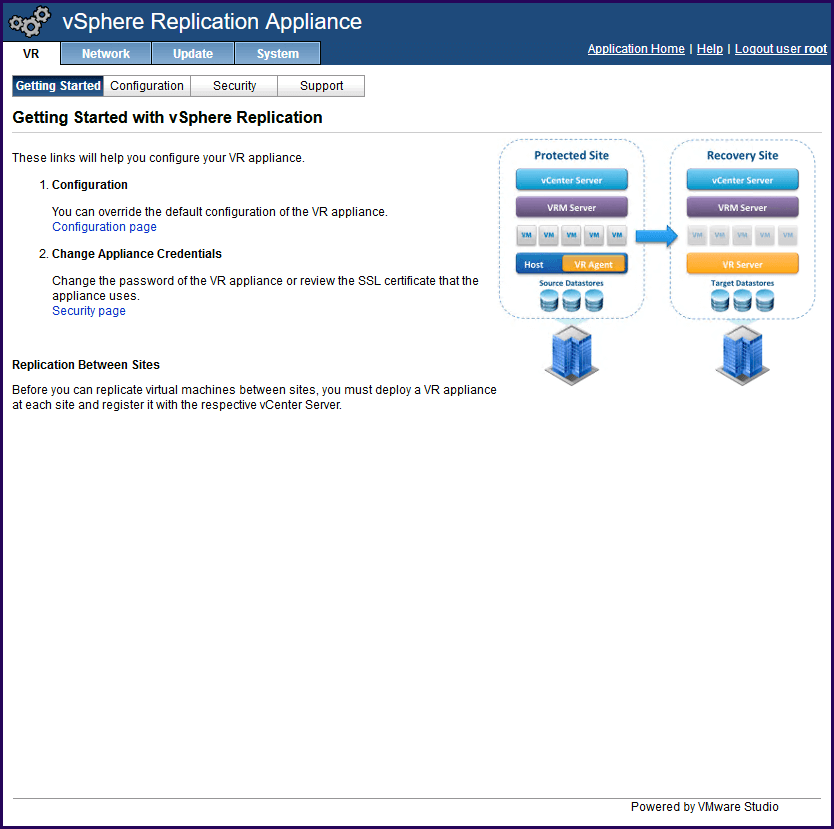
In VR VAMI we can:
- Register VR in vCenter
- Stop/Start/Restart VR Services
- Change VAMI Network Settings
- Change VAMI password
- Set Time
- Update VAMI (it depends from which version we are updating)
2. Next, we need to register vSphere Replication in vCenter
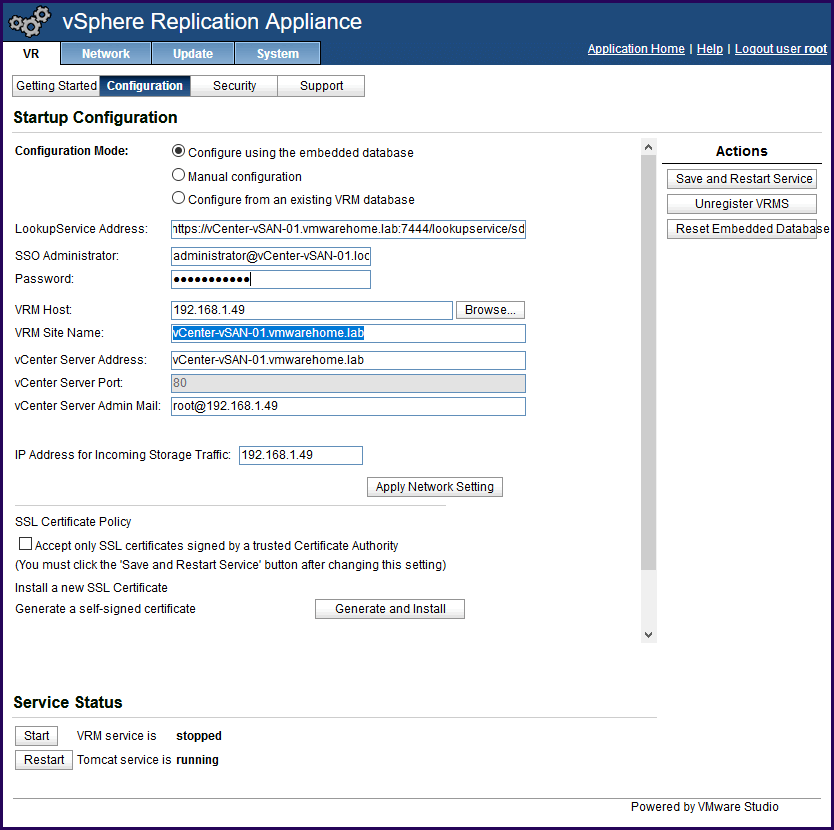
3. Go to tab Configuration and add all the information from your Center.
After adding all information about your vCenter and add particularly the LookupService address (that is: https:/ip-address:7444/lookupservice/sdk), click the Save and Restart Service.
In the IP Address for incoming traffic, the default is your VR management IP address. This value only changes if you have a different network to receive incoming connections (like discussed above regarding isolated vSphere Replication networks). If this is not the case, leave the default.
Note: In the certificate section, if you are using the default self-signed certificate, then leave the SSL Policy disabled. Only enable this option if you have a certificate from an internal Certificate Authority (CA).
4. After that confirm the SSL Certificate from vCenter (meaning that was able to connect to vCenter) to continue
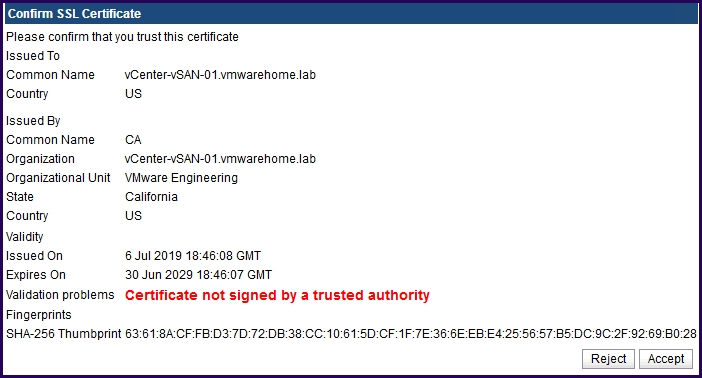
After VRM service is running and VR is now registered in the Center.

5. Next, go back to your vCenter. If you are already logged in, just log out and log in again. Then you should see the information regarding the Plugin for vSphere Replication that was deployed. Refresh your browser so that Site Recovery shortcut is available

6. You now can start the vSphere Replication by clicking Home, or Menu in vCenter and select Site Recovery shortcut to configure a replication.
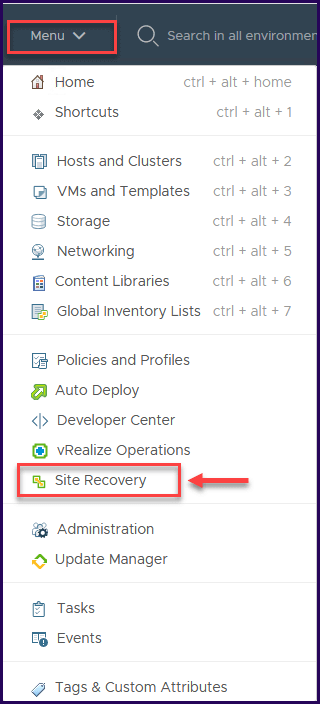
This last step finishes the deployment of vSphere Replication Appliance and register in Center.
Don’t forget that this process and deployment needs to be done in both sites and both vCenter (source and target).
If you are replicating between sites (like this article example), then you need to Install and register a vSphere Appliance Manager in the target vCenter also.
Next, we need to create and start the replication between sites.
How to create a Replication for a virtual machine
1. Create a site-to-site connection for the source and the target.
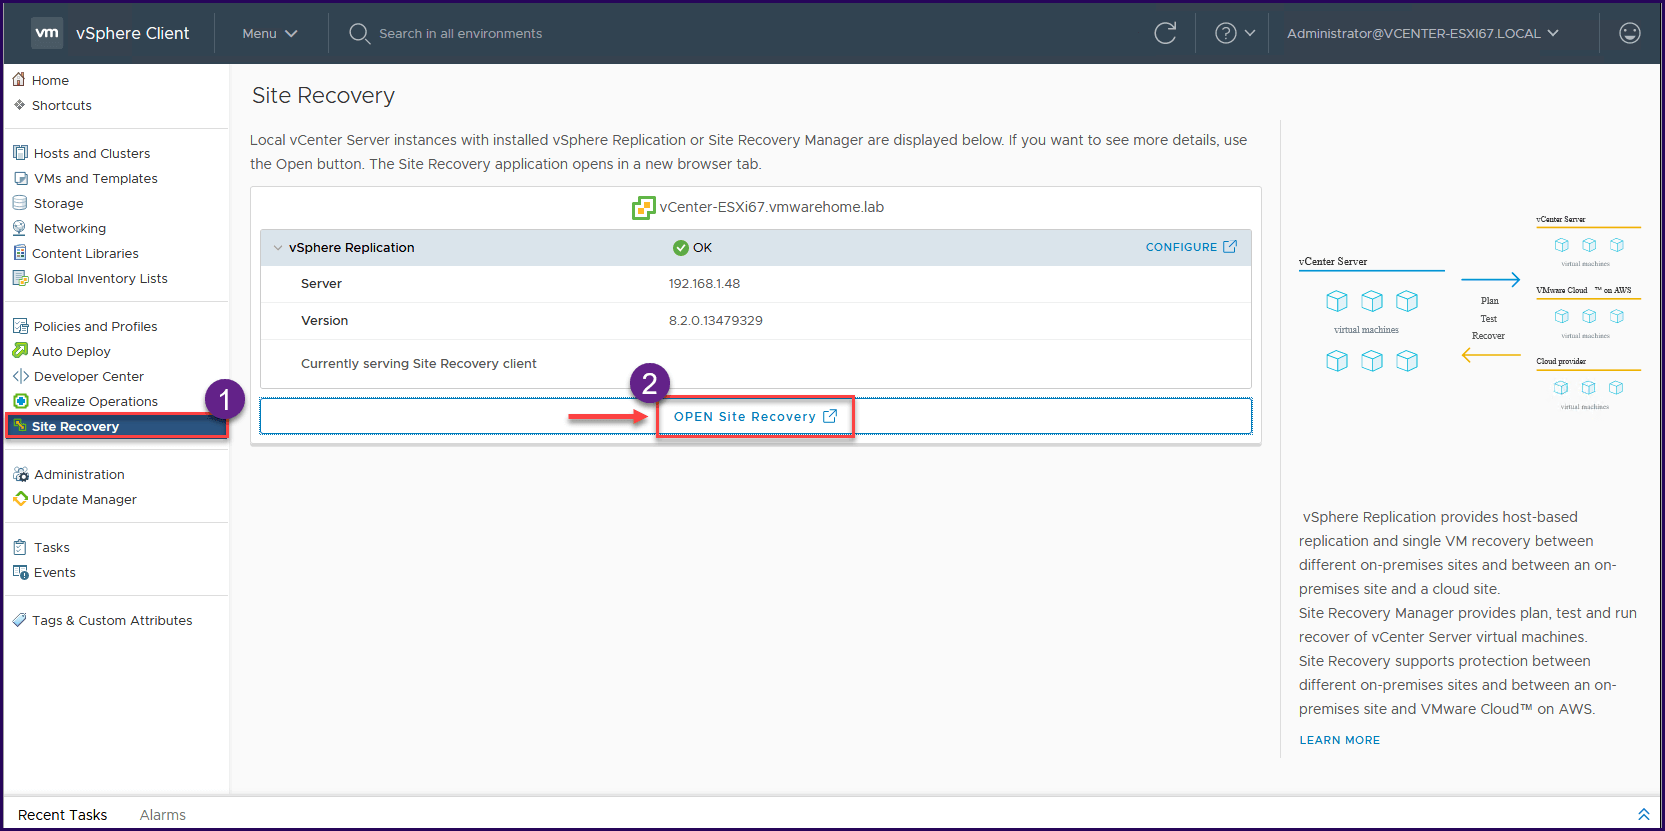
Launch vSphere Replication on the vCenter source by clicking in the shortcut Site Recovery, then click Open Site Recovery to configure vsphere replication connections.
It will open vSphere Replication from Center.
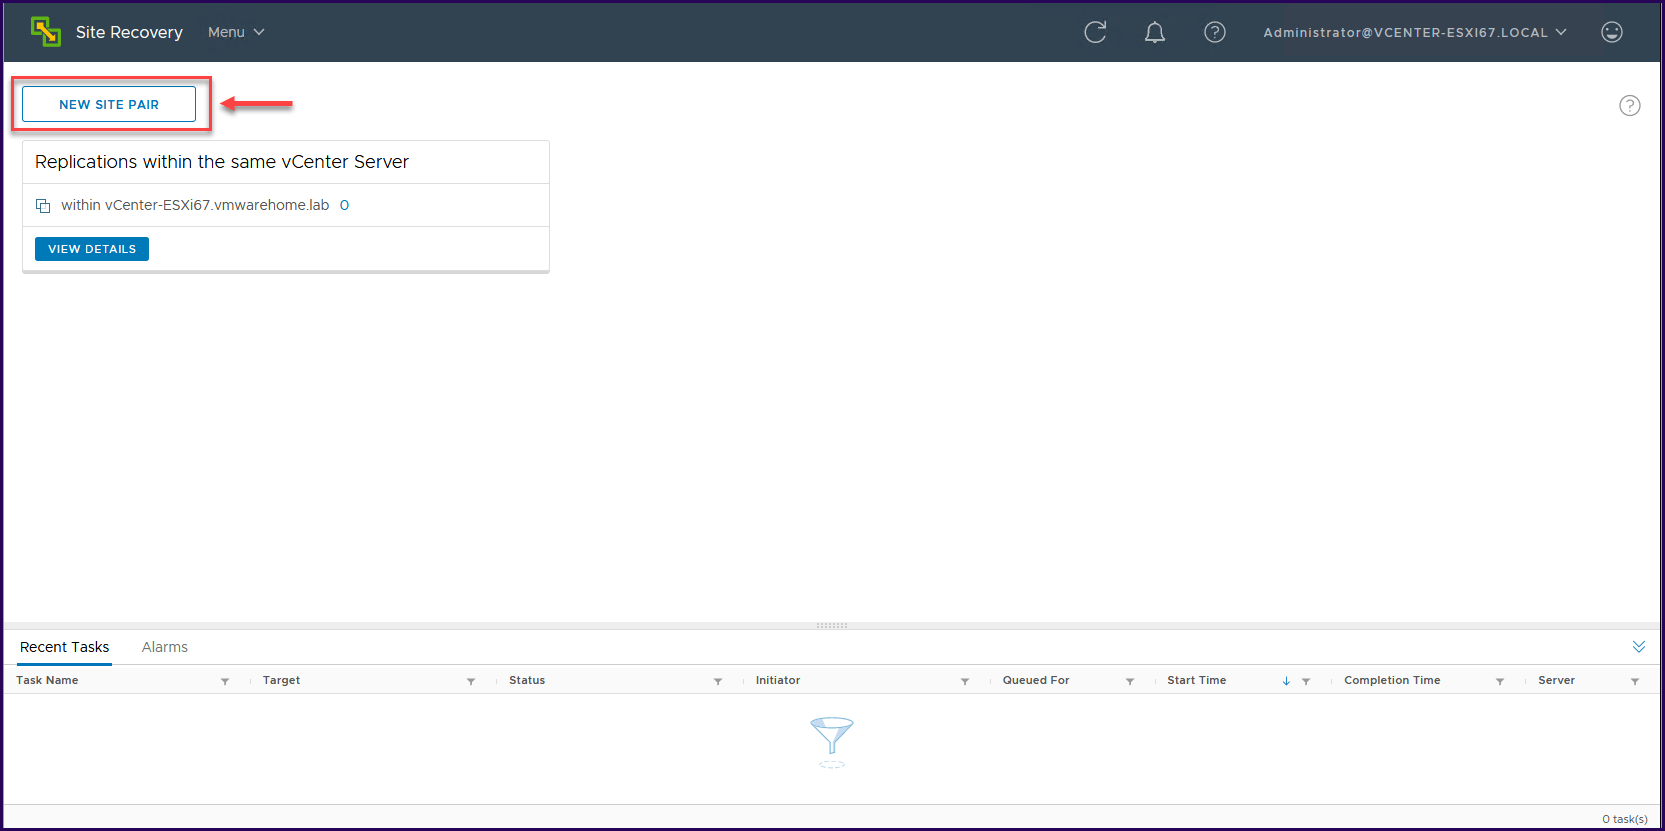
2. Next, click in New Site Pair to create a Replication between sites.
Note: As we can see in the next image, a Replication site is already created by default. This is internal replication on the Center.
As we explain above and in the first article, with this Replication, we can replicate VMs inside of the same vCenter, between Clusters and Datastores.
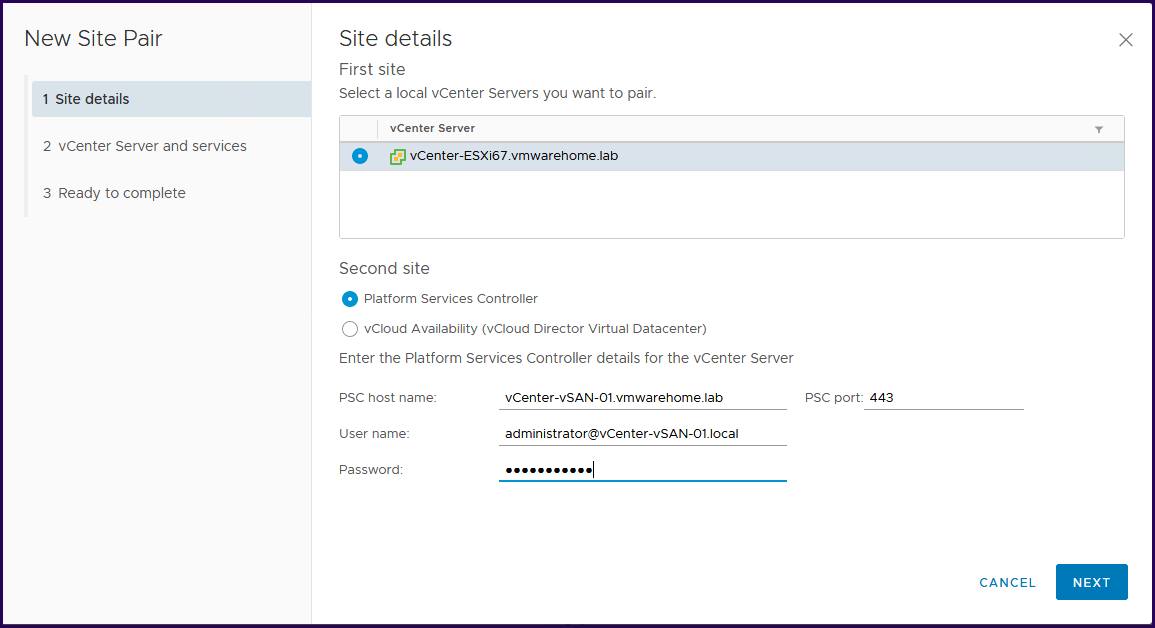
3. Next, connect to your target PSC. If the target has an embedded PSC, then is your vCenter. If the target has an external PSC, then you need to add your PSC and credentials so that vSphere Replication can pair to the target PSC.
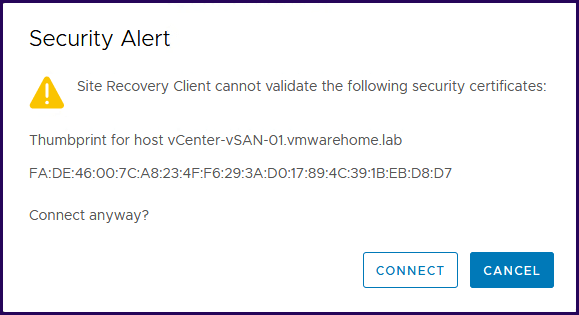
Accept the Certificate and continue.
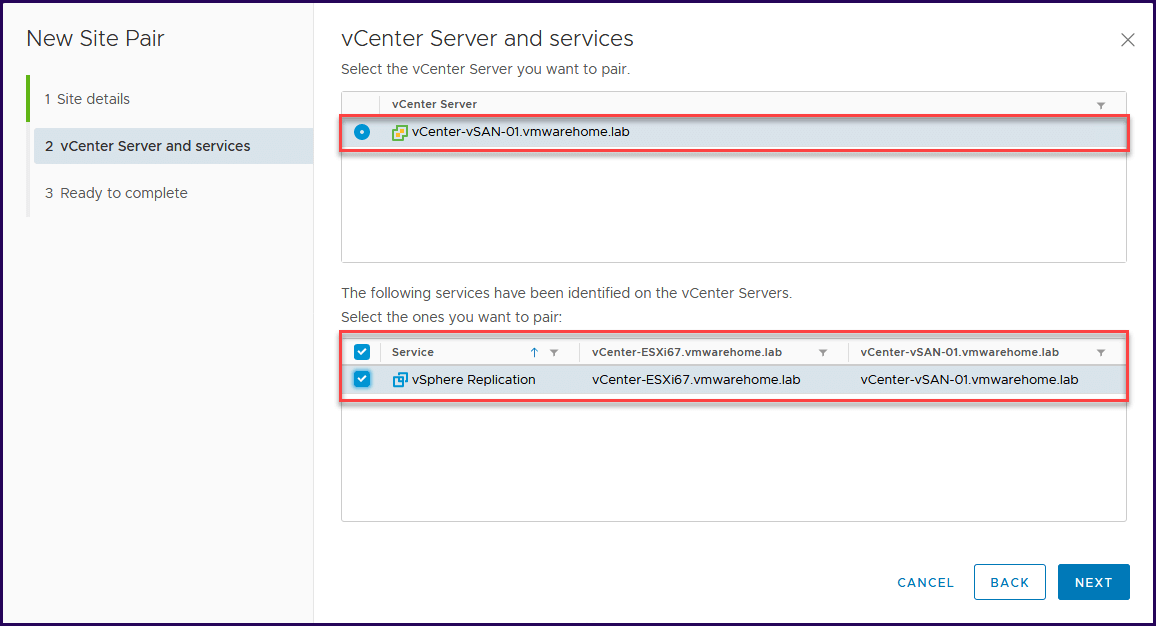
4. Next, vSphere Replication source recognize target vCenter and the target vSphere Replication and click Next.
5. In the next image, we see 1 is the Source vCenter, and 2 is the Target vCenter, click finish to create the connection pair between both vCenters.
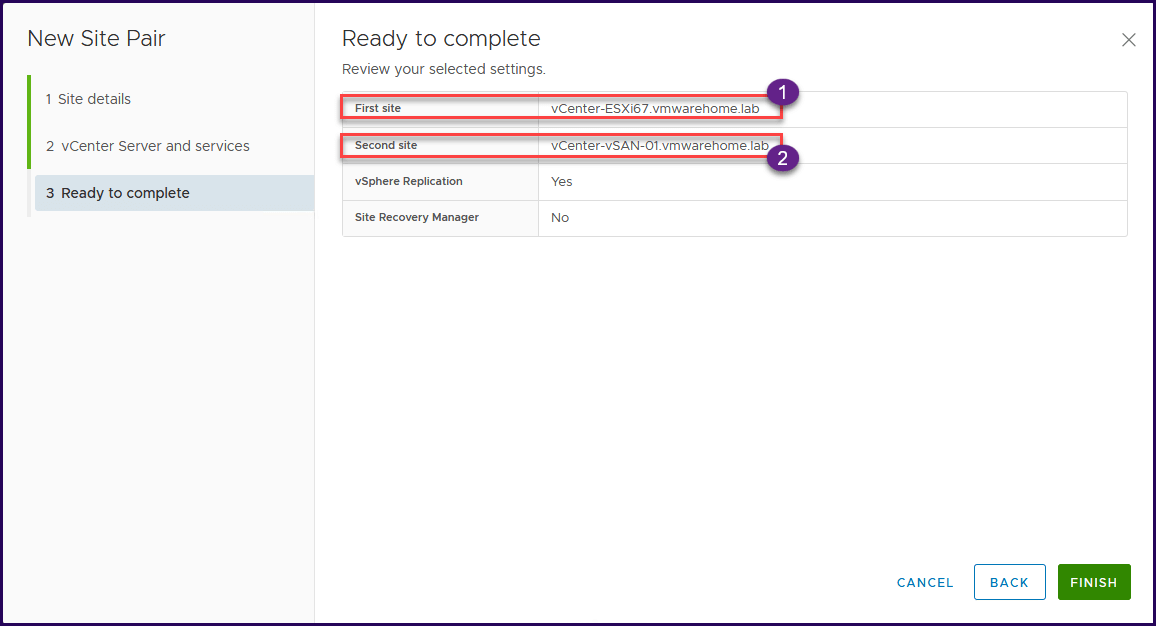
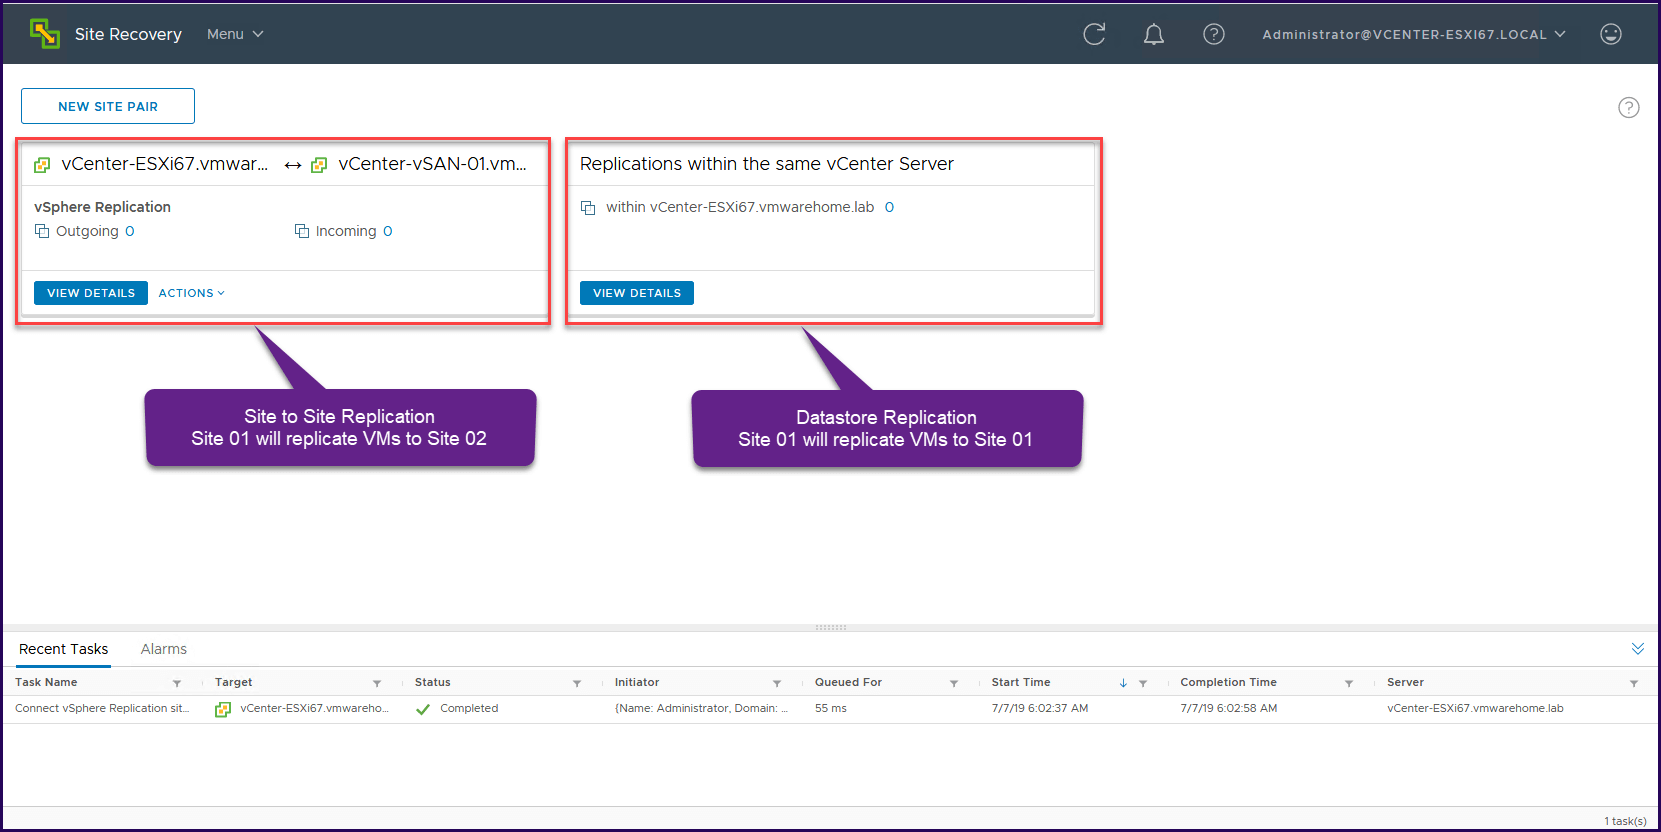
6. In the next image, we see the Site-to-Site Replication, but also the default vCenter-Local Replication (if we want to replicate inside the same vCenter in a different Cluster / Datastore).
Click the site-to-site to login and have access to vCenter (the previous login was to PSC not to the vCenter itself).
7. Enter credentials for the target Center.

After pair is created, you now have access to target vCenter. It’s time to create the VMs replication and select which VMs will be replicated.
Create VMs Replication
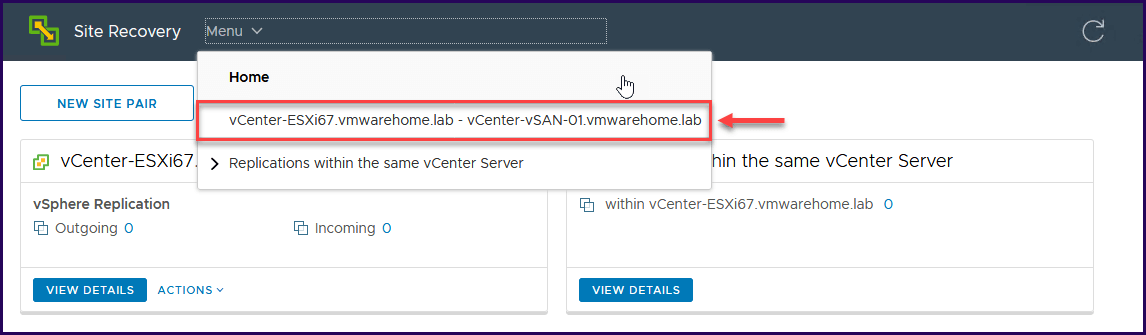
1. In the vSphere Replication click Menu and select the target Center.
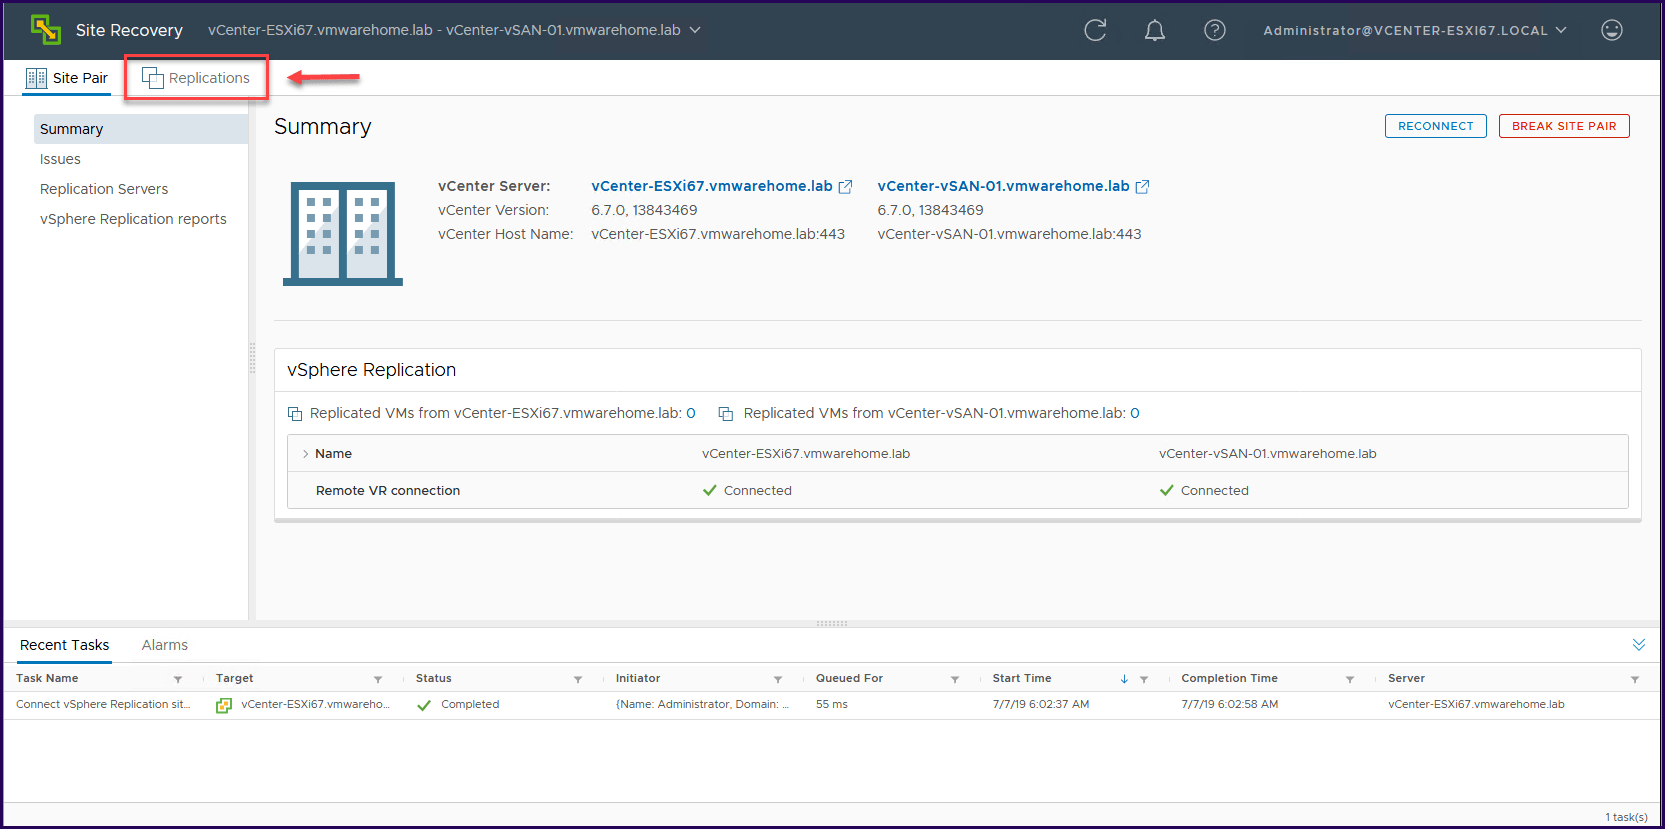
2. Next, click the Replications tab to open replication area.
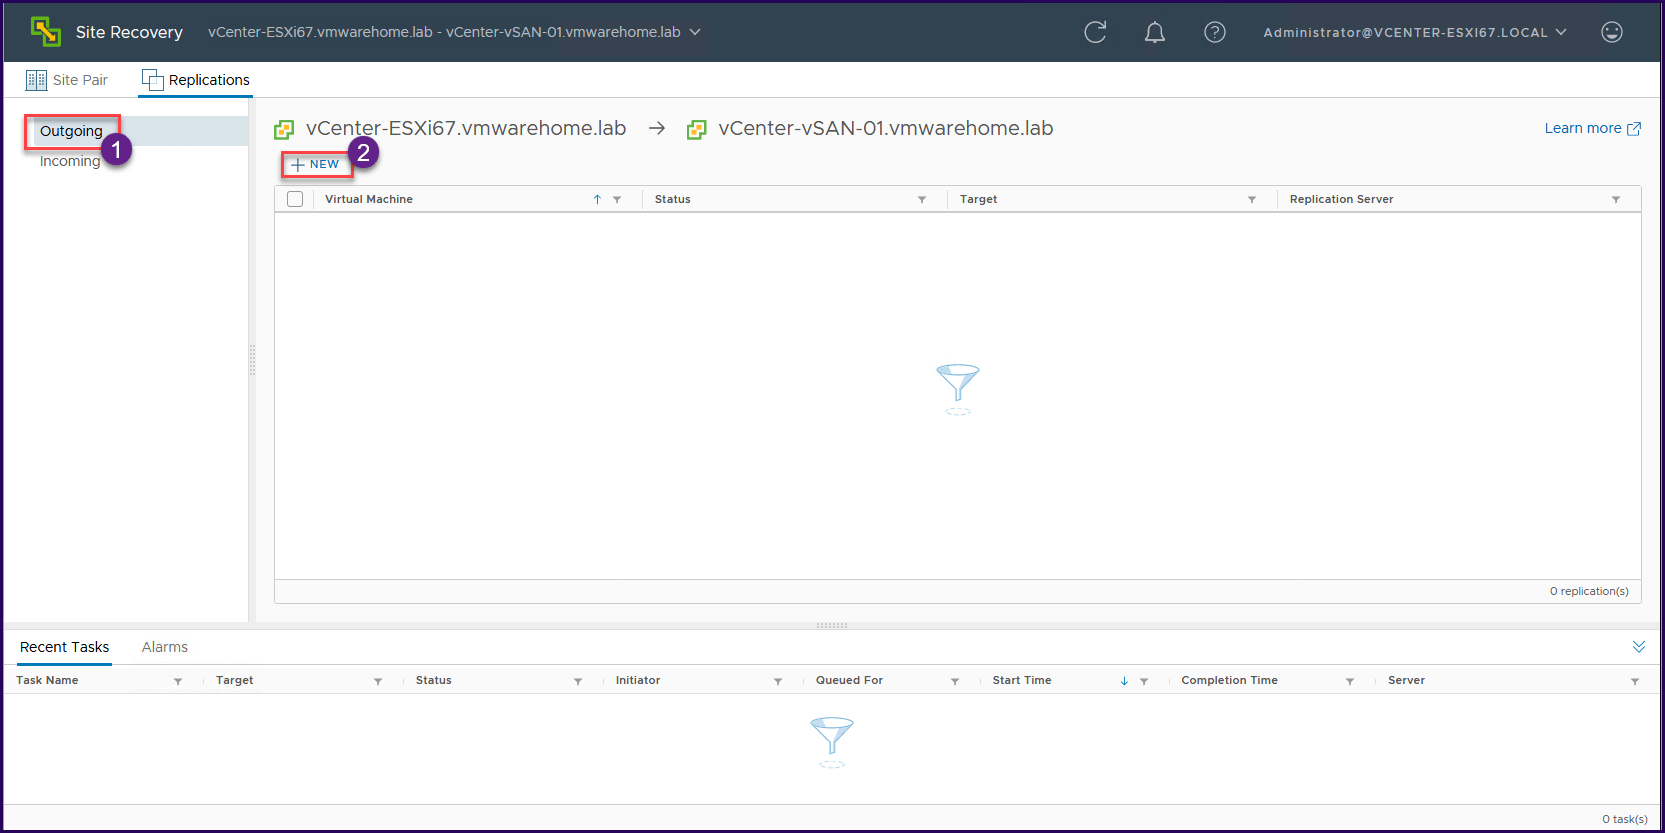
3. Next click in Outgoing. Since we are replicating to the target, we will have an outgoing replication.
If we want to create a replication from the target to source, then we select incoming replication.
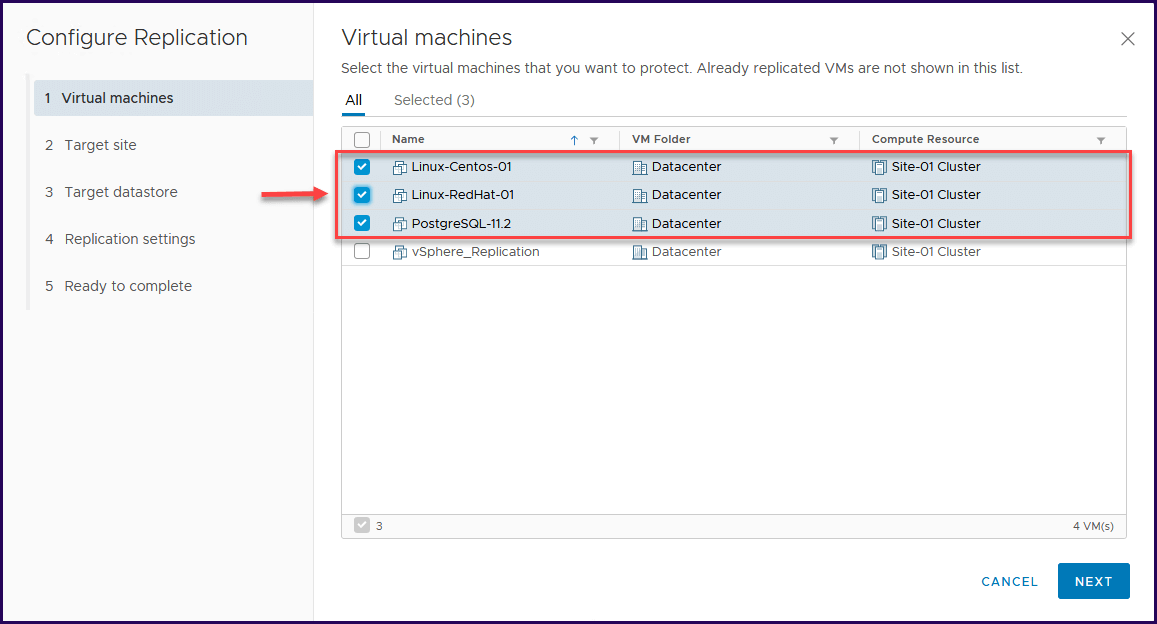
4. Next, select the VMs that you want to replicate.
Note: We do not replicate the vSphere Replication Appliance itself. It could be done, but we will not enable replication for VR.
Power off VMs are not replicated. We can add Power off VMs to the replicating list, but they will only be replicated when we Power on the VM. When we power on the VM VR automatically start replicating that VM.
5. Next is one of the essential sections on our replication process. Here is where we set our RTO and RPO for our SLAs and Disaster Recovery plan.
Like we have explained in the first part of this article, too many restore points and lower RPO have a critical impact on your Replication network and also in your environment.
So plan it carefully and use it wisely. Always check if you have network bandwidth and infrastructure resources for your RPO.
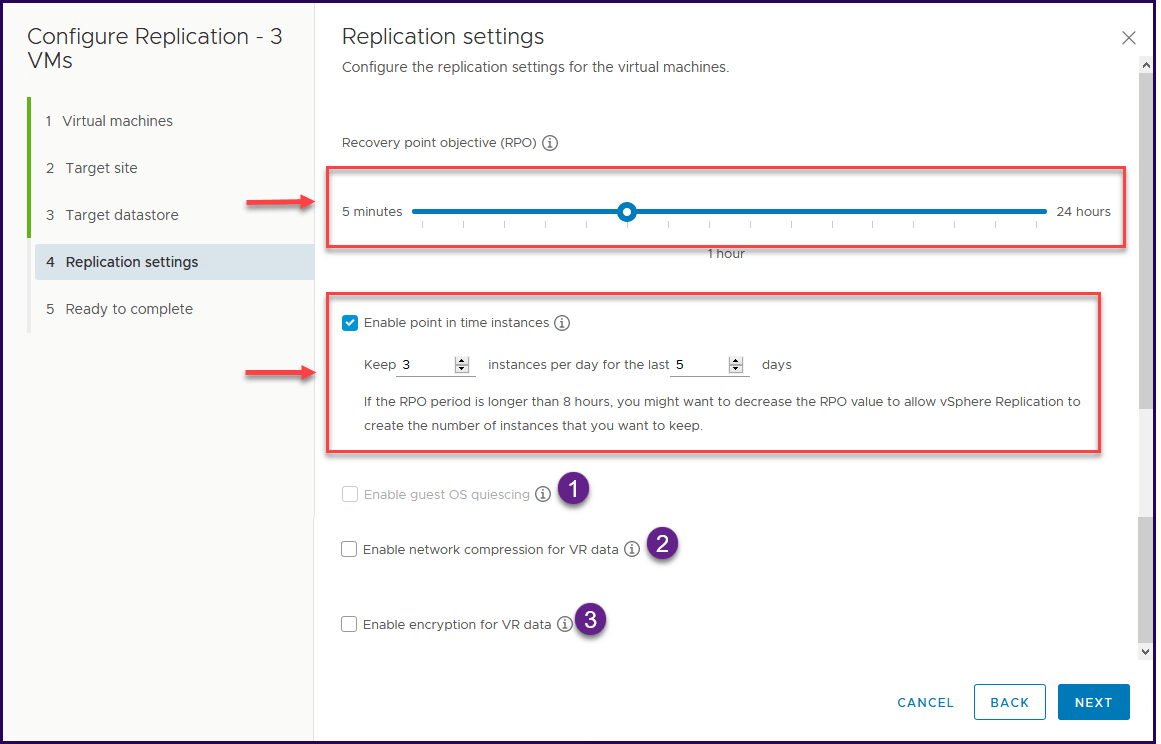
There are also extra options that we can add to our replication.
Network compression can reduce the bandwidth used to replicate your VMs. Enabling compression uses more CPU resources at both the source and target sites to compress and decompress the replicated data
Quiescing might take several minutes and might affect RPO time. Use only for VMs that are configured to support quiescing methods
Encryption protects VR Data against unauthorized access. Enabling encryption use more CPU resources at both the source and target sites to encrypt and decrypt the replicated data.
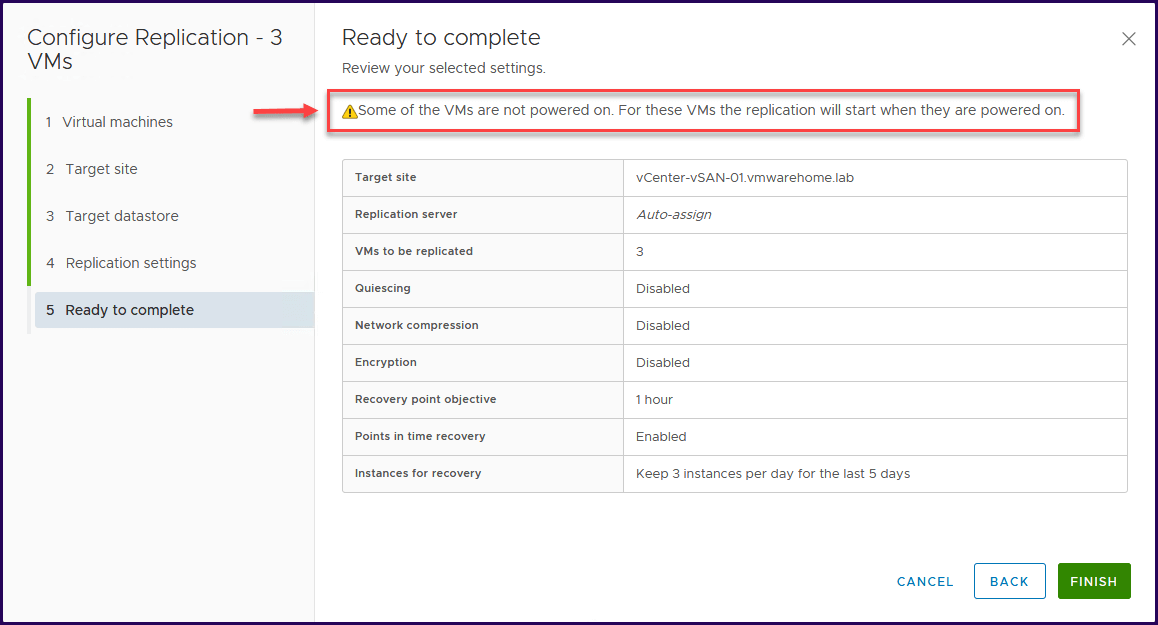
6. Next, check your details and click finish to create the replication.
Note: Again take into account that power off VMs will not be replicated until they are power on.
In the next image, we can see the VMs that were already replicated to the target and with 3 restores points a day.
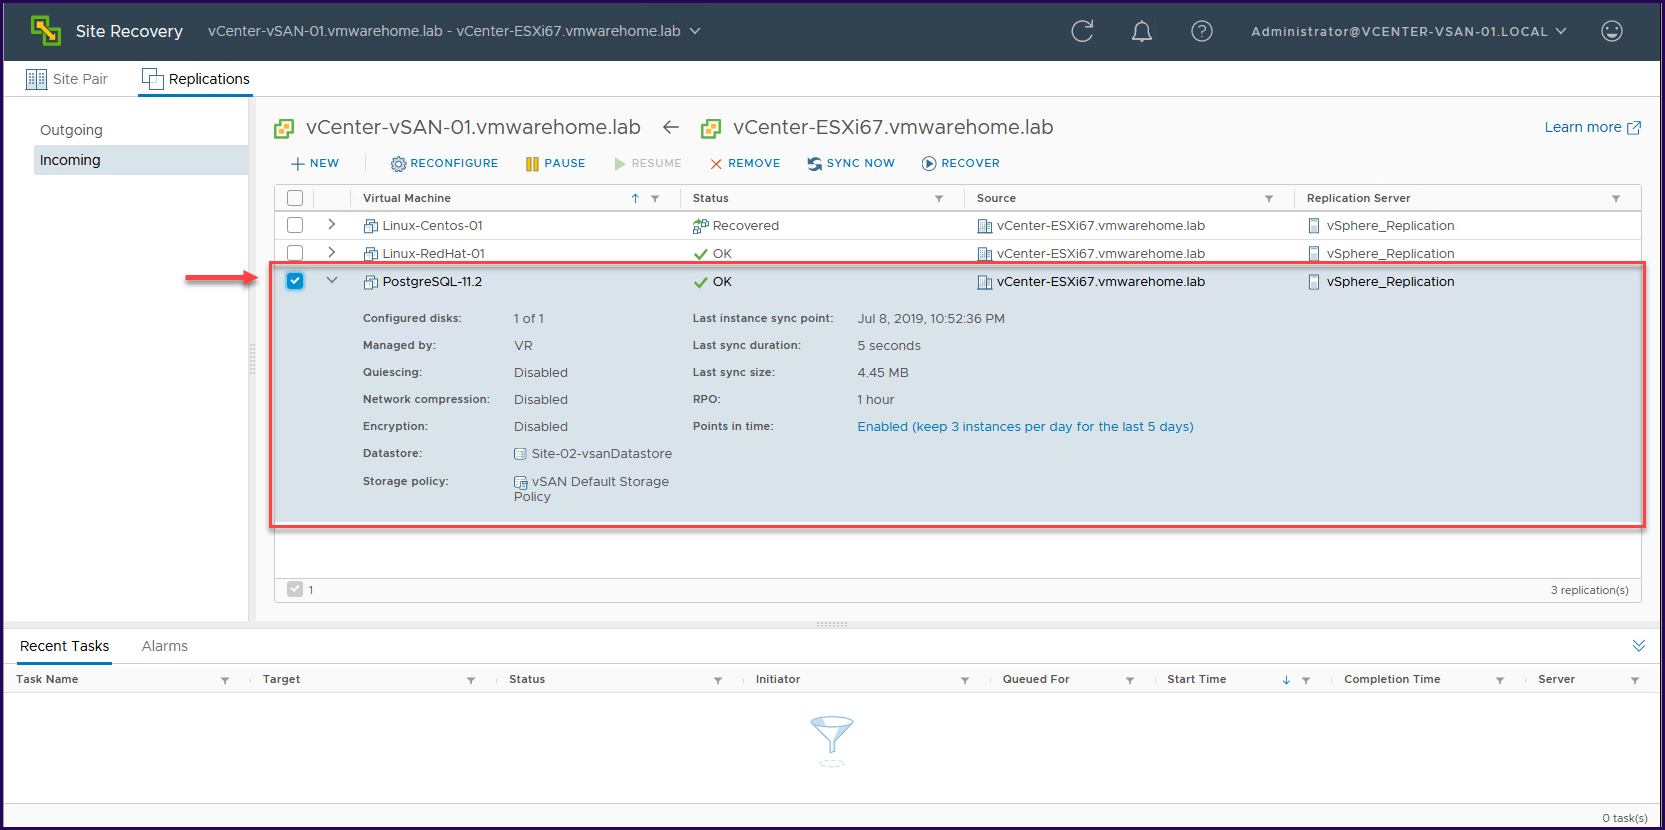
With the last task, we finished to deploy vSphere Replication and created a replication task between two sites.
Final thoughts:
In these two articles we have discussed vSphere Replication and the advantages to using a replication process in your Disaster Recovery plan, but also add a backup into that plan.
We have explained how to deploy the vSphere Replication and how to replicate between two sites using the vSphere web client and managing replications in vSphere.
As we have stated in the first article, for a full data protection we should have both Backup & Replication in place, in your environment. It allows for recovery with vSphere replication.
Check out our VMware Series for Beginners:
VMware for Beginners – What is vSphere Proactive HA?: Part 13
Embark on an Extraordinary Quest: Uncover the Ultimate VMware Backup Marvel!
Empower your critical data with the magic of secure and seamless VMware backup, forging an unbreakable shield of protection. Awaken the true potential of your virtual realm, preserving your invaluable information with unwavering confidence. This thrilling opportunity awaits — step into the realm of limitless possibilities and safeguard your data with a free trial today!
Ready to embark on this captivating adventure? Download BDRSuite now and take the first stride towards securing your VMware environment. Embrace tranquility and immerse yourself in the realm of unparalleled VMware backup excellence!
To explore more about VMware backup solutions, visit VMware Backup and discover the power of seamless data protection!
Follow our Twitter and Facebook feeds for new releases, updates, insightful posts and more.