
Depending on your business, it is important to manage your traffic and share the load between your servers. Auto-scaling is what you need to implement in your Cloud/On-Premise environment because auto-scaling will be used in case of traffic fluctuations on your infrastructure. It means that new machines would be added in order to increase capacity and availability because there is more hardware to share the load. Based on this case, I will explain how to create and configure Azure Virtual Machine Scale Sets, which will help you to manage your traffic in Azure.
What are Virtual Machine Scale Sets (VMSS)?
VMSS is a great way to deploy and manage a set of identical Virtual Machines in your Azure subscription. I mean that you can deploy three Virtual Machines, which are identical instead of creating three individual Virtual Machines. Many pros can be noticed:
- Starting and stopping Virtual Machines is very easy
- Easily auto-scaling the number of instances in your VMSS to increase the availability
- Reducing the number of instances to save money
VMSS is just an Azure Compute Resource (e.g Microsoft.Compute/VirtualMachineScaleSets). One cool thing is that you can integrate Virtual Machine Scale Sets with Azure Load Balancer and Azure Traffic Manager. You can build a Virtual Machine Scale Set using pre-defined Azure Template or by creating a new VMSS from the Azure Portal. Of course, you can also create a new VMSS using Azure CLI or PowerShell.
Another thing to notice is that VMSS is compatible both with Windows VMs and Linux VMs.
For those of you who are wondering why not simply these three Virtual Machines from scratch, then I must admit that it is not the new best practice. Think Azure Next Generation to save time and money!

In order to create three identical IIS Virtual Machines without VMSS, you would need to:
- Create a Resource Group
- Create the first VM with network card, storage, Public IP, …
- Create the second VM with network card, storage, Public IP, …
- Create the third VM with network card, storage, Public IP, …
Now, let’s imagine you no longer need the third IIS VM, then you would remove this VM, and two hours later the traffic increase significantly, so you must add a new IIS Virtual Machine for scalability, right? Of course, you can automate this process using JSON, PowerShell, and so on …, but thanks to Azure VMSS, you will be able to increase the number of Virtual Machines just by clicking on a button and that’s all! Scale set VMs are configured identically, you just choose how many new VMs you need. You do not need to independently define:
- Network,
- Storage,
- Extension resources,
As shown below, you will also be able to use an Azure Load Balancer with your Azure VMSS. It means that you can redirect an inbound request to a specific Virtual Machine inside your Azure VMSS.
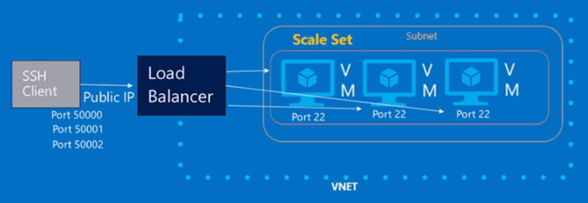
In the previous example, the SSH request will be “NATed” through the Load Balancer and redirected to the Virtual Machine depending the inbound port number.
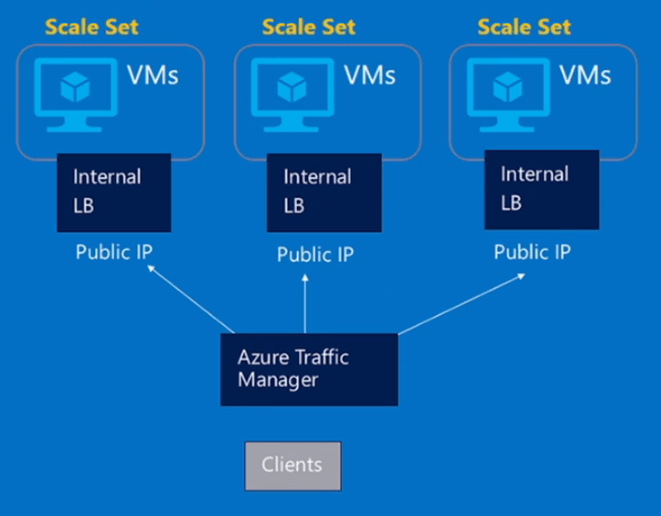
Another complex scenario can help you to redirect your traffic between multiple Azure Regions using Azure Traffic Manager, as shown below:
Create Virtual Machine Scale Set
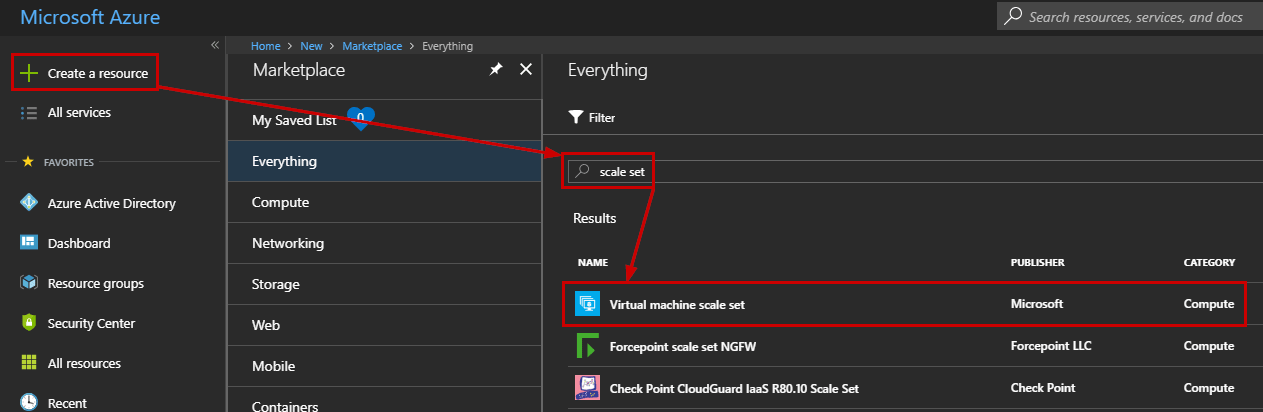
To create a new Virtual Machine Scale Set, log in to the Azure portal at https://portal.azure.com and click Create a resource, Search for Scale Set, then select Create:
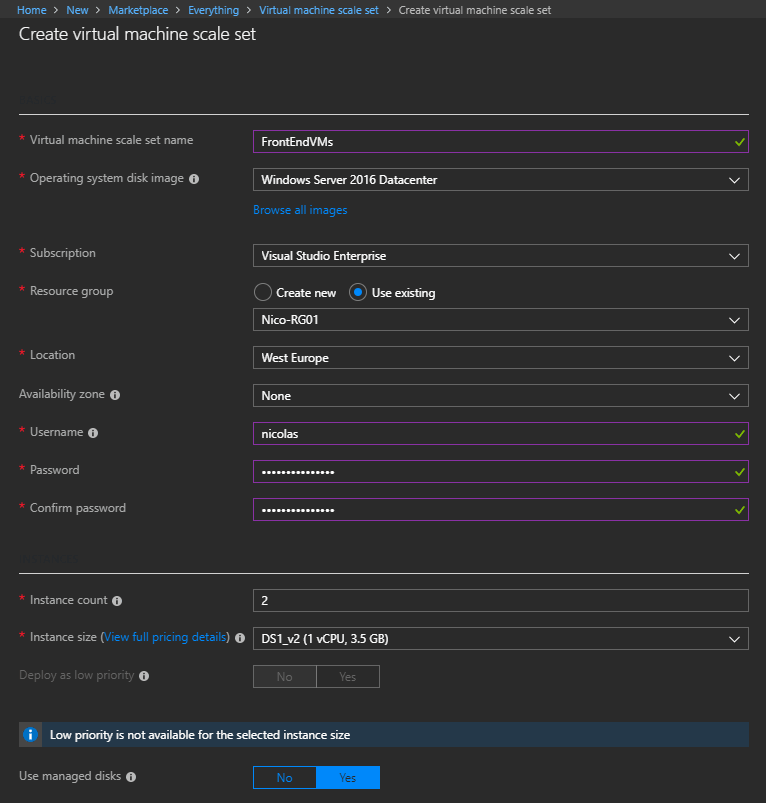
Enter the following information to create the Virtual Machine Scale Set:
- Name: It is a friendly name for your VMSS. This name will be incremented to name your Virtual Machines
- Operating System: Choose which OS you want to deploy
- Subscription: Select your Azure subscription
- Resource group: Select an existing Resource Group or create a new one
- Location: Select the location
- Username/password: It is the admin username that you will use to connect on your Virtual Machines
- Instance count: The number of virtual machines in the scale set. Minimum is 0 and maximum is 1000. Default is two VMs, which is nice to start working with VMSS
- Instance size: It is the size of each VM in the scale set. It means that all the virtual machine will be created using the same instance size. Note that you can modify the size later
Click Show Advanced Settings to configure the Load Balancer. In this example, I want to leave these virtual machines behind a load balancer with NAT rules for inbound connections.
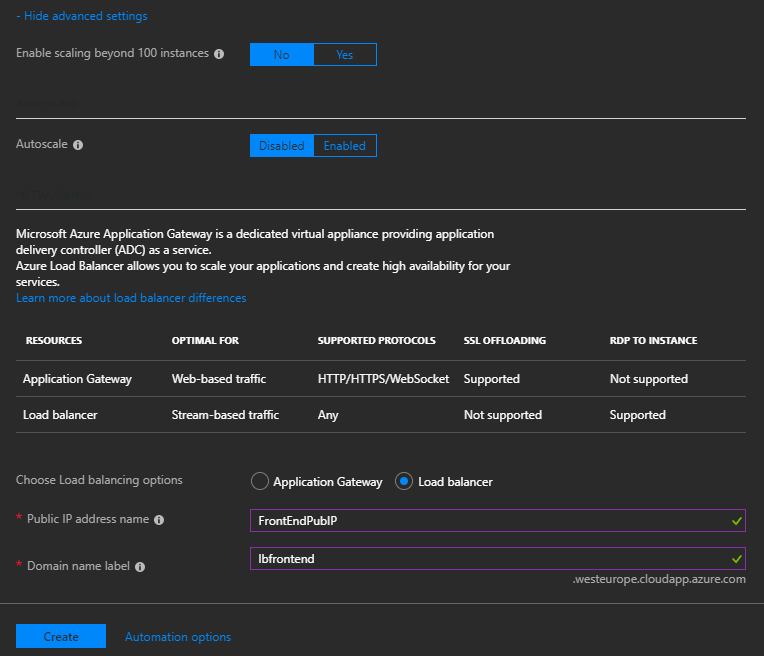
After it has been deployed, use the Azure Portal to find the public IP address of the load balancer and see the NAT rules associated with the load balancer.
Note that you cannot see the Virtual Machines created through your VMSS individually as an Azure Resource. You must use the VMSS blade to interact with these VMs.
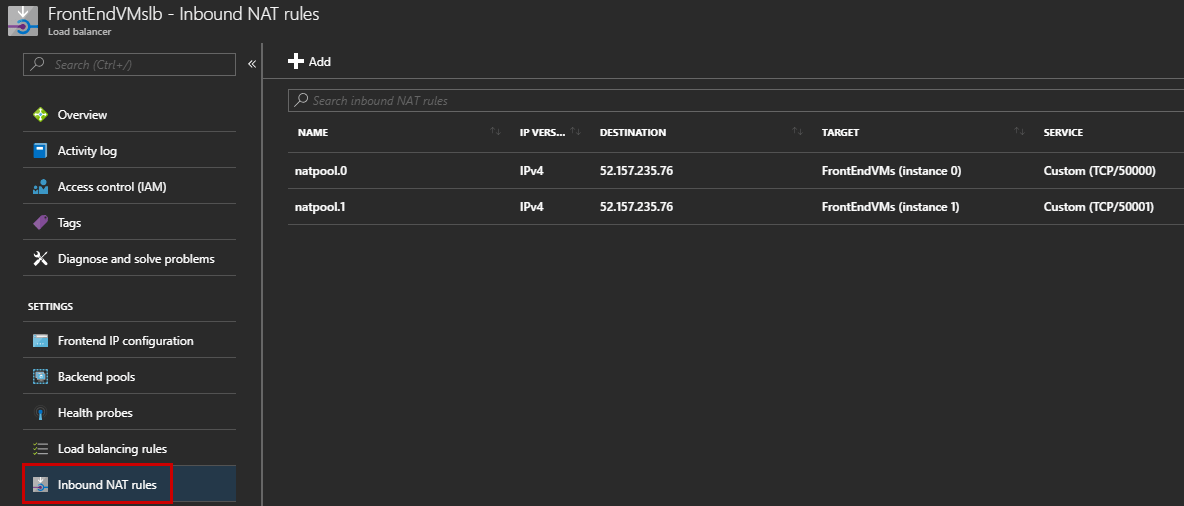
Navigate to your Azure Resources and confirm that a new Load Balancer has been successfully created:

Click on the Load Balancer and check the NAT Rules. One NAT rule has been created per instance:
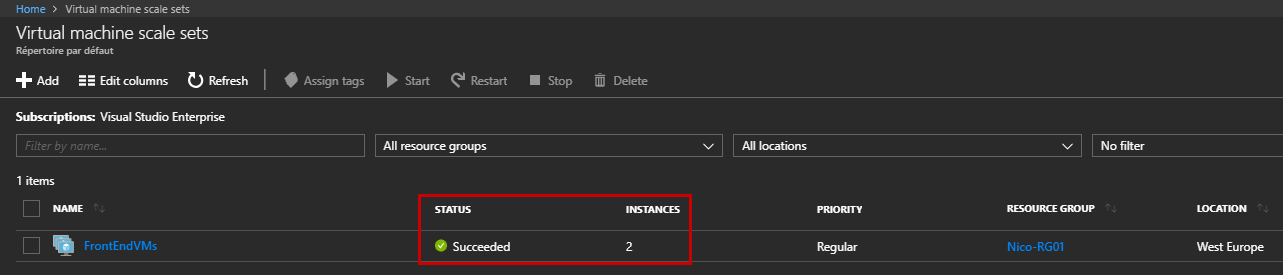
Go back to your VMSS and confirm the number of deployed instances:
Confirm that you can connect to your Virtual Machines. Use the following
- VM1 => 52.157.235.76:50000
- VM2 => 52.157.235.76:50001
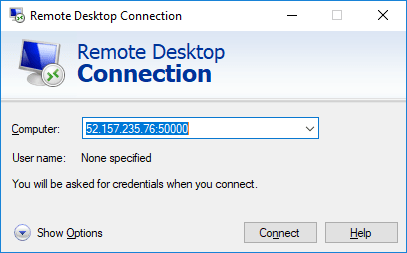
Here, you use the Load Balancer to redirect the RDP request to the specific Virtual Machine.
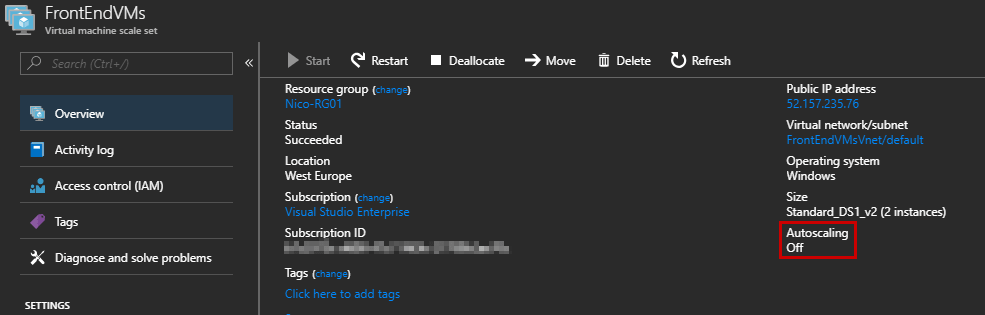
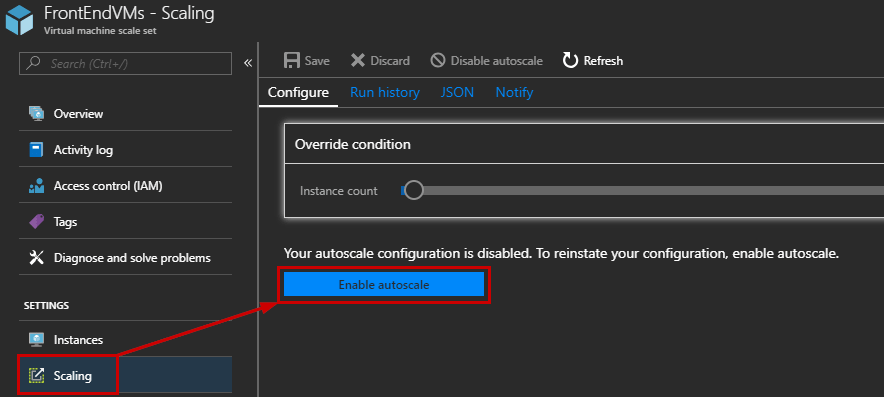
At this step, your Virtual Machine Scale Set is up and running with two VMs. However, the auto-scaling feature is disabled by default:
Click “Scaling” and “Enable autoscale”:
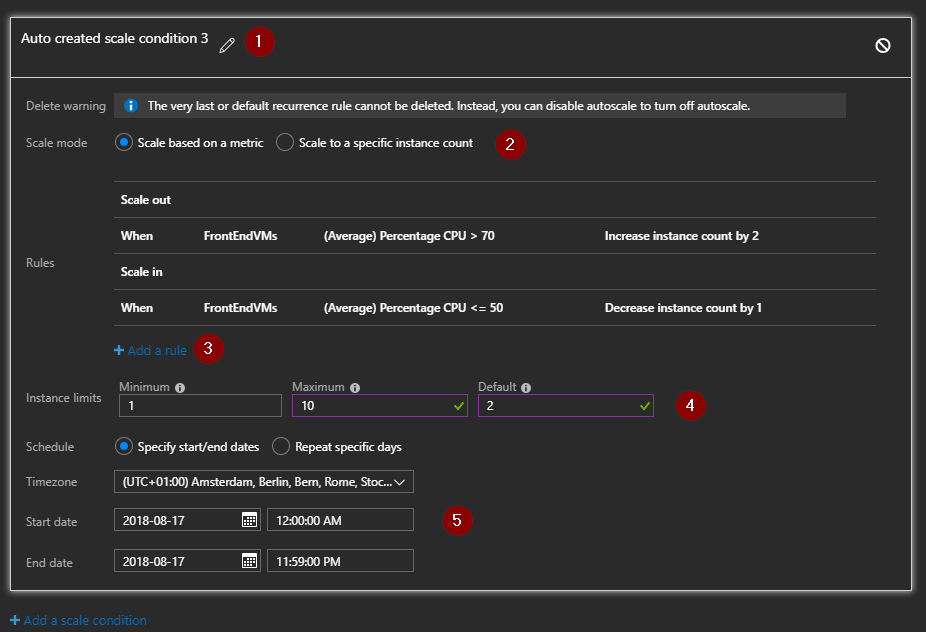
Now, you can play with the auto scale conditions. You must define the behavior of your Virtual Machine Scale Set when a specific metric is detected. In this example, I configure the following:
- The friendly name of the condition, which is just for the ease of management
- The scale mode, which lets you add a rule based on a metric or a specific instance count
- Add a rule depending on the CPU, network, storage, … Usually, a standard rule will check the CPU and increase or decrease the number of Virtual Machines in your VMSS
- Configure the limit: minimum, maximum, and default number of VM instances. These limits are essential to make sure that you do not scale out beyond the maximum number of instances allowed in your Azure subscription
- You can also create auto scale rules based on schedules. This setting is interesting if you know that the traffic will increase at a specific moment
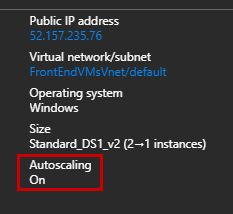
After configuring the auto scale feature, you can confirm that auto scaling feature is ON.
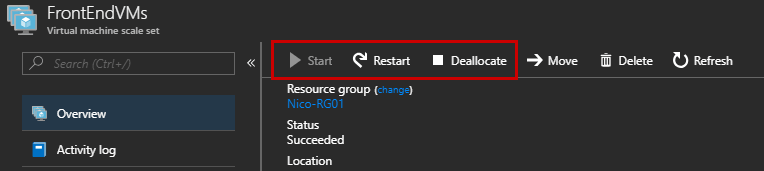
To finish, note that you can easily manage your VMSS using the following buttons:
- Start all instances in the scale set
- Restart all instances in the scale set
- Shut down all instances in the scale set
Useful Links
Here are some useful links to start with Azure VM Scale Sets:
Azure Templates: https://github.com/Azure/azure-quickstart-templates/
You can send suggestions to vmssfeedback@microsoft.com
VM Scale Set Template on Channl9: https://channel9.msdn.com/Blogs/Windows-Azure/VM-Scale-Set-Template-Dissection/player
Conclusion
Thanks to Azure Virtual Machine Scale Sets, you will save time to manage your Virtual Machines in your Azure subscription and it will make it easier to define your Azure infrastructure by providing greater efficiency. Depending on the traffic, you will be able to add or remove Virtual Machines very easily.
BDRSuite is a one-stop solution for the Backup & DR needs of diverse IT environments that include VMware VMs, Hyper-V VMs, physical servers, and workstations – Windows, Linux, Mac, AWS EC2 instances, Microsoft 365 and Google Workspace.
BDRSuite for Azure
BDRSuite provides backup and disaster recovery solutions for IT administrators running their workloads on Microsoft Azure VMs. It helps IT administrators to securely backup the Azure VMs to other regions or to other public clouds or to their own Data Centers with RTO and RPO of less than 15 minutes and minimal administration effort.
How it works
Vembu BDR backup server needs to be installed on a Windows machine running on any public cloud or local data center with an assigned public DNS/IP if you would like to back up the Azure VMs over WAN. Then, using BDRSuite client (installed on one of the VMs), these VMs can be backed up to the BDR backup server over LAN or WAN.
Feature Highlights
Disk Image Backup – Vembu uses VSS to take snapshots of the entire disk and backs up only the used blocks to the BDR backup server. It backs up full disk images including OS, applications, and data.
File-level Backup – Supports file backup of Windows, Linux and MAC machines. Also, supports pre-configured folders such as My Documents, My Photos, Desktop, Browsers, etc.
Application-level Backup – Supports backup of Microsoft Exchange servers, Exchange Mailboxes, MSSQL Database, SharePoint sites and MySQL.
Changed Block Tracking – Using BDRSuite own proprietary CBT driver, changed blocks alone will be backed up after the initial full backup.
Application-aware Image Backups – During each backup schedule, it verifies Microsoft Applications writer consistency. Also, it reduces the overflow of storage space by automatically truncating the transaction logs after performing a successful backup.
Retention Policies – Basic and Advanced (GFS) retention policies help to maintain multiple recovery points for data restoration and to effectively manage the backup data storage size.
Automated Backup Verification – Backed-up Windows Servers and Workstations will be booted as a virtual machine with the latest recovery point available. And the screenshots of the booted screen will be captured and emailed to the administrator.
Azure VM Recovery – BDRSuite creates VHD, VHDX, VMDK, and IMG virtual images for all backed-up Azure VMs.Using VHD/VHDX you can restore the VMs back to Microsoft Azure. Also, you can use these images to restore the Azure VMs to other public clouds.
Instant VM Recovery on Local Data Center – Backed-up Azure VMs can be booted instantly in VMware, Hyper-V, and KVM environments without any manual driver injections or conversion tool assistance.
File Recovery – Individual files and folders of the Azure VMs can be instantly restored from the system image backup without restoring the whole machine.
Applications Recovery – Instantly recover individual application items from Microsoft Applications such as Microsoft Exchange, SQL, SharePoint, and Active Directory.
To learn more about BDRSuite for Azure VM Backup click here
Download BDRSuite – Free Edition and try it for yourself. Experience modern data protection for your environment.
Try out a Beta build for Microsoft Azure VM agentless backup today: BDRSuite for Azure-Beta Build
Try out our Microsoft Azure Exam preparation series:
Microsoft Azure Data Fundamentals DP-900 – Study Tips
Follow our Twitter and Facebook feeds for new releases, updates, insightful posts and more.