
Quick Bites:
5 Key Points about using PowerShell Jobs:
Faster Execution: Run tasks concurrently instead of sequentially, significantly reducing time for long-running scripts. Think 2 hours vs. 2 minutes!
Better CPU Utilization: Leverage your multi-core processor by running commands in parallel, maximizing hardware usage.
Keep the Prompt Free: Launch background jobs to free up the PowerShell prompt while scripts run, allowing you to multitask.
Monitor Progress: Easily track job status with Get-Job and receive output with Receive-Job, keeping you informed.

Scheduled Tasks: Schedule jobs to run automatically at specific times, automating repetitive tasks.
In regular circumstances we don’t usually take concurrency into account when writing a PowerShell script. The commands/functions are one after the other and it works great. Except if there is a need to execute a lot of similar commands that each take a lot of time to execute and move on to the next command. In this case, a traditional loop with the command inside will take ages to complete. An example of it could be a port scan, an operation on multiple servers, creating multiple virtual machines, file conversion.
By using jobs, you tell PowerShell to run the command in the background so it can move on to do something else. You can launch several jobs in parallel and check their status at any time. Some cmdlets include an -asjob parameter that will run the command as a job. The good thing about using jobs is that you can save a lot of time and make better use of the processor cores.
Table of Contents
- Background Jobs
- Scheduled Jobs
- Execution time
- CPU core usage
- Run 1 endless loop to simulate sequential execution
- Run 1 endless loop in 4 concurrent jobs
- Availability of the prompt
- Conclusion
PowerShell Jobs basics
Before getting stuck in let’s have a quick look at how to use jobs in PowerShell for those that are not familiar with it. We will only talk about the most basic use of jobs. That being a ScriptBlock that runs in a standard background job available only in the current session. The most common cmdlets to work with jobs are the following:
Start-Job : Create the job and run the commands in the background. Returns a job object that contains useful information about the job but not the result of the job itself.
Wait-Job : Wait for the specified job(s) to complete before bringing you back to the command prompt. You can use the -TimeOut parameter if you want to get the interactive prompt back after x seconds even though the script is still running. Note that if you want the prompt back, you can still use ctrl + c, it will not kill the running job(s).
Stop-Job : Stops a job while it is running. The command running in the job will be interrupted, it will have the same effect as pressing ctrl + c in the middle of a script. Note that the job will still exist with the state Stopped.
Get-Job : Displays all the jobs of the session that have not been removed regardless of their status. You can monitor the status of a background job with this cmdlet.
Receive-Job : Retrieves the result of (a) background job(s). The result is stored in the job object until you use the Receive cmdlet. Do note that, unless you use the -Keep parameter, you can only use it once so it may be a good idea to place it in a variable to be able to manipulate the output object. Again the job will still be here after receiving with the status Completed this time and won’t be deleted automatically. The HasMoreData property of the job object will tell you if there is something to receive or not on a particular job.
Remove-Job : This cmdlet with delete the specified jobs in the current session.
Scheduled Jobs
The background jobs mentioned above are only available in the current PowerShell session. Meaning if you open a new PowerShell window and type Get-Job you will not see the jobs of the first session. Scheduled Jobs are independent of the session. You can then display the scheduled jobs that were created in another session with the command Get-ScheduledJob. I will not get into the details of what the cmdlets are and how they work as it is out of the scope but I thought it was worth mentioning and giving a quick example of its usage.
Below we create a new job scheduled to run a 1:02PM that will store the output of an ls command in a text file (LS.txt) on the desktop.
| Id | Name | JobTriggers | Command | Enabled |
| 5 | JOBLS2 | 1 | ls | Out-File C:\Users\xavier\Desktop… | True |
You can think of it as scheduled tasks in PowerShell. In fact you can visualize it in the Task Scheduler run Task Scheduler Library > Microsoft > PowerShell > ScheduledJobs.
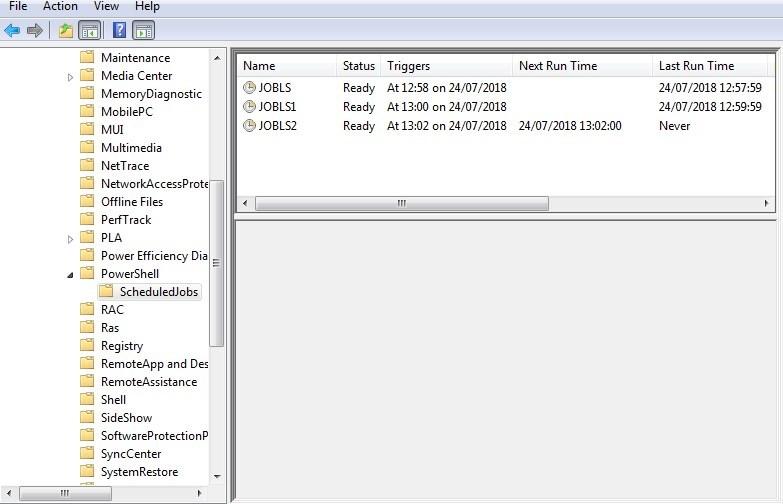
If you go in the Action tab of the task you can display what PowerShell will run at the scheduled time. All the properties of the job are actually stored in an xml file located in the user profile. The action of the scheduled task uses this xml file.
According to what the script does, the value added of using PowerShell jobs can be questionable as it does add a layer of complexity. However in most cases you will use it because it can significantly reduce the execution time thanks to parallelism of tasks. One such example was mentioned in the introduction but in this chapter we will demonstrate the impact jobs can have by timing several Sleep commands sequentially first, and then in Jobs. We will only use background jobs for our tests below and not scheduled ones that have a different purpose.
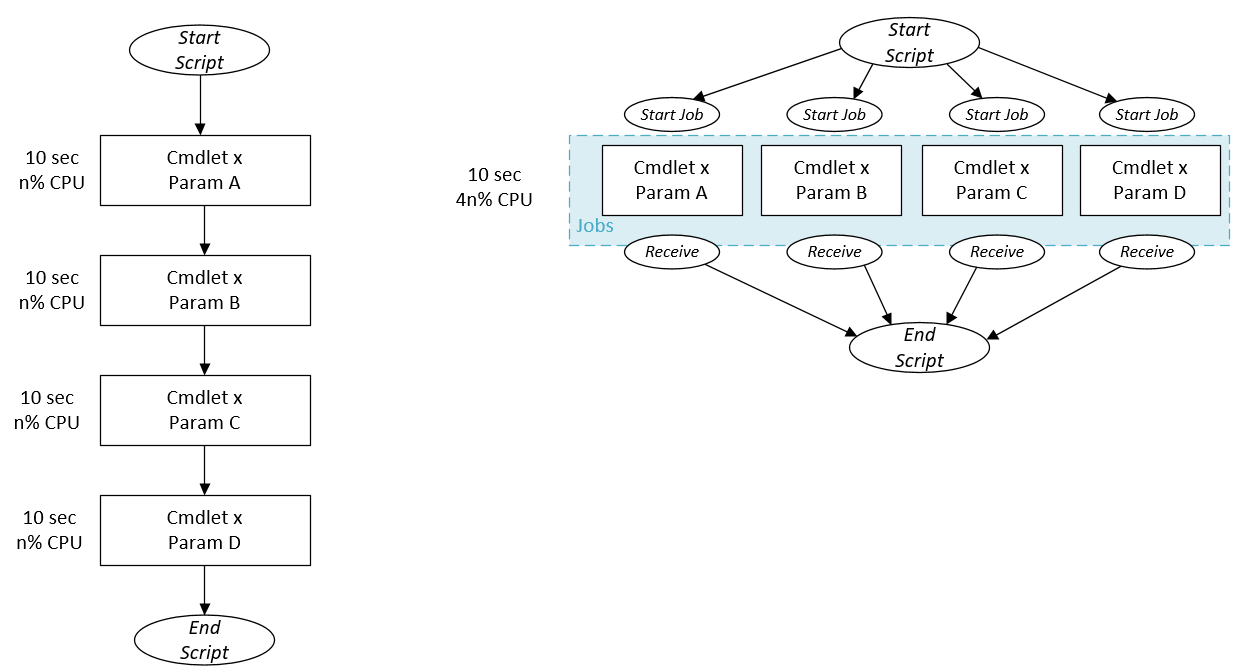
In this example we simulate the execution of a command that takes 10 seconds to execute that we run 10 times.
- In a real world scenario it would usually be the same command run with 10 different sets of parameters
- In order to catch the time it takes to execute we will use the Measure-Command cmdlet
- To make sure the jobs have completed and generated output (simulated) we will use the Wait-Job | Receive-job cmdlets on the jobs we created
Sleep 10 seconds : Jobs
As you can see below, the execution of the 10 sleep commands took 11 seconds and 342 milliseconds to execute. This is due to the fact that the jobs were started in parallel and were running at the same time. there is still a slight 1.343sec delay that is probably due to the overhead of the creation and completion of the jobs.
Days : 0
Hours : 0
Minutes : 0
Seconds : 11
Milliseconds : 342
Ticks : 113429626
TotalDays : 0,000131284289351852
TotalHours : 0,00315082294444444
TotalMinutes : 0,189049376666667
TotalSeconds : 11,3429626
TotalMilliseconds : 11342,9626
Sleep 10 seconds : Sequentially
Below we see that the execution took 1 minute, 40 seconds and 69 milliseconds (10 x 10 seconds). So 1 minute and 29 seconds slower than the jobs. The fact that the commands were executed sequentially means each one had to wait for the previous one to finish (10 seconds).
Days : 0
Hours : 0
Minutes : 1
Seconds : 40
Milliseconds : 69
Ticks : 1000693629
TotalDays : 0,00115821021875
TotalHours : 0,02779704525
TotalMinutes : 1,667822715
TotalSeconds : 100,0693629
TotalMilliseconds : 100069,3629
This is obviously a silly test but an effective one. Imagine you had a script that take 2 minutes to complete and you have to run it on 60 occurrences. It would take 2 hours sequentially compared to 2 minutes and change if you used jobs! Of course it is not every day that you have a task like this to prepare but when you do you will be happy to know that you don’t have to go to lunch after everyone because you are waiting on a script.
Here we get in one of the other obvious benefit of parallelism and a very interesting one in my opinion. Just like we demonstrated previously, running commands sequentially will execute them one by one so only the resources needed to execute that very task will be used. With nowadays computers that embed more and more cores you might want to make use of it (you paid for them after all…).
In this demonstration we will show the difference on core usage between sequential and parallelism on my 4 cores processor by simulating a CPU hungry command. In order to achieve this I will :
- Run 1 endless loop to simulate sequential execution
- Run 1 endless loop in 4 concurrent jobs
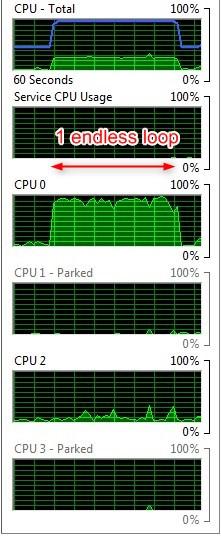
Run 1 endless loop to simulate sequential execution
An endless loop is an easy and cheap way to simulate CPU burn. Here we launch one endless loop and see how my 4 cores CPU handles it. In the screenshot we notice that only the first one is active and the other ones keep cruising on whatever they were doing. Press CTRL + C to stop the loop or close PowerShell.
Run 1 endless loop in 4 concurrent jobs
Now we run the same command but we place it in 4 jobs so we are effectively running 4 endless loops at the same time. This will of course put more strain on the CPU but this is what we want and independently they generate the same load. As per the screenshot below, it is clear that each job is scheduled on a different physical core by the kernel. Run “Get-Job -Name jobCPU* | Stop-Job” to stop the jobs or close PowerShell.
| Id | Name | PSJobTypeName | State | HasMoreData | Location | Command |
| 1 | JobCPU1 | BackgroundJob | Running | True | localhost | While ( $True ) { } |
| 3 | JobCPU2 | BackgroundJob | Running | True | localhost | While ( $True ) { } |
| 5 | JobCPU3 | BackgroundJob | Running | True | localhost | While ( $True ) { } |
| 7 | JobCPU4 | BackgroundJob | Running | True | localhost | While ( $True ) { } |

Jobs are great to better utilize your hardware and execute a bunch of commands faster, but keep in mind that you don’t want to launch too many jobs at once if they all are resources hungry. Otherwise you will hit the resource contention wall and it will have the opposite effect. A good idea when generating jobs dynamically is to set a limit to the number of concurrent running jobs (done at the parent loop level). Which limit to use is down to what you judge sensible in your use case.
After a day of work a PowerShell session can become valuable for several reasons (variables stored, useful history, you name it). And as silly as it seems, it can be quite sad to have to start a new session after you closed the current one or started a sequential script that will take 40 minutes to complete and you don’t know what will happen if you give it the ctrl + c “treatment”. Here again using jobs will give you that little bit of flexibility in you day to day tasks by having your commands to run in the background. It will actually be a lot easier to track what’s happening as you can quickly check where the script is at by running a Get-Job command. Obviously you want to avoid running your “conceptual” scripts or use it when testing as it does make troubleshooting trickier due to the fact that it provides no output of what is going on behind the scene.
Conclusion
The concept of jobs has been around for many years in PowerShell but isn’t used a lot, usually due to the lack of use cases for it. However if writing scripts is an important part of your work it will definitely be a useful addition to your tool belt.
Related Posts:
Convert VHD to VHDX using Hyper-V Manager and Powershell
How to Merge Hyper-V Checkpoints using Hyper-V Manager and Powershell
Follow our Twitter and Facebook feeds for new releases, updates, insightful posts and more.