
The number of tools and resources used in your average IT infrastructure is getting out of hand. Microsoft SCVMM 2016 was built to address this. To understand what SCVMM, we need to know what is a Virtual Machine Manager is.
What is a Virtual Machine Manager
VMM is a part of the System Center Suite, which is used to configure, manage, and transform traditional data centers. It also helps in providing a unified management experience across on-premises and the Azure cloud.
This blog covers it all, from hardware requirements to installation procedures:
Prerequisites for SCVMM 2016 are two virtual machines – one is for AD and another one is for VMM.
From hardware requirements to installation steps, the following are covered in this blog:

- Capacity & scaling
- Hardware requirements
- Supported server operating systems
- Supported client console operating systems
- Supported SQL Server
- SCVMM installation
Capacity & Scaling:
The following table provides the scale limits that were tested for System Center 2016 Virtual Machine Manager. There are various factors that impact the scale limits, such as hardware configuration, network, topology and others.
| Entity | Recommended maximum count |
|---|---|
| Physical hosts | 1000 |
| Virtual Machines | 25000 |
| Services | 1000 |
| User roles | 1000 |
| Clouds | 20 |
| Virtual networks | 2000 |
| logical networks | 20 |
| Library resources | 1000 |
| Library Objects (templates, profiles) | 100 |
Hardware requirements:
| Hardware | VMM server | VMM database | VMM library | VMM console |
|---|---|---|---|---|
| Processor (minimum) | 8 core Pentium 4, 2GHx (x64) | 8 core Pentium 4, 2.8GHx | 4 core Pentium 4, 2.8GHz | 2 core Pentium 4, 1 GHz CPU |
| Processor (recommended) | 16-core, 2.66 GHz CPU | 16 core 2.6 GHz CPU | 4 core 2.66 GHz CPU | 2 core 2 GHz CPU |
| RAM (minimum) | 4 GB | 8 GB | 2 GB | 4 GB |
| RAM (recommended) | 16 GB | 16 GB | 4 GB | 4 GB |
| Hard drive (minimum) | 4 GB | 50 GB | Based on size/amount of stored files | 10 GB |
| Hard drive (recommended) | 10 GB | 200 GB | Based on size/amount of stored files | 10 GB |
Supported client Server operating systems:
| Operating system | VMM serve | Remote VMM library | Remote VMM database |
|---|---|---|---|
| Windows Server 2012 Standard/Datacenter | N | N | If supported by SQL Server version |
| Windows Server 2012 R2 Standard/Datacenter | N | Y | If supported by SQL Server version |
| Windows Server 2016 | Y | N | If supported by SQL Server version |
| Windows Server 2016 (with desktop experience) | Y | Y | If supported by SQL Server version |
| Windows Server 2016 Nano | N | N | If supported by SQL Server version |
Supported Client console operating systems:
| Operating system | Supported |
|---|---|
| Windows 7 | N |
| Windows 8 | N |
| Windows 8.1 | Y |
| Windows 10 Enterprise | Y |
| Windows Server 2008 R2 with SP1 onwards | N |
| Windows Server 2012 | Y |
| Windows Server 2012 R2 Standard, Datacenter | Y |
| Window Server 2016 Standard, Datacenter | Y |
Supported SQL Server:
| Operating system | Supported |
|---|---|
| SQL Server 2008 R2 (SP1, SP2) | N |
| SQL Server 2012 (Enterprise, Standard, 64-bit) | N |
| SQL Server 2012 SP1 onwards | Y |
| SQL Server 2014 and all service packs | Y |
| SQL Server 2016 and all service packs | Y |
Virtualization:
| VM | Supported |
|---|---|
| VMM management server | The VMM management server can be installed on a VM.
If you use dynamic memory, set the start RAM of the VM to at least 2048 MB. You can deploy the VMM management server (physical or VM) in a highly available cluster. |
| VMM console | You can install the VMM console on a VM. |
Installation components:
These components should be installed on the server before you install VMM.
| Component | VMM server | VMM console |
|---|---|---|
| Active Directory | The VMM management server must be a domain member.
The computer name shouldn’t exceed 15 characters. |
A computer with the VMM console installed should be a domain member. |
| Windows ADK | Available in the Download Center | Not applicable |
SCVMM Installation:
Step – 1 SQL server installation and configuration
- Install and configure an ADDS server and join the VMM machine to the domain as an administrator account
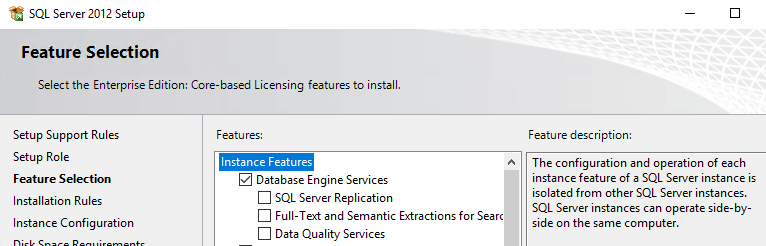
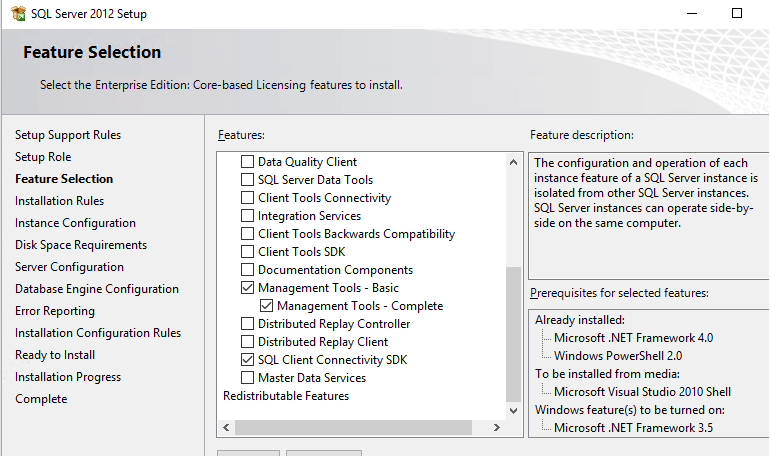
- Now install MSSQL on the VMM machine, and select “SQL Server Feature Installation” and click Next
- In the next tab, we have to select Instance Features, we need Database Engine Services, Management Tools – Basic, Management Tools – Complete, and SQL Client Connectivity SDK
- Now you can click Next and continue with the default settings
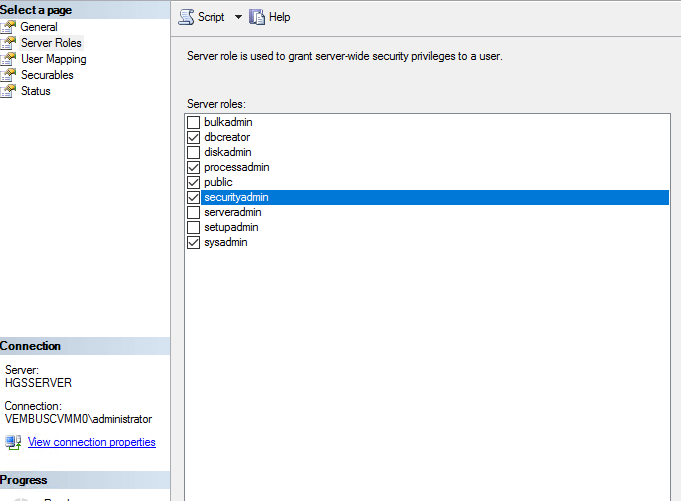
- Once the installation is finished successfully, open SQL Server Management Studio
- In the left side pane you can see logins; expand it and navigate to your user, then right-click and go to properties
- In properties, you can find some server roles. Click on that and select server roles such as dbcreator, processadmin, and securityadmin, and click on OK
Step – 2 Windows ADK installation
Now we are going to install Windows ADK 10.
- Double click on the setup file of Windows ADK 10 file and select Features. We need only Deployment Tools, Windows Preinstallation Environment (Windows PE), Windows Performance Toolkit, and Windows Assessment Services.
- Now click install and the process will take some time
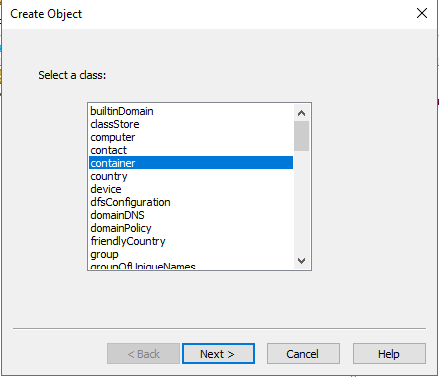
Step – 3 Container creation and permission assignment
- In this step, we are going to create a VMM Container on the AD server
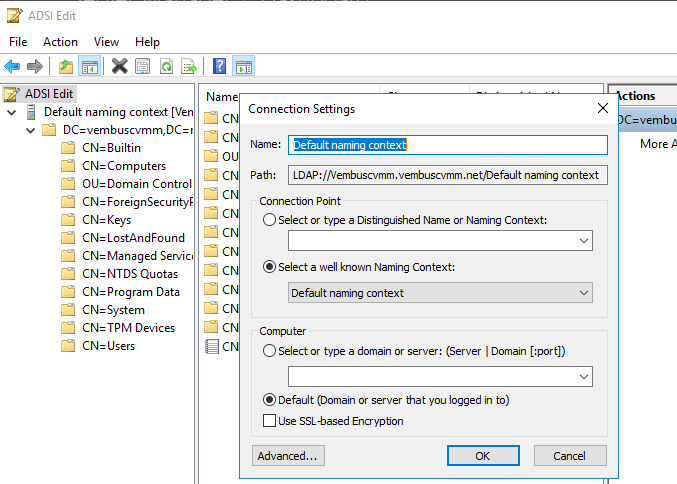
- Login to the AD server and open Server Manager. Click on Tools and select ADSI Edit
- In the ADSI console, right-click on ADSI Edit and click Connect to. Now the default connection settings will appear. Click OK to continue
- Click on the DC and select New and select Object
- Here you can create Container and name it
- Once the container has been created, right-click on it and go to properties. Then navigate to the security tab
- Click on advance in the same security tab and select your user and click edit
- Now change the object to this object and all descendant objects
- That’s all. Now we are good to install the VMM
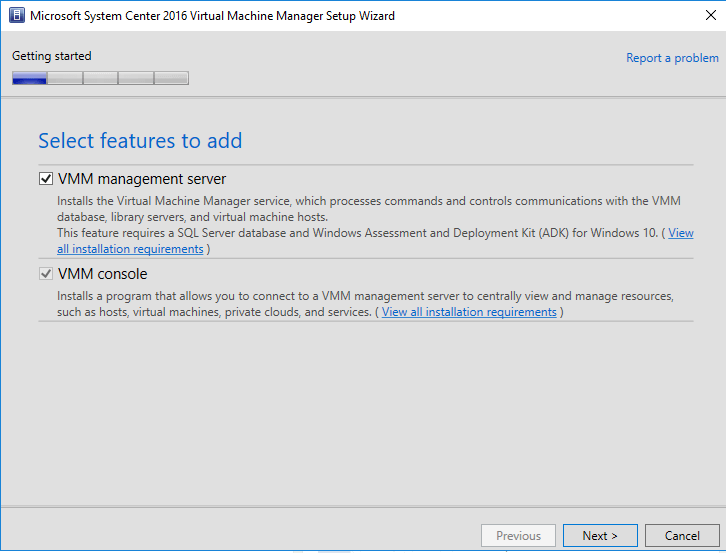
Step – 4 VMM installation
- Double-click on SC2016_SCVMM to extract it, and navigate to the folder to run the setup
- There will be two options VMM Management Server and VMM Console. If you select the VMM ManagemServer, then the second option will be added automatically
- On the next page, you need to fill in product registration details. Fill in your details and click “Next.”
- Next, you need to accept the license agreement and give Next. Apply the default settings and continue
- On the Database Configuration page, make sure the server is correct and check the “Use the following credentials” option to fill in the username and password of the machine and select the instance, then give a database name or leave it as it is and click Next
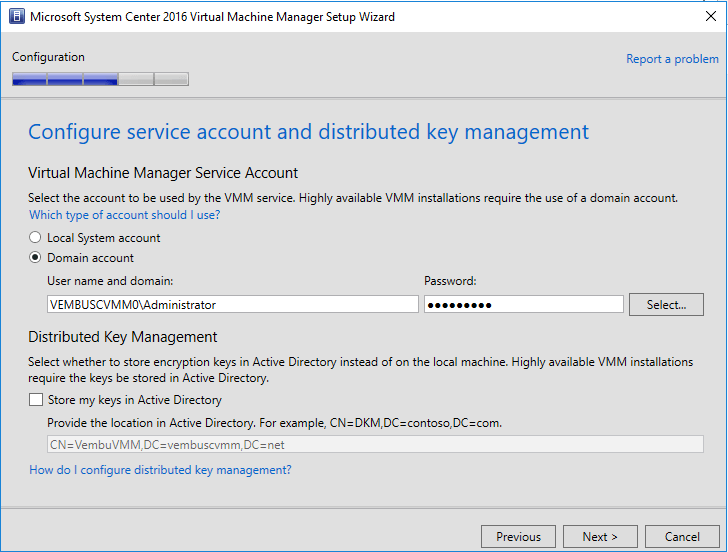
- On the next page, select domain account and fill in the details, and check the option “Store the keys in Active Directory” and provide the location
- For this location, move on to the AD machine and navigate to the container which we have created in step–3, right-click and select the properties, and double-click on distinguishedName. Then copy the value and paste it into the “Store the keys in Active Directory”
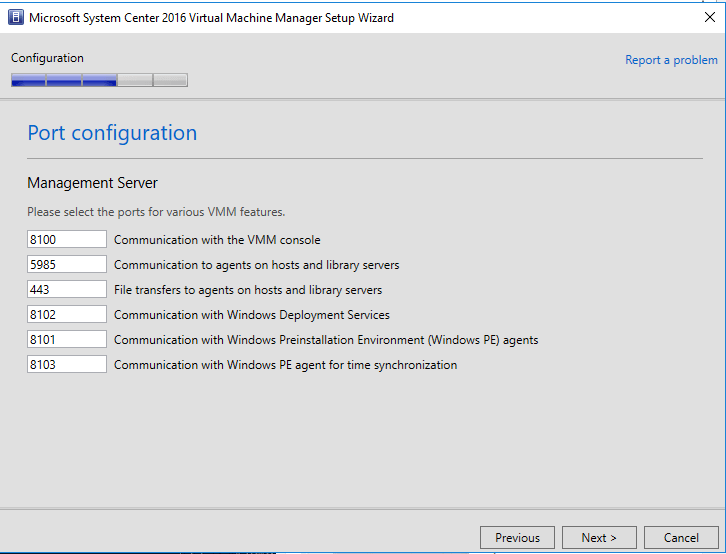
- Now review the port configuration and click Next.
- In the next tab, you need to specify the library and select “Create a new library and share” and click Next
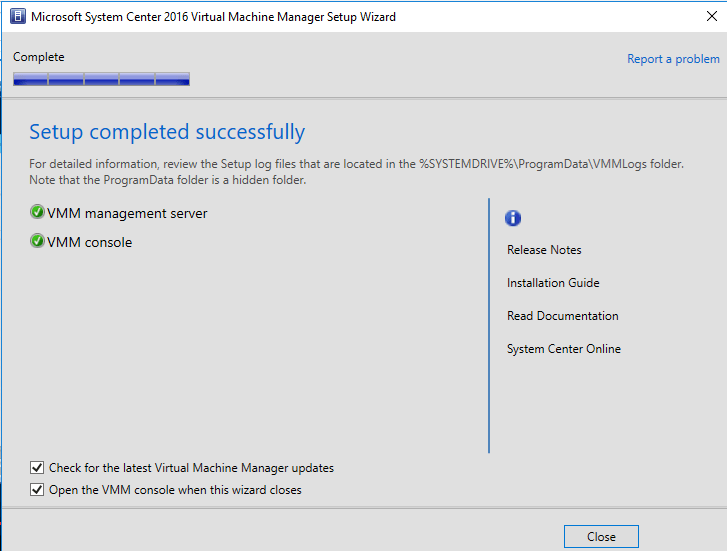
- Verify the installation summary and click Install
- After successful installation, your result will look like this
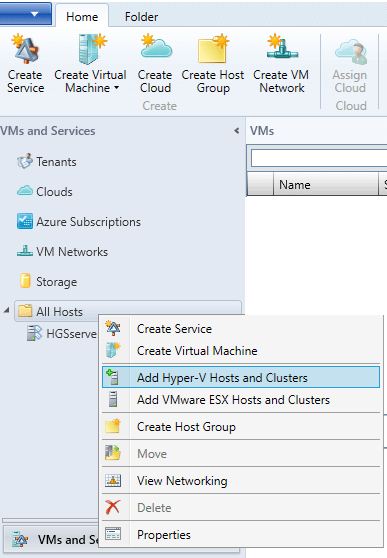
Step – 5 Adding Hyper–V host in VMM
- Open the VMM console and right click on All Hosts and select Add Hyper-V Hosts and Cluster
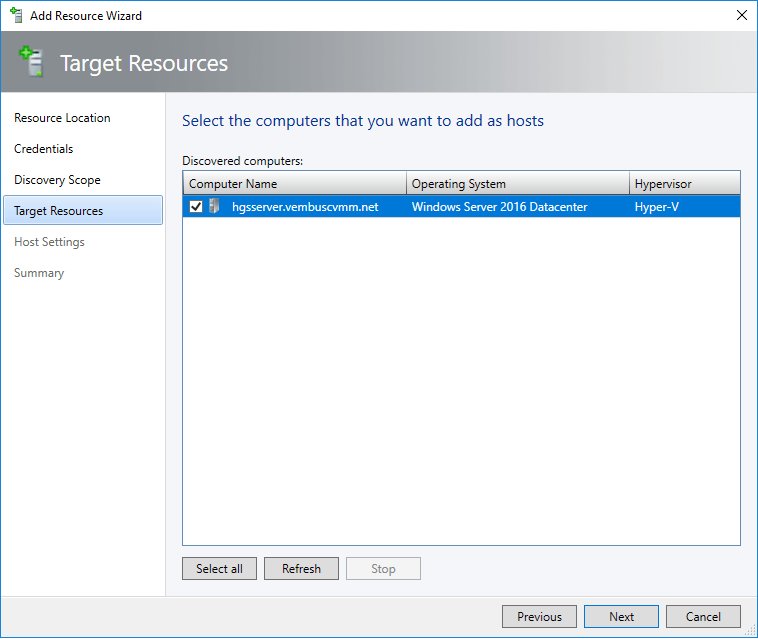
- We are going to add a host in “Windows Server computers in a trusted Active Directory domain” select this option and click Next
- Now select the option “Use an existing run as account” and click “Browse” to create a run as account
- After successful validation you select the host and proceed further.
- Select default settings and proceed further and finish.
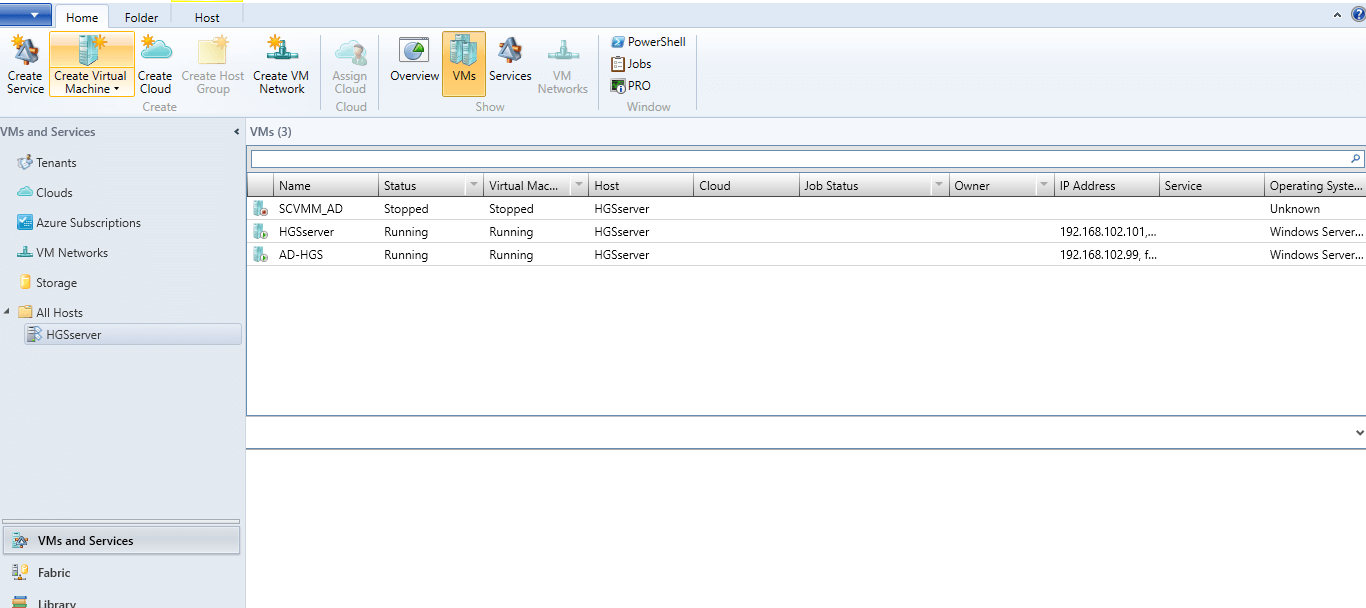
- Now in the All Hosts tab, you can find the Hyper-V host and manage it
Note: Create a two-way trust relationship between these domains
Note: Provide the domain administrator account credentials. In the next tab, select “Specify Windows Server computers by names.” Give the FQDN or IP and proceed to the next step
- Windows Server 2022 and Windows Server 2022 Guest OS support: VMM 2022 allows management of Windows Server 2022 hosts and Windows Server 2022 Guest OS hosts
- Windows 11 support: VMM 2022 supports Windows 11 as a guest operating system
- Support for Azure Stack HCI clusters 21H2: VMM 2022 enables management of Azure Stack HCI, 21H2 clusters, which are on-premises clusters with virtualized workloads
- Register and unregister Azure Stack HCI cluster using PowerShell cmdlets: VMM 2022 provides PowerShell cmdlets to register and unregister Azure Stack HCI clusters
- Support for dual-stack SDN deployment: VMM 2022 supports the deployment of SDN (Software-Defined Networking) with both IPv4 and IPv6 (dual stack) capabilities
Conclusion:
System Center Virtual Machine Manager is very easy to deploy and manage the Hosts, Admins can have control of all the Virtual Machines through Virtual Machine Manager. There are more to explore in System Center Virtual Machine Manager i.e we can add vCenter servers and ESXi hosts as well.
As an update to this existing article, learn about the overview and installation of System Center Virtual Machine Manager (SCVMM) 2019
Follow our Twitter and Facebook feeds for new releases, updates, insightful posts and more.