
Table of Contents
- What is AWS CloudFormation?
- Creating an AWS Cloudformation stack
- Step 1 : Specify a template
- Step 2: Specify stack details
- Step 3: Configure stack options
- Step 4 : Review
- Working with AWS Cloudformation Stack
- Deleting the Stack
- Conclusion
What is AWS CloudFormation?
AWS CloudFormation is a service that gives developers and businesses a simple way to create a collection of related AWS and third-party resources, and provision and manages them in an orderly and predictable fashion for Amazon web services resources. Users can create a template that describes all the AWS resources that you want (like Amazon EC2 instances or Amazon RDS DB instances), and AWS CloudFormation takes care of provisioning and configuring those resources for you.
AWS Cloudformation constitutes three stages or components viz:
- Templates
- Stacks
- Change sets
Templates – An AWS CloudFormation template is a JSON or YAML formatted text file. You can save these files with any extension, such as .json, .yaml, .template, or .txt. AWS CloudFormation uses these templates as blueprints for building your AWS resources.
Stacks – When you use AWS CloudFormation, you manage related resources as a single unit called a stack. You create, update, and delete a collection of resources by creating, updating, and deleting stacks. All the resources in a stack are defined by the stack’s AWS CloudFormation template.

Change sets – If you need to make changes to the running resources in a stack, you update the stack. Before making changes to your resources, you can generate a change set, which is a summary of your proposed changes. Change sets allow you to see how your changes might impact your running resources, especially for critical resources, before implementing them
In this blog, we will use the AWS Management Console to create a stack from an example template from the AWS CloudFormation sample template library and learn the basics of creating a template.
Creating an AWS Cloudformation stack
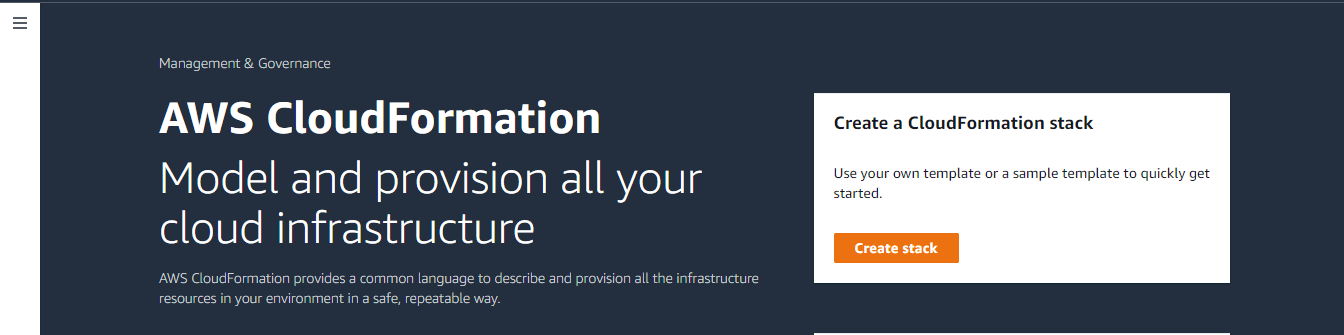
Login to AWS console as a root user with valid credentials. Choose All Services → Management & Governance → Cloudformation
Choose the button “Create stack” as shown in the image below
Step 1 : Specify a template
Creating an AWS Cloudformation stack comprises four steps, and the first step is preparing a template. In three ways you can present the template for preparation.
Template ready – You can manually create a JSON or YAML template file which describes your stack’s resources and properties. You can upload this file from your computer or can avail to access through an Amazon S3 URL. This way is generally referred to as the “Template ready” method.
Using a sample template – Amazon offers a collection of sample templates will help you get started with AWS CloudFormation and quickly build your own templates.
Available sample templates are
- Simple LAMP Stack – Create a LAMP stack using a single EC2 instance and a local MySQL DB for storage.
- Simple Ruby on rails Stack – Create a Ruby on rail stack using a single ECE instance and a local MySQL DB for storage.
- Simple WordPress Blog – This template install a Word press application with a local MySQL db for storage
- Multi_AZ Lamp Stack – Create a highly available and scalable Lamp stack with an Amazon RDS database instance for backend data storage
- Multi_AZ Ruby on rails Stack – Create a highly available and scalable Ruby on rail stack with a multi_az MySQL RDS database instance for backend data storage
- Windows features and roles – This template enables windows features and roles of a Windows Server
- Windows Active Directory – This template creates a single server installation of Active Directory
Using a template designer – Use the AWS CloudFormation Designer to graphically design your stack on a simple drag-and-drop interface. The Designer automatically updates and validates the template JSON or YAML.
In our blog, we are choosing a sample template method & selecting a Simple LAMP stack template for demo purpose
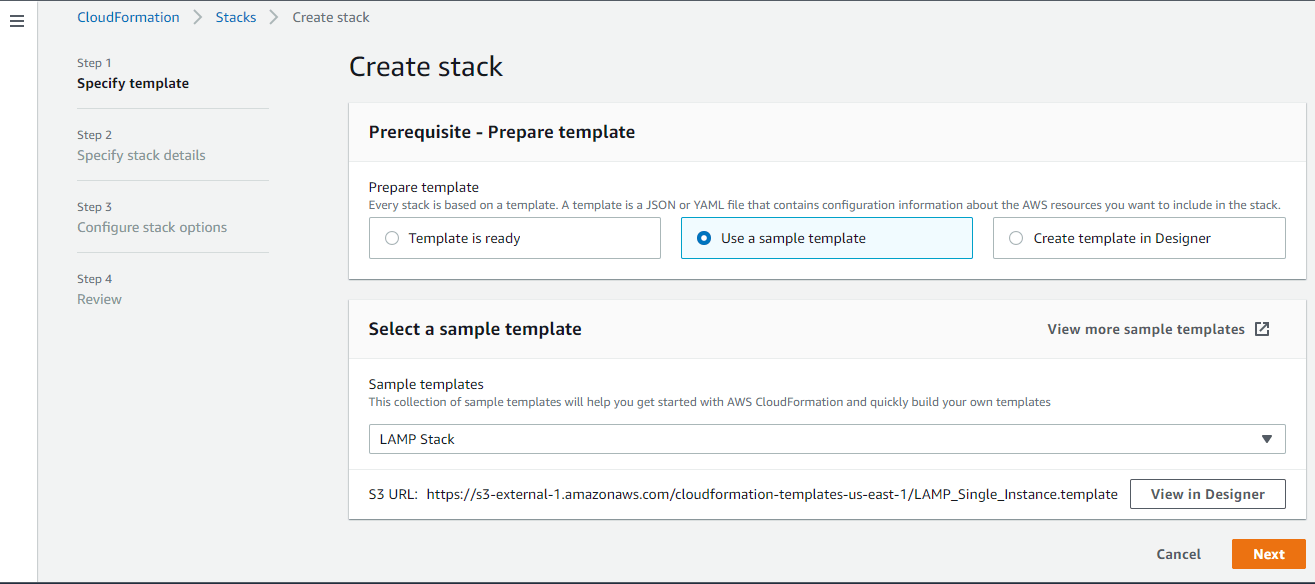
Click Next to continue to Step2
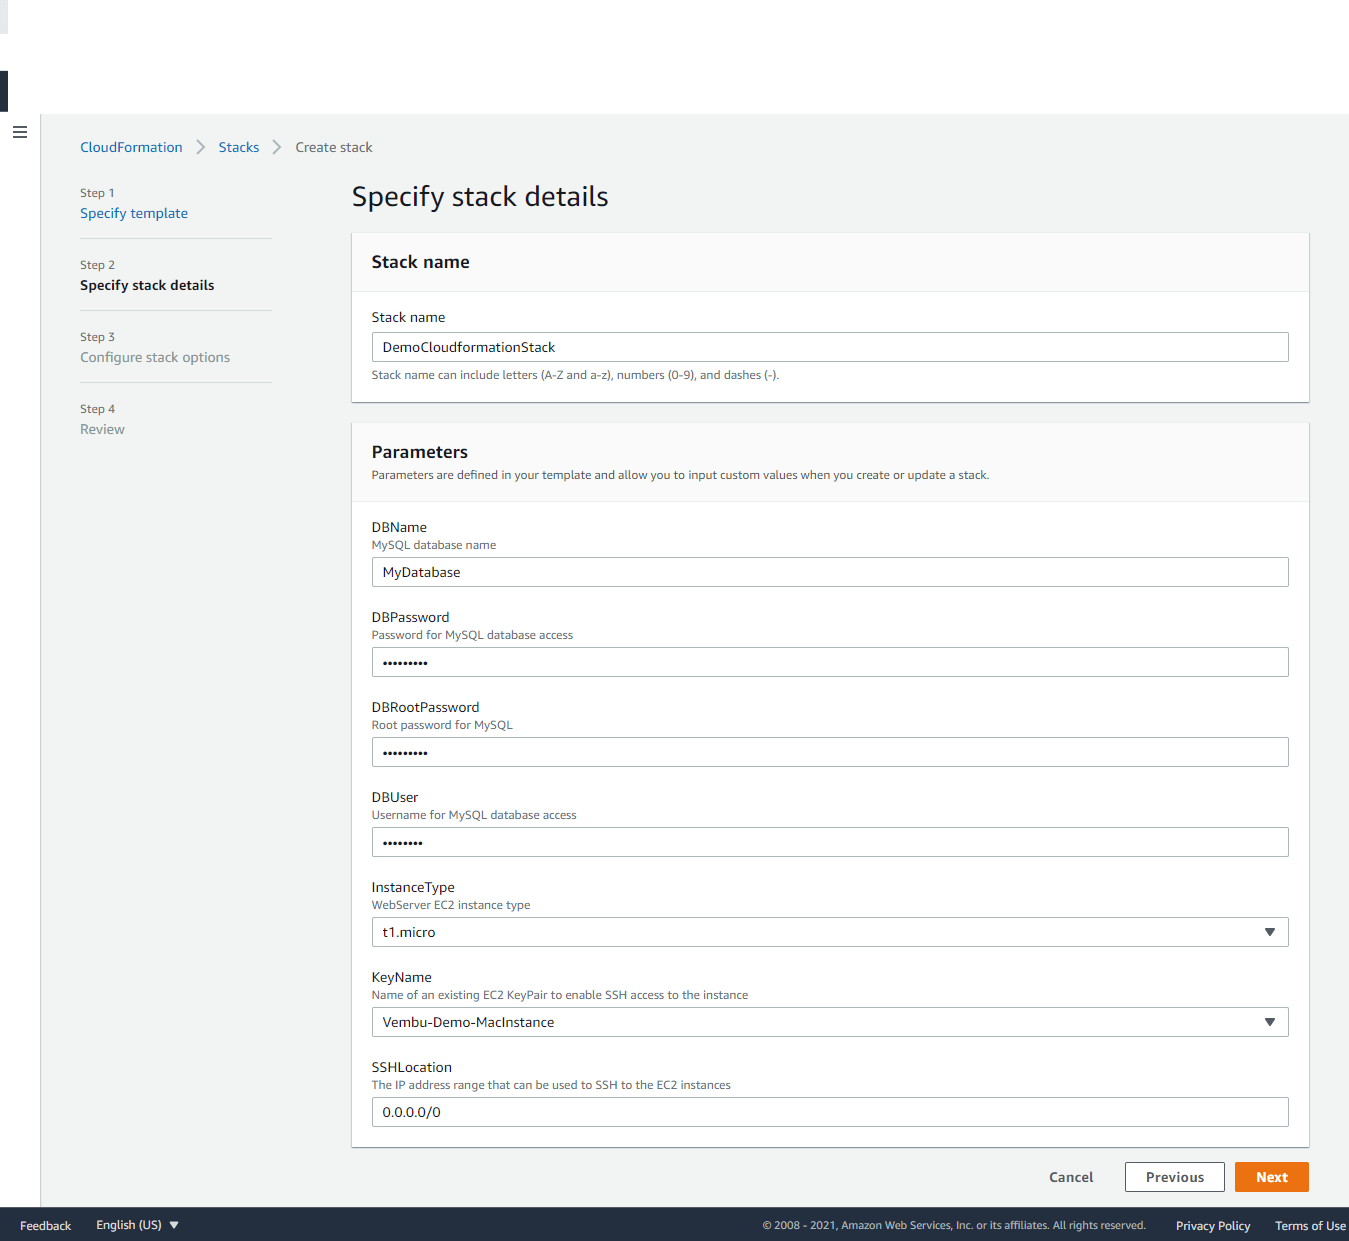
Step 2: Specify stack details
In this step, we are providing the details of the stack which includes a name for the stack, DB credentials, and SSH key pair you already created.
- Stack Name – Provide a stack name, Stack name can include letters (A-Z and a-z), numbers (0-9), and dashes (-).
- DBName – Provide a MySQL database name. By default, MyDatabase is the database name.
- DBPassword – Provide a strong DBPassword for the above database
- DBRootPassword – Provide a strong password for the Root user of the above database
- DBUser – Username for MySQL database access
- Instance type – Choose the Web-server EC2 Instance Type from the available list. The list shows Micro, Nano, Small, Medium, Large, and XLarge instances. We selected t1.micro instance.
- Keyname – Choose your existing Keypair to enable SSH access to the instance. Advised to create a new Keypair or use the Keypair you already created for another EC2 instances.
- SSHLocation – The IP address range that can be used to SSH to the EC2 instances. By default all IP addresses are allowed to access the instance. Administrators should allow only his network to access the instance. 0.0.0.0/0 allows all connections to the instance from the internet.
Step 3: Configure stack options
In this step, we configure Tags, Permissions, and Advanced options such as Rollback configuration, static policy etc. These are additional configurations to be configured on this stack setup.
Tags – You can specify tags (key-value pairs) to apply to resources in your stack. You can add up to 50 unique tags for each stack.
Permissions – Choose an IAM role to explicitly define how CloudFormation can create, modify, or delete resources in the stack. If you don’t choose a role, CloudFormation uses permissions based on your user credentials. It can be an IAM role name or an IAM role ARN. This is an optional configuration.
In the Advanced option configuration section, you have,
Stack policy – Defines the resources that you want to protect from unintentional updates during a stack update. A stack policy is a JSON document that defines the update actions that can be performed on designated resources.
You have three options in this configuration to choose any one of
No stack policy – Nothing to configure and there is no action to be carried out
Enter stack policy – The user has to create a JSON stack policy file to be created and should enter the content of the file in the available box.
Upload a file – The user has to upload the manually created JSON stack policy file
Rollback configuration – Specify alarms for CloudFormation to monitor when creating and updating the stack. If the operation breaches an alarm threshold, CloudFormation rolls it back. This includes monitoring time, a number of minutes after the operation completes, and CloudFormation should continue monitoring the specified alarms. Cloud watch alarm ie Amazon Resource Name (ARN) of the alarm to monitor. These two are optional configurations
Notification options – Here you can configure AWS SNS, a Simple notification service, which sends message notifications and email notifications.
Stack creation options – This configuration option is useful for stack protection against failure. You can enable or disable rollback on failure, which specifies whether the stack should be rolled back if stack creation fails.
Timeout – You can also set the number of minutes before a stack creation times out.
Termination protection – The user can enable or disable this selection. This selection prevents the stack from being accidentally deleted. Once created, you can update this through stack actions also.
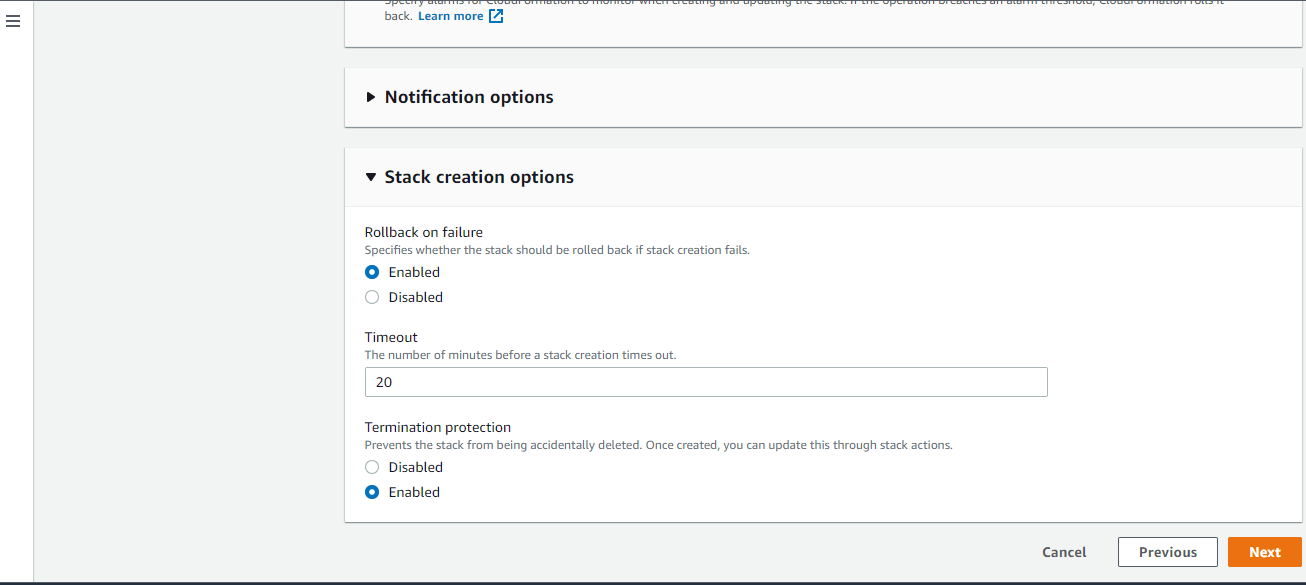
Click Next to continue to Step 4
Step 4 : Review
On this final step, you can review all the configurations and edit each step if any change is required. Upon confirmation click Create stack.
Note: On this step, you can notify a message stating “ AWS CloudFormation Sample Template LAMP_Single_Instance: Create a LAMP stack using a single EC2 instance and a local MySQL database for storage. This template demonstrates using the AWS CloudFormation bootstrap scripts to install the packages and files necessary to deploy the Apache web server, PHP, and MySQL at instance launch time. **WARNING** This template creates an Amazon EC2 instance. You will be billed for the AWS resources used if you create a stack from this template”. Note that you will be billed if you use this template after stack creation.
Also, your template access URL will be available for you in this step.

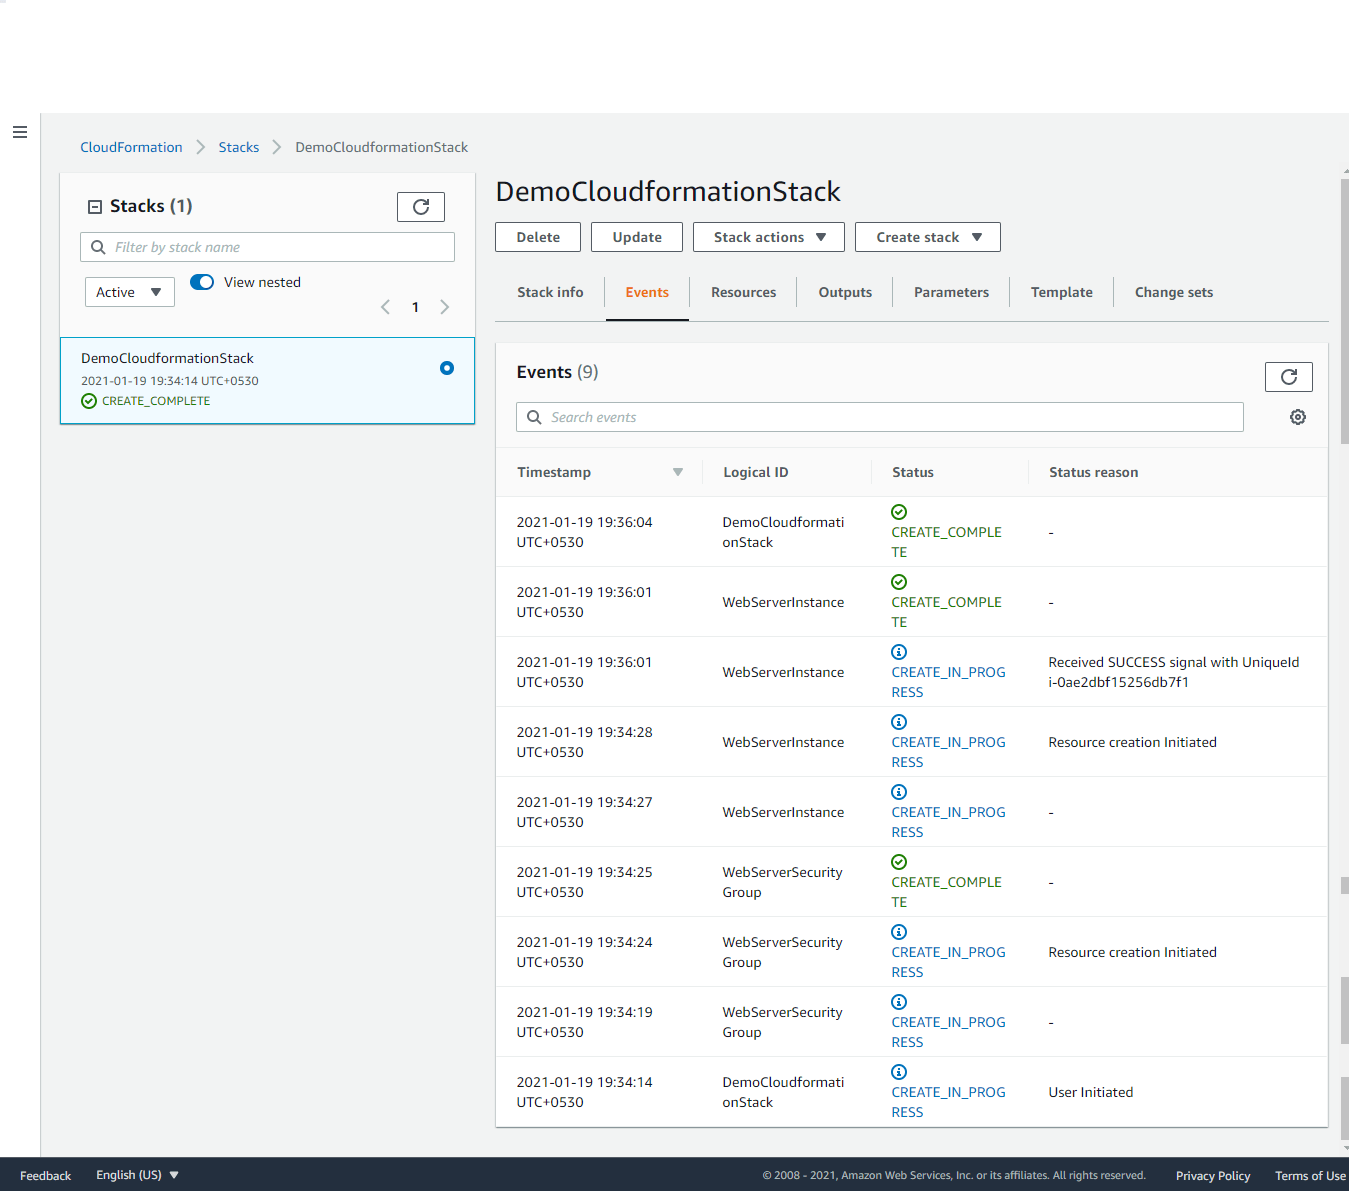
During the AWS Cloudformation stack creation process, you can view all the service creating details in the Events tab. Cloudformation → Stacks → New Stack Name → Events as shown in the below image.
Working with AWS Cloudformation Stack
Once an AWS CloudFormation Stack is created, you can work on created Stack by double-clicking the stack name under CloudFormation → Stacks
Generally each stack classified under 7 tabs namely Stack info, Events, Resources, Outputs, Parameters, Template, and Change set.
Stack info – This tab has overview details of the created stack. This page shows Stack ID and Stack description. Also, this page contains all the details of the configuration listed on the above steps we provided.
Events – This page lists all the processes executed during the stack creation time. This shows
WebServerInstance, WebServerSecurity Group with created timestamp along with the current status.
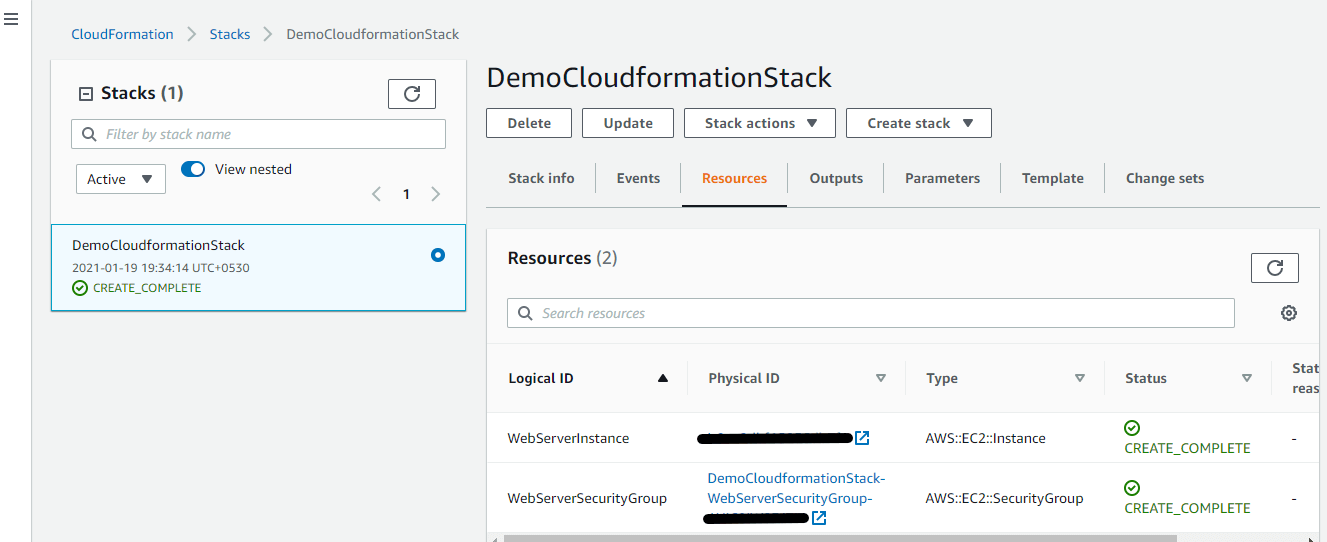
Resources – This page lists WebServerInstance and WebServerSecurity Group details with its physical ID. On double-clicking each physical ID, you can access the associated EC2 instance, and its security group from this page directly. The below screenshot shows those details.
Outputs – This tab shows the created LAMP stack website URL. In our example, we have created a LAMP stack, and so the URL landing on the phpinfo page. You can customize the Website URL with a friendly URL later.
Parameters – This tab shows all the details of DBName, DBPassword, DBRootPassowrd, DBUser,Instance type, KeyName and SSH location details.
Template and Change sets – In this tab, you will get the complete template listing in the browser. You can also view the template in Designer too to get a graphical view of the template.
Deleting the Stack
If you want to remove the stack or want to recreate a fresh stack, you can delete the stack from the stack main page by clicking the Delete button.
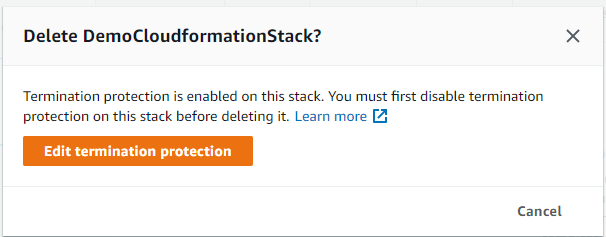
Note: You can’t delete a stack if the termination protection is enabled. You must disable the termination protection before deleting it.
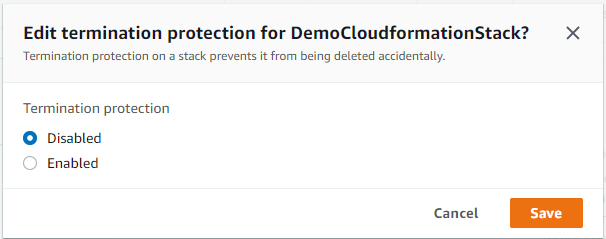
You can edit the termination protection from the delete dialog itself and can disable it. Select the Disabled button and Save. Again try to delete from the Stack main page, and you will get a stack to delete succeeded message.
Conclusion
AWS CloudFormation gives you an easy way to model a collection of related AWS and third-party resources, provision them quickly and consistently, and manage them throughout their life cycles, by treating infrastructure as code.AWS CloudFormation supports various applications that let you make a highly reliable, available, and scalable or upgradeable AWS infrastructure to cater to your specific application requirements. Also, it is easy to create templates in a few steps and flexible to use with any AWS resources.
Protect AWS EC2 instances for free using BDRSuite today! Download 30-days free full-featured trial here
Follow our Twitter and Facebook feeds for new releases, updates, insightful posts and more.