
Site Recovery Manager doesn’t need an introduction. It is one of the best and most popular tools out there when it comes to orchestrating disaster recovery, especially in environment running on the VMware platform. It gives you the ability to integrate with the replication of your workloads to a remote site using VM or storage array replication.
In order to work, SRM requires at least two servers, on which the SRM software is installed, that interact with all the components involved in the DR (vCenter, storage arrays…). It is important to understand that these servers don’t handle the replication, instead they act as a conductor that tells everyone what to do.
The SRM software requires a database per server that can be local or remote to store its data. VMware offers compatibility with Microsoft SQL Server, Oracle Server and provides an embedded vPostgreSQL database.
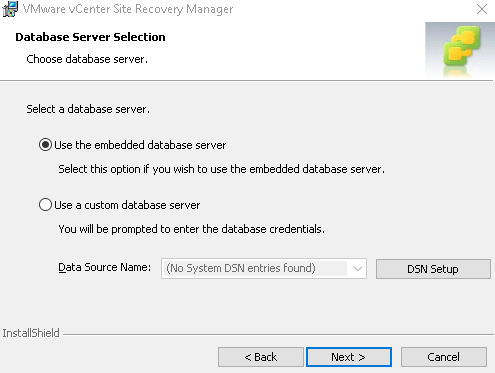
The latter is actually, in most cases, a very well suited option as it requires fewer steps to configure than an external database and it supports a full-scale Site Recovery Manager environment. You can select the option to use the embedded database when you install Site Recovery Manager. The Site Recovery Manager installer creates the embedded database and a database user account according to the information that you specify during installation.

VMware recommends to always back up the Site Recovery Manager database before updating or upgrading Site Recovery Manager. You might also need to backup and restore the embedded vPostgres database if you need to uninstall then reinstall Site Recovery Manager and retain data from the previous installation, migrate Site Recovery Manager Server to another host machine, or revert the database to a clean state in the event that it becomes corrupted.
In this article we will demonstrate how to backup the db regularly and consistently. Of course you may be ok just backing up the VMs running SRM but when running a database there is always a risk of altering consistency and corrupting the data inside it. VMware offers the manual steps to back up the embedded database in the online documentation, so let’s automate it.
The backup process of the database is going to follow these few steps:
- Scheduled task runs and calls the backup script
- Stops the Site Recovery Manager Service
- Creates a dump of the vPostgreSQL database into a dated backup file
- Sends an email to the configured address if an error occurred
- Starts the SRM service
- Rotates the existing backup files
Requirements
I recommend you to ensure that your installation is healthy by restarting the Site Recovery Manager service. If it fails for some reason you need to fix this as a priority.
Before you start, make sure you have the following information handy for both sites as you will need it later.
- A service account to run the backup: For this I use the service account that the SRM service runs as because I think it makes sense and is simpler. However you are free to use another account if you don’t use a dedicated account for the SRM service or if you just don’t want to re-use it
- vPostreSQL database username: This is the database username you specified when you installed SRM. If you don’t know it, you can find this information in the pgconf file located in “$env:APPDATA\postgresql\pgpass.conf” of the user that runs the SRM service
- A backup destination: This can either be a local folder on the SRM server or a share on the network. This folder will store the backup files. Note that they are tiny so you don’t need a lot of space. The usage is about 1MB per file for 600 VMs
1 – User permissions
Whether you use the SRM service account or another one to run the backup scheduled task:
- Make sure this user is allowed the write permission on the backup destination folder
- Make sure it is allowed to stop and start the SRM service
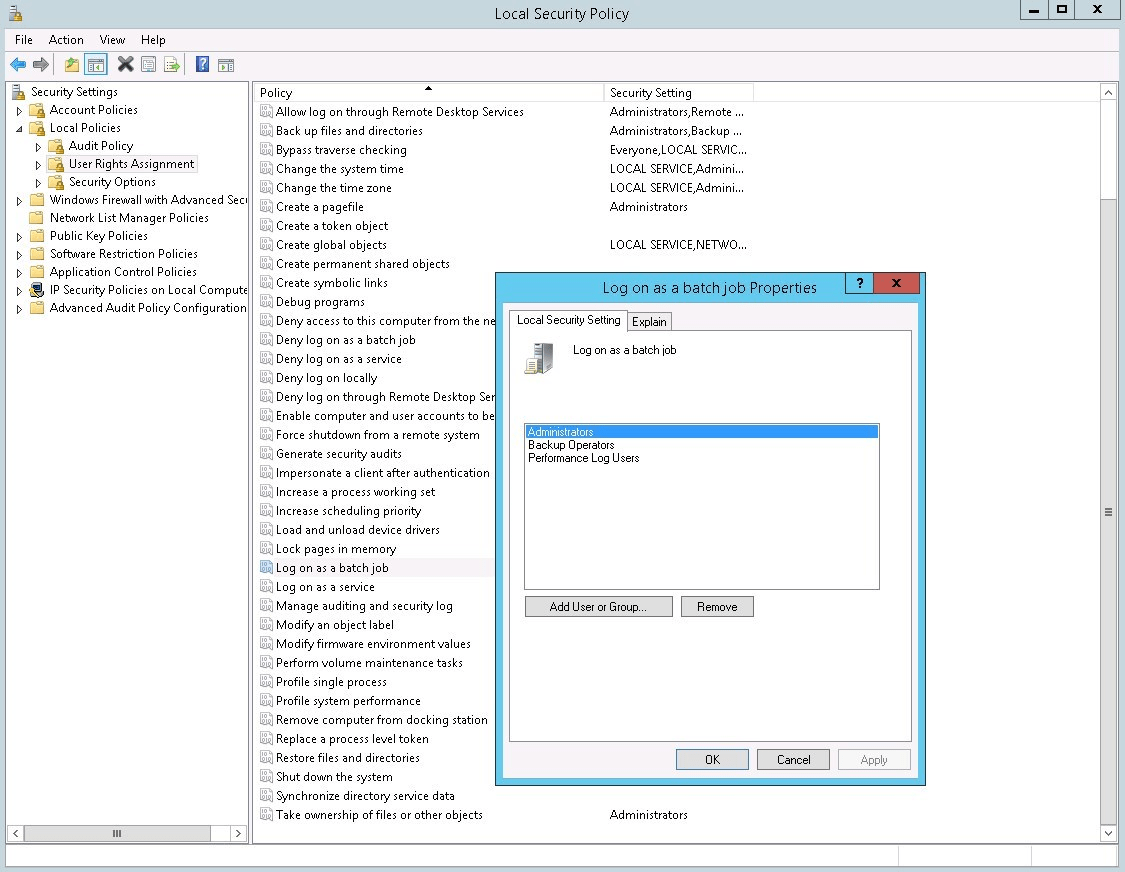
Then we need to allow the service account to run as a batch job, otherwise you will be unable to configure it in the scheduled task. In my case it is a local service account that is a member of the Administrators group which is already allowed to run as a batch job.
If the account is not administrator, follow these few steps:
- Open the Local Security Policy console by typing secpol in windows search
- OExpand Local Policies > User Rights Assignment
- OLocate Log on as a batch job and open its properties
- OAdd the user or group associated with the user you which to use for the backup
If you don’t use the SRM service account for the Backup task
Follow these steps only if you are running the backup job as an account that is not the one used by the SRM service.
PostGreSQL uses the pgpass.conf DSN file to connect to the database automatically with no need to specify the user password. If the file is not accessible by the PostGreSQL process, you will be required to type in the password every time. The file is created automatically during the install of SRM in the profile of the user it runs as. Meaning any other user needs to type the password by default. To allow the task user to connect automatically we need to copy the file into its profile.
- Locate the folder “%APPDATA%\postgresql\”. The path to APPDATA depends on the user used by SRM
- Copy the folder into “%APPDATA%\postgresql\” of the user that will run the task
2 – Installation of the script
Find the Powershell script and the associated batch file at the end of this article.
- Pick a location on the SRM server, to store the Powershell script and the associated batch file. I personally like to place it in C:\Scripts out of habit but it doesn’t really matter as long as the service account has write permission in the folder
- Copy Backup-PostGresDb.bat and Backup-PostGresDb.ps1 in the selected folder
- Customize the variables at the beginning of the Powershell script according to your environment
Change the path to the SRM bin folder if you installed the software in a non-default location.
$PostGrePath = “C:\Program Files\VMware\VMware vCenter Site Recovery Manager Embedded Database\bin”
Optional: You can also edit the port used by PostGreSql in case you are not using the standard 5678 port.
$PostGrePort = 5678
Change the PostGreSql user with the one you specified when you installed SRM. Check the DSN file if you can’t remember.
$PostGreUser = “srm_db_user”
Don’t change this variable as the db name in PostGreSql doesn’t change.
$PostGreDb = “srm_db”
Don’t change the PostGreHost variable as we are running it locally.
$PostGreHost = “localhost”
Change the destination path to the backup location.
$BackupPath = “C:\Backup”
Optional: You can change the format for the name of the backup files if you wish. The file name must start with $PostGreDb and the extension must be .backup, otherwise the rotation won’t work.
$BackupFile = “$PostGreDb-$(get-date -format “yyyy-MM-dd_HH-mm-ss”).backup”
Optional: Specify the number of backup files you want to keep.
$KeepLast = 3
Optional: Number of seconds after which the backup is considered failed. You may need to tweak it if you run into issues in your environment but it usually takes no more than a few seconds.
$BackupTimeoutSec = 60
Change these variables to fit your email settings so you get a notification should the backup fail.
$SMTP = “smtpserver.mydomain.local”
$FROM = “$env:COMPUTERNAME@mydomain.local”
$TO = “john.doe@mydomain.local”
$SUBJ = “$PostGreDb DB backup error on $env:COMPUTERNAME”
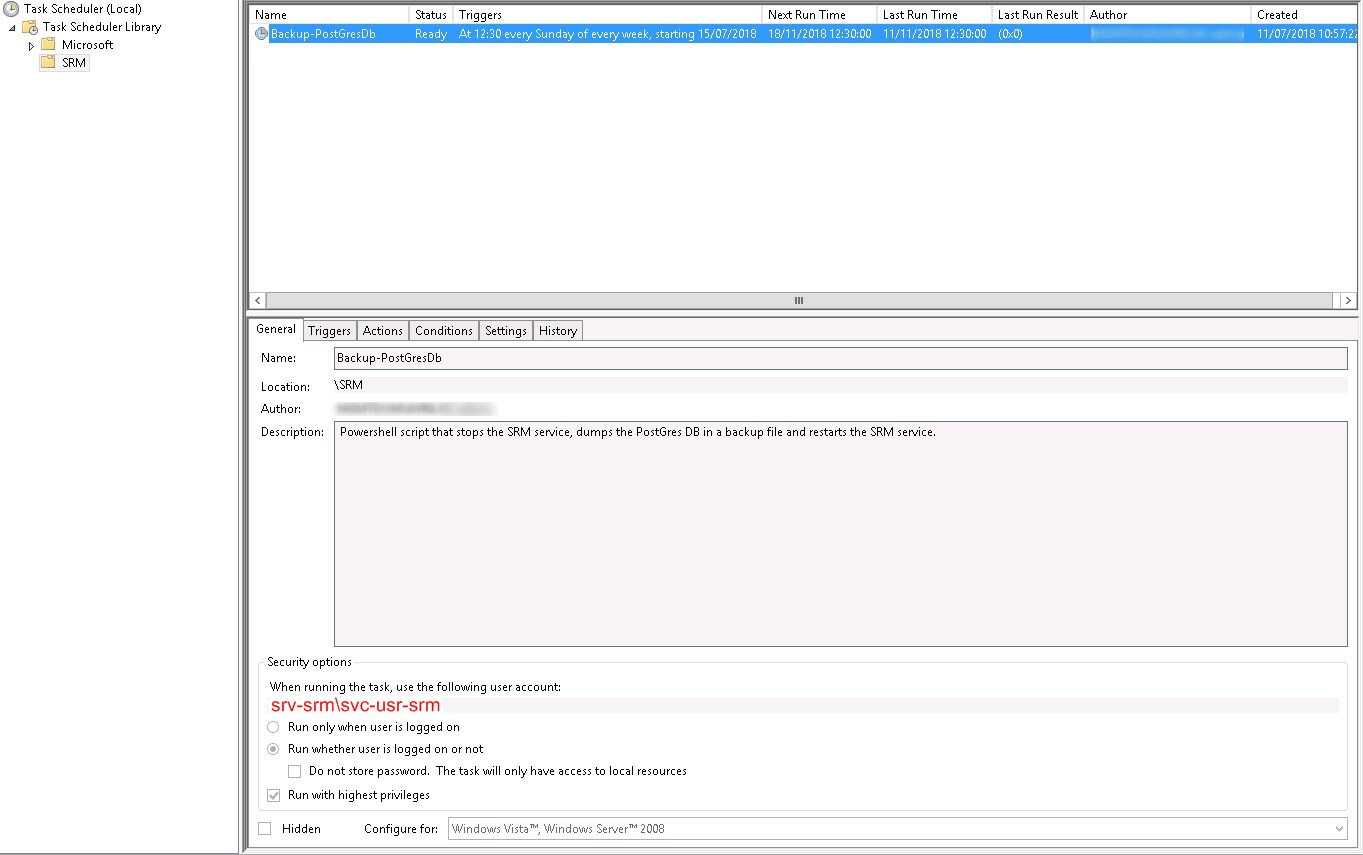
3 – Scheduled task
In this last part we create the scheduled task that runs the backup script. Head over to the task scheduler, you can create a folder named SRM in the scheduler to make it cleaner.
- Create the task with a name and description your colleagues can recognize
- Change the user account to run the task under to the selected service account
- Check Run whether user is logged on or not
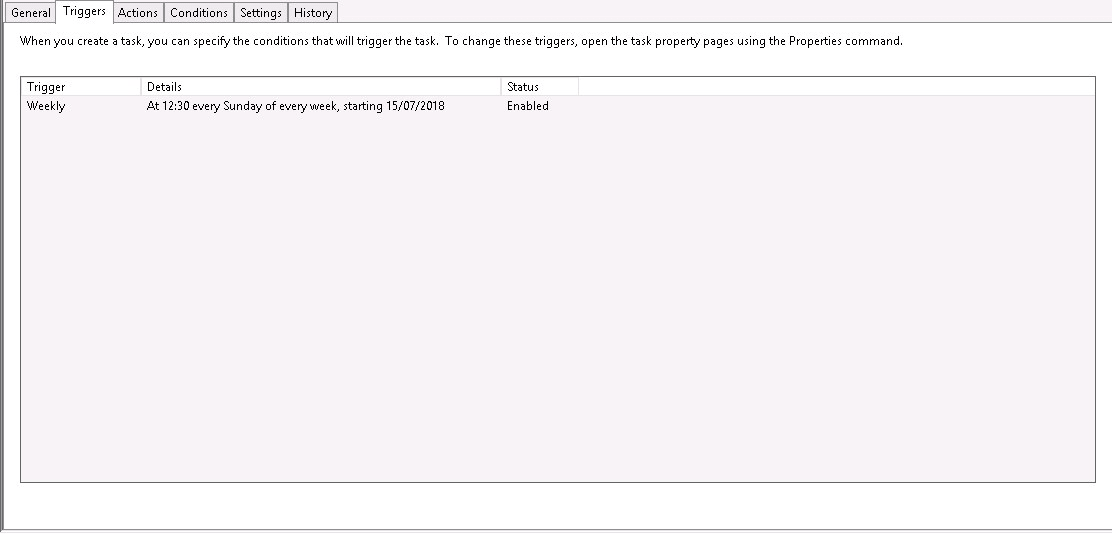
- Select the Triggers tab and configure a time and schedule that fits your needs
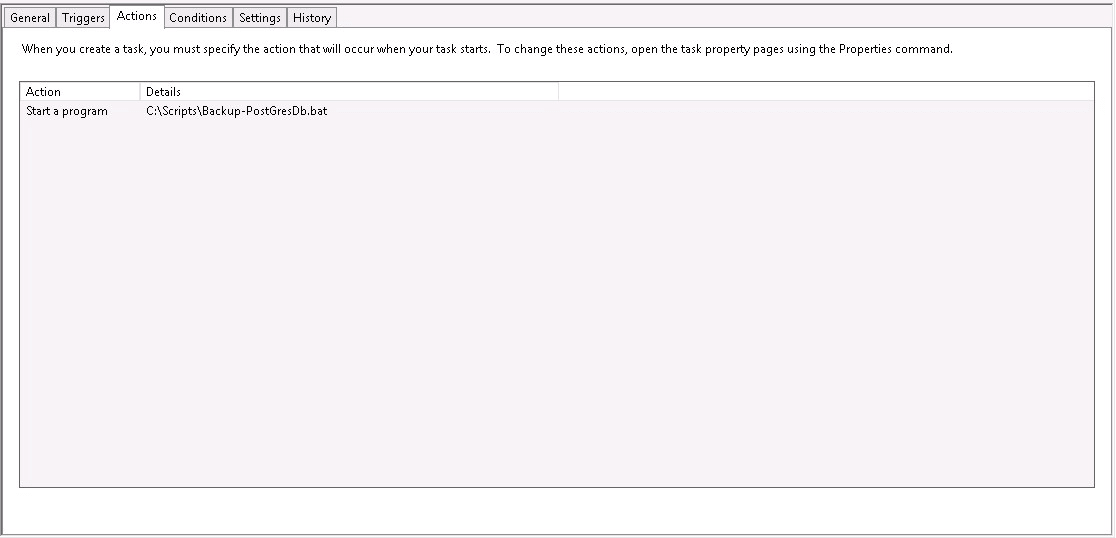
- Select the Actions trigger, browse to the folder where you stored the script and select Backup-PostGresDb.bat
- You can leave the rest of the tabs to their default settings unless specifically needed
Now run the task to make sure the backup runs correctly. It should generate a log file in the scripts folder and a backup file in the backup destination. If the backup fails you can use the log file generated in the folder to troubleshoot what went wrong.
Backup-PostGresDb.ps1
This is the Powershell script that will orchestrate the backup of the database. The dump of the PostGre database will be done by calling pg_dump.exe with a set of arguments.
$PostGrePath = “C:\Program Files\VMware\VMware vCenter Site Recovery Manager Embedded Database\bin”
$PostGrePort = 5678
$PostGreUser = “srm_db_user”
$PostGreDb = “srm_db”
$PostGreHost = “localhost”
# Backup variables
$BackupPath = “c:\Backup”
$BackupFile = “$PostGreDb-$(get-date -format “yyyy-MM-dd_HH-mm-ss”).backup”
$KeepLast = 3
$BackupTimeoutSec = 60
# Mail alert variables
$SMTP = “smtpserver.mydomain.local”
$FROM = “$env:COMPUTERNAME@mydomain.local”
$TO = “john.doe@mydomain.local”
$SUBJ = “$PostGreDb DB backup error on $env:COMPUTERNAME”
Write-Output “—————————————-”
get-date -Format u
TRY {
### Pre run checks
Write-Output “— Checking paths”
if (!(Test-Path “$PostGrePath\pg_dump.exe”)) { Throw “pg_dump.exe not found in $PostGrePath” }
if (!(Test-Path $BackupPath)) { Throw “Backup destination not found : $BackupPath” }
Write-Output “— Checking for pgpass file.”
if (!(Test-Path “$env:APPDATA\postgresql\pgpass.conf”)) { Throw “pgpass.conf not found – PostGre authentication won’t succeed” }
if (!(Get-Content “$env:APPDATA\postgresql\pgpass.conf” | where {$_ -match “:$PostGrePort`:$PostGreDb`:$PostGreUser`:”})) {Throw “pgpass.conf incomplete – PostGre authentication won’t succeed”}
### Execution
Write-Output “— Stopping SRM service”
Stop-Service -Name “vmware-dr”
Write-Output “— Backing up $PostGreDb Database”
Start-Process -FilePath “$PostGrePath\pg_dump.exe” -ArgumentList “-Fc”, “–host $PostGreHost”, “–port $PostGrePort”, “–username $PostGreUser”, “–file $BackupPath\$BackupFile”, “–dbname $PostGreDb” | Wait-Process
While (!(Test-Path $BackupPath\$BackupFile) -and $i -lt $BackupTimeoutSec) {
Sleep 1
$i++
}
### Check for backup file
$Bak = Get-ChildItem “$BackupPath\$BackupFile”
if (!$Bak) { Throw “Backup failed – Timeout $BackupTimeoutSec seconds reached” }
else {
Write-Output “Backup complete ($([math]::round($BAK.length/1KB,1))KB) : $BackupPath\$BackupFile”
}
} CATCH {
Send-MailMessage -From $FROM -To $TO -Subject $SUBJ -SmtpServer $SMTP -Body $_.Exception
Write-Error $_.Exception -ErrorAction Stop
} FINALLY {
Write-Output “— Starting SRM service”
Start-Service -Name “vmware-dr”
### Rotation of backup and log file
Write-Output “— Rotating Backups”
Get-ChildItem “$BackupPath\$PostGreDb-*.backup” | sort creationtime -Descending | select -Skip 3 | Remove-Item -Confirm:$false
Get-ChildItem “Backup-PostGresDb-*.log” | sort creationtime -Descending | select -Skip 3 | Remove-Item -Confirm:$false
}
Backup-PostGresDb.bat
This short bat file makes it easier to create the scheduled task and to redirect the output of the Powershell script into a log file.
REM %~dp0 : directory of the current file
CD %~dp0
SET runDate=%DATE:~6,4%_%DATE:~3,2%_%DATE:~0,2%
REM Call powershell with a file with the same name but ps1 as extension
REM Output everything to a file with the same name but log as extension
REM %~n0 : name of the current file without extension
C:\Windows\System32\cmd.exe /c powershell.exe -noninteractive -noprofile -file %~dp0\%~n0.ps1 >> %~dp0\%~n0-%runDate%.log
How to restore the database
Make sure you know what you are doing before engaging any database restore operation.
Follow these steps to restore the database. It may also be a good idea to take a snapshot of the VM before going for it should something go sideways.
- Stop the Site Recovery Manager Service
- use the following command in a cmd prompt (replace the required fields, not the dbname):
“C:\Program Files\VMware\VMware vCenter Site Recovery Manager Embedded Database\bin\pg_restore.exe” –Fc -–host localhost -–port 5678 -–username srm-db-user –-file “C:\Backup\PostGres1.backup” –-dbname srm_db –password
- Start the Site Recovery Manager Service
Again, like any database restore operation, make sure that you know what you are doing and do it at your own risk. I would recommend that you go through these steps in a test environment if possible, so you are prepared should the day come when you need it. Also remember to document the procedure internally as it is always useful for fellow colleagues.
BDRSuite offers cost-effective VMware Backup Solutions to backup and protect VMs on ESXi & vCenter. Backup starts at $1.80 vm/month.
Follow our Twitter and Facebook feeds for new releases, updates, insightful posts and more.