
Introduction:
Firms have been investing a lot of money and resources to ensure data protection in today’s modern IT Setup. Building secure, sophisticated data centers, implementing complex and streamlined processes to restrict easy access to resources are part of these protections. Virtualization has made it much more sophisticated as the techniques which were used for physical machines cannot be reused. Virtualization can make things easier for people with malicious intents as VMs can be accessed using brute force techniques. Hence it is rightfully said that things have become more complicated.
The scope of this blog is limited to minimal configuration to setup Host Guardian Service role and the corresponding Hyper-V support components to provision a Shielded VM in the guarded host. For advanced setup, refer to Microsoft guarded fabric document – Click Here
Components required for this setup
Minimum requirement to set up a guarded fabric consists of One Windows 2012/2016 physical/virtual machine to provision fabricated domain controller, One Windows 2016 DC physical/virtual machine to provision Host Guardian Service (HGS), One Windows 2016 DC physical machine to provision guarded hosts, and one or more shielded virtual machines (Generation 2 VMs) provisioned on the guarded hosts.

Note: If it’s a production bed, it’s recommended to go with physical machine.
| Description | IP Details |
| AD Server | 192.168.102.100 |
| Host Guardian Service Node | 192.168.102.101 |
| Guarded Host Node | 192.168.102.102 |
| VM | 192.168.102.103 |
Note: Ensure that you have installed the latest cumulative update in both Host Guardian Service Node and Guarded Host Node, before you deploy shielded virtual machines in production.
Configuring HGS Node:
To configure HGS node, one should follow the below steps at the machine which is planned to used for the HGS deployment, in our case – I am going to take IP: 192.168.102.101 as the HGS server.
1. Enable Host Guardian Service role by opening Windows PowerShell in an elevated mode and run the following command.
Install-WindowsFeature -Name HostGuardianServiceRole -IncludeManagementTools -Restart
2. Install HGS Domain in its own forest by running the below command.
$adminPassword = ConvertTo-SecureString -AsPlainText ‘
Note : Replace
Install-HgsServer -HgsDomainName ‘Vembutechhgs.net’ -SafeModeAdministratorPassword $adminPassword -Restart
Note: Replace ‘Vembutechhgs.net’ with a domain name of your choice.
3. After machine reboot, log in with the domain account with the same password which you have used for the local account.
Initialize HGS Node:
To initialize HGS node one should need a valid certificate, invoke the below command to generate self-signed certificates, which is fair enough for the testing purpose.
$CertificatePassword = ConvertTo-SecureString -AsPlainText ‘
Note : Replace
$signingCert = New-SelfSignedCertificate -DnsName “signing.Vembutechhgs.net”
Export-PfxCertificate -Cert $signingCert -Password $CertificatePassword -FilePath ‘C:\signingCert.pfx’
$encryptionCert =New-SelfSignedCertificate -DnsName “signing.Vembutechhgs.net”
Export-PfxCertificate -Cert $encryptionCert -Password $certificatePassword -FilePath ‘C:\encryptionCert.pfx’
Now we need to initialize the HGS service by invoking below command.
Initialize-HgsServer -HgsServiceName ‘Hgs’ -SigningCertificatePath ‘C:\signingCert.pfx’ -SigningCertificatePassword $certificatePassword -EncryptionCertificatePath ‘C:\encryptionCert.pfx’ -EncryptionCertificatePassword $certificatePassword -TrustTpm
Switch to AD Mode by invoking below command
set-hgsserver -TrustActiveDirectory
To do a conditional forwarding pointed to the fabricated domain, invoke the below command.
Add-DnsServerConditionalForwardZone -Name “vembutech.net” -ReplicationScope “Forest” -MasterServers 192.168.102.100
Note: This is with the assumption, you already hosted a fabricated domain with the name as “vembutech.net” on a separate machine – in our case the IP is 192.168.102.100.
To add the vembutech.net to the trusted group, invoke the below command.
netdom trust vembutechhgs.net /domain:vembutech.net /userD:vembutech.net\Administrator /passwordD:
Note: Replace “
That’s it, you all done with HGS Server configuration, now connect to your fabricator domain controller and proceed the below steps.
Configuration to be performed on the Fabricator domain controller: 192.168.102.100
1. Add the Guarded Host to the AD domain.
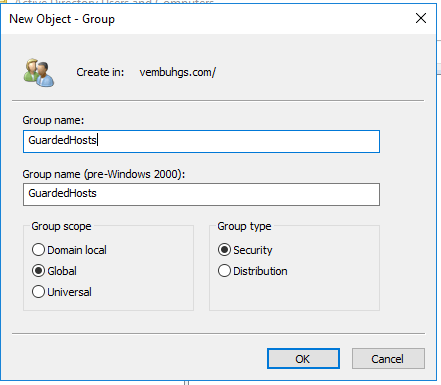
2. Create a group with the name “GuardedHosts” with the scope as “Global” and Group Type as “Security”
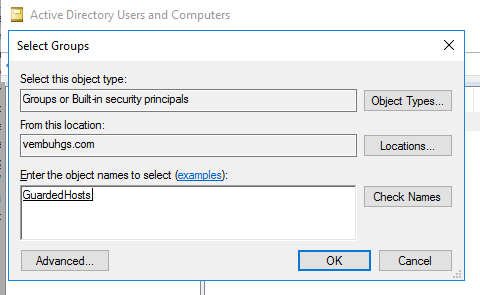
3. Now add available guarded host server to the newly created group, by going to Computer-> Right click the Guarded Host and choose Add to group.
Note: This is under the assumption that the guarded host: 192.168.102.103 is already a part of the fabricated domain controller, if not please do that first, before proceeding this step.
4. Type in the group name as “GuardedHosts” in the object field and hit “Check Name” button.
5. Now add a conditional forwarding to the HGS domain name, to do this, open DNS service at your AD host.
6. Right click “Conditional Forwarders” and choose “New Conditional Forwarders”.
7. Type in your HGS domain name ‘Vembutechhgs.net’ and provide its IP address – 192.168.102.101 to add.
8. Now open power shell in the elevated mode on the AD Server and invoke below command.
Get-ADGroup “GuardedHosts” | Select-Object SID
Note down its resultant SID and keep it aside.
Eg : S-1-5-21-1715446949-429339150-1483827033-1107
9. Switch back to your HGS Server PowerShell and invoke the below command.
Add-HgsAttestationHostGroup -Name “GuardedHosts” -Identifier “S-1-5-21-1715446949-429339150-1483827033-1107”
Note: Replace the SID which you got as the resultant to step9.
10. To verify added HgsAttestation, invoke below command.
Get-HgsAttestationHostGroup
On success, you will be seeing a result as below.
Name Identifier
—- ———-
GuardedHosts S-1-5-21-1715446949-429339150-1483827033-1107
At this point we are done with all configuration settings at both AD and HGS host, now let’s move on to guarded host configuration.
Configuring Guarded Host
1. On the guarded host, create Code Integrity Policy by invoking below two commands sequentially.
New-CIPolicy -Level FilePublisher -Fallback Hash -FilePath ‘C:\HWLCodeIntegrityc.xml’
ConvertFrom-CIPolicy -XmlFilePath ‘C:\HWLCodeIntegrityc.xml’ -BinaryFilePath ‘C:\HWLCodeIntegrityc.p7b’
2. Copy the converted file “C:\HWLCodeIntegrityc.p7b” to HGS server
3. Then run the below command on the HGS Server.
Add-HgsAttestationCIPolicy -Path ‘C:\HWLCodeIntegrityc.p7b’ -Name ‘StdGuardHost’
4. To get the AttestationUrl and KeyProtectionUrl run the below command at your HGS server
Get-HgsServer
On the successful run, the result will looks something like below.
Name Value
—- —–
AttestationOperationMode AD
AttestationUrl {http://hgs.vembutechhgs.net/Attestation}
KeyProtectionUrl {http://hgs.vembutechhgs.net/KeyProtection}
5. Switch back to your Guarded Host and Configure it to use HGS, by invoking below command.
Set-HgsClientConfiguration -KeyProtectionServerUrl “http://hgs.vembutechhgs.net/KeyProtection” -AttestationServerUrl “http://hgs.vembutechhgs.net/Attestation”
Note: On successful verification, you can see like a below message.
IsHostGuarded : True
Mode : HostGuardianService
KeyProtectionServerUrl : http://hgs.vembutechhgs.net/KeyProtection
AttestationServerUrl : http://hgs.vembutechhgs.net/Attestation
AttestationOperationMode : ActiveDirectory
AttestationStatus : Passed
AttestationSubstatus : NoInformation
6. You can also check the host guarded status on-demand by invoking the below command at the guarded host.
Get-HgsClientConfiguration
7. After seeing the successful message as IsHostGuarded true, invoke the below command to proceed further at the guarded host.
7.1 Invoke-WebRequest ‘http://hgs.vembutechhgs.net/KeyProtection/service/metadata/2014-07/metadata.xml’ -OutFile ‘C:/VembuTechGuardian.xml’
7.2 Import-HgsGuardian -path ‘C:\VembuTechGuardian.xml’ -Name ‘VembuTech’ -AllowUntrustedRoot
7.3 $Guardian = Get-HgsGuardian -Name ‘VembuTech’
7.4 $Owner = New-HgsGuardian -Name ‘Owner’ -GenerateCertificates
7.5 $KP = New-HgsKeyProtector -Owner $Owner -Guardian $Guardian -AllowUntrustedRoot
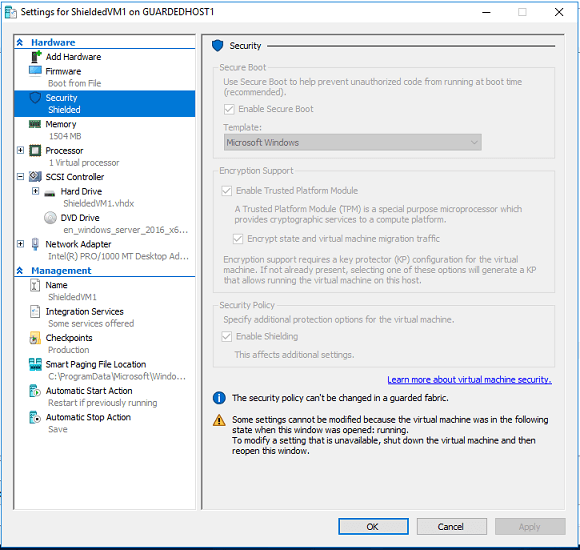
Note: Before proceeding further, we were under the assumption, that guarded host is already having a VM provisioned with the name “ShieldedVM1”.
Also, note before enabling shielded VM, please make sure that you enabled the remote desktop service at the vm because you cannot connect to shielded VM using virtual machine connection.
7.6 $VMName = ‘ShieldedVM1’
7.7 Stop-VM -Name $VMName -Force
7.8 Set-VMKeyProtector -VMName $VMName -keyprotector $KP.RawData
7.9 Set-VMSecurityPolicy -VMName $VMName -Shielded $true
7.10 Enable-VMTPM -VMName $VMName
7.11 Start-VM -Name $VMName
Conclusion: After the successful completion of the above steps the VM machine: ‘ShieldedVM1’ got shielded you can verify this by checking VM’s security properties.
Follow our Twitter and Facebook feeds for new releases, updates, insightful posts and more.