
Nested virtualization refers to running hypervisors inside the virtual machine. Nested virtualization exposes hardware virtualization support to guest virtual machines, allowing Hyper-V to be installed on a guest virtual machine and multiple virtual machines to be created within it.
Before going for Nested virtualization, we need to be aware of its merits and de-merits to get a better understanding of when we can use it to our best advantage.
Merits:
1. Improved resource utilization: Nested virtualization allows multiple virtual machines to be run on a single physical host, increasing the overall resource utilization.
2. Greater flexibility: With nested virtualization, you can run different types of virtualization software on the same host, such as Hyper-V and VMware.
3. Testing and development: Nested virtualization can be used for testing and development purposes, allowing developers to test different configurations and scenarios in a safe, isolated environment.

4. Easier migration: Nested virtualization can make it easier to migrate virtual machines from one host to another, as you can simply export and import the virtual machine configuration.
5. Cost savings: Nested virtualization can help reduce costs by allowing multiple virtual machines to be run on a single physical host, reducing the need for additional hardware.
Demerits:
1. Poor Performance: Hyper-V nested virtualization can cause a significant performance drop, particularly when using multiple levels of nested virtualization.
2. Limited Features: Many of the features available in Hyper-V are not available when using nested virtualization. This includes some of the more advanced features such as live migration and replication.
3. Cost: Nested virtualization can be expensive if you are not leveraging existing hardware.
4. Stability: Nested virtualization can be unstable because it adds additional layers of complexity. This can be especially problematic for mission critical applications.
5. Security: Nested virtualization can introduce additional security risks, as there are additional layers of security that must be managed.
Prerequisites for Hyper-V Nested Virtualization
- A Hyper-V host running Windows Server 2016 or Windows 10 Anniversary Update
- A Hyper-V VM running Windows Server 2016 or Windows 10 Anniversary Update
- A Hyper-V VM with configuration version 8.0 or greater
- An Intel processor with VT-x and EPT technology
Nested Virtualization
Below are the things we are going to cover in this article related to implementing the nested virtualization in your Windows Servers
- Configuring Nested Virtualization
- Disabling Nested Virtualization
- Dynamic Memory and Runtime Memory Resize
- Networking Options
- MAC Address Spoofing
- Network Address Translation
Before proceeding further, please make sure you have a Windows Server 2016 Virtual Machine running under Hyper-V host. You can execute the below command in the PowerShell of Hyper-V host to check the status of the VMs in it.

Configure Nested Virtualization
Below are the steps to configure Nested Virtualization in the VM.
When a virtual machine is in a running state, we will not be able to enable nested virtualization. We need Power OFF virtual machine and run the following PowerShell commands in Hyper-V host.
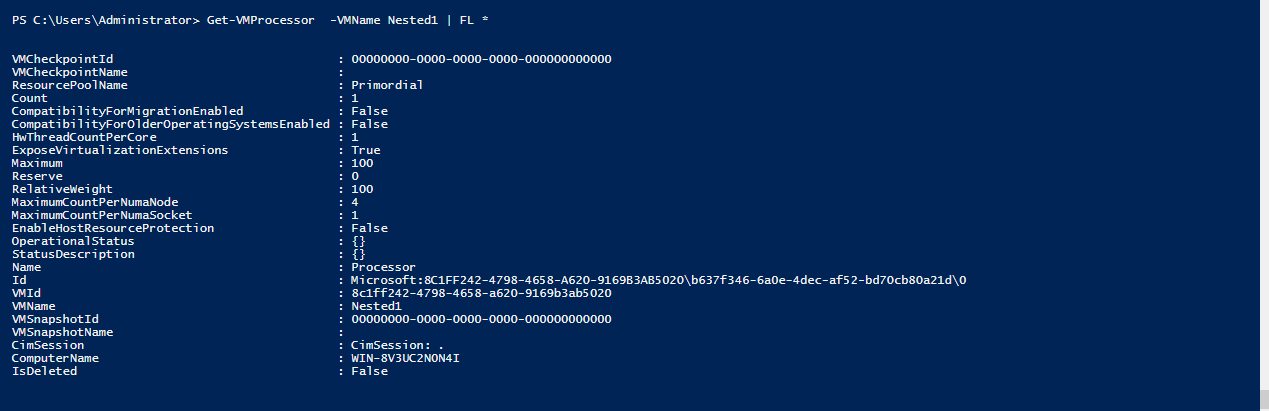
- First, we need to check whether the Expose Virtualization Extensions state is TRUE or FALSE
- If it is in FALSE state, we will not be able to modify changes in processor setting
- To make that extension true, execute the following PowerShell command

In the below screenshot, you can see the Expose Virtualization Extensions is in TRUE state.
Now we go ahead Power On the VM and enable hyper-v role in it
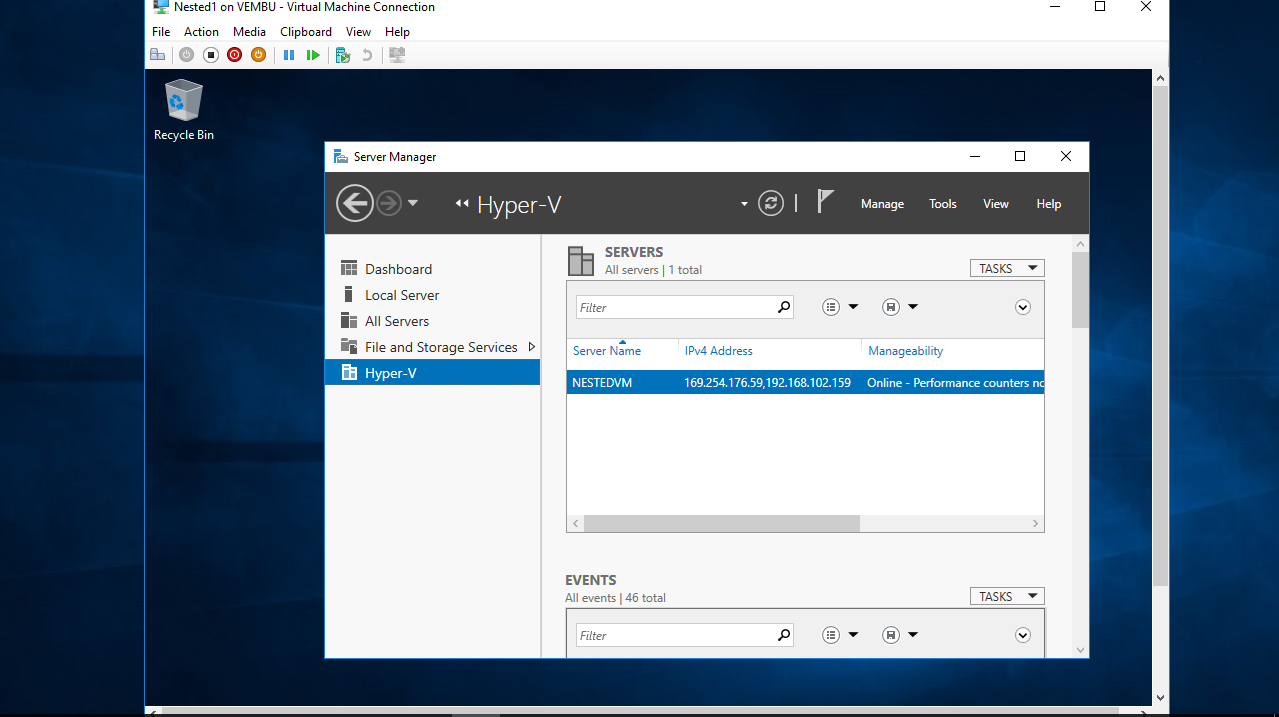
Once the Hyper-V role enabled, and we will be able to create a virtual machine inside on it.
Disable Nested Virtualization
Run the following command in the PowerShell to disable nested virtualization.
You can see the Expose Virtualization Extensions state is changed to False after executing the above command.
Dynamic Memory and Runtime Memory Resize
When Hyper-V is running inside a virtual machine, the virtual machine must be turned off for the memory to be adjusted. This means that the amount of memory will not fluctuate even if dynamic memory is enabled. Any attempt to adjust the amount of memory for virtual machines that do not have dynamic memory enabled will fail.
It is important to note that simply enabling nested virtualization has no effect on dynamic memory or runtime memory resizing. Only while Hyper-V is running in the VM does the incompatibility occur.
Nested Virtualization Networking
There are two options for networking with nested virtual machines: MAC address spoofing and NAT mode.
MAC Address Spoofing
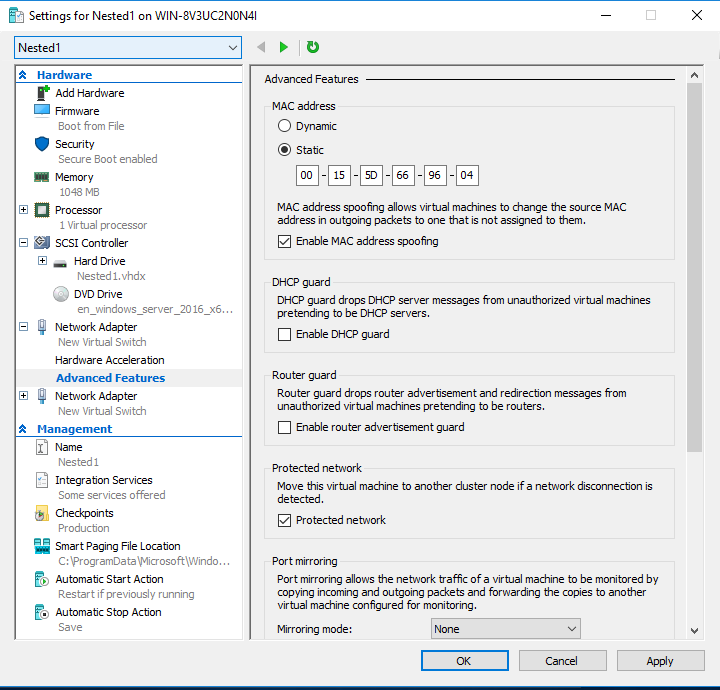
MAC address spoofing is a technique for changing a factory-assigned Media Access Control (MAC) address of a network interface on a networked device. For network packets to be routed through two virtual switches, MAC address spoofing must be enabled on the first level of virtual switch. This is completed with the following PowerShell command.

- Before Mac Address Spoofing On, we need to power off the virtual machine
- In Hyper-V host virtual machine settings, choose Advanced Features under Network Adapter
- Select the Static Mac Address and then click Apply
Follow the below steps for Mac Address Spoofing.
- In Hyper-V host virtual machine, Choose Advanced Features under hardware devices
- Static Mac Address will display-> click Apply and ok
Network Address Translation
Network Address Translation(NAT) assigns public address to a computer inside a private network. This approach is best suited for cases where MAC address spoofing is not possible, like in a public cloud environment.
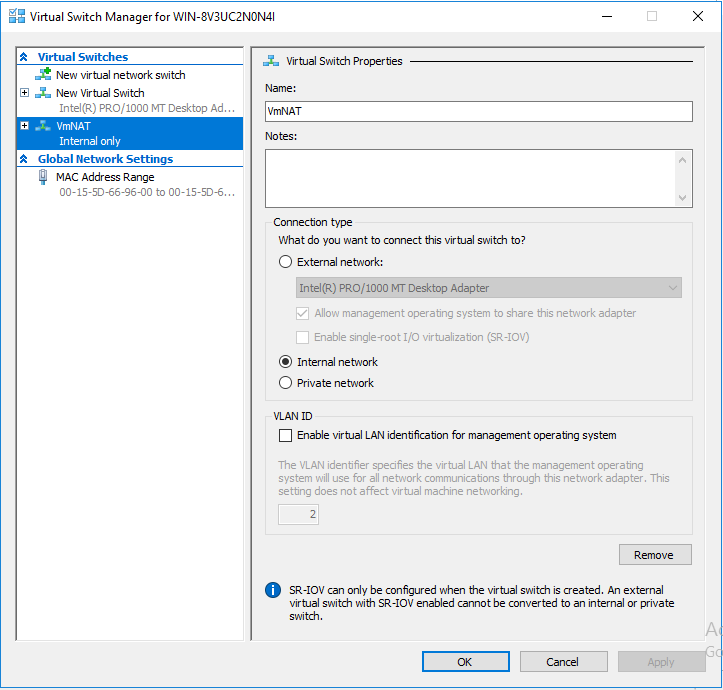
First, NAT switch must be created in the Virtual Switch Manager
To create NAT switch, run the below commands using PowerShell.

Next we will assign IP address, Gateway and DNS to point out the NAT adapter. The following commands needs to run in PowerShell.
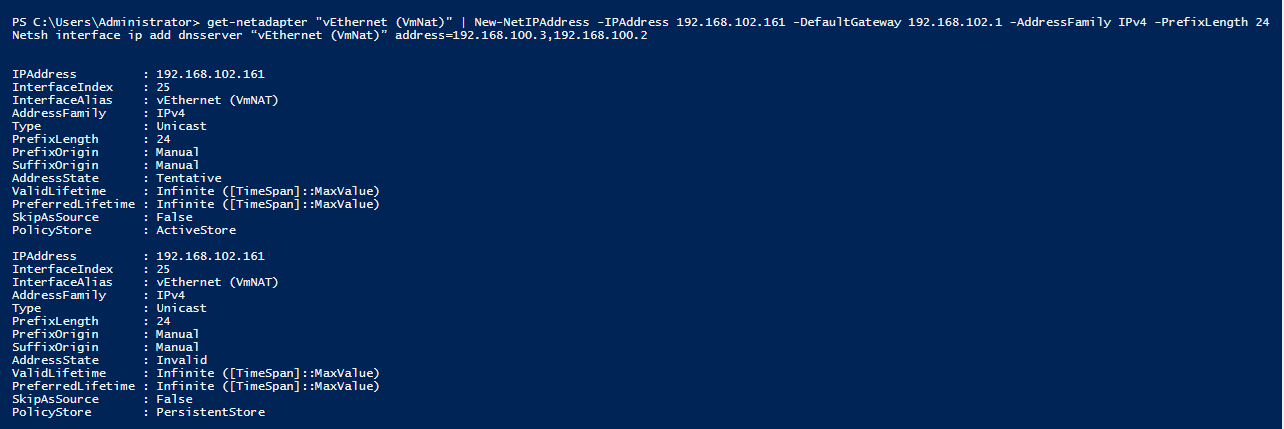
- Here we saw, created virtual switch (i.e)VmNAT is added under Hyper-V host
3rd Party Virtualization Apps
Virtualization applications other than Hyper-V are not supported in Hyper-V virtual machines, and are likely to fail. This includes any software that requires hardware virtualization extensions.
Conclusion
Hyper-V Nested Virtualization is the advanced feature to run virtual machines with less resource utilization.
Read more:
Build a virtual lab with Hyper-V using Nested Virtualization
Follow our Twitter and Facebook feeds for new releases, updates, insightful posts and more.