
In this blog post I will be discussing what Azure Virtual networks are, how to deploy them, and how to design them.
Virtual Networks
Azure Virtual Networks popularly called as VNets are basic fundamental building blocks for Azure Virtual Networking. VNets is an collection of address space in classic datacenter networking terminology. Planning networking Address space is very critical for proper Network design. You need VNets to deploy VMs in Azure. VMs deployed in same VNets can talk to each other. In fact, you don’t need to enable any routing to make it work. To put it another way, routing is configured by default between subnets created in the same VNets. However, if you like to connect to the services outside VNETs you need to establish Site to Site VPN. It needs a component called as Azure Virtual Network Gateway. There is no extra cost for using Virtual Networks in Azure.
When do I need more than one VNETs?
VMs deployed in VNets as described above will speak with each other by default unless you enable Network Security Group. The use cases for creating multiple subnet is when you need a strict isolation between VMs. The best example in this case would be segregation of Development, Testing and Production networks.


Address Space
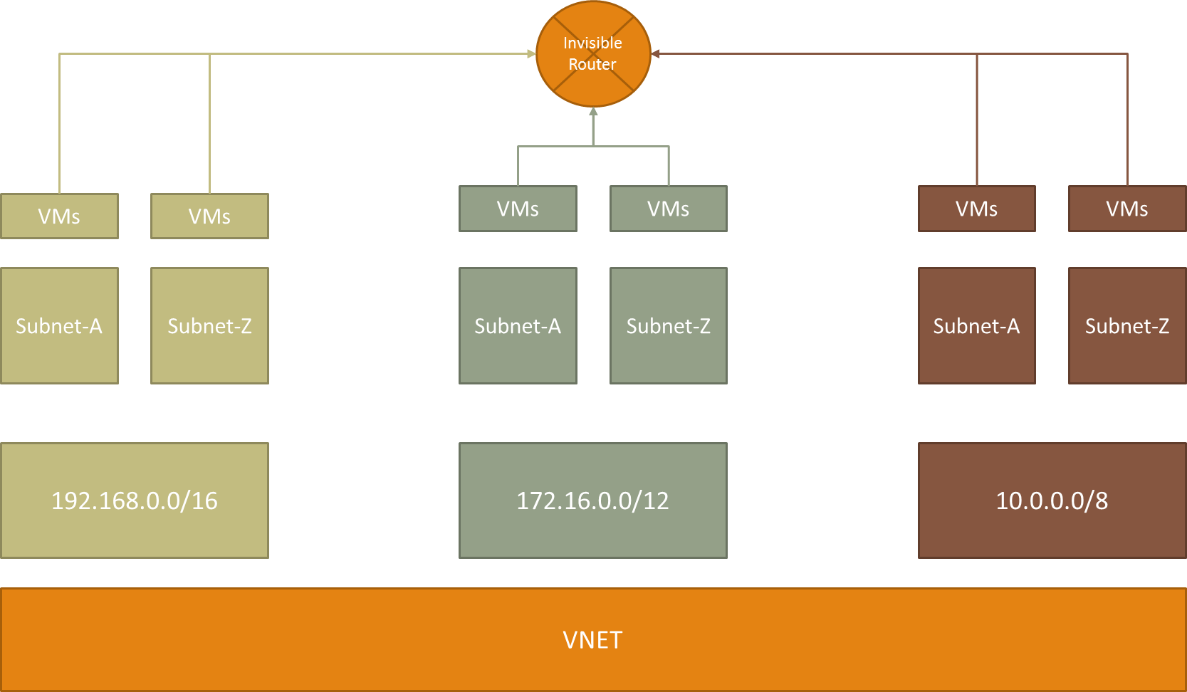
While deploying VNets you must decide Address space. Now this Address space must not conflict with the Address space on your Physical datacenter. Address space in Azure are specified in CIDR Notation. Address Space in initial days were restricted to follow private IP Address range also referred as unrouteable IP Address
- 192.168.0.0/16
- 172.16.0.0/12
- 10.0.0.0/8
But this has changed now. You can use any non-routable address space
Factors deciding Address space
Address space must be overlapping with any networks. By any networks I meant either a vNets defined in the same or different region and Subnets defined on your on-premises network. Better way to plan is to select a smaller Address space
e.g. you can either give 10.0.0.0/8 or you can select 10.0.0.0/27
Subnets
But VNets are in itself are of little use. You need to create subnet inside VNets. It is likely slicing and dicing your address space. Why you do this? Let’s take an example in 172.16.0.0/12 you get 1,048676 address space (1 million). Now you need to design your network to maximum the usage of these IP Address range. The way to do this is 172.16.9.0/27 will get you 32 address. In Azure, first four addresses and last one address is reserved. This means out of 32 address you have only 27 usable addresses.
It is worth noting here there is no restriction between subnets created in single VNets. Again with an example I would like to explain. I have created two subnets as 172.16.9.0/27 and 172.16.10.0/27. In traditional network VMs attached to these networks will not communicate unless routing is defined. But in Azure 172.16.9.0/27 and 172.16.10.0/27 will be able to talk with each other without any configuration.
IP Address
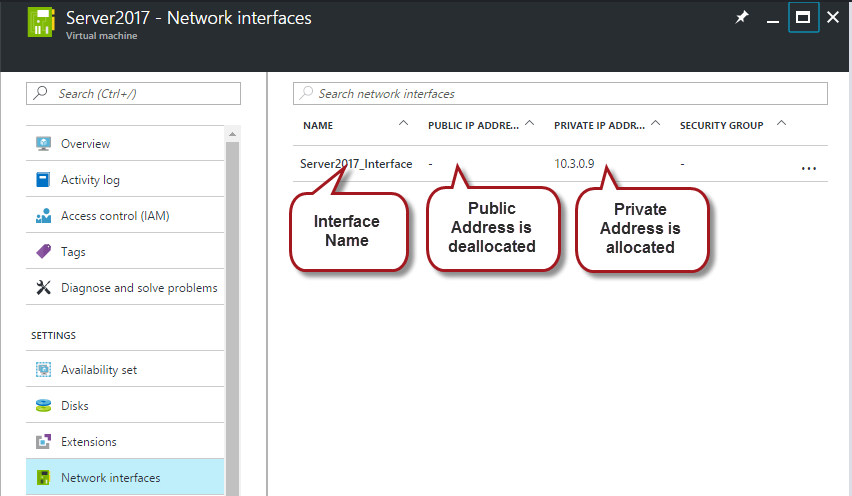
IP Address as a topic is usually is not required to be discussed. But in Azure we need to know about it a bit. In Azure IP address are assigned Dynamically by default which referred as DIP. DHCP scope is infinite in Azure and IP is released only if you decommission/de-allocate VM. Though we can change them to static but the process is bit involved. IP Address are assigned to VM when they are deployed. In cases multiple VMs are deployed IP Addresses are assigned when VM boots up. There are two types of address assigned to VM Private IP Address and Dynamic IP Address. Private IP Address is used for internal communication within VNets while Public Address is used to access VM from outside.
You do get to choose the private ip but you do not get to choose public IP
Network Interface Card (NIC)
VMs communicate with each other using NIC. IP Addresses (both Private & Public) are assigned to NIC. VMs can have more than one NIC.
Limitation
By default, we can create 50 VNets in Azure per subscription per region. This limit can be increased by contacting Azure support. Networking limits are listed in detailed here
Creating Virtual Networks in Azure Using Azure Resource Manager Portal
Now that we understand little bit of virtual networking in Azure, let me walk through on how to create one VNet, two Subnets and attach a VMs to these subnets respectively. At the end of this Walk through we will achieve
- VNet – 172.16.0.0/16
- Subnet A – 172.16.9.0/27
- Subnet B – 172.16.10.0/27
Login to Azure Portal ( https://portal.azure.com ) with your subscription details. Like any other software there are numerous ways to create VNet. Here is the simple way to do it.
-
You to Click the + button, then click the 2) Networking which expands the Blade from which you 3) select Virtual Network. In Deployment model select 4) Resource Manager from drop down menu and finally press 5) Create.

Microsoft is heading towards the Resource Manager deployment model
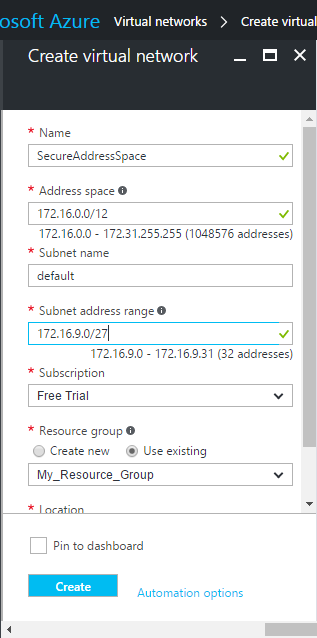
- Decide the Name for your Address Space, put in CIDR notation for Address Space. In my example I have selected 172.16.0.0/12.
- Next, specify the name for the Subnet in my case I forgot the change from ‘Default’
- Now I have to select an Address range which will fall in 172.16.0.0/16 address space. As seen above you see I have selected 172.16.9.0/27 (32 Address only)
- Remaining selections, I left it at default. I need to explain Subscription, Resource Group and Location. I will focus on it in future posts
- Final click ‘Create’
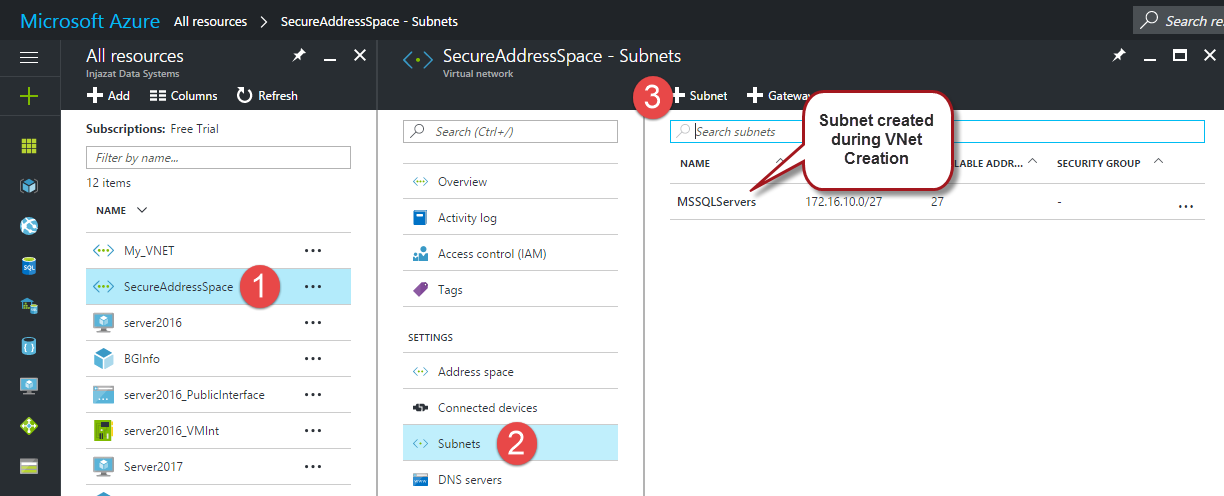
- Select VNet, in my case SecureAddressSpace
- Select the Subnets which opens up another blade
- Create on Plus sign, fill in the
- Name for the Subnet
- Address Range
- Leave Network Security Group (NSG) none
- Leave Route table none
Now let me show you how to add Second subnet. This is quite simple process. I say this as we have already create VNet and Subnet. In order to create second subnet find VNet you just created. In reality if you have not moved your cursor somewhere in the portal, you are presented to with VNet screen.
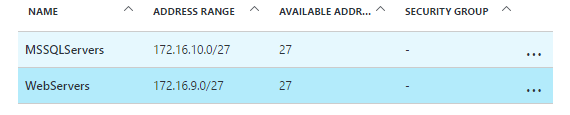
Now we have networking configured with following details
| Attribute | Name | IP Range |
| VNet | SecureAddressSpace | 172.16.0.0/12 |
| Subnet | MSSQLServers | 172.16.10.0/27 |
| Subnet | WebServers | 172.16.9.0/27 |
As a next step we must deploy Virtual machines in these respective subnets. I would cover VM deployment in future topics
Follow our Twitter and Facebook feeds for new releases, updates, insightful posts and more.