
Introduction
In this How-to, we are discussing Oracle VM Virtualbox advanced features for running a guest OS and providing the steps to integrate Oracle VM Virtual Manager with Oracle cloud infrastructure.
With Oracle VM Virtualbox 6.0 release, the capability to export a virtual machine and get it running as an Oracle Cloud Infrastructure (OCI) Emulated Instance in a few steps was introduced.
Oracle VM VirtualBox 6 requires proper configuration to interact with a specific Oracle Cloud Infrastructure environment. All those configuration information will be used by VirtualBox to authenticate with Oracle Cloud Infrastructure (without user prompt).
Table of Contents
- Integrating with Oracle cloud infrastructure
- Setting up Oracle Cloud Infrastructure tenant
- Creating OCI bucket
- Creating OCI Virtual Cloud Network (VCN)
- Preparing Oracle VM Virtualbox
- Conclusion
Oracle VM Virtualbox components that support running a VM and having additional features that support the integration of OnPremise VM Virtualbox to OCI are described here.
Virtual Media Manager – Oracle VM VirtualBox keeps track of all the hard disks, CD/DVD-ROM, and floppy disk images that are used by the created virtual machines. These are often referred to as known media and come from two sources:

- All media currently attached to virtual machines
- Registered media, for compatibility with legacy Oracle VM VirtualBox versions
The known media can be viewed and changed using the Virtual Media Manager, which you can access from the File menu in the VirtualBox Manager window.
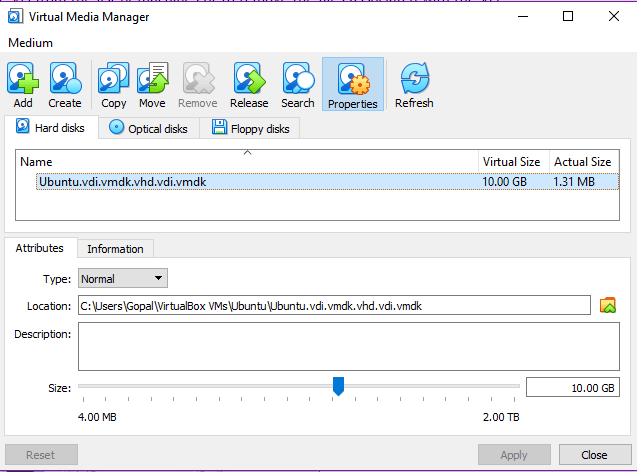
The known media are grouped in separate tabs for the supported formats. These formats are:
- Hard disk images, either in Oracle VM VirtualBox’s own Virtual Disk Image (VDI) format or in the third-party formats like VHD, VMDK and HDD
- CD/DVD images in standard ISO format
- Floppy images in standard RAW format
For each image, the Virtual Media Manager shows you the full path of the image file and other information such as the virtual machine to which the image is currently attached. You can also perform these operations on the images: add, create, move, copy, remove, release, and refresh.
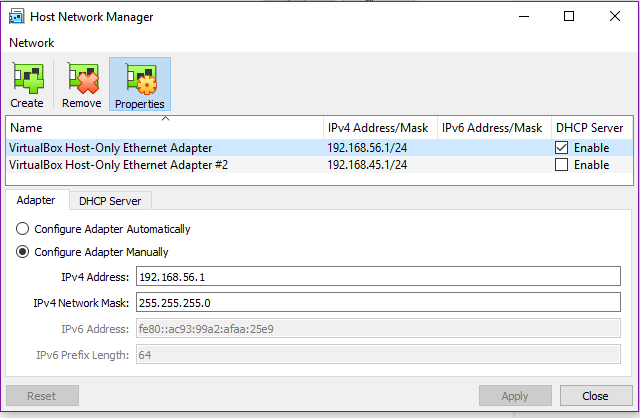
Host Network Manager – This component allows adding/removing the host network adapters from the host. By default, one NIC will be added. If your host has more than one adapter, you can add another network adapter that can be leveraged for guest OSes. By clicking properties of each NIC, you can assign IP address details to it.
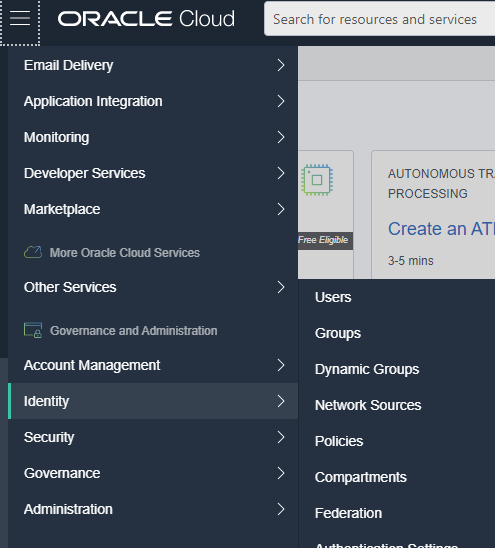
Integrating with Oracle cloud infrastructure
This process involves three steps:
- Setting up Oracle Cloud Infrastructure tenant
- Preparing on-premise Oracle VM VirtualBox to connect OCI
- Migrating a sample VM from Oracle VM VirtualBox to OCI
Setting up Oracle Cloud Infrastructure tenant
Before starting, you should have subscribed to a personal or company account on OCI. You can use the one-month full-featured trial account to start with.
Creating OCI bucket
In the Oracle Cloud Infrastructure Object Storage service, a bucket is a container for storing objects in a compartment within an Object Storage namespace. A bucket is associated with a single compartment. The compartment has policies that indicate what actions you can perform on a bucket and all the objects in the bucket.
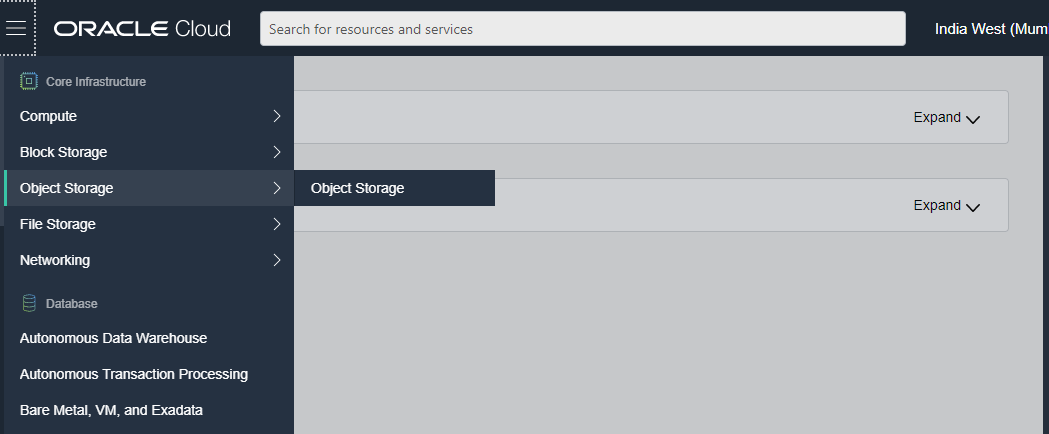
- To create an OCI bucket, login to OCI infrastructure with your registered credentials
- On top left side main menu, expand Core Infrastructure → Object Storage → Object Storage
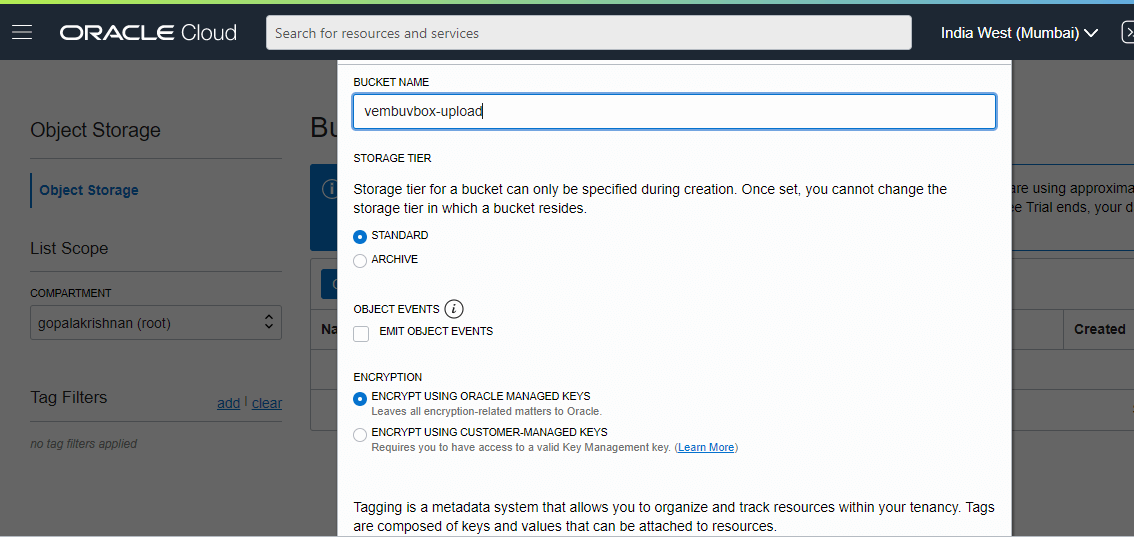
- Create a new bucket by selecting your compartment (your tenancy name) and click Create Bucket. A new pop window will appear as below
- Provide a name for the bucket, we have given vembuvbox-upload
- Next, we are choosing the Standard Storage tier
- Use the standard Object Storage tier for data to which you need fast, immediate, and frequent access
- Use the Archive Storage tier for data to which you seldom or rarely access, but that must be retained and preserved for long periods
- In the Encryption section, choose Encrypt using Oracle managed keys if the keys are managed by Oracle. This is the easiest way to not manage encryption-related concerns by yourself
- Once you create a bucket, you will know all the details of the bucket when you double click the bucket name as shown in the below image
Note:

Creating OCI Virtual Cloud Network (VCN)
The OCI VCN is a virtual, private network that you set up in Oracle data centers. Like a traditional network, VCN also comes with firewall rules and specific types of communication gateways that you can choose to use. A VCN resides in a single Oracle Cloud Infrastructure region and covers a single, common IPv4 CIDR block of user choice.
To create OCI VCN, proceed with the following steps:
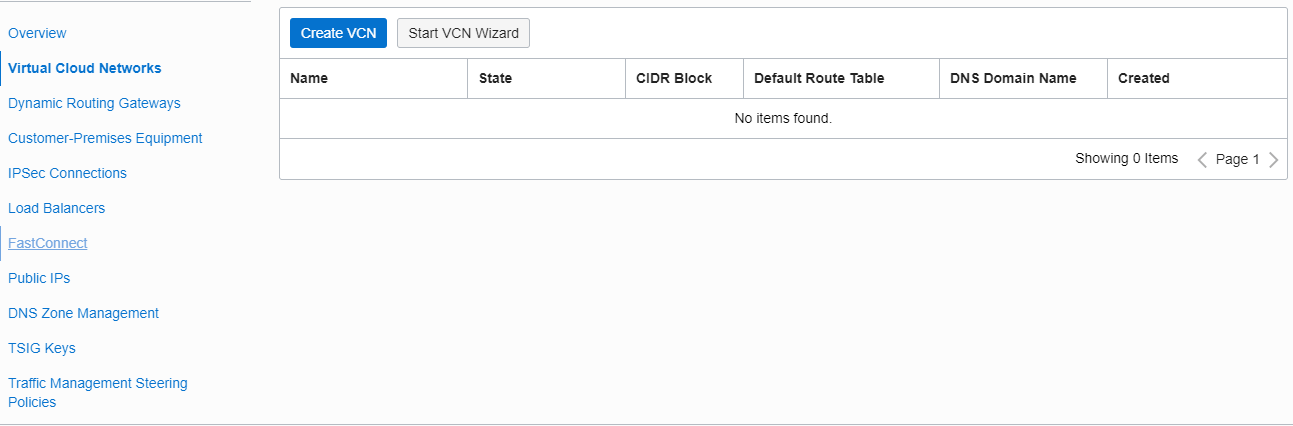
- On the left pane, click Networking and all the networking components will be listed
- Select Virtual Cloud Networks on the available lists, and click Create VCN
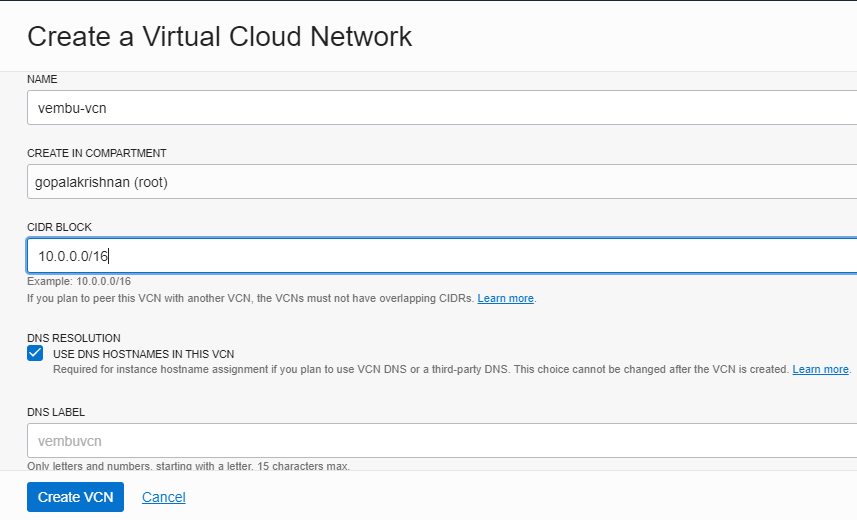
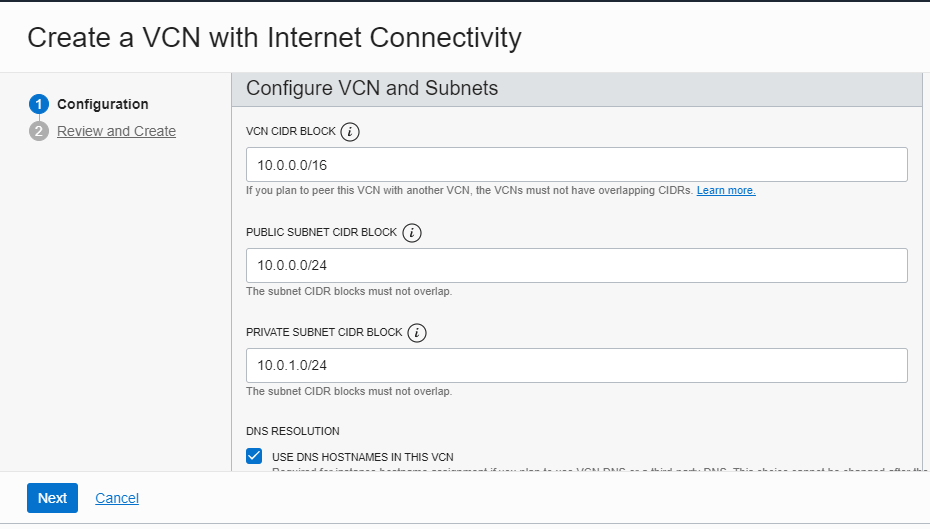
- Provide a VCN name and choose your existing compartment under which your VCN should be created
- Provide a CIDR Block. We have chosen the default 10.0.0.0/16 Block. Make sure DNS resolution is enabled, and hence DNS Label and DNS Domain Name for the VCN is automatically assigned
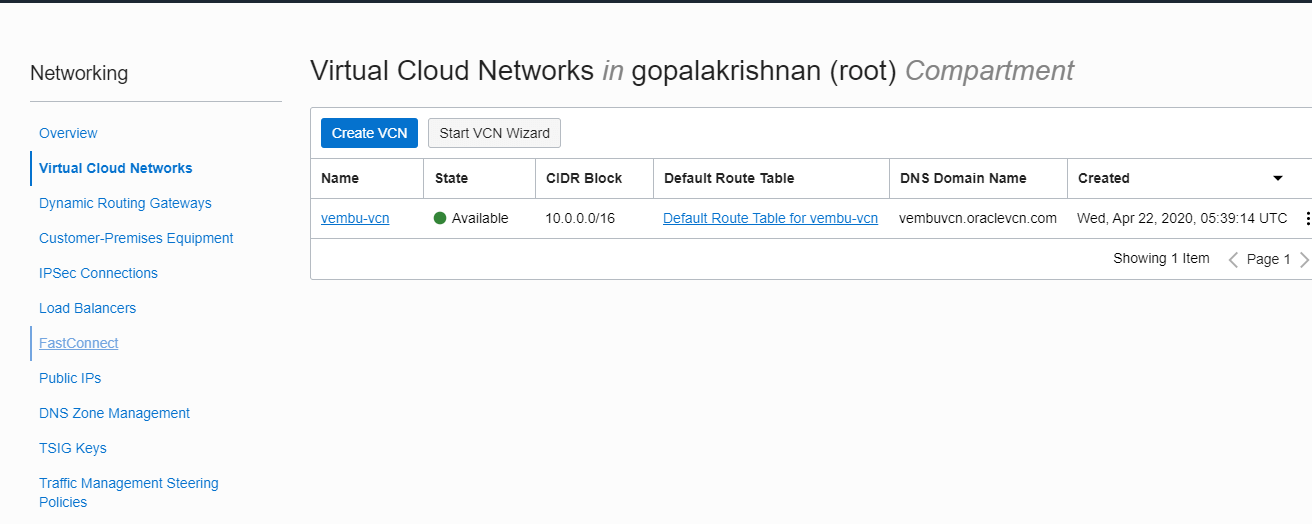
- Click Create VCN and a new VCN will be created and listed on the VCN Main page as below
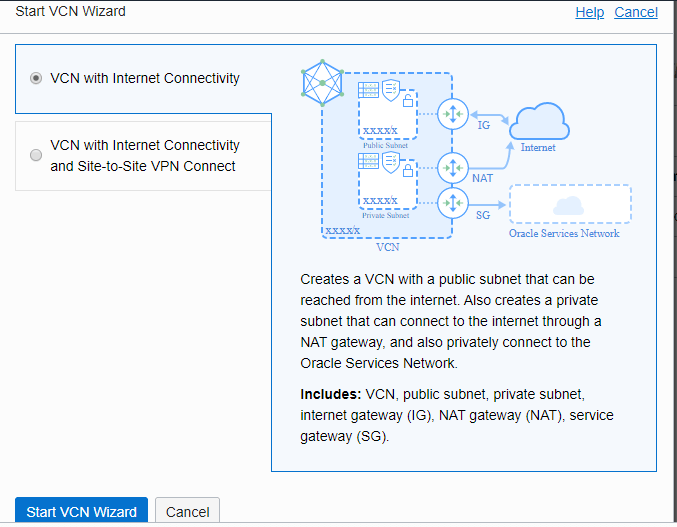
- Once VCN is created, click Start VCN Wizard next to Create VCN, this will pop up the advanced configuration settings of VCN
- VCN with Internet Connectivity
- VCN with Internet Connectivity and Site-to-Site VPN connect

Here DNS label is vembuvcn and DNS Domain Name is vembuvcn.oraclevcn.com
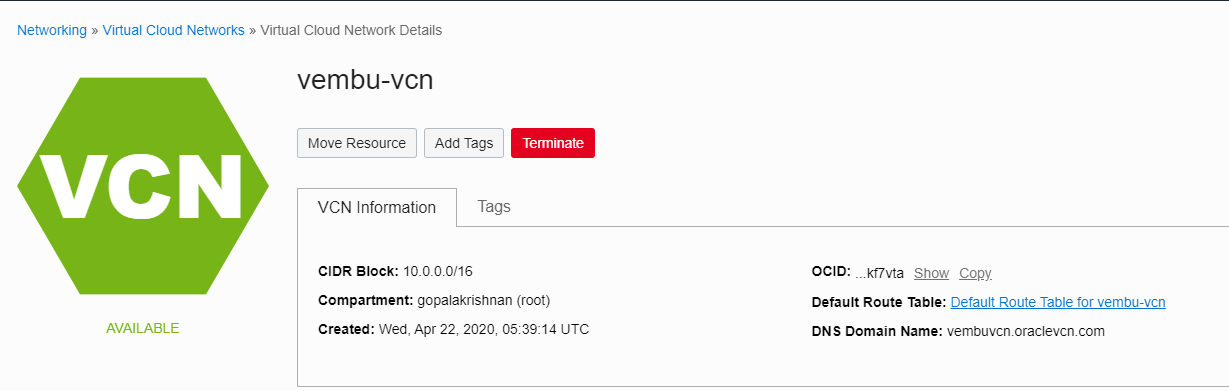
You can view all the details of the created VCN, by clicking on the VCN name, and it will be shown
If you want to connect a group of computers from your office network, you can select the second option with Site-to-Site VPN connect. If you are connecting only one computer directly to your OCI, you can select the first option
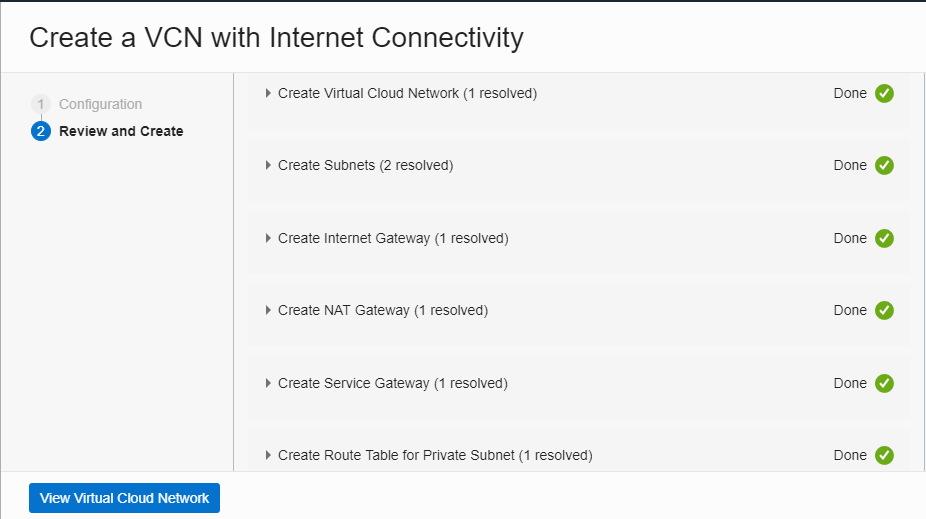
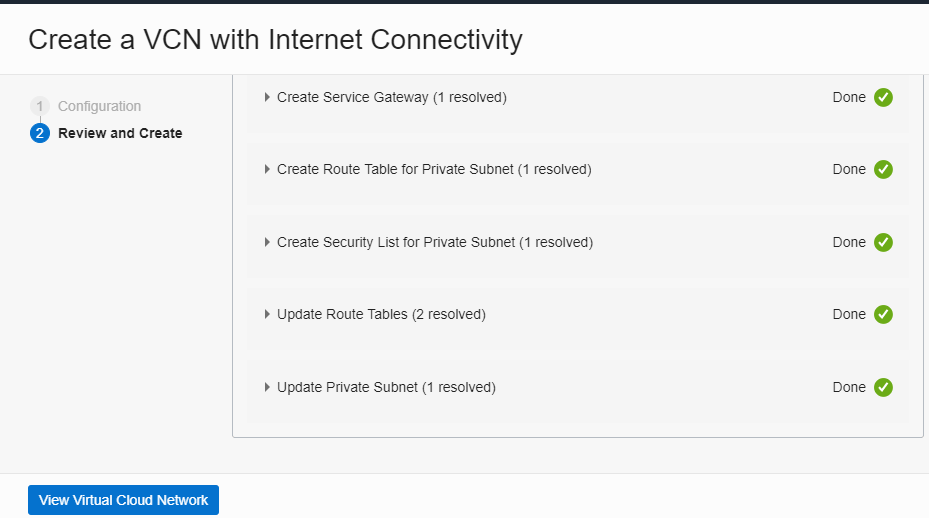
This VCN creation includes the following network setups:
- Create a Virtual Cloud Network
- Create Subnets
- Create Internet Gateway
- Create NAT Gateway
- Create Service Gateway
- Create Route table for Private Subnet
- Update Route table
- Update Private Subnet
You will be notified when all these processes are completed as in the picture below
Preparing Oracle VM Virtualbox
In this step, we are preparing the OnPremise Oracle VM Virtualbox to tightly integrate OCI. Oracle VM VirtualBox 6 and later requires proper configuration to interact with a specific Oracle Cloud Infrastructure environment. All that information will be used by VirtualBox to authenticate, without any user prompt, with Oracle Cloud Infrastructure.
The first step is to collect a list of information, possibly in a text file, from the OCI Console:
- user
- tenancy
- region
- compartment
- key_file and
- fingerprint
User
The account used to connect OCI has its OCID, called user ocid. To collect this information, click on the upper-right side of the OCI console on the human face icon and select your email address.
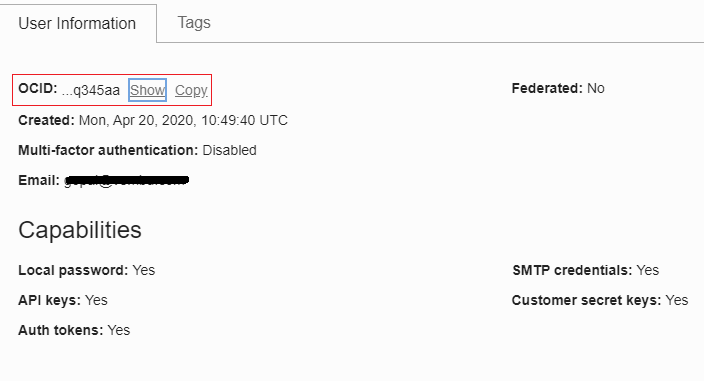
Click copy on the highlighted (in red), you will get User OCID information, record this information in a text file.
Tenancy
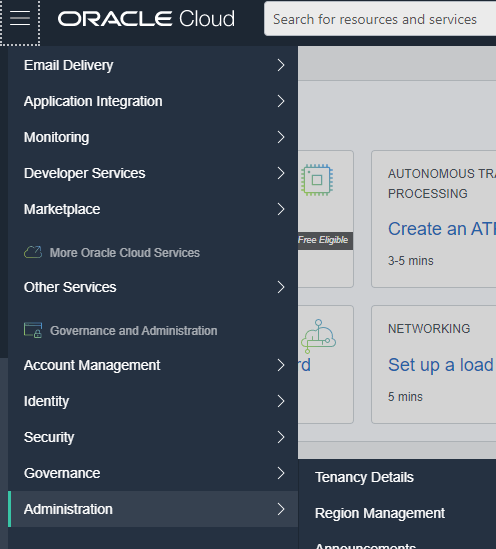
A tenancy is a secure and isolated partition within Oracle Cloud Infrastructure used to create, organize, and administer cloud resources. Each tenancy has its OCID. To collect this information, click on the OCI Main Menu -> Administration -> Tenancy Details as shown in the below image
Click on Tenancy Details, will show Tenancy Information.
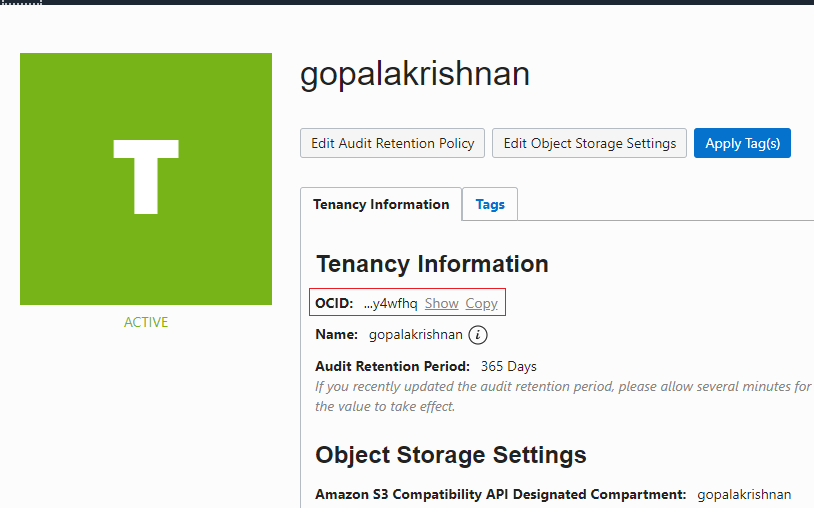
Click copy on the highlighted (in red), you will get Tenant OCID information, record this information in the same text file.
Region :
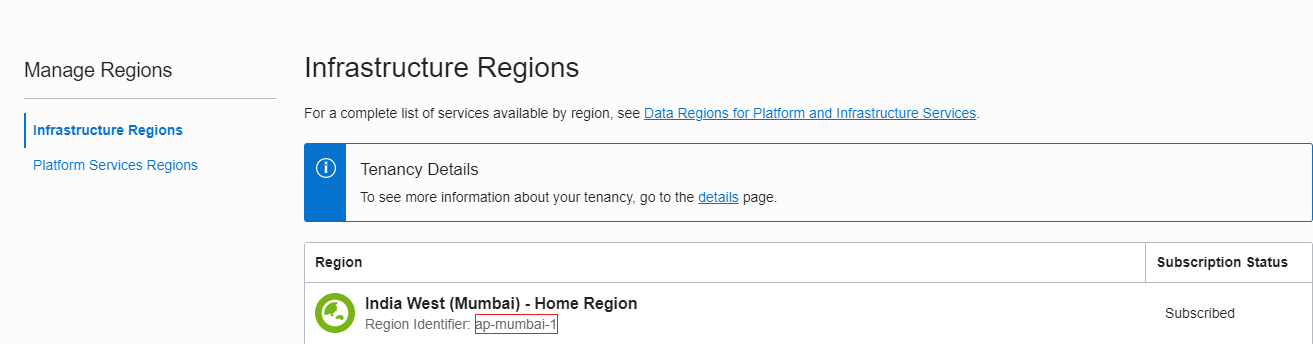
A region is a specific geographic area where your OCI resources are created. It is composed of one or more availability domains. An availability domain is one or more data centers located within a region. Each region can be identified by an easily recognized name, found in the upper-right corner of the OCI console:
Select your Region → Manage regions, will show Infrastructure Regions, there you can see your subscribed region identifier name, in our case, it is “ap-mumbai-1” highlighted in red box.Take a note of it in the same text file.
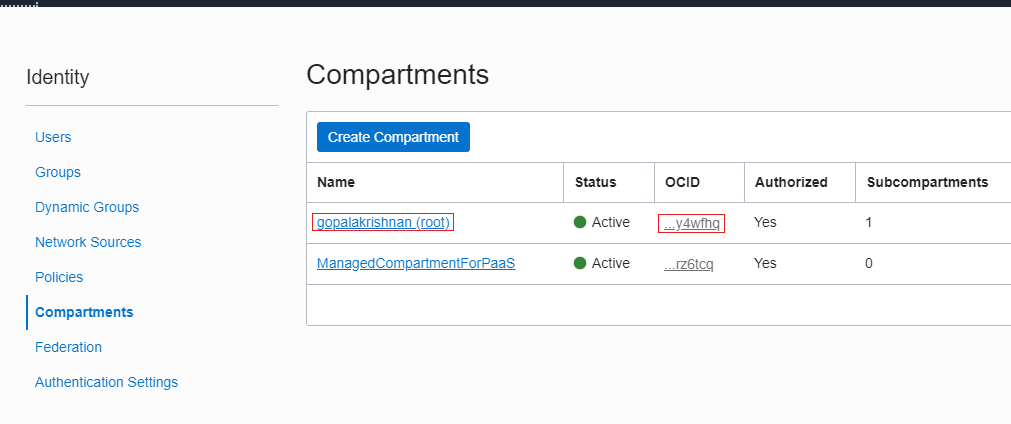
Compartment :
A compartment is a collection of related resources (such as cloud networks, compute instances, or block volumes) that can be accessed only by those groups that have been permitted by an administrator in your organization. Each compartment has its OCID. To collect this information click on the “OCI Main Menu” => “Identity” => “Compartments”.
In the Compartments window, adjacent to your working compartment, click on the Compartment OCID and then use the Copy button to copy your Compartment OCID.
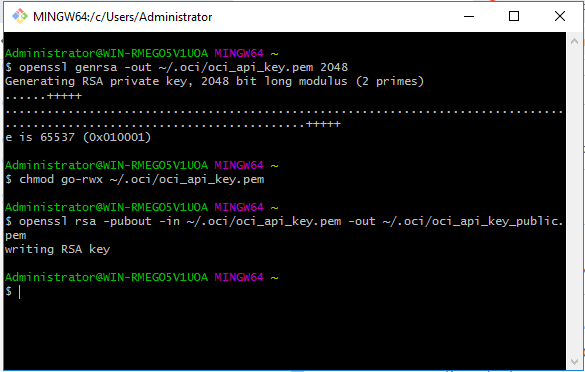
Generating Keyfile on OCI connecting Computer
This step is necessary for connecting your OCI from a trusted machine (your machine) securely using the OpenSSL tool. If you are using a Windows machine, install GitBash for Windows and use the OpenSSL tool. Here you are creating Private and Public Keypair, and copy the Public Key on to your OCI.
Both the private key and public key must be in PEM format (not SSH-RSA format)
Use the following OpenSSL commands for creating Private/Public Keys
Create a folder .oci in C:\ Users\Administrator
mkdir ~/.oci
Generate the key with no passphrase
openssl genrsa -out ~/.oci/oci_api_key.pem -aes128 2048
Make sure that only you can read the file
chmod go-rwx ~/.oci/oci_api_key.pem
Generate the public key :
openssl rsa -pubout -in ~/.oci/oci_api_key.pem -out ~/.oci/oci_api_key_public.pem
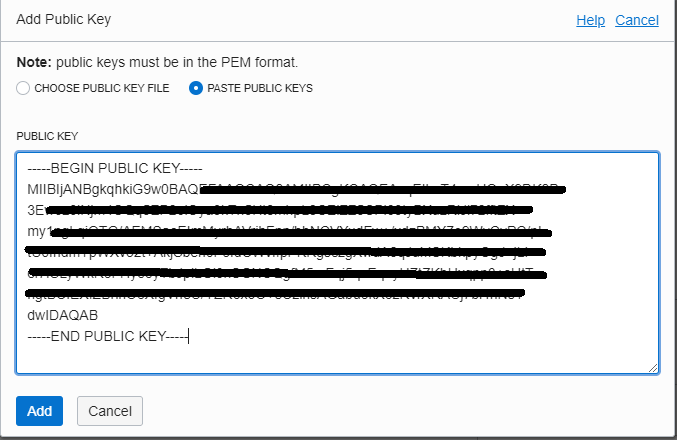
Using Vim or Cat utility copy the contents of the public key, it is similar to the below-given text, copy including BEGIN and END Public key text and the full content has to be added in the OCI console as shown in the below steps.
—–BEGIN PUBLIC KEY—–
MtvAIjANBgkqhkiG8w0BArQE…
…
—–END PUBLIC KEY—–
Open OCI console and login
On right side top left, Open the Profile Menu ( Human face Icon ) → Select User Settings
Under API Keys → Add Public Key
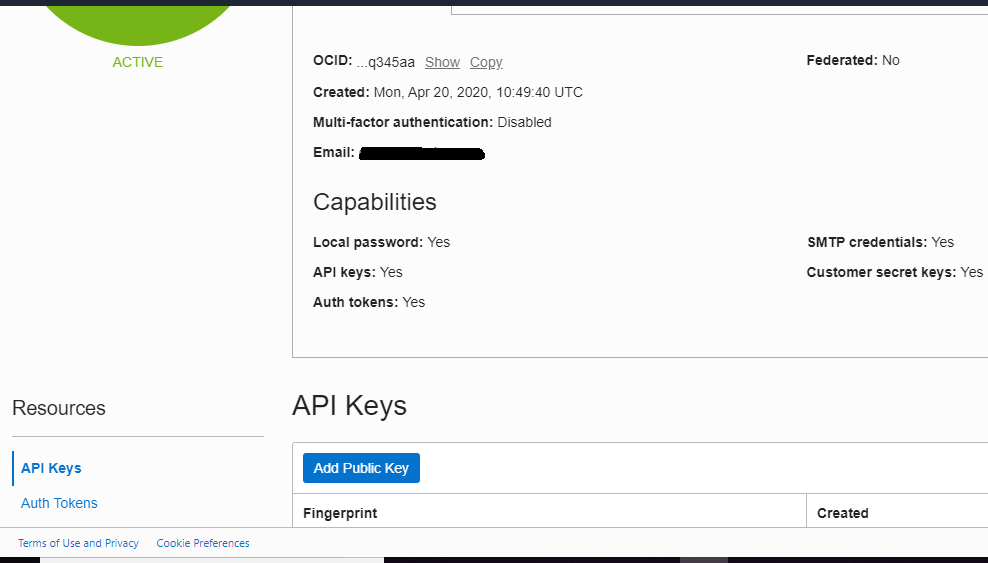
Select Paste Public Keys, and paste the content as shown in the picture below, Click Add
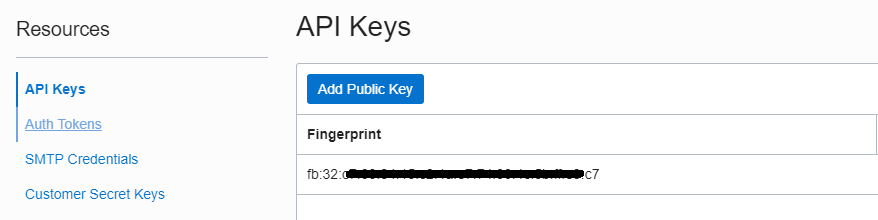
Now you have successfully added your public key, and your OnPremise system can connect your OCI securely.
Fingerprint
Once you create a public key, a fingerprint key will be created automatically, and make note of this fingerprint in the same text file. You can get the fingerprint details on the same page under API Keys. Copy this Fingerprint content into the same text file.
Virtualbox Configuration
Now using the above details copied in the text file, we need to generate a Cloud Profile in Cloud Profile Manager
Open Oracle Virtualbox VM Manager → File → Cloud profile Manager
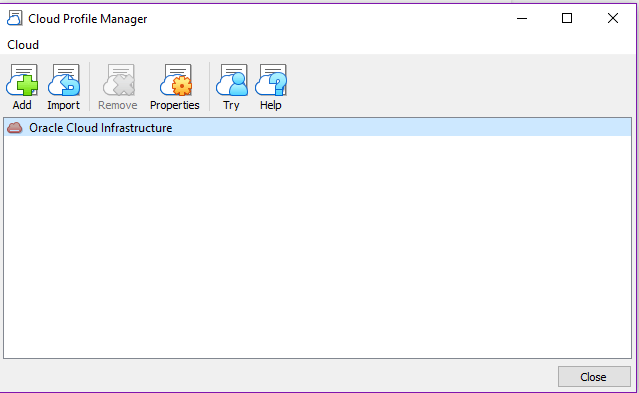
Click Add, provide a Profile name, in our case it is Vembuvbox-OCI
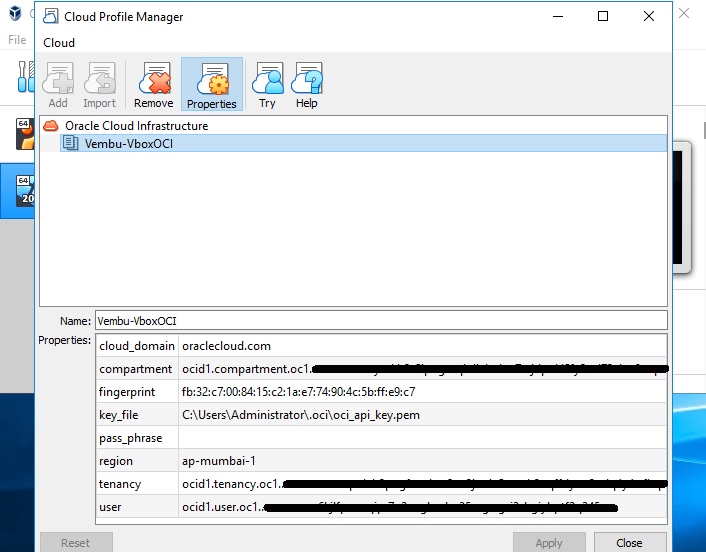
After adding, select that profile, and click Properties to add values on it, one by one from the saved text file.
Click Apply to save each property’s value.
Conclusion
In this How-to, we have seen some of the advanced features of Oracle VM Virtualbox and also the steps for creating OCI Bucket & OCI Virtual Network in our Oracle Cloud Infrastructure for future usage while we detailed the integration steps to prepare an OnPremise Oracle VM Virtualbox to connect OCI. These steps are necessary to import/export VMs to and from Oracle VM Virtualbox & OCI.
Related Posts:
How-to Guide: Installing Oracle Virtualbox & Extension Pack on a Windows Server Machine
How-to Guide: Importing Oracle Virtualbox VM to Oracle Cloud Infrastructure
Beginners’ Guide for Microsoft Hyper-V: Hyper-V vs VirtualBox Virtualization – Part 63
How to migrate VMs from VirtualBox to VMware
Client Hyper-V vs VirtualBox
Follow our Twitter and Facebook feeds for new releases, updates, insightful posts and more.