
Table of Contents
- Introduction
- What is Oracle Virtualbox?
- Supporting Operating Systems as Guest OS
- What is the Oracle Virtualbox Extension pack?
- Steps for installing Oracle VirtualBox
- Installing Extension pack on Oracle VM Virtualbox Manager
- Conclusion
Introduction
What is Oracle Virtualbox?
Oracle VM Virtualbox is a free open source hypervisor to run on X86 server / desktop machines to host more guest operating systems on it independently and simultaneously. All the guest operating systems hardware is emulated by the host hypervisor.
Oracle VM Virtualbox software can be installed on various operating systems including Microsoft windows server & desktop OS versions, Linux, Mac OS, and Solaris hosts.
Supporting Operating Systems as Guest OS
Windows: Windows 2000, Windows XP, Windows Server 2003, Windows Vista, Windows Server 2008, Windows 7, Windows Server 2008 R2, Windows 8, Windows Server 2012, Windows 8.1, Windows Server 2012 R2, Windows 10, Windows Server 2016, Windows Server 2019

Linux: Linux 2.6 Kernel OS, Linux 3.X and later Kernel OS versions.
Other OS: Oracle Solaris 10 and 11 versions, FreeBSD and OpenBSD with limited support. And support for Mac OSX with restrictions and known limitations.
What is the Oracle Virtualbox Extension pack?
VirtualBox Extension Pack is an executable binary package intended to extend the functionality of VirtualBox. The Extension pack adds the following functionality:
- Oracle Cloud Infrastructure integration
- Support for USB 2.0 and USB 3.0 devices
- Intel PXE Boot ROM
- VirtualBox Remote Desktop Protocol (VRDP)
- Host webcam pass-through
- Disk image encryption with the AES algorithm
- NVMe – non-volatile memory express
Prerequisites :
- A server machine with enough storage space and RAM
- Basic knowledge of hypervisor technology & Networking
- Minimum one or two NIC
- Latest Oracle Virtualbox application downloaded from virtualbox.org
- Guest OS ISOs
Steps for installing Oracle VirtualBox
In this How-to guide, we are providing step by step instructions with screenshots to explain the process of installing Oracle Virtualbox 6.1.6 on a Windows 2019 server & Oracle Virtualbox Extension pack 6.1.6 over it.
Note: Before beginning the installation, make sure the host is connected to the Internet.
Step 1:
To begin, execute the installer “VirtualBox-6.1.6-137129-Win” with administrator privileges to install the Oracle VM Virtualbox 6.1.6 & Extension pack 6.1.6.

Step 2:
On the next screen, make sure all the features are selected – Virtualbox USB Support, Virtualbox Networking – Bridged Networking and Host-only Networking.
Note: Enabling bridged Networking will enable Guest OS’es to communicate with the host machine NIC adapter, and hence all Guests OS’es can communicate with each other and to the external world.
The total installation takes approximately 220 Mb of disk space, and later Guest OS’es occupy space depending on the disk storage used while creating individual VMs.
By default, the application will be installed on C:\Program Files\Oracle\Virtualbox directory, you can also change the installation directory in this step, after checking the Disk usage option.

Step 3:
On the next screen, The options are enabled automatically, click Next.

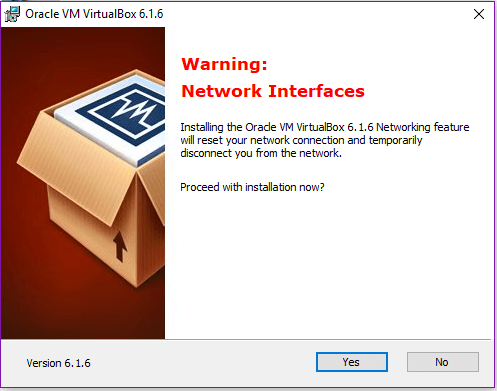
Step 4:
Before installation begins, you will get a warning message that Installing the Oracle VM Virtualbox Networking feature will reset your network connection and temporarily disconnect you from the network. Click Yes to proceed with the installation.
Step 5:
You will prompt to begin the installation. Click install.

Step 6:
Once after selecting Install, the Setup Wizard installs Oracle VM VirtualBox files, and it takes 10 to 15 minutes to copy all the relevant files into the selected installation directory.

Note: During installation, you will be asked to install USB device driver software and accept Install

Step 7:
Then, Installation continues and changes the running OS system registry values.

Step 8:
Once all installation files copied, and written system registry values, your installation will be finished. You can select the option “ Start Oracle VM Virtualbox after installation”. So you can straightway use the application

Step 9:
Once completed, Oracle VM Virtual Manager opens, this has two main tabs File & Machine

Under the File section, you can see various tools listed. Same are described below
Import Appliance – If you use another virtualization platform and have an export of an existing virtual machine in Open Virtualization Format (OVF or OVA), you can import the virtual machine into VirtualBox and use this to prepare the desktop template for further usage.
Export Appliance – Similarly you can export the existing virtual machine on Oracle VM Virtualbox into an OVF or OVA format, and can use it under another virtualization platform.
New Cloud VM – You can use this feature in Oracle VM VirtualBox to create new instances from a custom image on your cloud service.
Virtual Media Manager – Oracle VM VirtualBox keeps track of all the hard disk, CD/DVD-ROM, and floppy disk images that are in use by virtual machines. These are often referred to as known media and the same can be viewed and changed using the Virtual Media Manager.
Host Network Manager – Allows adding/removing host network adapters. By default, NIC will be added. If your host has more than one adapter, you can add another network adapter and can be leveraged for guest OSes.
Cloud profile Manager – The Cloud Profile Manager is a component of Oracle VM VirtualBox that enables you to create, edit, and manage cloud profiles for your cloud service accounts.
Both New Cloud VM and Cloud profile Manager are components that tightly work with the public Oracle cloud infrastructure.
On “Machine” Tab – You can add or create new virtual machines
Installing Extension pack on Oracle VM Virtualbox Manager
Here, we are going to install Oracle VirtualBox Extension pack ( same version ) on Oracle VM VirtualBox Manager.
Step 1:
Click Preferences → Extensions and Click Add + Symbol as shown below

Step 2:
Select downloaded path of the Oracle_VM_VirtualBox_Extension_Pack-6.1.6.vbox-extpack file
Step 3:
Click “Install” confirmation, and this will add Oracle VM VirtualBox Extension Pack successfully.

Conclusion:
In a few steps, a normal user can install Oracle VM VirtualBox and the same version of the Extension pack easily. This will be useful for basic learners who want to understand hypervisor technology, and how guest OSes are managed by hypervisors independently and simultaneously. Users are advised to install guest OS’es and configure networks independently to get more knowledge on hypervisor networking concepts.
Related Posts
Client Hyper-V vs VirtualBox
How-to Guide: Importing Oracle Virtualbox VM to Oracle Cloud Infrastructure
How-to Guide: Integrating Oracle VM Virtualbox to Oracle Cloud Infrastructure (OCI)
Follow our Twitter and Facebook feeds for new releases, updates, insightful posts and more.