
Most organizations especially large enterprises are moving towards a multi-hypervisor environment. This is because running a multi-hypervisor environment offers potential benefits like the ability to support different application workloads, to improve performance, and to reduce licensing costs.
Rather, in the cases of Small and Medium Businesses, they prefer to migrate their virtual workloads from one hypervisor to other based on their capital expenditures. Hence, they look for an efficient and less-expensive or even free hypervisor to run their lighter and less critical workloads.
In both the situations, VM migration is an important requirement for their IT environment. IT administrators always look to preserve the operational integrity of VMs and ensure availability. They search for a more robust and full-featured conversion tool to perform migrations across different hypervisors and different platforms i.e, from Virtual to Virtual (V2V) and Physical to Virtual (P2V).
Eventually, at the end of the day, all they need is a reliable conversion tool for successful workload migration.
This blog will walk you through the following

- The best solution to perform a cross-platform migration
- How it suits your requirement?
- Detailed procedure to perform Hyper-V to VMware Migration
A Functional Solution for Migration
Vembu with its flagship offering Vembu BDR Suite provides a reliable, secure, and scalable Backup and Disaster Recovery solution to ensure Business Continuity for Data Centers. Vembu also offers migration support as a part of their backup and disaster recovery solution.
This lets you experience easy data migration across any environment (P2V, V2V, V2P). Vembu is one among the few vendors that offer data protection as well as data migration in a single solution.
Why is Vembu preferable for migration?
There are a number of migration tools available in the market that let you perform migration (machine and its data) from one platform to another. Migration involves a lot of data risks and in most cases, migration tools are not reliable since data can’t be recovered if there is any inconsistency during migration.
Most importantly, many organizations require different conversion tools to perform different migrations according to their diverse IT environment needs. However, implementing multiple conversion tools may raise some difficulties in managing along with increased expenses.
Thus, Vembu made the IT administrator’s work easier with a single cost-effective software that provides data protection and also ensures seamless cross-platform migration across multiple hypervisors (V2V), or across different workloads (P/V).
How to perform Cross-Platform migration with Vembu?
Vembu has an efficient in-house file system called VembuHIVE which is the foundation of all the functionalities that Vembu BDR provides, including data migration.
The following are the steps involved in migrating a machine and its data from one platform to another (P2V) or from one hypervisor to another (V2V)
Step 1: Download Vembu BDR Suite and configure backups for the workloads (physical/virtual) you wish to migrate
Step 2: Then, download the backup data in any of the different virtual formats like VHD, VMDK, Flat.VMDK, VHDX, and RAW through the Recovery option Download
Step 3: Import the downloaded virtual file on another hypervisor where you wish to migrate your current workload
Virtual Machine Migration from Hyper-V to VMware
Step 1: Download Vembu BDR Suite
Step 2: Configure backups for your Hyper-V VMs that you wish to migrate to VMware environment
Hyper-V Backup using Vembu BDR Suite
- Choose Backup and select Microsoft Hyper-V
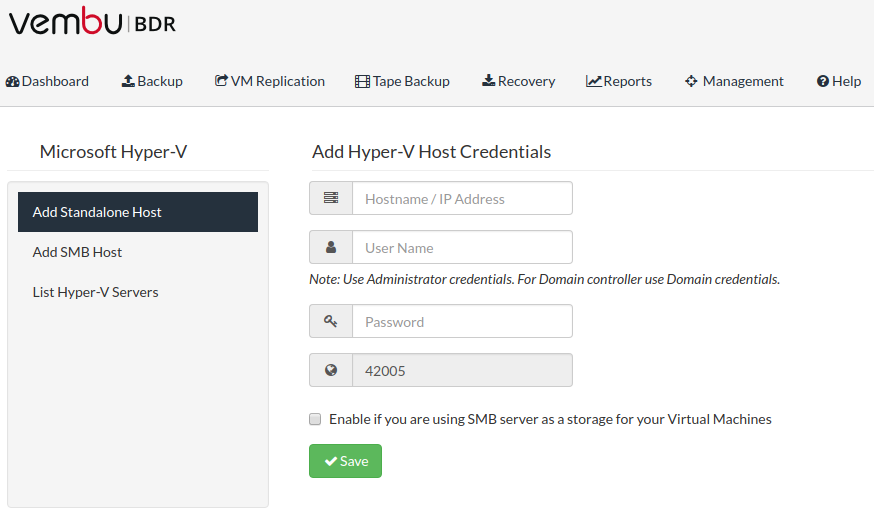
- Add the Hyper-V host details – Choose Standalone/SMB host and then Enter the IP address and Administrative Credentials (Username & Password) of the host
- Click Save. Then, the host will be added under Added Hyper-V Servers
- Now, click Backup and choose the VM(s) to perform the backup
- Enable Truncate transaction logs, if any MS-Apps like Exchange Server/SQL server are running inside the VM which you are going to backup
- Set the Scheduling Policies and Retention Policies. If required, you can enable Additional Full Backup and Encryption options
- Review all the configurations, assign a name for your backup job and then click on Save the Backup job
Note: Only after successful backup of VMs, you will be able to convert your Hyper-V virtual machine as VMware virtual machine
Once the backup is successfully completed, the backup data of the Hyper-V VM(s) gets stored in the backup storage repository.
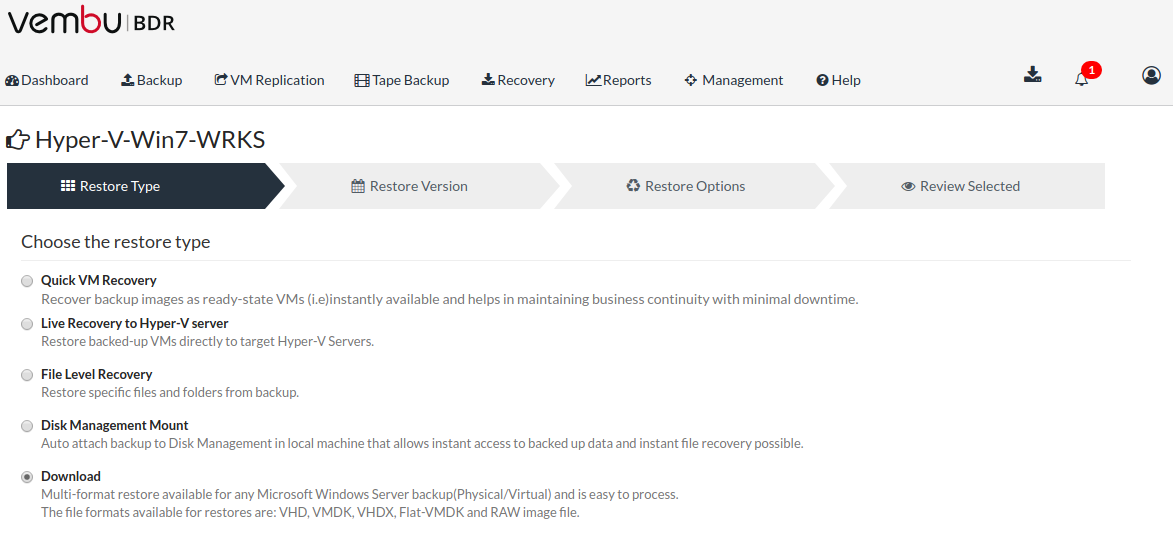
Step 3: Download the Hyper-V VM backup data in Flat.VMDK virtual file format using the Download recovery option
- In the BDR Server console, Click on the Recovery tab
- From the listed backup jobs, Choose the restore icon of the VM backup that you would like to convert as a VMware
- Choose the Download option from the multiple recovery options that are listed on UI
- Then, choose the restore version and the restore data. (If multiple VMs are configured in a single backup job, choose a particular VM you wish to recover/migrate)
- Enter the restore location and then choose the Flat.VMDK format to restore
Note: The Flat.VMDK file restoration requires entire disk space of the VM that is backed up
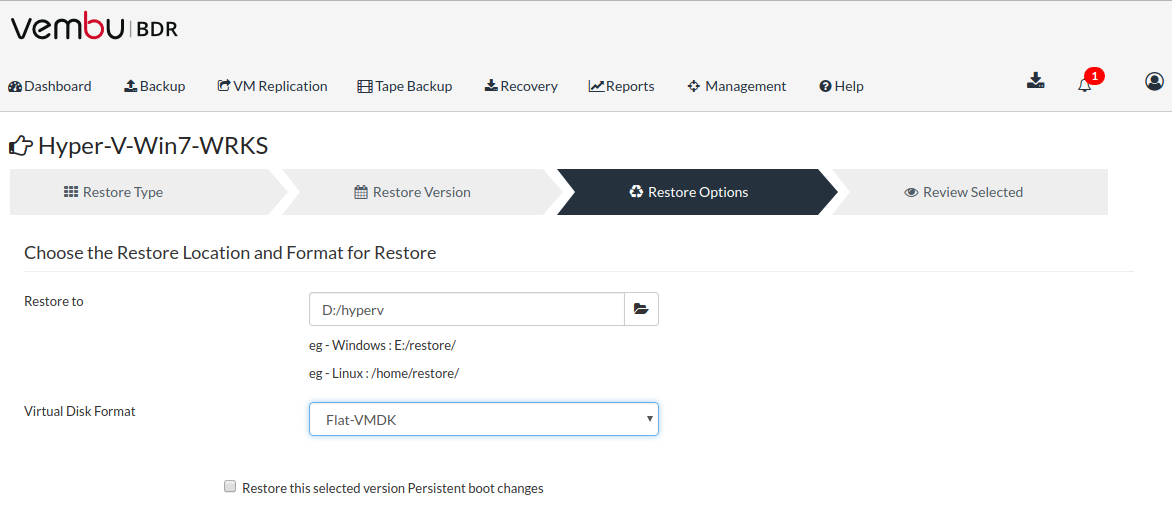
Once the virtual file format (Flat.VMDK) is downloaded, use the file to perform the migration process.
Step 4: Log into the VMware vSphere Client. Enter the ESXi host/vCenter Server details to which you want to migrate your Hyper-V VM
Step 5: Select the datastore, then choose browse datastore and then upload the Flat.VMDK file to that particular datastore
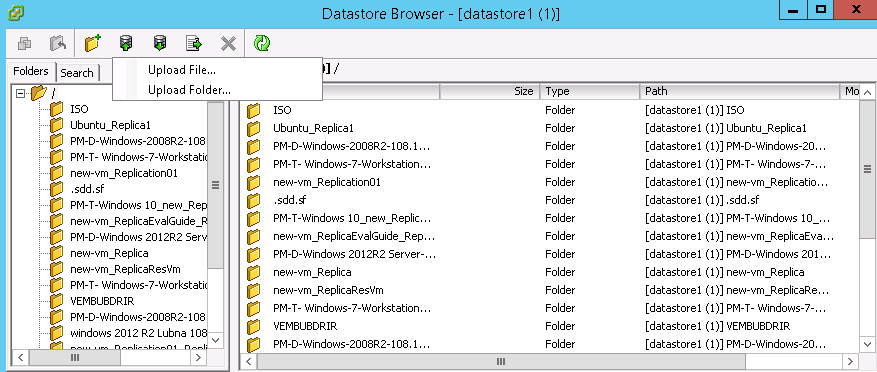
Once the Flat.VMDK file is uploaded, click on the option “create new virtual machine”
Note: After uploading the Flat.VMDK file to datastore, the migration steps are more similar to the procedures that are followed while creating a new virtual machine in the VMware environment
- Initially specify a name for the VM and then select the destination storage (Datastore) for the virtual machine files
- Choose the virtual machine version and then select the guest OS for the virtual machine
- Specify the number of Virtual Sockets for the VM and the number of cores per socket
- Configure VM’s memory size
- Create network connections for the VM and then specify the type of SCSI controller you would like to use
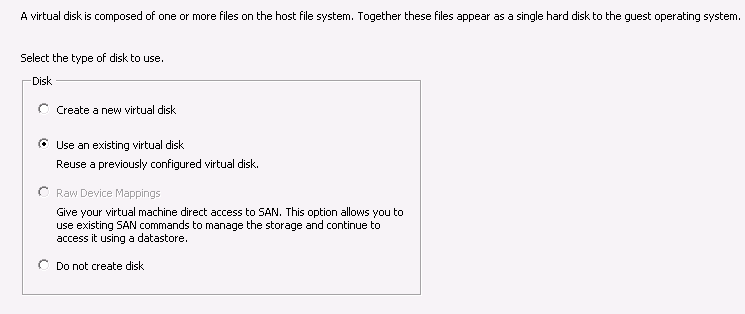
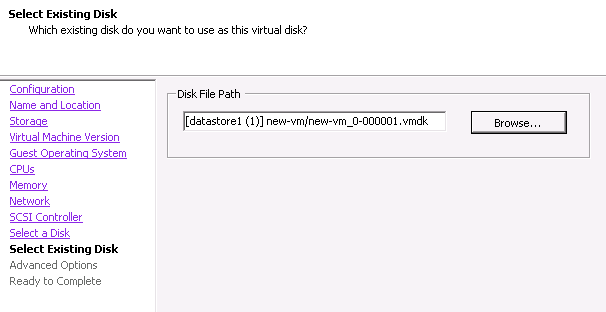
- Now, Select the type of Disk to use wizard appears. Choose the “use an existing virtual disk” option. Enter the Disk File Path – browse through the datastore and choose the uploaded Flat.VMDK file of the VM
- Then, if you would like to change the virtual node and disk mode settings you can modify in the advanced options wizard
- Finally, review all your configurations and click finish
Once the VM is created, Power ON and start the Virtual Machine. Thus, your Hyper-V VM is successfully converted as a VMware VM. In this way, all your Hyper-V VMs can be permanently migrated to the VMware environment.
Similarly, if you want to migrate your physical machine/VMware virtual machine to Hyper-V environment, then choose VHD (Generation-1 VM) or VHDX (Generation-2 VM) format and perform restore. Create a VM on Hyper-V using the obtained virtual file format.
Even if you wish to migrate your physical/virtual machine to any other hypervisor environments like KVM, Oracle VirtualBox, Citrix Xen etc., follow the same procedure by downloading the virtual file format that is compatible on these hypervisors.
Conclusion
Performing backup and then migrating your workloads to other environments is really a secure way to migrate as your current workload is not disturbed. Additionally, this provides an advantage of recovering your current workloads from its backup if any unexpected disasters like OS corruption, hard drive failure, etc. has taken place.
Hope this blog has given you an insight in choosing the best solution to perform cross-platform migration and the elaborated procedure of Hyper-V to VMware migration is clear.
Experience modern data protection with this latest Vembu BDR Suite v.3.9.1
Follow our Twitter and Facebook feeds for new releases, updates, insightful posts and more.