
Table of Contents
- Quick Bites
- What is Live Migration?
- Hyper-V Live Migration Types
- Setup Hosts for Live Migration
- Concluding Thoughts
Quick Bites
This blog post explains how to perform a live migration of a Hyper-V virtual machine without using failover clustering. It starts by discussing the benefits of live migration, including the ability to move virtual machines between physical servers with no downtime.
It then goes on to describe the steps involved in performing a live migration without failover clustering, including configuring the source and destination servers, setting up network storage, and moving the virtual machine using the Hyper-V Manager.
The post also highlights some potential issues that can occur during the migration process and provides recommendations for avoiding them. It emphasizes the importance of planning and testing before performing a live migration to ensure a successful outcome.
What is Live Migration?
Live Migration is performed when a user migrates virtual machines from one host to another without powering off the VM. This is especially useful for system administrators when they need to restore operations for critical VMs quickly or when they want to run a maintenance check/update for some VMs without downtime for the users.

Load balancing is another benefit of Live Migration, where the load is distributed across different nodes to optimize CPU resource utilization.
Hyper-V Live Migration Types
There have been different types of live migration in Hyper-V over the years. Initially, migration was possible only among nodes that were part of a Hyper-V Failover Cluster. But after Windows 2012, there will be possibilities for migration without failover.
- Quick Migration
- Live Migration
- Quick Storage Migration
- Storage Live Migration
- Shared-Nothing Live Migration
- Hyper-V Replica
The first two technologies involve a failover cluster- a group of servers clustered together to balance loads immediately or migrate VMs to avoid downtime. The difference between Quick/Live Migration and Storage Migration is that in the former, the virtual machines are migrated from one host to another while in the latter the virtual machine’s storage is migrated across hosts.
This blog talks about migrating the virtual machines running on one server to another without Failover Cluster using Windows 2016 server Distributed File System (DFS). This is a part of the Shared-Nothing Live Migration method of migration.
This migration exercise involves two Windows Server 2016 hosts, named – NODE1 and NODE2.
Each node has 2 VMs – Windows 10 and Windows Server 2016.
We are going to migrate a Windows 10 VM from NODE2 to NODE1 (DFS Configured).
Setup Hosts for Live Migration
Requirements for Hyper-V Live Migration without Failover Clustering
- This Live Migration is possible between the hosts only if they run on the OS’s Windows Server 2012 R2 and its later variants
- Virtual Machines (VMs) running on the host must be of Version 5 or higher
- Both the source and destination servers must be located in the same Active Directory Domain or trusted domains
- Source and Destination Hyper-V hosts must be connected by a reliable network
- Hyper-V management tools must be installed on Windows Server 2016 or Windows 10
Considerations for Live Migration
Authentication
CredSSP and Kerberos authentication protocols are available in Hyper-V for live migration of VMs.
If we enable the CredSSP authentication protocol, it avoids configuring constrained delegation, but it is required to sign in to the source server. Server sign-in can be done through a console session, a remote desktop session, or a remote Windows PowerShell session. If you do not log in to the source server, you will get the error “authentication attempt failed.”
Enabling the Kerberos authentication protocol avoids signing into the server but requires a constrained delegation (KCD) setup. With constrained delegation, the services are restricted for access by the server on behalf of the user.
Performance
The Performance option helps you reduce network and CPU usage, which obviously makes the virtual machine’s live migration process faster. Before configuring the performance options, consider your requirements and infrastructure, based on which you can test different configurations for better results.
Networking
The Live Migration data is not encrypted while it is transferred over a network. Hence, while performing Live Migration, it is recommended to isolate the migration traffic on a private network or trusted network. This is to increase security when live migration is carried out. Network isolation can be achieved through a physically isolated network or through trusted networking technology such as VLANs.
Step 1: Configure constrained delegation (optional)
- Login to the Hyper-V role-enabled server
- Then open the Active Directory users and computers
- Select the domain name and click on computers
- Inside the computer folder, it will display all the computers that belong to a particular domain (here we use vembublog.com)
- Select the computer account of the source server, right-click and then go to properties
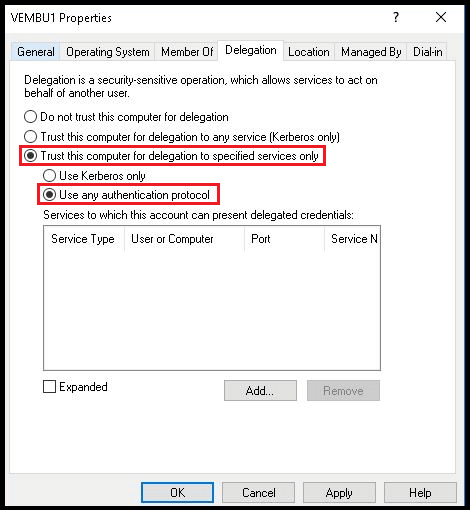
- From properties, click the Delegation tab
- From the Delegation tab, choose the option “Trust this computer for delegation to specified services only”, and then select the “Use any authentication protocol” option and click Add
- Click add. Then, click the users and computers and type the name of the destination server and click check names. Verify the server details and click ok
- In the add services, select the service and click ok
- To move the Storage, you can select the CIFS service
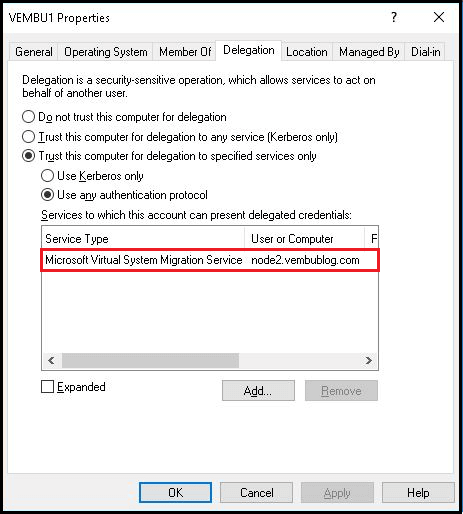
- To move the virtual machines, select the Microsoft Virtual System Migration Service
- On the delegation tab, verify if the selected services are listed and that the selected destination computer is present with the delegation credentials
- These changes are replicated to the domain controllers into which the servers running Hyper-V are logged in
- The domain controller supplies a new Kerberos ticket
Example:
Step 2: Set up the source and destination computers for live migration
You can set the source and destination computers in two ways:
- Using Hyper-V Manager and
- Using PowerShell
Using Hyper-V Manager:
- Open Hyper-V Manager
- In the navigation pane, select the servers. If servers are not added, right-click on Hyper-V Manager and click ‘Connect to server’
- Type in the server name and click OK. In the same way, add the other servers also
- After that, select the servers you require, and then click Hyper-V settings and select Live Migrations
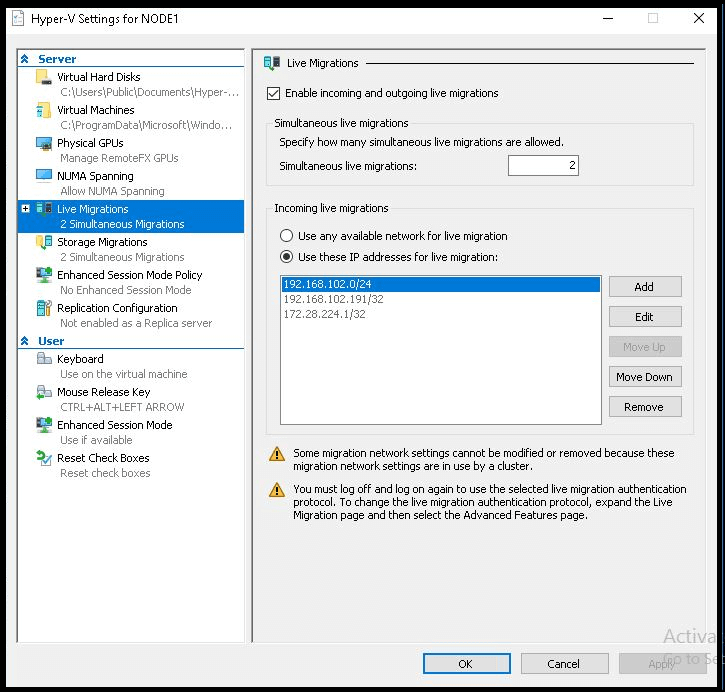
- Now enable the incoming and outgoing live migration options in the Live Migration pane
- Under simultaneous live migration, specify the number of simultaneous live migrations you want to use; by default, the number is 2
- In incoming live migrations, you can add the IP address and specify a network connection for live migration traffic, or else you can select from the available network. Finally, click OK to proceed further
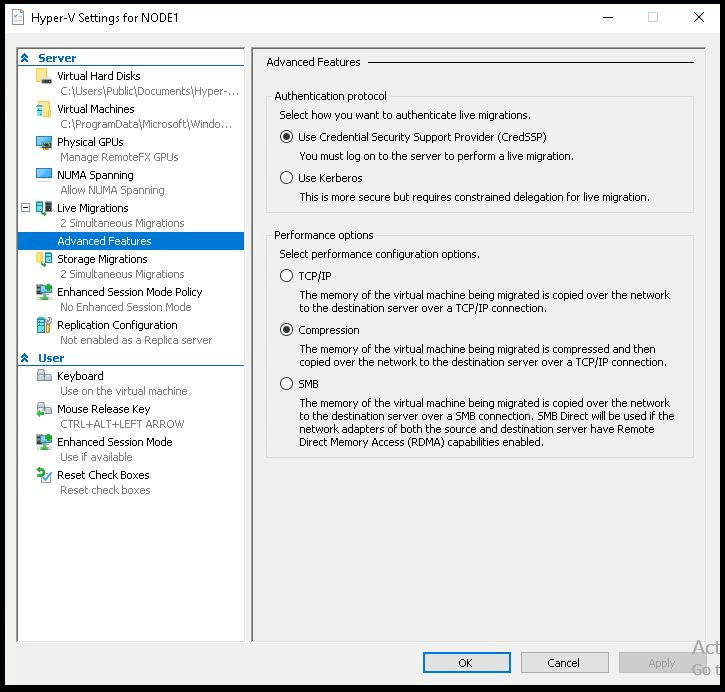
For Kerberos and performance options, expand Live Migration and select Advanced features
- For Constrained delegation authentication protocol, you can select Kerberos
- To enable Credssp, you need to login into the destination server to perform the live migration
- Under the performance options, select the performance configurations based on your requirements
- A similar configuration process is carried out for the other servers that need to be added to the Hyper-V manager
Using PowerShell:
There are 3 cmdlets you will be using to set up the source and destination computers.
Configuring live migration on the host machine – PS C:\> Enable-VMMigration
Allowing incoming traffic for specific networks – PS C:\> Set-VMMigrationNetwork
Choosing Kerberos for authentication – PS C:\>
Set-VMHost-VirtualMachineMigrationAuthenticationType Kerberos
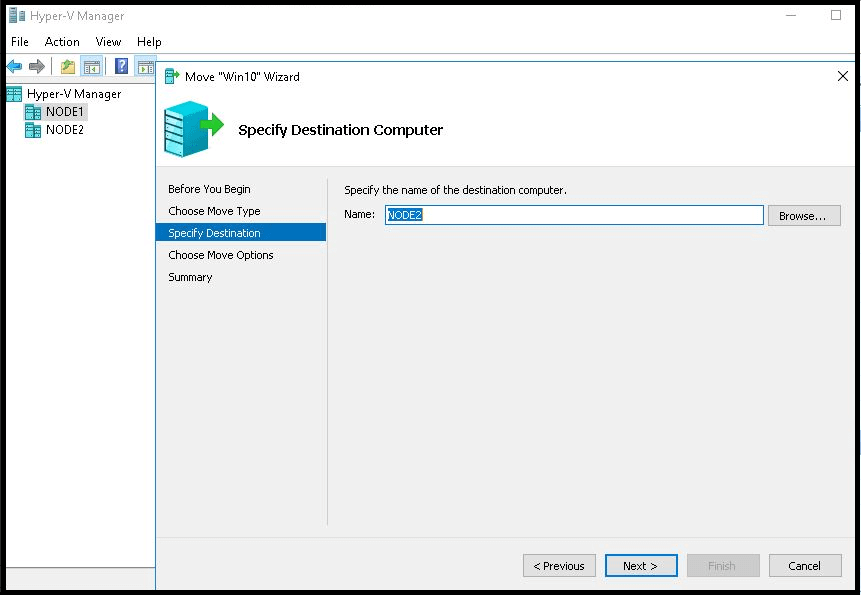
Step 3: Use Hyper-V Manager to move a running virtual machine
- In the navigation pane, select one of the servers on which you want to move the virtual machine from one host to another host
- After selecting the server, in the Virtual machine pane, right-click the virtual machine and select Move
- Now choose the move type, then specify the destination host machine details and click finish. Below are the screenshots for your reference

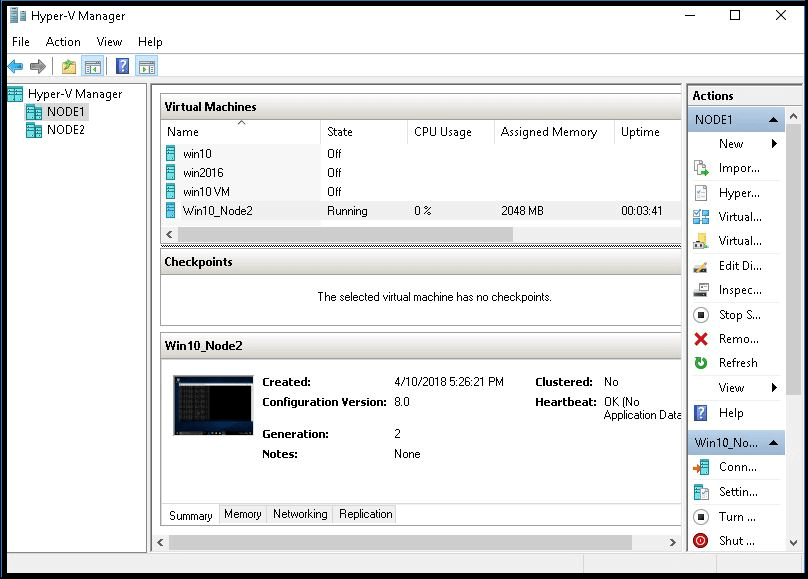
Finally, you will see a pop-up window showing the virtual machine migration process.
Once virtual machine migration is completed, you can login to the destination host machine and check the machine status.
Note: we created a DFS (Distributed File System) on the NODE1 server to store the Virtual Machines’ virtual hard disks
Concluding Thoughts
Hyper-V Live Migration is often related to failover clustering technology. But, in this blog, a comprehensive overview of how to set up the Live Migration process without Failover Cluster is briefly narrated.
While these options to migrate without the need for a failover cluster exist, most of the Hyper-V infrastructure these days has deployed clustering models for better resource utilization. Migrating VMs across hosts definitely reduces downtime, but that doesn’t protect the systems from large-scale attacks or disasters.
The entire High Availability (HA) model depends on the same AD, reliable network, and other conditions, which you will not have when your entire infrastructure is flooded. That is when a good backup and DR strategy will rescue your business.
By having a backup of your machines on another site, you can quickly resume operations without much downtime by turning on the VMs on the other site while the main office recovers from the disaster.
This means you should have a suitable backup and DR solution that is able to backup VMs that are migrating from one host to another within a Failover Cluster.
One such comprehensive backup and DR solution is the BDRSuite, which offers agentless Backup and Replication for Hyper-V VMs hosted on standalone host or cluster servers. The BDRSuite makes it easier for you to ensure data protection for the VMs that get migrated across servers.
Experience modern data protection with the latest version of Vembu’s BDRSuite
Follow our Twitter and Facebook feeds for new releases, updates, insightful posts and more.