
When working with any virtualization vendor, best practices should always be followed to ensure the best stability, performance, redundancy, and supportability. This is especially true when it comes to the initial environment configuration. You want to make sure the configuration meets best practices before the environment is in production. When thinking about utilizing Microsoft Hyper-V, we want to make sure the configuration of the Hyper-V environment from both a physical layer standpoint as well as from the Hyper-V hypervisor standpoint is in line with the best practices that will meet the stated goals above – stability, performance, redundancy, and supportability. What Hyper-V configuration best practices do organizations need to make sure they follow before running production workloads in a new Hyper-V environment? Let’s take a look at Hyper-V configuration best practices and note some of the crucial checks that need to be made before utilizing the Hyper-V environment in production.
Hyper-V Configuration Best Practices
There are several critical configuration areas that you want to take a look at when thinking about Hyper-V configuration best practices with any environment. We will look more closely at the following configuration areas:
- Use Hyper-V Core installations
- Sizing the Hyper-V Environment Correctly
- Network Teaming and Configuration
- Storage Configuration
- Operating System Patches Uniformity
The above configuration areas represent a large portion of potential Hyper-V configuration mistakes that many make in production environments. Let’s take a closer look at the above in more detail to explain why they are extremely important to get right in a production environment and what can be done to ensure you do get them right.
Use Hyper-V Core installations
While traditional Windows administrators love the GUI to manage servers, maintaining GUI interfaces on server operating systems is not really a good idea. It leads to much larger installation bases as well as having to maintain patches and other upgrades simply due to the GUI interface and any security and other vulnerabilities that may present as a result.
Using the Windows Server 2016 core installation to run the Hyper-V role is certainly the recommended approach to run production workloads on Hyper-V nodes. With the wide range of management tools that can be leveraged with Hyper-V core such as PowerShell remoting, as well as running the GUI Hyper-V manager on another server, it really presents no additional administrative burden to run Hyper-V core with today’s tools.

Sizing the Hyper-V Environment Correctly
There are many issues that can come from sizing a Hyper-V environment incorrectly. If a Hyper-V cluster environment is sized too small, performance issues can certainly result due to over-provisioning of resources. Oversizing a Hyper-V environment can certainly be a deterrent from a fiscal standpoint of either being approved for funds on the outset for either a greenfield installation or an upgrade to server resources that are due for a refresh. A final very crucial part of correctly sizing a Hyper-V environment is being able to properly plan for growth in the environment. Every environment in this respect will be different depending on forecast growth.
A great tool that can be utilized to correctly size the needed number of cores, memory, and disk space is the Microsoft Assessment and Planning Toolkit. It can calculate the current cores, memory, and storage being utilized by production workloads in an automated fashion so you can easily gather current workload demands. Then, you can calculate for growth in the environment based on the projected amount of new server resources that will need to be provisioned in the upcoming future.
The Microsoft Assessment and Planning Toolkit can be downloaded here:
https://www.microsoft.com/en-us/download/details.aspx?id=7826
The Microsoft Assessment and Planning Toolkit allows sizing new Hyper-V environments based on current workloads
Network Teaming and Configuration
Hyper-V network design is an extremely important part of the Hyper-V Cluster design in a production build out. In fact, if the networking configuration and design is not done properly, you can expect problems to ensue from the outset. Microsoft recommends to design your network configuration with the following goals in mind:
- To ensure network quality of service
- To provide network redundancy
- To isolate traffic to defined networks
- Where applicable, take advantage of Server Message Block (SMB) Multichannel
Proper design of network connections for redundancy generally involves teaming connections together. There are certainly major mistakes that can be made with the Network Teaming configuration that can lead to major problems when either hardware fails or a failover occurs. When cabling and designing network connections on Hyper-V hosts, you want to make sure that the cabling and network adapter connections are “X’ed” out, meaning that there is no single point of failure with the network path. The whole reason that you want to team network adapters is, if you have a failure with one network card, the other “part” of the team (the other network card) will still be functioning.
Mistakes however can be made when setting up network teams in Hyper-V cluster configurations. A common mistake is to team ports off the same network controller. This issue does not present itself until a hardware failure of the network controller takes both ports from the same network controller offline.
Also, if different models of network controllers are used in a physical Hyper-V host, then it is not best practice to create a team between those different models of network controllers. There can potentially be issues with the different controllers and how they handle the network traffic with the team. You always want to use the same type of network controller in a team.
Properly setting up your network adapters for redundancy and combining available controller ports together can bring many advantages such as being able to make use of “converged networking”. Converged networking with Hyper-V is made possible by combining extremely fast NICs (generally higher than 10 Gbps) and “virtually” splitting traffic on your physical networks inside the hypervisor. So, the same network adapters are used for different kinds of traffic.
To know more on Hyper-V Networking best practices follow the link
https://www.bdrsuite.com/blog/hyper-v-networking-best-practices/
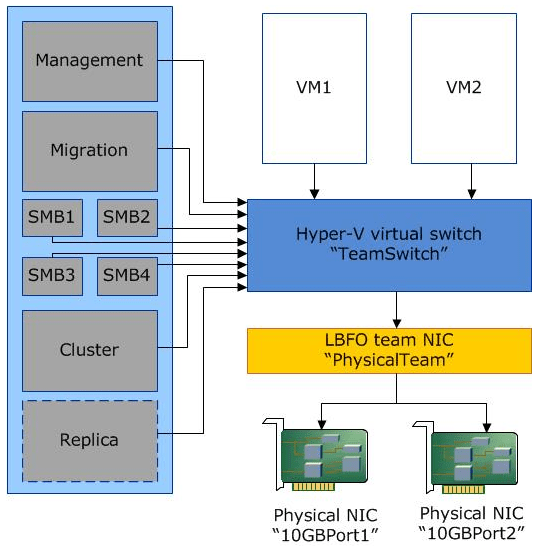
Hyper-V Converged Networking logical layout (image courtesy of Microsoft)
Storage Configuration
There is another “teaming” issue as it relates to Hyper-V storage. While teaming is good in other types of network traffic, you do not want to team network controllers with iSCSI traffic. Instead you want to utilize MPIO for load balancing iSCSI traffic. The problem with teaming technologies such as LACP (802.3ad) as relates to iSCSI traffic is that aggregating links via LACP, etc, does not improve the throughput of a single I/O flow. A single flow can only traverse one path. Link aggregation helps traffic flows from different sources. Each flow will then be sent down to a different path based on a hash algorithm. MPIO on the other hand works between the hosts and iSCSI initiators and properly load balances the traffic of single flows to the different iSCSI initiators.
Aside from the performance benefits that MPIO brings, it also enables redundancy in that a path may go down between the Hyper-V host and the storage system, and the virtual machine stays online. The Multipath I/O that is what MPIO stands for allows for extremely performant and redundant storage paths to service Hyper-V workloads.
As an example, to enable multipath support in Hyper-V for iSCSI storage, run the following command on your Hyper-V host(s):
- Enable-MSDSMAutomaticClaim -BusType iSCSI
To enable round-robin on the paths:
- Set-MSDSMGlobalDefaultLoadBalancePolicy -Policy RR
Set the best-practice disk timeout to 60 seconds:
- Set-MPIOSetting -NewDiskTimeout 60
Another best practice to keep in mind as relates to storage is always consult your specific vendor when it comes to the Windows storage setting values. This ensures performance is tweaked according to their specific requirements.
Operating System Patches Uniformity
With Hyper-V it is extremely important to maintain operating system patch uniformity. This relates to Windows Server patches as well as any vendor firmware patches as well as drivers. In fact, if you notice during the creation of a Windows Failover Cluster, including Hyper-V failover clusters, one of the checks that is made during the cluster creation is that the multiple hosts are on the same Windows patch level. So, Microsoft believes it is extremely important to have Windows at the same patch level to ensure there are no issues from an installed software perspective. Firmware and drivers can certainly make hardware behave differently. If you have one host in the cluster with a different firmware/driver version than the other host, erratic behavior can result.
For troubleshooting or supportability, it is recommended to have a patch management schedule to routinely apply the latest Windows update patches to Hyper-V hosts in a cluster. The same goes with vendor supplied firmware updates and patches. Generally speaking when calling support on any kind of issue, the first question that is asked is “are you running the latest firmware?”. Do yourself a favor and keep your hosts updated so that when you have a major production impacting issue, you don’t have to first spend the time it takes to patch hosts, firmware, etc. Organizations can choose to utilize various Microsoft technologies to maintain current Hyper-V host patch levels such as WSUS, SCCM, or SCVMM.
Takeaways
Running any environment in accord with the recommended best practices is certainly the course of wisdom from a stability, performance, and certainly a supportability standpoint. Microsoft Hyper-V environments are no exception to that rule. Many problems can be averted by keeping with best practices such as using Hyper-V core installations, sizing the Hyper-V environment correctly, properly implementing network teaming and configuration with various network traffic configurations as well as keeping up to data with operating system patches and staying uniform across Hyper-V hosts. By keeping with these and other Hyper-V configuration best practices in production environments, your Hyper-V environment will run smoothly, efficiently, and will perform as expected. Additionally, problems will be minimized.
Follow our Twitter and Facebook feeds for new releases, updates, insightful posts and more.