
What is Azure Virtual Network?
Azure Virtual Network (VNet) is the fundamental building block for your private network in Azure. VNet enables many types of Azure resources, such as Azure Virtual Machines (VM), to securely communicate with each other, the internet, and on-premises networks.
Table of Contents
- What is the Azure Resource group?
- How does Azure VNet communicate with other resources?
- Communicating Azure resources
- How to create Azure Virtual Network in Azure?
- Basics
- IP Addresses
- Security
- Tags
- Review + Create
- How can I use this VNet & Resource group on Azure resources?
- Conclusion
Azure Virtual Network gives you an isolated and highly-secure environment to run your virtual machines and applications. Use your private IP addresses and define subnets, access control policies, and more. Use Virtual Network to treat Azure the same as you would your own OnPremise datacenter.
What is the Azure Resource group?
According to the Microsoft Azure document, a resource group is a container that holds related resources for an Azure solution. The resource group can include all the resources for the solution, or only those resources that you want to manage as a group. You decide how you want to allocate resources to resource groups based on what makes the most sense for your organization. Generally, add resources that share the same lifecycle to the same resource group so you can easily deploy, update, and delete them as a group.
The resource group stores metadata about the resources. Therefore, when you specify a location for the resource group, you are specifying where that metadata is stored. For compliance reasons, you may need to ensure that your data is stored in a particular region.
How does Azure VNet communicate with other resources?
You can classify Azure VNet communication into three different ways.

- Communicating Azure resources inside an Azure account.
- Communicating with the Internet
- Communicating with your on-premise network
Communicating Azure resources
Azure resources communicate securely with each other primarily using Azure Virtual Network.
If you want to deploy any resources on Azure, it requires communication between you and the resource through the internet. For example, if you deploy an Azure VM, you are required to access the VM from your office network computer. In this case, Azure VNet is a must.
In this blog, we are going to describe how to create an Azure Virtual Network & Resource group and how to use the created Virtual network to be used by other Azure resources by calling the Azure Resource group.
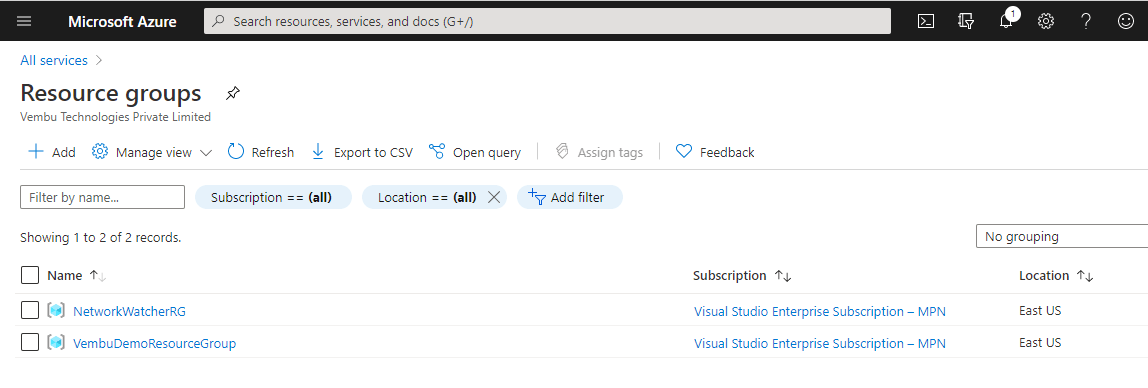
How to create an Azure Resource group?
Login to your Azure portal. Choose All services → General → Resource group → Click Add Icon
- Choose the subscription you want to associate your resource group
- Provide a Resource group name ( In our case resource group name is “VembuDemoResourceGroup”
- Choose the region you want to associate with your resource group.
How to create Azure Virtual Network in Azure?
Login to your Azure portal. You can access through All services → Networking → Virtual Networks → Create Virtual Network
Click to create a virtual network button at the bottom of the page.
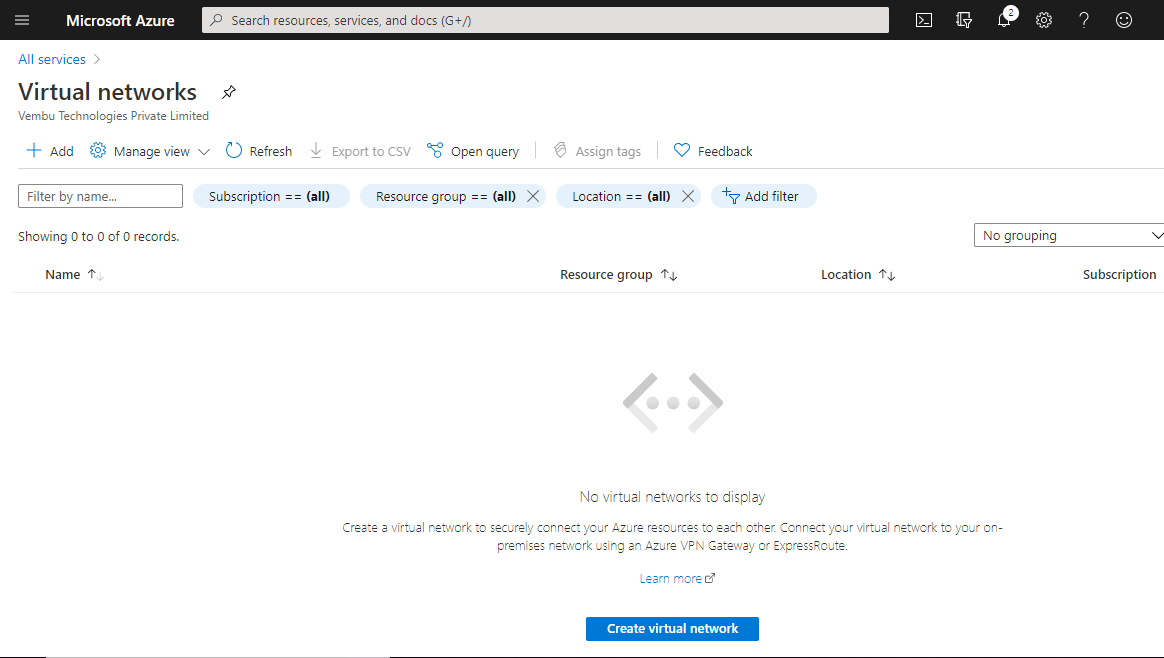
Creating a virtual network can be done in five steps.
- Basics
- IP Addresses
- Security
- Tags
- Review + create
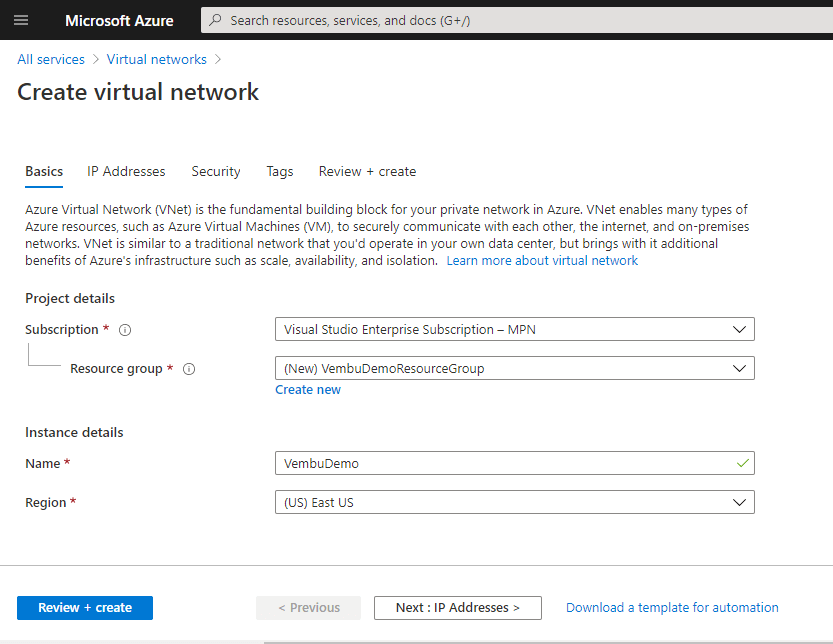
Basics
On this first step, select the subscription you want to associate this VNet resource with. Initially, you should have a valid subscription to use Azure resources. You can also opt to pay as you go subscription also. Here we selected Visual Studio Enterprise Subscription – MPN as our subscription. Then you need to select the resource group if you already have, or can create a new resource group.
Creating a new resource group – A resource group is a container that holds related resources for an Azure solution. Provide a name for the resource group. Click Ok to create a new resource group.
Instance details – Provide a name to proceed and select the region to reside in this resource. Selected East US
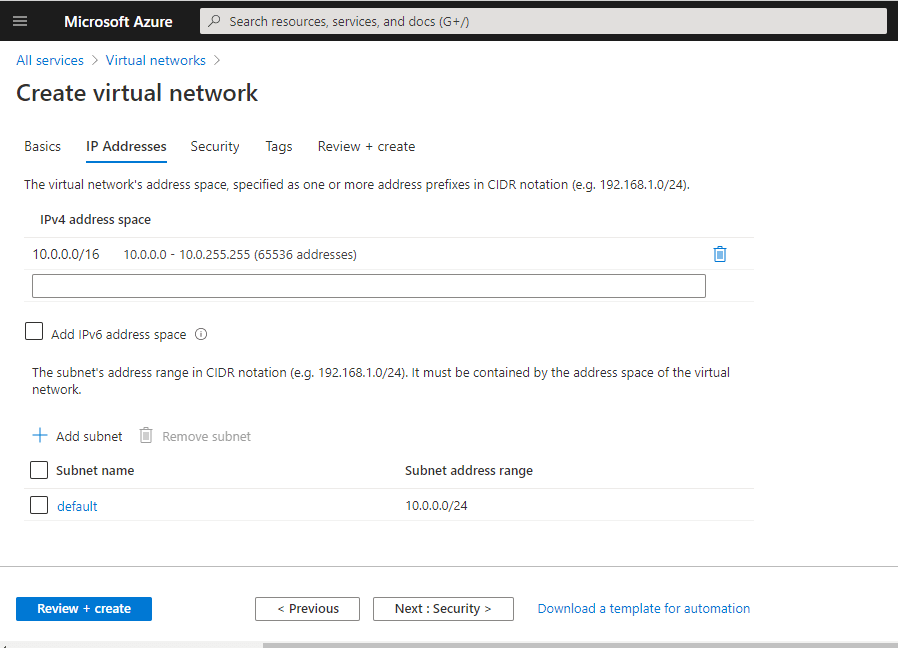
IP Addresses
In this step, you need to provide the virtual network’s address space, specified as one or more address prefixes in CIDR notation (e.g. 192.168.1.0/24). Default is 10.0.0.0/16
You can also enable “ Add IPV6 address space”.
You can create a virtual network that’s dual-stack (supports IPv4 and IPv6) by adding an IPv6 address space. You can also add IPv6 support later, after creating the virtual network.
Add Subnet – The subnet’s address range in CIDR notation (e.g. 192.168.1.0/24). It must be contained by the address space of the virtual network.
By default, a default subnet block is added.
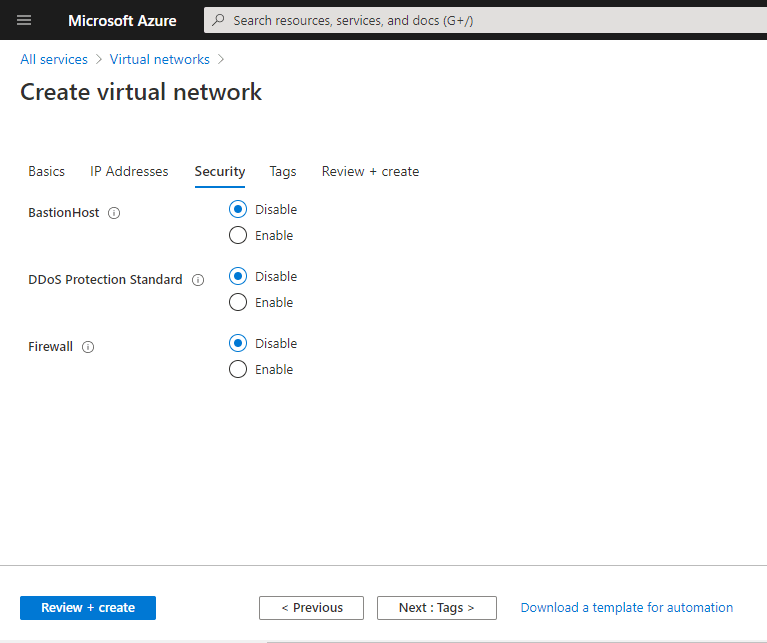
Security
In this step, you need to enable or disable three security settings
BastionHost – The Azure Bastion service is a new fully platform-managed PaaS service that you provision inside your virtual network. It provides secure and seamless RDP/SSH connectivity to your virtual machines directly in the Azure portal over SSL. When you connect via Azure Bastion, your virtual machines do not need a public IP address. You can enable or disable this security setting as per your requirement. If you assign a public IP address to an Azure VM which uses the created Azure VNet, recommend disabling these settings here.
DDoS protection standard – A DDoS protection plan is a paid service that offers enhanced DDoS mitigation capabilities via adaptive tuning, attack notification, and telemetry to protect against the impacts of a DDoS attack for all protected resources within this virtual network. Basic DDoS protection is integrated into the Azure platform by default and at no additional cost. So we can disable this setting also.
Firewall – Azure Firewall is a managed cloud-based network security service that protects your Azure Virtual Network resources. By default Firewall service is disabled. You can also enable it at a later stage.
Tags
Tags are name/value pairs that enable you to categorize resources and view consolidated billing by applying the same tag to multiple resources and resource groups. Note that if you create tags and then change resource settings on other tabs, your tags will be automatically updated.
Provide a Name and Value if you require to tag this VNet resource, or left as it is
Click Next
Review + Create
In this final step, Azure validates your inputs and shows if there are any errors. Otherwise, you will get a “Validation passed” mark on the page to proceed further.
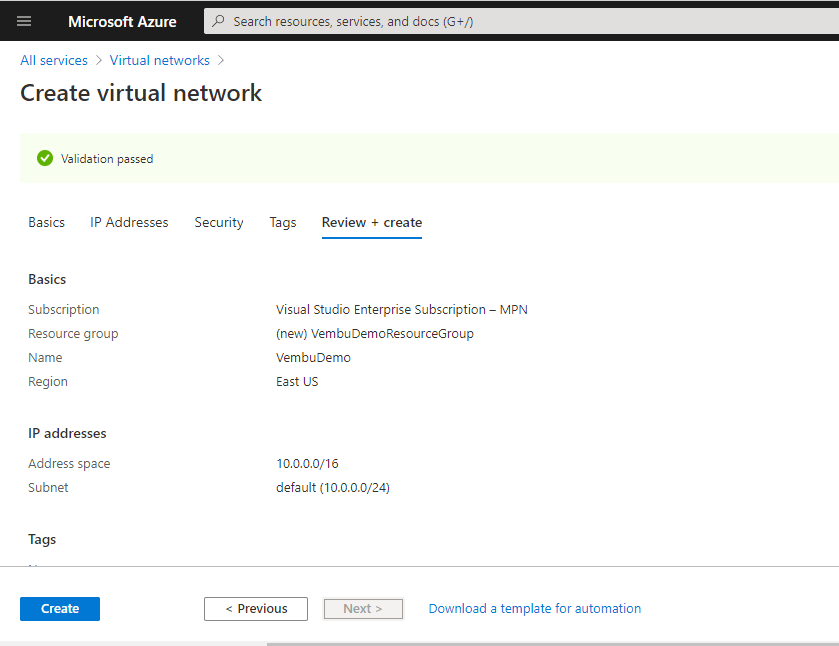
Click Create to proceed to create a VNeT, and you will get a deployment complete notice as below
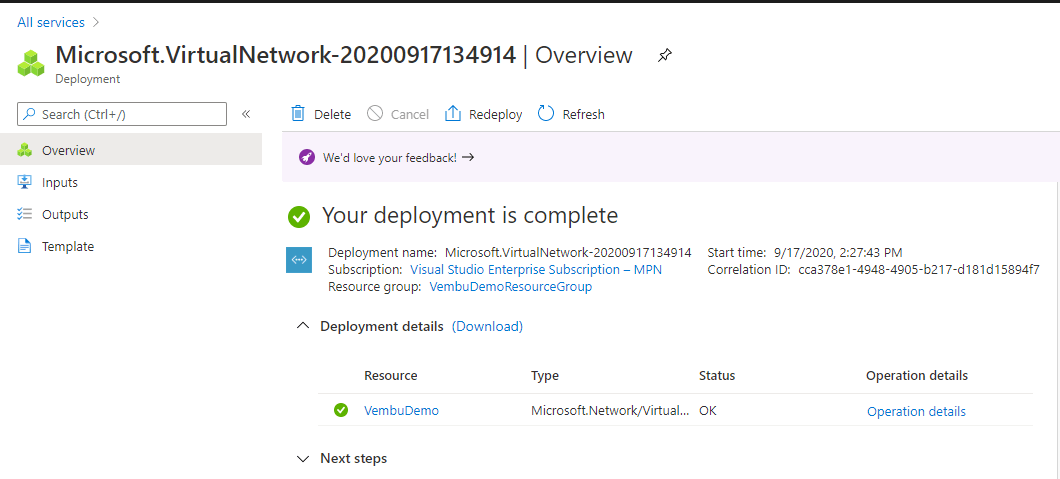
Now your VNet is ready for use.
How can I use this VNet & Resource group on Azure resources?
Some of the use cases described here, where you can attach your VNet and VNet resource group to the other Azure services.
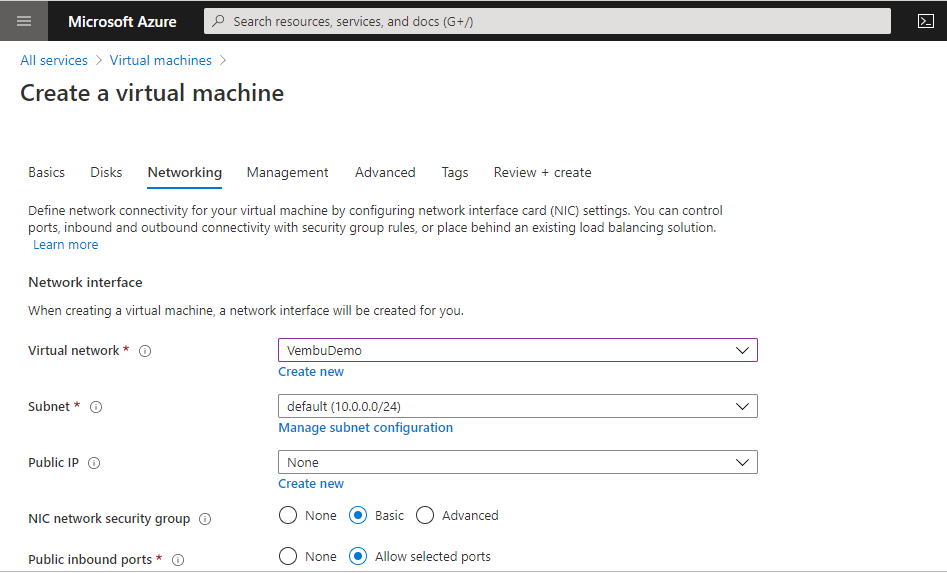
1. Attaching Virtual Network with an Azure VM during VM creation
While creating your Azure VM, you need to define network connectivity for your virtual machine by configuring network interface card (NIC) settings. There you need to provide Virtual network and subnet configuration details. So the same created VNet will be shown and can be used for communicating the Azure VM with other Azure resources as shown in the picture below
Here Virtual Network “VembuDemo” is selected, and the subnet is automatically assigned in the subnet configuration section.
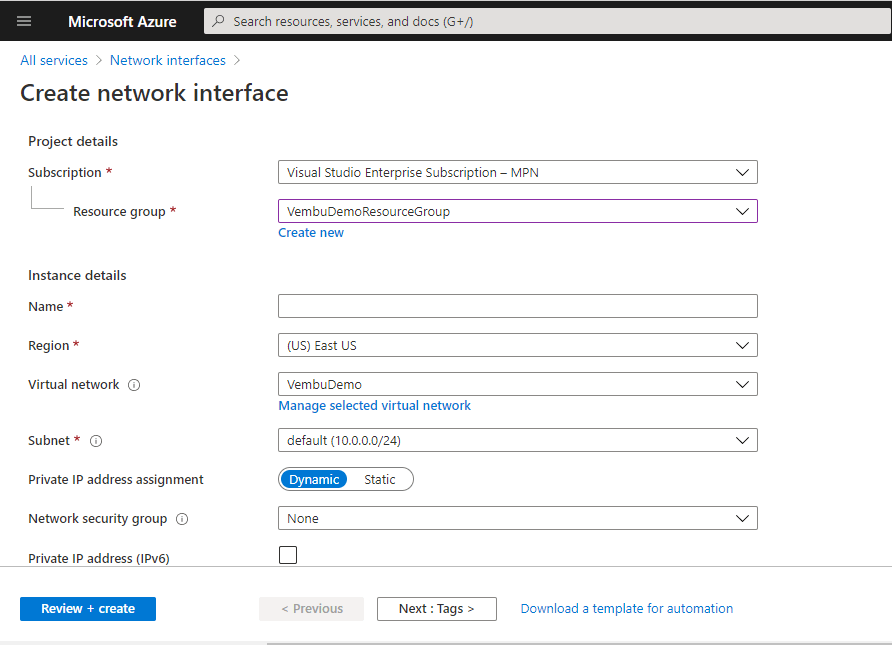
2. Creating an additional network interface to attach to an Azure VM
On the Azure portal under the Network Interface blade, you can create an additional network interface to attach to an Azure VM on run time. A network interface enables a virtual machine to communicate with the Internet, Azure, and on-premises resources. While creating a network interface, you can use the existing VNet and Resource group as shown in the picture below.
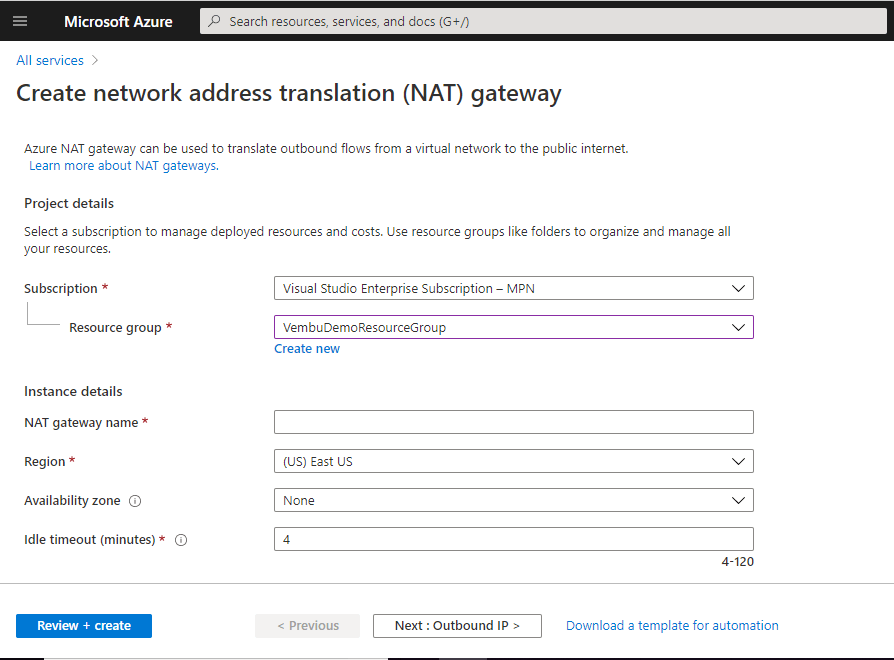
3. Creating an Azure NAT gateway
Azure NAT gateway can be used to translate outbound flows from a virtual network to the public internet. While creating an Azure NAT gateway you need to provide an existing or new Resource group. As shown in the picture below we have chosen an already existing resource group.
Conclusion
Azure Virtual Network (Azure VNet) is likely one of the most important components in your Azure Infrastructure deployment. For any Azure administrator, designing an azure network implementation is the first step, as the Azure resources are required to connect to the internet and from the Office network. To perform these operations, creating a Virtual Network and associated Resource group is the first task in this first step. Creating a VNet and a Resource group is a simple task and any Windows administrator can do in a few steps. Since VNet and Resource group form the foundation you need to run cloud-based applications, it is very much essential for the Azure application developer too.
Related Posts:
Designing and Implementing Microsoft Azure Networking Solutions AZ-700 – Study tips
Windows Server 2019 Azure Network Adapter : Overview and Configuration
Network Security Groups in AWS and Azure – A Brief Overview
Follow our Twitter and Facebook feeds for new releases, updates, insightful posts and more.