
Microsoft Hyper-V is a virtualization software that allows virtual machines to be created by virtualizing the OS and all hardware components. The ability to move virtual machines from one location to another without downtime is one of the main benefits of virtualization. Hyper-V also provides such mechanisms and one of them is, Export and Import functionality.
Export makes it easy to copy and transfer a VM to another location and import lets you restore it on any Hyper-V host. If you don’t have any backup solution in place, and in cases like complete hardware failure, you can use the exported VM files and restore the VM by performing the import.
Table of Contents
- Hyper-V Export
- Hyper-V Import
- Export Hyper-V VM
- Using PowerShell
- Import Hyper-V VM
- Using PowerShell
- Data Protection with BDRSuite
Quick Bites:
- The blog offers a guide on exporting and importing VMs from Hyper-V using Hyper-V Manager and PowerShell
- It emphasizes the benefits of virtualization and the importance of moving VMs without downtime
- The export process is detailed, including use cases and methods like copying VMs for safekeeping
- Similarly, the import process is explained, covering options such as in-place registration and copying
- Additionally, data protection considerations and limitations of using Hyper-V Export and Import as a backup solution are discussed, with alternative options like BDRSuite to achieve robust data protection
In this article, we’ll look into the steps to perform Export and Import of a Hyper-V virtual machine using Hyper-V Manager and Powershell.
Hyper-V Export
Hyper-V Export is the process of exporting a complete Hyper-V virtual machine which includes the virtual hard disk files, VM configuration files, and Hyper-V snapshots a single component. This export can be performed either the VM is online or offline.

Prior to Windows 2012 export can be performed only when the Hyper-V virtual machines are offline. Also, you can’t export the VM directly to a network share, first you need to export to local storage and then you need to copy to share. Windows Server 2012 onwards both operations can be performed.
Use Cases of Hyper-V Export
- Hyper-V Export can be used for archiving the virtual machines.
- Hyper-V Export can be used in a test environment or any troubleshooting purposes.
- Hyper-V export can be used as a backup if there is no backup solution available.
The export process of Hyper-V VM is often compared to Hyper-V snapshots and backups. Exporting VMs doesn’t go as fast as taking snapshots, but it allows us to create a complete copy of the VM and store it on another location, unlike Hyper-V snapshots.
The Hyper-V Export can not be considered as a full VM backup at the same time. It does not use compression, deduplication, and encryption methods, which are commonly used by data protection systems to minimize storage space and to more effectively use available disk space.
Hyper-V Import
Hyper-V Import is the process of recovering the exported virtual machine with all configuration. You can import the virtual machine to the source Hyper-V host or another one and the virtual machine will get registered with Hyper-V host. The Import Virtual Machine wizard also helps you fix incompatibilities that can exist when moving from one host to another.
Hyper-V import can be performed in three ways:
- Register the Virtual Machine in-place
- Restore the Virtual Machine
- Copy the Virtual Machine
Register the Virtual Machine in-place
In this type of import, the source files in the location where you store run the VMs are not changed or moved in any way. And the Virtual machine’s unique ID remains the same as at the time of export.
Due to this, the VM is already registered with the Hyper-V host and if you attempt to import the VM without deleting the source VM with the ID, the operation will fail.
Hence, you need to delete the source to avoid duplicate ID occurrence and for a successful import.
When the import operation is complete, the export files become the running state files and can’t be removed.
Restore the virtual machine
Using this type, you can restore the virtual machine to a location you choose, or the default location configured with Hyper-V.
This import type will create a copy of the exported files and moves them to the selected location and once it’s imported, the virtual machine has the same ID as the time of export.
Because of this, if the virtual machine is already running in Hyper-V, you must delete that before the import starts.
And once the import completed the exported files remain intact and can be removed or imported again.
Copy the virtual machine
This import type is similar to the Restore type in that you select a location for the files. The only difference is that the imported virtual machine will have a new unique ID and it will help you to import the virtual machine to the same host multiple times.
Export Hyper-V VM
You can perform the export of Hyper-V VMs using Hyper-V Manager and PowerShell.
Let’s check the steps for exporting VM using both options.
Using Hyper-V Manager
- Open Hyper-V Manager
- Right-click the VM from the list and select Export
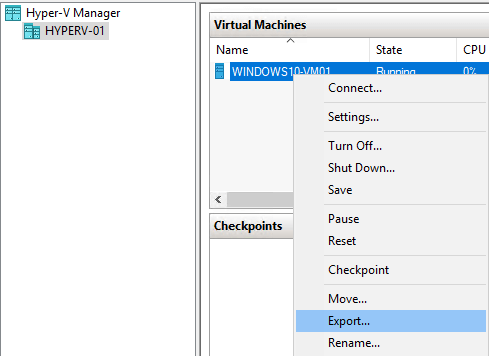
- Export Virtual Machine wizard will open, click Browse to specify the location to where the VM should be exported.
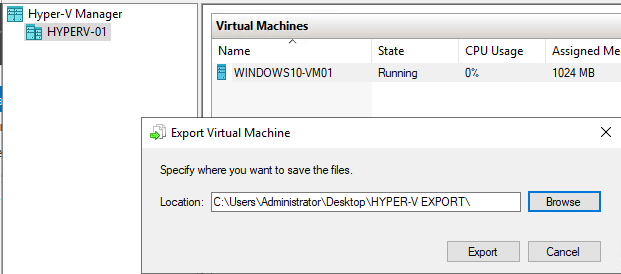
- You can monitor the progress of the Hyper-V Export operation in the Status column.

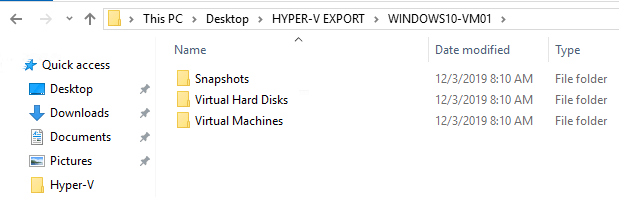
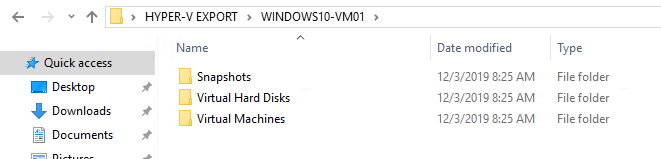
- After the export is completed, you can open the folder to verify that VM is successfully exported. The Location will contain the Virtual Hard Disks, VM configuration files, and VM snapshots.
Using PowerShell
The other method to export the virtual machine is using PowerShell through which you can use manually export or it can be automated.
Open the PowerShell as Administrator and run the following cmdlet to export Hyper-V VMs using PowerShell
Export-VM -Name “VMNAME” -Path “LOCATION”
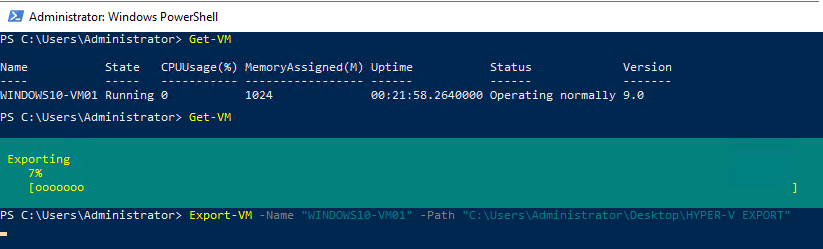
Once the export has finished checking the target location to verify that VM, the corresponding files will be successfully exported. You can see the files in the below screenshot.
You can use below cmdlet to export all available VMs
Get-VM | Export-VM -Path “LOCATION”

Import Hyper-V VM
Using Hyper-V Manager
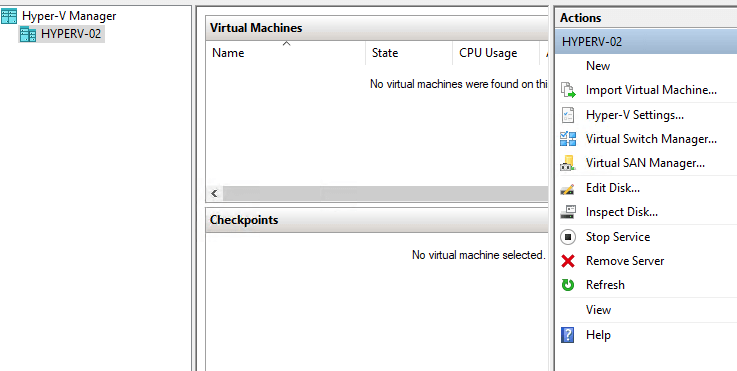
- Open Hyper-V Manager.
- In the Actions section from the right side, select Import Virtual Machine.
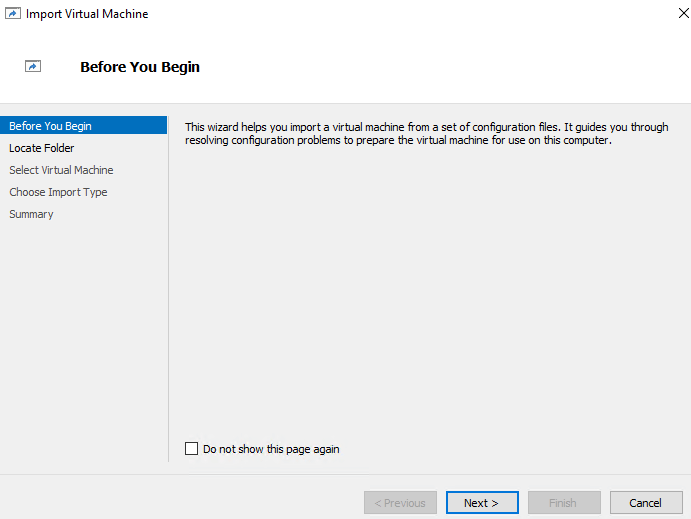
- Click Next
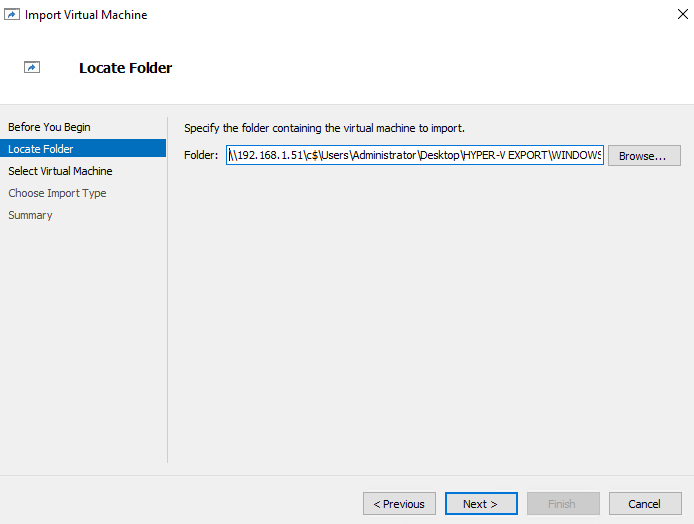
- In the Locate Folder section, browse and select the VM folder which you want to import and click Next.
In this case, we are importing the VM exported from another Hyper-V server and accessing files from the shared path.
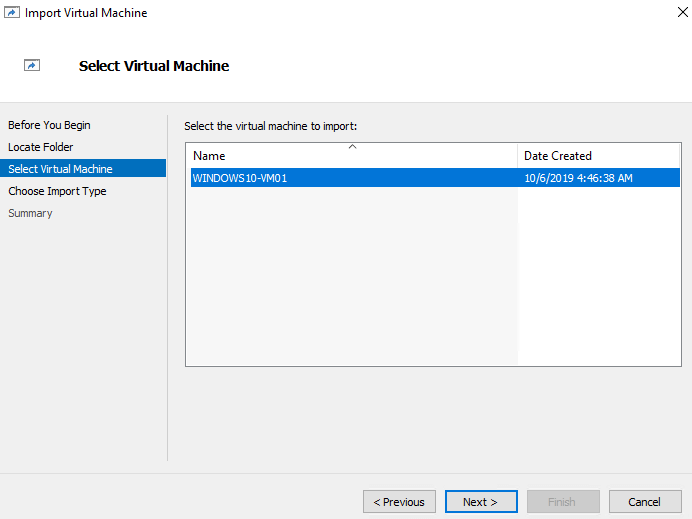
- From the Select Virtual Machine section, choose the VM to import and Click Next
- From Choose Import Type section, based on the requirement choose the import option and Click Next
In this case, we are selecting the copy option which will assign a new unique ID to the imported VM.

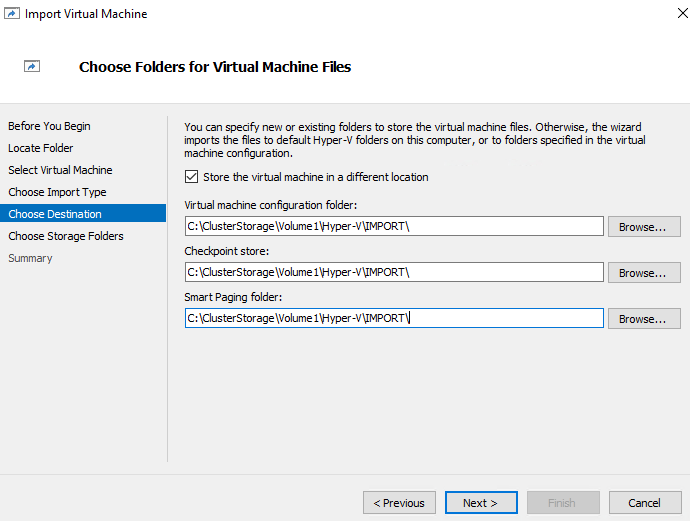
- In the Choose Destination section, by default, it will show the Hyper-V folders, but you can specify folders where the VM files should be stored.
In our case, we created a new folder and set that path by selecting Store the Virtual machine in a different location option
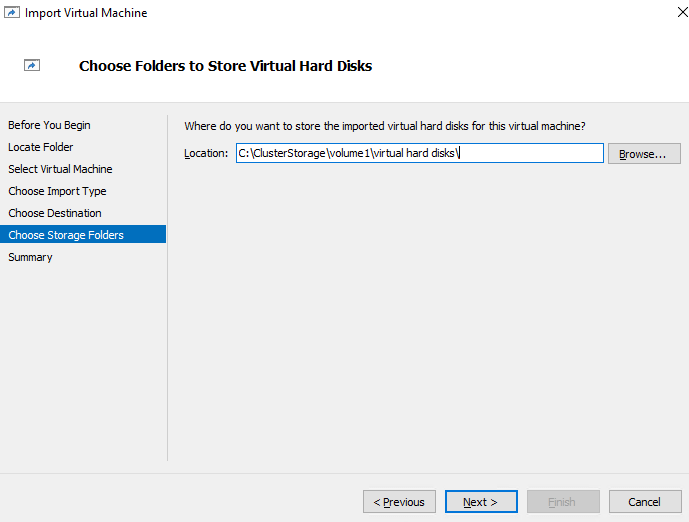
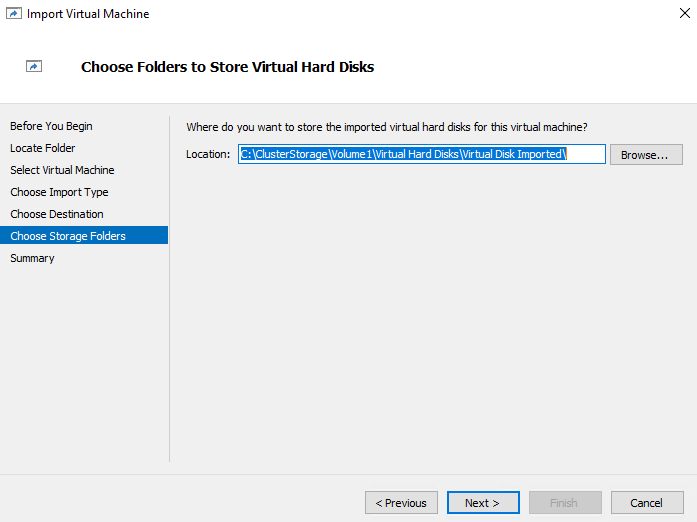
- From the Choose Storage Folders section, you can continue by selecting the default location “virtual hard disk folder” or you can set a new location by manually browsing.
Note that we have created a new folder and use that location to store the virtual disks
Click Next
- Verify the selections you have made in this wizard from the summary section, and Click Finish
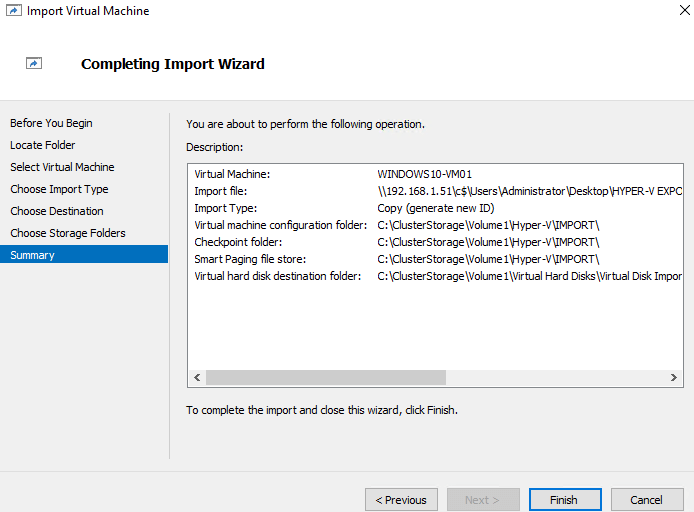
- Files will be copied to the target location and once the operation is complete, imported VM will be listed in the Hyper-V host in the saved state.
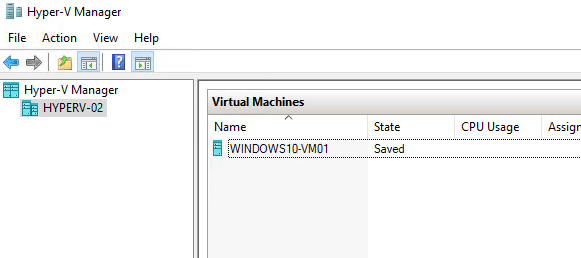
- You can start the VM by right click on that and test that all configuration and data are available on the imported VM.

Using PowerShell
You can import the Virtual Machine using power Shell also, and you can perform all the three types of import using power shell. The cmdlet we use for the import operation is Import-VM to perform various types of Hyper-V Import.
Register in place
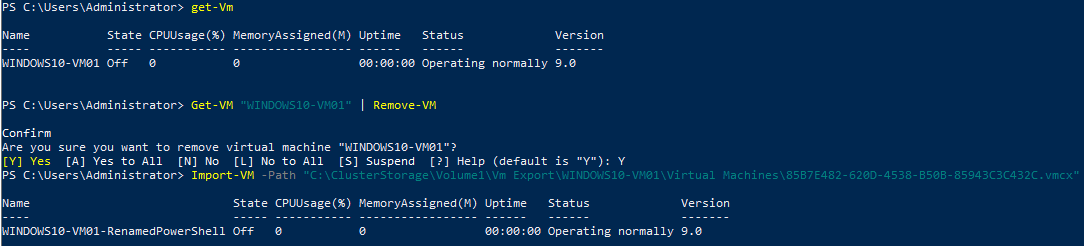
To perform this type of import, you should first delete the source VM which has the same ID. You can delete the VM by running the following cmdlet
Get-VM “VMNAME” | Remove-VM
After that run the below Import-VM cmdlet to import the VM and get registered in-place and the existing unique ID
Import-VM –Path “VM Location\Virtual Machines\VM Configuration file(.vmcx)”
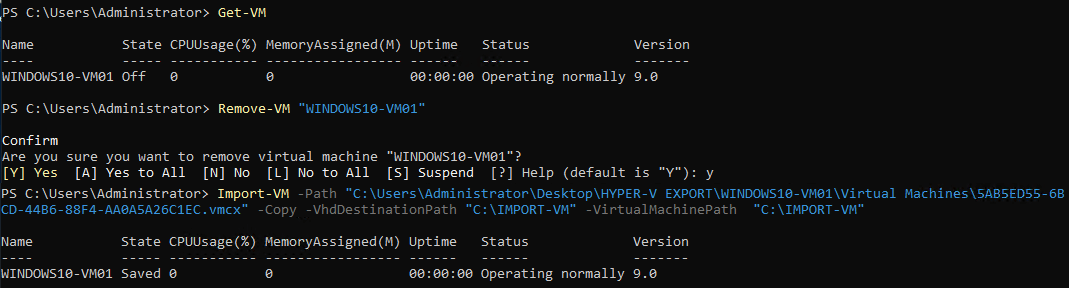
Restore the VM
As we discussed earlier in this import type exported files will be copied and moved to the new location and the existing ID will be used in this case. Note that you must delete the source VM before starting the restore operation.
Import-VM -Path “C:\Users\Administrator\Desktop\HYPER-V EXPORT\WINDOWS10-VM01\Virtual Machines\5AB5ED55-6BCD-44B6-88F4-AA0A5A26C1EC.vmcx” -Copy -VhdDestinationPath “C:\IMPORT-VM” -VirtualMachinePath ” C:\IMPORT-VM”
Import as a copy
In this import type, you don’t need to delete the source VM and a new unique ID will be created for the imported VM. Using this type, you can import this VM to the same host multiple times.
Import-VM -Path “C:\Users\Administrator\Desktop\HYPER-V EXPORT\WINDOWS10-VM01\Virtual Machines\5AB5ED55-6BCD-44B6-88F4-AA0A5A26C1EC.vmcx” -Copy -GenerateNewId

Data Protection with BDRSuite
You can use the Hyper-V Export and Import feature as a backup alternative but the process of exporting and importing the VMs requires a lot of manual input. Alternatively, you can automate the export and import using PowerShell scripts. Still, you cannot use the Hyper-V Export and Import as a full-fledged backup solution since it has many limitations. You need a lot of storage if you are using Hyper-V export as a backup solution because export will not have deduplication and compression or granular level recovery and other critical features. Hyper-V Export and Import can be used to protect only small Hyper-V environments.
BDR Suite is one of the suitable backup & DR solutions to protect your Hyper-V environment. It allows you to ensure complete data availability in Hyper-V environments, including single Hyper-V hosts to multiple Windows Server Failover Clusters hosting the Hyper-V role.
Learn More about BDR Suite – Hyper-V backup here.
Download the full-featured 30-day free trial of our latest version Vembu BDR Suite v4.1.0 and experience modern data protection for your environment.
Related Posts:
Beginners’ Guide for Microsoft Hyper-V: How to Export and Import Hyper-V VM’s – Part 26
Beginners’ Guide for Microsoft Hyper-V: How to Import OVA into Hyper-V – Part 44
How-to Guide: Importing Oracle Virtualbox VM to Oracle Cloud Infrastructure
AWS for Beginners: How to Import AWS MySQL DB from AWS S3: Part 30
Follow our Twitter and Facebook feeds for new releases, updates, insightful posts and more.