
Virtual networking is at the core of what makes virtualizing server resources possible. There have been so many exciting developments in the world of networking which is possible through virtualizing and abstracting networking resources from the underlying hardware.
Microsoft Windows Server Hyper-V has made many powerful advancements with each new version of Windows Server in the way Hyper-V handles the networking layer for virtual machines running on top of Hyper-V. Hyper-V has characteristics that are a bit unique when compared to other hypervisors.
Table of Contents
- Hyper-V Virtual Networking
- Hyper-V Virtual Switch Types
- Private Virtual Switch
- Management Operating System Connectivity
- Hyper-V Physical NIC Teaming
- Is a Physical Network Team Required?
- How is Converged Networking Configured?
- Hyper-V Clusters and Additional Network Requirements
- Windows Server 2019 New Virtual Networking Features
- Hyper-V Networking Configuration Best Practices
- Backup Hyper-V and Hyper-V Clusters
Before we can look at the best practices involved with Hyper-V network configuration, let’s take a look at the basics of Hyper-V networking, virtual switch infrastructure, Hyper-V clusters, and new Hyper-V networking features found in Windows Server 2019.
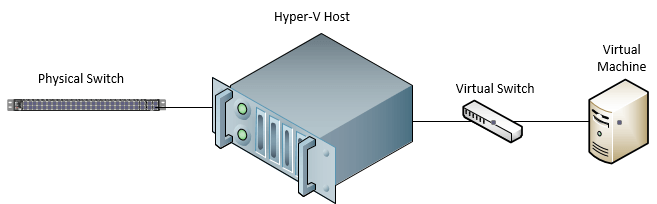
Just like other components in virtualized server infrastructure, there is a point where the virtual world must meet the physical. This can be physical CPU/memory, and storage, but also includes the network. At a certain point, the packets from the virtual machines running in Hyper-V must be directed to the physical network for communication both outbound and inbound.
Hyper-V Virtual Networking
Hyper-V creates virtual NICs and also uses virtual switches as a construct these virtual NICs are plugged into. On both fronts, the virtual NICs are very similar to physical NICs and operate using the same mechanisms and protocols. The virtual switches are virtualized versions of network switches that have all the same characteristics that you would find in a physical switch with Layer 2 features like VLANs, etc.

The virtual NICs plugin to the virtual switches and the physical NICs in the Hyper-V host are the uplink from the virtual switch to the physical switch.
Hyper-V Virtual Switch Types
Hyper-V provides different virtual switch types to suit different use cases and present different capabilities and isolation modes to virtual network resources. It also allows for flexibility in how virtual networking is connected to the physical network.
There are three different Hyper-V virtual switch types that are used to connect Hyper-V virtual machine NICs:
- External Virtual Switch
- Internal Virtual Switch
- Private Virtual Switch
External Virtual Switch
The Hyper-V External Virtual Switch is by far the most common virtual switch used in the Hyper-V virtual network infrastructure. The external virtual switch is the type of virtual switch used to connect virtual machines to the physical network.
The characteristics of the external virtual switch include:
- Ability to connect VMs to the physical network
- Allows VMs to talk to each other on the same Hyper-V host or different Hyper-V hosts
- The default option when creating a new Hyper-V virtual switch
The external virtual switch provides connectivity to LAN and WAN traffic as routed/segmented in the physical network.
Internal Virtual Switch
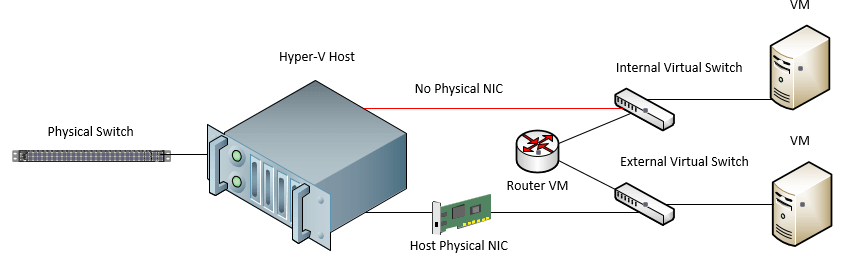
As you would imagine, the Internal Virtual Switch intuitively does not provide access external to the Hyper-V host. The internal virtual switch is a type of virtual switch that allows VMs connected to the switch to talk to one another and also to the Hyper-V host.
A good way to think about the internet virtual switch is to think of a physical switch that is not uplinked to any other switch. Any device plugged into the switch can communicate with each other but cannot communicate with other devices external to the switch. The internal virtual switch is not backed by a physical NIC on the Hyper-V host.
The internal virtual switch has a perfect use case where you want to isolate traffic around a group of VMs. This allows easily provisioning isolated lab environments where virtual machines can only communicate with one another or bolstering network security in certain use cases such as for compliance. The internal virtual switch provides a way to securely and safely replicate production subnets in an isolated environment for labs, testing, POC, etc.
You can egress traffic out of the internal virtual switch by way of a router or other device that can route traffic between network segments.
Below is an example of making use of a router VM to route traffic between VMs located on an internal virtual switch and those that are located on an external virtual switch. This applies equally to routing traffic to external VMs or physical machines outside of the Hyper-V host itself.
Private Virtual Switch
The Private Virtual Switch is essentially the same as the internal virtual switch except that not even the management operating system can communicate with VMs located on a private virtual switch. This means that it is not able to plug into the virtual switch with a virtual network adapter.
What use case would be appropriate for using this type of Hyper-V virtual switch?
Even though it is not extremely common, guest clustering provides the ability to extend the availability offered by Hyper-V itself in terms of application high-availability. Guest clusters use a special network for heartbeats that should only be used for VM-to-VM communication.
By using a private virtual switch this guarantees that only the guest cluster hosts are able to communicate over this network without even the management operating system introducing traffic. This is a perfect use case for ensuring VM to VM traffic on an isolated network segment.
Have a look at the steps to create & manage Hyper-V virtual switches using Hyper-V Manager & Powershell.
Management Operating System Connectivity
If you notice when you create a new Hyper-V external virtual switch, you will see the option to Allow management operating system to share this network adapter. What does this mean?
This essentially means, the management operating system will be plugged into the Hyper-V virtual switch.
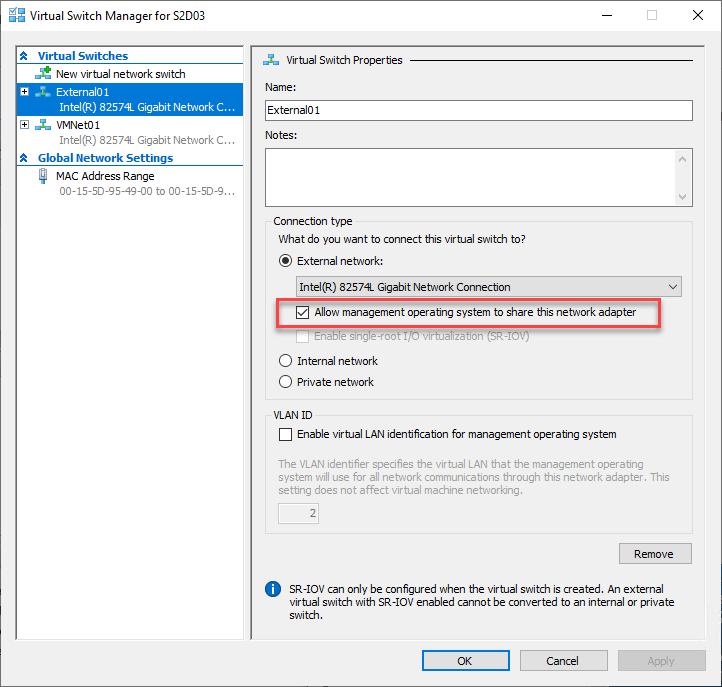
When you choose to allow the management operating system to share this network adapter setting, you will see the specialized network adapters appear in your network adapters configuration on the Hyper-V host. They are enumerated as vNetwork appended with the name of the Hyper-V external virtual switch.

The same goes for unchecking this box. When unchecked, the specialized vNetwork interfaces are automatically deleted. You will notice that you only have the option to check this box on an external virtual switch. This is because the external virtual switch is tied to the physical Hyper-V network cards.
With both the internal and private virtual switches, the physical network cards present on the Hyper-V host are not used as these two types of virtual switches are isolated as explained earlier.
Hyper-V Physical NIC Teaming
One of the more powerful networking capabilities that has been introduced since Windows Server 2016 and higher Hyper-V versions is Converged Networking.
With converged networking, limitations regarding the use of dedicated physical NICs exposed by Remote Direct Memory Access (RDMA) enabled services used by the management operating system and dedicated physical NICs backing Hyper-V virtual switches, has been lifted. Now, the same physical NICs can be used by both types of services, allowing Hyper-V VMs to use those RDMA exposed NICs for normal TCP/IP communication.
This is accomplished by Windows Server 2016 and higher exposing RDMA through a host-partition virtual NIC, allowing the host partition services to use RDMA with the same NICs as Hyper-V VM guests. RDMA services are exposed to host processes by using RDMA over converged Ethernet (RoCE).
Is a Physical Network Team Required?
Unlike creating a physical NIC team in previous Windows Server versions, the converged networking feature does not require a physical team. While you can use a physical NIC team, a new approach has been introduced called Switch Embedded Teaming or SET.
With SET, the physical network adapters on the Hyper-V host are connected and teamed by a virtual switch. This assumes certain prerequisites:
- Two servers that run Windows Server 2016 Datacenter edition or Windows Server 2016 Standard edition
- One RDMA-capable, certified network adapter installed on each server
- Hyper-V server role installed on each server
How is Converged Networking Configured?
We can utilize PowerShell to configure a Hyper-V Virtual Switch that is configured for embedded teaming (SET).
New-VMSwitch -Name ConvergedSwitch -AllowManagementOS $True -NetAdapterName NET01,NET02 -EnableEmbeddedTeaming $True
To verify RDMA capabilities on an adapter, we can use the command:
- Get-NetAdapterRDMA
To enable RDMA capabilities if not already enabled we can use the command:
- Enable-NetAdapterRDMA
PowerShell commands to add vNICs created on the management OS and bound to a vSwitch:
Add-VMNetworkAdapter -ManagementOS -Name “Management-100” -SwitchName “ConvergedSwitch” MinimumBandwidthWeight 10
Add-VMNetworkAdapter -ManagementOS -Name “LiveMigration-101” -SwitchName “ConvergedSwitch” MinimumBandwidthWeight 20
Add-VMNetworkAdapter -ManagementOS -Name “VMs-102” -SwitchName “ConvergedSwitch” MinimumBandwidthWeight 35
Add-VMNetworkAdapter -ManagementOS -Name “Cluster-103” -SwitchName “ConvergedSwitch” MinimumBandwidthWeight 15
We can add VLANs to the virtual NICs with the Set-VMNetworkAdapterVlan command:
$Nic = Get-VMNetworkAdapter -Name Management-100 -ManagementOS
Set-VMNetworkAdapterVlan -VMNetworkAdapter $Nic -Access -VlanId 100
$Nic = Get-VMNetworkAdapter -Name LiveMigration-101 -ManagementOS
Set-VMNetworkAdapterVlan -VMNetworkAdapter $Nic -Access -VlanId 101
$Nic = Get-VMNetworkAdapter -Name VMs-102 -ManagementOS
Set-VMNetworkAdapterVlan -VMNetworkAdapter $Nic -Access -VlanId 102
$Nic = Get-VMNetworkAdapter -Name Cluster-103 -ManagementOS
Set-VMNetworkAdapterVlan -VMNetworkAdapter $Nic -Access -VlanId 103
Hyper-V Clusters and Additional Network Requirements
Outside of the traditional virtual machine network requirements in a Hyper-V environment and using the various Hyper-V virtual switches to provide network connectivity to Hyper-V VMs, with Hyper-V clusters, there are additional network traffic considerations.
What is a Hyper-V cluster?
A Hyper-V cluster enables high-availability to Hyper-V virtual machines by housing the Hyper-V role on top of a Windows Failover Cluster with at least two Hyper-V hosts configured. In this way, if a single Hyper-V host fails due to hardware or other issues, the VMs that are running as part of a high-availability role configuration is restarted on a healthy host to bring the VM back online.
There are several key infrastructure requirements that make this possible, such as having “like” configured hosts as well as shared storage. The VM files must be located on storage that all of the cluster nodes have access to so that any node can assume ownership of a Hyper-V VM if a fault occurs.
Aside from the normal virtual machine network communication that takes place on the three types of Hyper-V virtual switches, what additional network traffic is needed with a Hyper-V cluster?
There are many types of specialized traffic that allow the Hyper-V cluster to function. These are related to the underlying Windows Failover Cluster, storage, and VM migration communication. They are:
Cluster Network – Windows Failover Cluster uses special cluster communication to exchange information between the nodes of the cluster. The term heartbeat was coined as a term to describe this process. Heartbeats are small packets (134 bytes) that travel over UDP Port 3343 on all networks configured for Cluster use between all nodes.
- What is the purpose of this special network communication?
- It establishes if a cluster network is up or down
- It checks routes between nodes
- It ensures the health of a cluster node, determining if it is in a good or bad state
- This specialized traffic is extremely crucial to a stable Hyper-V cluster. Even if a node is healthy and for some reason cluster communication cannot be established with a node, the other nodes in the cluster assume there is a problem and will partition off the affected host
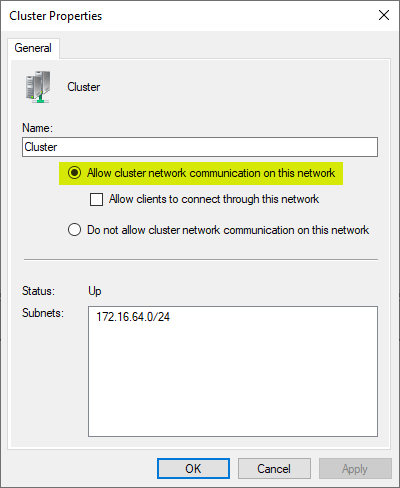
- Windows Failover Clusters use all networks possible to communicate between them. If one of the networks isn’t available, it will try a different network to establish cluster communication. You can configure this behavior in the Failover Cluster Manager. The setting Allow cluster network communication on this network affects this behavior and allows administrators to choose which networks the cluster communication has available for this process
Storage Network – In a standalone Hyper-V server configuration with direct-attached storage (DAS), there is no special network needed for a dedicated storage communication network as this is all handled internally. The storage network is an ultra-important network when it comes to Windows Failover Clusters. As mentioned earlier, one of the key requirements with a Hyper-V cluster is shared storage.
This allows compute nodes in the Hyper-V cluster to simply assume compute/memory for a virtual machine without the storage changing. This is handled by either an external storage array accessible with iSCSI, SMB, etc or software-defined storage by means of Storage Spaces Direct providing the shared storage between the Hyper-V cluster nodes. Storage traffic is generally bandwidth & latency sensitive. If bandwidth diminishes or latency escalates, performance problems will quickly ensue. Storage Spaces Direct storage accessibility, erasure coding, and other mechanisms rely on an extremely fast network between the hosts. Shared storage by means of an external storage array also requires high-performance storage.
Cluster Shared Volumes (CSV) allow all the hosts in the Hyper-V cluster to access the same storage provisioned for virtual machines simultaneously. CSV requires the exchanging and updating of metadata between the hosts. This special type of network communication is part of the overall storage communication needed in a Hyper-V cluster.
Live Migration – This is the specialized network that is used to transfer the memory state information from one host to another host for a virtual machine. This allows a VM to be moved between hosts with no downtime. This is a powerful feature that allows maintenance operations to be carried out on a particular host by simply Live Migrating VMs from the host to other hosts in the cluster.
Windows Server 2019 New Virtual Networking Features
Microsoft has made tremendous strides with each Windows Server release by introducing new features to extend and make both the Windows Server and Hyper-V platforms more powerful.
Let’s take a moment to review two new features and enhancements in Windows Server 2019 in the realm of networking that will no doubt be features that IT admins will want to take advantage of.
Encrypted Virtual Networks – Virtual network encryption allows encryption of virtual network traffic between virtual machines that communicate with each other within subnets marked as Encryption Enabled. It also utilizes Datagram Transport Layer Security (DTLS) on the virtual subnet to encrypt packets. DTLS protects against eavesdropping, tampering, and forgery by anyone with access to the physical network. This is generally known as encryption of data in-flight and is a security mechanism that bolsters data security.
Network Performance Improvements for Virtual Workloads – New improvements in Windows Server 2019 helps to reduce host CPU utilization and increase throughput. Further, the technology – Receive Segment Coalescing (RSC) in the vSwitch allows coalescing multiple TCP segments into fewer but larger segments. The processing of these fewer, larger segments is more efficient than processing numerous, small segments.
In general, Receive Segment Coalescing was available in Windows Server 2012 but provided hardware-only offload versions of the technology. This technology though was incompatible with virtual workloads. As soon as a network adapter is attached to a vSwitch, this type of RSC was disabled.
Workloads whose datapath traverses a virtual switch benefits from this feature.
For example:
- Host Virtual NICs including:
- Software-Defined Networking
- Hyper-V Host
- Storage Spaces Direct
- Hyper-V Guest Virtual NICs
- Software-Defined Networking GRE Gateways
- Container
Hyper-V Networking Configuration Best Practices
Now that we have covered the basics of Hyper-V networking, virtual switches, Hyper-V cluster network requirements, as well as new features found in Windows Server 2019 virtual networking.
Let’s look at the key Hyper-V networking best practices to keep in mind when designing and building out your Hyper-V infrastructure.
- When possible install or upgrade to the latest version of Windows Server. With each Windows Server release, there are new and enhanced capabilities related to Hyper-V
- Use up-to-date physical network cards that are supported by Microsoft and have the capabilities to use Remote Direct Memory Access (RDMA)
- Make sure you are running the latest network card drivers and firmware
- Use Virtual Machine Queue or VMQ enabled NICs – This provides hardware virtualization benefits that allow more efficient network connectivity for TCP/IP/iSCSI and FCoE
- Use high-speed networks between Hyper-V hosts in a Hyper-V Cluster – Use at least 10 GbE networks between Hyper-V hosts to ensure bandwidth and performance requirements are met between the cluster hosts
- Enable jumbo frames – Jumbo frames allow more efficient network communication in high-performance applications as it allows larger transmission frames and reduces CPU utilization on the hosts. Jumbo frames are typically 9000 bytes or larger as opposed to the standard 1500-byte Ethernet frame size
- Do not use TCP Chimney Offloading or IPsec Offloading with Windows Server 2016. These technologies have been deprecated in Windows Server 2016 and can impact server and networking performance. To disable TCP Chimney Offload, from an elevated command prompt run the following commands:
- Netsh int tcp show global – This shows the current TCP settings
- netsh int tcp set global chimney=disabled – Disables TCP Chimney Offload, if enabled
- Ensure you are using redundant paths between Hyper-V cluster hosts to ensure if you have a failure in one path, there is another path that can be used for communication
- Plan out your Hyper-V networks – Especially with Hyper-V clusters, planning out networks is essential. Make sure you have provisioned separate IP ranges/subnets, VLANs, etc., for your cluster-specific networks (Live Migration, Cluster, Storage, VM Networks)
- Do not use ReFS with Cluster Shared Volumes (CSV) – Currently, when used with CSV, ReFS causes the cluster to run in file system redirection mode which sends all I/O over the cluster network to the coordinator node for the volume. This can dramatically impact performance
- Understand the cluster network and its usage – You should enable multiple networks for cluster communication since this provides built-in resiliency to the cluster communication, helping to ensure HA of this important network communication within a Hyper-V cluster
- Only enable management operating system access on networks that are necessary. Understand how this creates the specialized vNetwork connections on the Hyper-V host
- Used Converged Networking – Converged Networking allows much more efficient use of physical adapters on the Hyper-V host as well as available bandwidth provided
- Used Switch Embedded Teaming – With Switch Embedded Teaming allows creating the team via the virtual switch instead of using a physical team
- If using Windows Server 2019, make use of the Receive Segment Coalescing (RSC) for performance improvements for virtual workloads
- With Windows Server 2019, use Encrypted networks – this allows encrypting all network communications on virtual networks for encryption in-flight
Backup Hyper-V and Hyper-V Clusters
While Hyper-V boasts extremely powerful resiliency and high-availability capabilities, this is no substitute for backing up your data contained in Hyper-V virtual machines. The resiliency and high-availability mechanisms provided by Hyper-V protect your business from hardware and other infrastructure failures, however, it does not protect your data from end-user mistakes or security threats such as ransomware.
Using a backup solution that allows protecting both standalone Hyper-V hosts and Hyper-V clusters is extremely important. BDR Suite allows backing up your Hyper-V hosts and clusters to ensure your data is properly protected. This includes backing up Hyper-V with agentless Hyper-V backups, support for SMB Share and CSV, application-consistent backups, quick and granular restores, cross-platform migration, and many other options.
Be sure to download a fully-featured trial version of BDR Suite here to see for yourself how Vembu provides a powerful option for protecting your Hyper-V environments.
Related Posts:
Hyper-V Network Switches: Choosing the Right One for Your Setup
Beginner’s Guide for Microsoft Hyper-V: Configuration of Hyper-V Networking Best Practices – Part 9
Best Practices for Hyper-V storage and Network configuration
Windows Server Hyper-V Cluster Networks
Connecting Hyper-V Virtual Machines to the Physical Network
Follow our Twitter and Facebook feeds for new releases, updates, insightful posts and more.