
Table of Contents
- What is a Compute Engine in GCP?
- Prerequisites for creating a VM on GCP
- Enabling Compute Engine in GCP
- Creating an Instance in GCP
- Name & Machine configuration
- Advanced Configuration
- Connecting the newly created VM
- Creating a machine Image from the running VM
- Conclusion
What is a Compute Engine in GCP?
Compute Engine is a secure and customizable compute service that lets you create and run virtual machines on Google’s cloud infrastructure called GCP. Google Compute Engine is the Infrastructure as a Service component of Google Cloud Platform. Compute Engine provides tools to help you bring your existing applications to the cloud infrastructure. You can have your applications running on Compute Engine within minutes while your data migrates transparently in the background. Also, you can migrate your applications with its OS running on physical servers, VMware vSphere, Amazon EC2, or Azure VMs
Prerequisites for creating a VM on GCP
- As the system administrator or DevOps administrator, the user should be able to create a virtual machine and have enough permission to working with it on the GCP console
- The Google Cloud Platform uses projects to manage resources. To use Google Compute Engine, you should have an existing project or can create a new one
- Google Compute Engine requires billing to be enabled for the project you use. The user has to set up by creating a new billing account
- The user has to set up his billing profile, by setting up his company profile, payment method and enable the billing profile
Enabling Compute Engine in GCP
Choose the project, where you want to create the VM, and Enable compute engine API
Before creating your VM on your specified project in GCP, you need to enable the compute engine API on your GCP console as shown in the screenshot below. Alternatively, you can enable this API by choosing API and services → Library → Compute → Compute Engine API → Enable API


Creating an Instance in GCP
Login to GCP Console. Choose Compute Engine → VM instances → Create Instance

On clicking the CREATE INSTANCE button, you will be directed to a VM instance creation page. Here you have 4 options or 4 ways of creating a VM. They are
- New VM Instance – Creating a single VM instance from scratch
- New VM Instance from template – Creating a new instance from the existing template
- New VM instance from machine image – Creating a new instance from the existing machine image. A machine image lets you store the configuration, metadata, and data disks required to create a VM instance
- New VM Instance from the MarketPlace – Deploy a new instance from the Market Place area where you can choose the image with applications you want to run on the instance
In our blog, we are going to create a New VM instance to explore all available options to create a VM instance. So we are choosing the option New VM Instance.
On expanding the New VM Instance page, you will be asked to provide Name, Machine Configuration, CPU configuration, Firewall, Security, Disk, and Storage configuration. These details are covered in the following steps.
Name & Machine configuration
In this section, you will be asked to provide the name of the virtual machine you created. Names must start with a lowercase letter followed by up to 62 lowercase letters, numbers or hyphens, and cannot end with a hyphen.
Region – A region is a specific geographical location where you can run your resources. You can choose the region from the available list, which is nearer to your geographic region.
Zone – A zone is an isolated location within a region. The zone determines what computing resources are available and where your data is stored and used. You can choose the available zone from the available list. Each region has three or four zones.
Machine Family – Based on your requirements, you can choose either General Purpose or Memory Optimized machine types. Each family has its series of CPU platforms either be a First Generation ( N1 ) families or Second Generation ( E2 ) families
Machine Type – Based on vCPU and Memory GCP classified machine types into various categories like shared core, standard, high CPU, and higher categories. You can choose the machine type depending on the workload and memory consumption of your application running on the VM.

CPU Platform – The microarchitecture of your VM instance. Select ‘Automatic’ unless you have a specific need.
Display Device – You can turn ON or OFF the display device setting. You can turn on a display device if you want to use screen capturing and recording tools, else it could be OFF
Confidential VM service – This service adds protection to your data in use by keeping the memory of this VM encrypted with keys that Google doesn’t have access to. This service is bound to a particular series of machine types, regions, and zones.
Container – You can deploy a container to this VM instance by using a container-optimized OS image. By deploying containers on Compute Engine, you can simplify app deployment while controlling your VM infrastructure. Alternatively, you could use the Google Kubernetes Engine. For a simple VM launch, you don’t need to enable this option.
Boot disk – Each instance requires a disk to boot from. Select an image or snapshot to create a new boot disk or attach an existing disk to the instance. Generally, this boot disk selection will choose the OS you want to run on the VM. If you want to change the OS, click change and choose the OS from the list of OSes which contains CentOS, Fedora, Debian, RHEL, SuSE Enterprise Linux, Ubuntu, and Windows Server

Identity and API access – This section allows applications running on the VM to use the service account to call Google Cloud APIs. You can select the service account that you want to use and the level of API access that you want to allow. Applications running on the VM use the service account to call Google Cloud APIs. Use Permissions on the console menu to create a service account or use the default service account if available.
Access scopes – Select the type and level of API access to grant the VM. There are three types of access scopes available, you can choose any one of them.
- Allow default access
- Allow full access to all Cloud APIs
- Set access for each API
Default access will grant → read-only access to Storage and Service Management, write access to Stackdriver Logging and Monitoring, read/write access to Service Control
Firewall – By default, all incoming traffic from outside a network is blocked. Select the type of network traffic that you want to allow. You can enable or disable HTTP or HTTPS traffic depending on your policy or requirement.

Advanced Configuration
You have advanced configuration tabs on the next step, namely Management, Security, Disks, Networking, and Sole Tenancy. In this section, we will describe most of the useful settings required to configure a VM.
1) Management Configurations
Deletion protection – You can enable or disable this deletion protection option. When deletion protection is enabled, instances cannot be deleted. By enabling deletionProtection, a VM instance can be protected from accidental deletion. If a user attempts to delete a VM instance for which you have enabled the deletionProtection, the request fails. Only a user that has been granted a role with computing instance creation permission can disable the option to allow the resource to be deleted.
Automation – This is an optional configuration, here you can set up startup script and metadata to be processed at the booting time of the VM. You can choose to specify a startup script that will run when your instance boots up or restarts. Startup scripts can be used to install software and updates and ensure that services are running within the virtual machine. You can set custom metadata for an instance or project outside of the server-defined metadata. This is useful for passing arbitrary values to your project or instance that can be queried by your code on the instance. You can add the metadata as a new item by inputting the Key and value of the metadata.
Availability policy
Preemptibility – A preemptible VM is an instance that you can create and run at a much lower price than normal instances. However, Compute Engine might stop (preempt) these instances if it requires access to those resources for other tasks. You can set ON or OFF of this flag to your VM. Usually, a preemptible VM can be set to off after 24 hrs. By default, the settings will be OFF.
On host maintenance – By default, when Compute Engine performs periodic infrastructure maintenance, it can migrate your VM instances to other hardware without downtime automatically. Here you have the option to terminate the VM too at the time of the maintenance window. It is recommended to choose the option “ Migrate VM Instance”
Automatic restart – Compute Engine can automatically restart VM instances if they are terminated for non-user-initiated reasons (maintenance event, hardware failure, software failure, and so on). You can choose either ON or OFF state. ON state is recommended.

2) Security configurations
Shielded VM – Shielded VM features include trusted UEFI firmware and come with options for Secure Boot, vTPM, and Integrity Monitoring.
Turn ON secure boot – Secure boot helps protect your VM instances against boot-level and kernel-level malware and rootkits.
Turn on vTPM – Virtual Trusted Platform Module (vTPM) validates your guest VM pre-boot and boot integrity and offers key generation and protection
Turn on Integrity monitoring – Integrity monitoring lets you monitor and verify the runtime boot integrity of your shielded VM instances using Stackdriver reports.
Note: requires vTPM to be enabled.
SSH Keys – These keys allow access only to this instance you created. Also, you can enable the option “Block project – wide SSH Keys”. By creating and managing SSH keys, you can let users access a Linux instance through third-party tools also. If a user presents their private SSH key, they can use a third-party tool to connect to any instance that is configured with the matching public SSH key file, even if they aren’t a member of your Google Cloud project. Therefore, you can control which instances a user can access by changing the public SSH key metadata for one or more instances.

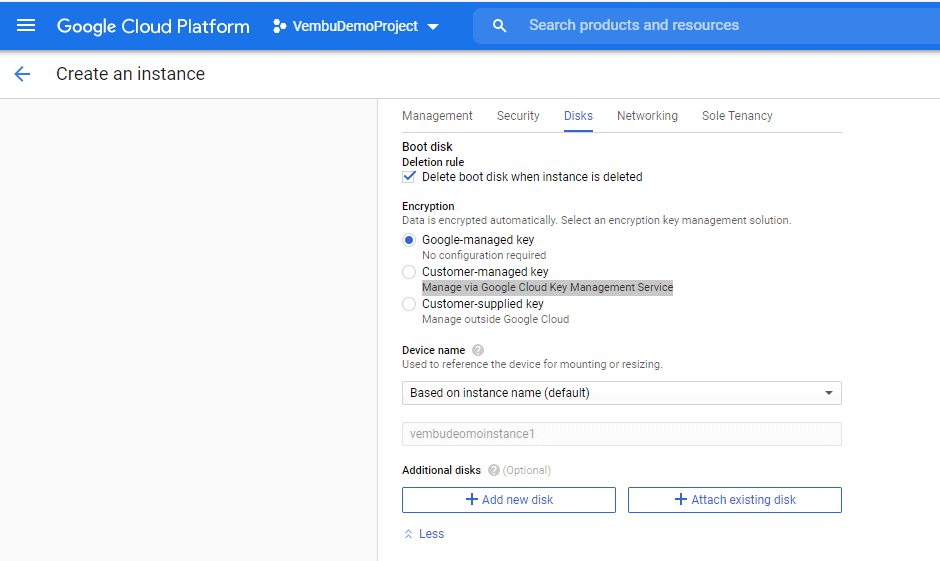
3) Disk configurations
Boot disk configurations
Deletion rule – You can enable or disable the option “Delete boot disk when the instance is deleted”. If it is disabled, you can retain the boot disk and create images for the new VM creation.
Encryption – Data is encrypted automatically by using the encryption key selected by the user. Available encryption keys are :
- Google managed keys – No configuration required. Google assigns the keys to encrypt your data
- Customer-managed keys – Manage via Google Cloud Key Management Service. The end-user has to provide a custom key in the Cloud key management service
- Customer supplied keys – Here to Customer provides the details of the custom keys through a third-party solution available outside of the Google Cloud
Device Name – You can use this name to reference the device for mounting, resizing, and so on, from within the instance. You can select to generate the device name based on the instance name or put a custom name. Based on instance name is the default option.
Additional Disks – Additional disks provide persistent and local SSD storage for the instance. You can add a new disk by clicking on the button “Add new disk” or can attach your existing disk by clicking on the button “Attach existing disk”
4) Networking configuration
Network Tags – A tag is simply a character string added to a tags field in a resource, such as Compute Engine virtual machine (VM) instances or instance templates. You can assign network tags to new VMs at creation time, or you can edit the set of assigned tags at any time later. You can edit network tags without stopping a VM.
HostName – When you create a virtual machine (VM) instance, Google Cloud creates an internal DNS name from the VM name. Unless you specify a custom hostname, Google Cloud uses the automatically created internal DNS name as the hostname it provides to the VM. You can create a VM with a custom hostname by specifying any fully qualified DNS name in the provided box.
Network Interfaces – Each VM has a minimum of one Network Interface to connect outside the network or internet depending on your firewall configuration. By default, while creating a VM Google’s compute environment provides a single Network Interface to it. To create another network interface you need to have a new network first and can add Network Interface and IP to it.

Now we mostly covered all the configuration options for creating a VM in the Google Cloud Platform console. Also, note that all the above configurations can also be achieved by generating REST requests or can use command-line tools. Finally, click create button to create the new VM.
Connecting the newly created VM
On double-clicking the Instance name available in VM Instances → Instances, you will get a full detailed description of the VM as shown in the below screenshot.

On the Remote access section, you can see various methods to connect your VM. Since the created machine is a Linux-based VM, configured SSH on the default port and configured Google managed SSH Keys, we can select the option “Open in a browser window” opens a new browser window as shown below.

Creating a machine Image from the running VM
Use a machine image to store all the configuration, metadata, permissions, applications, and data from one or more disks for a VM instance running on Compute Engine. The VM instance that you use to create a machine image is referred to as a source instance. Using source instances you can create multiple instances easily.
Select the particular instance in GCP, Choose the button “Create Machine Image” on top.
- Provide a name for the image
- Provide a brief description for the image created
- Provide the name of the source instance
- Choose the location where you want to create the image. By default, the image will be created in the same region where the VM is running. You can choose other regions also
- Choose the encryption method, you want to use and then click “CREATE”

Conclusion
It is very easy and straightforward to create a VM on GCP. With a limited amount of knowledge on networks and systems, any administrator can create a VM in a few steps. One can operate GCP confidentially with advanced security tools. Google Cloud protects your data, applications, infrastructure, and customers from fraudulent activity, spam, and abuse with the same infrastructure and security services Google uses.
Related Posts
Hyper-V Quick Create : Creating Custom Hyper-V Virtual Machine Gallery
Follow our Twitter and Facebook feeds for new releases, updates, insightful posts and more.