
In part I of this series, we discussed the steps to convert VMware VM to Hyper-V using Microsoft Virtual Machine Converter (MVMC). In this second part, we will discuss, How to convert a VMware virtual machine to Hyper-V using System Center 20160 – Virtual Machine Manager (VMM).
Converting a Virtual Machine from VMware to Hyper-V using System Center 20160 – Virtual Machine Manager (VMM) is a similar process as of in the first part when you have the entire infrastructure (source and destination) already connected to your System Center.
Let us do a quick look at the System Center infrastructure so that we are allowed to convert Virtual Machine between both systems.
Source: ESXi hosts or vCenter need to be added to your System Center, and all VMs listed.
Destination: Hyper-V Servers or Hyper-V Cluster need be added into your System Center, and all VMs listed.

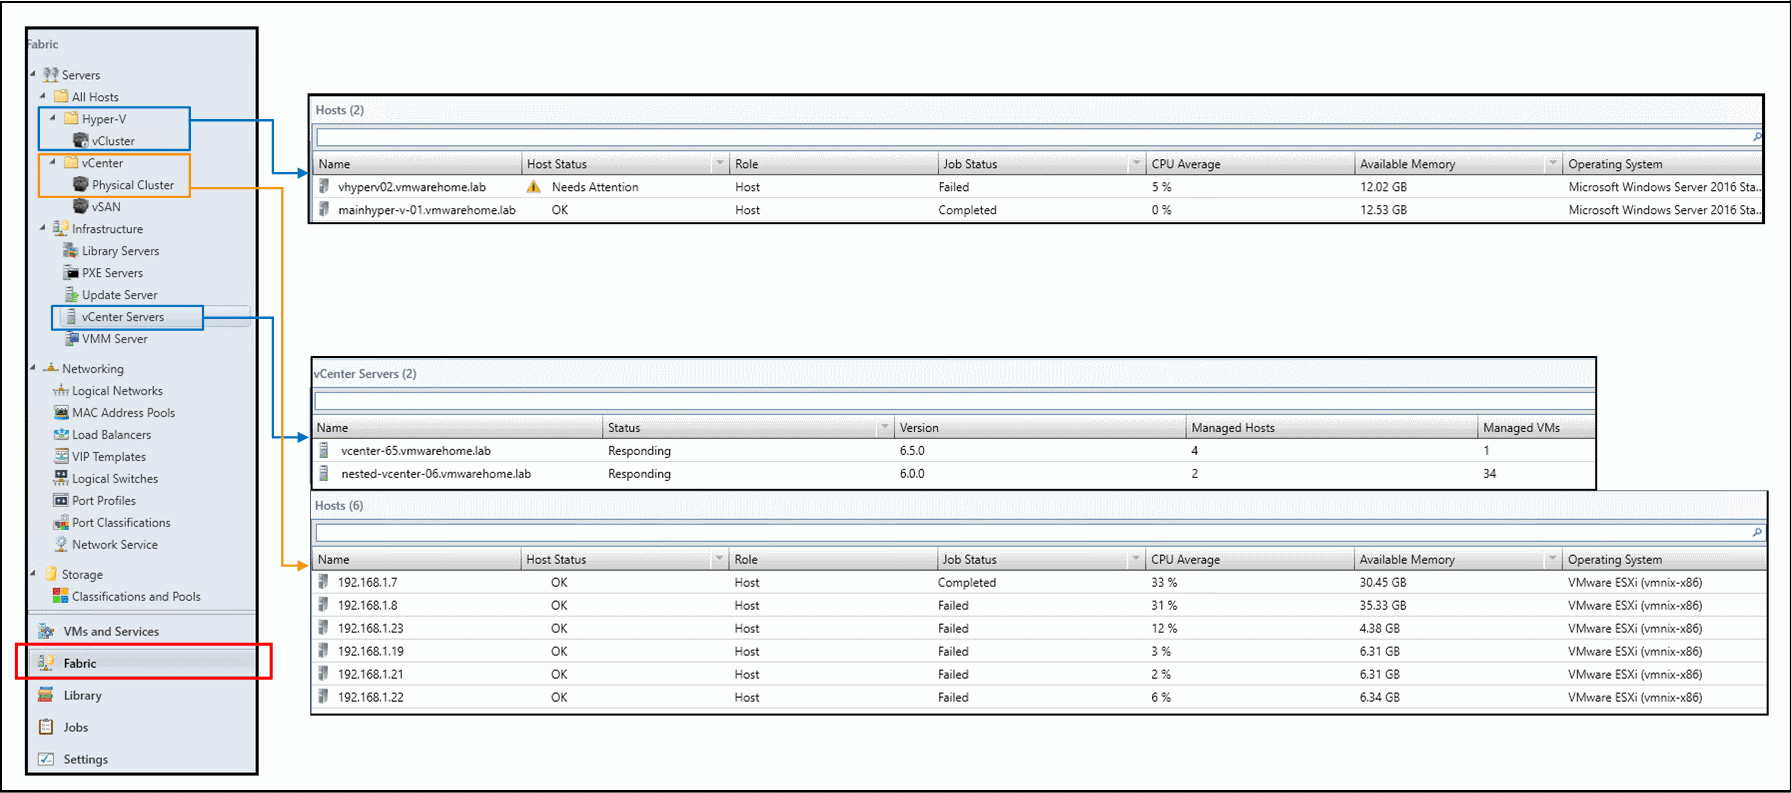
Next image shows our entire infrastructure from System Center 20160 – VMM that we use for this conversion.
ESXi and Hyper-V Servers:
In the tab Fabric, you should see all the VMware and Hyper-V Servers.
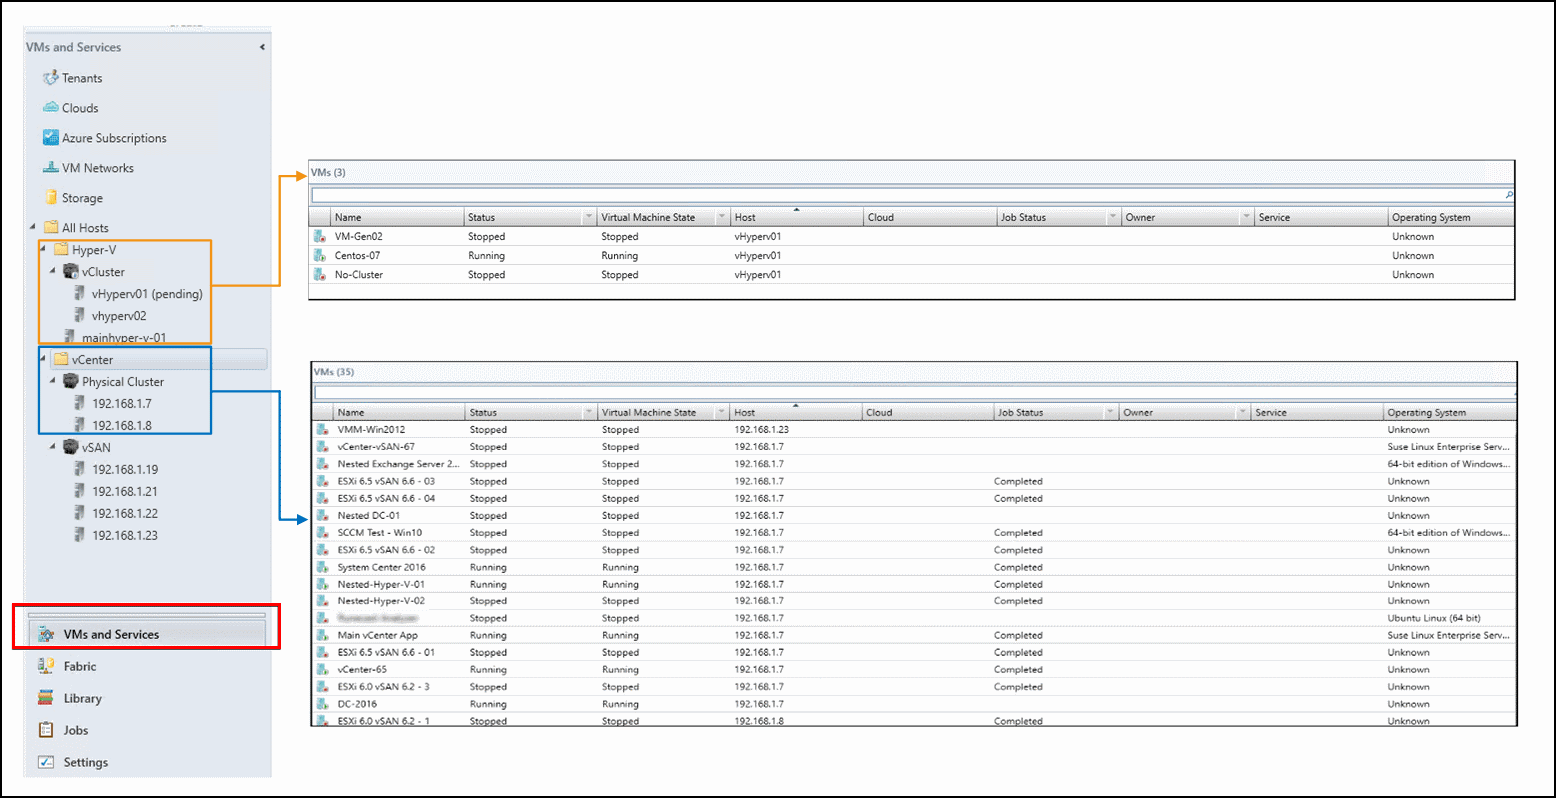
Virtual Machines for each Hypervisor
In the tab VMs and Services, you should see all your Virtual Machines from VMware and Hyper-V.
Only when you have the above information in your System Center, you have all the resources to start the conversion process.
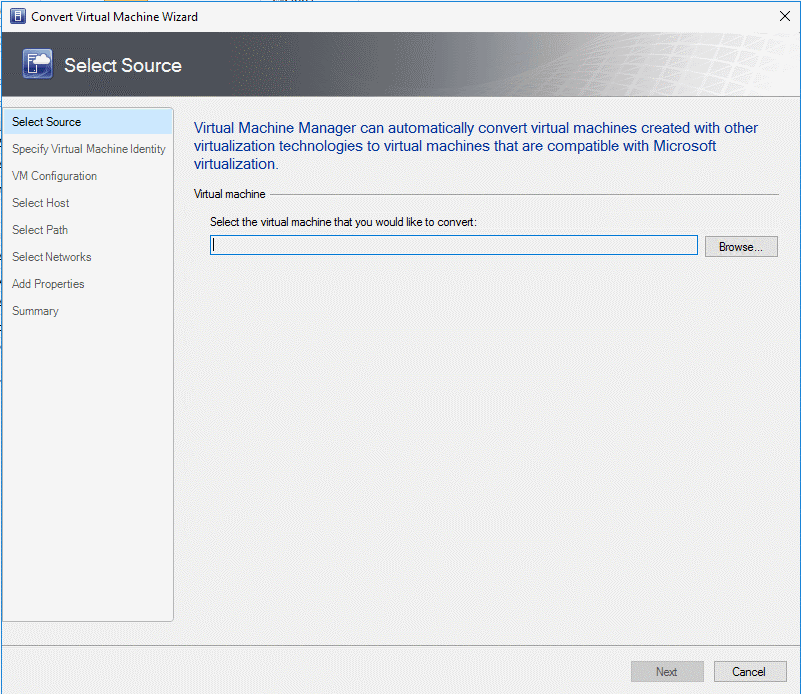
In the section VMs and Services, you have in the upper icons the option to Open Convert Virtual Machine. Select that option.

After this section, the process is similar when using the tool Microsoft Virtual Machine Converter.
Steps to Convert VMware to Hyper-V with Virtual Machine Manager
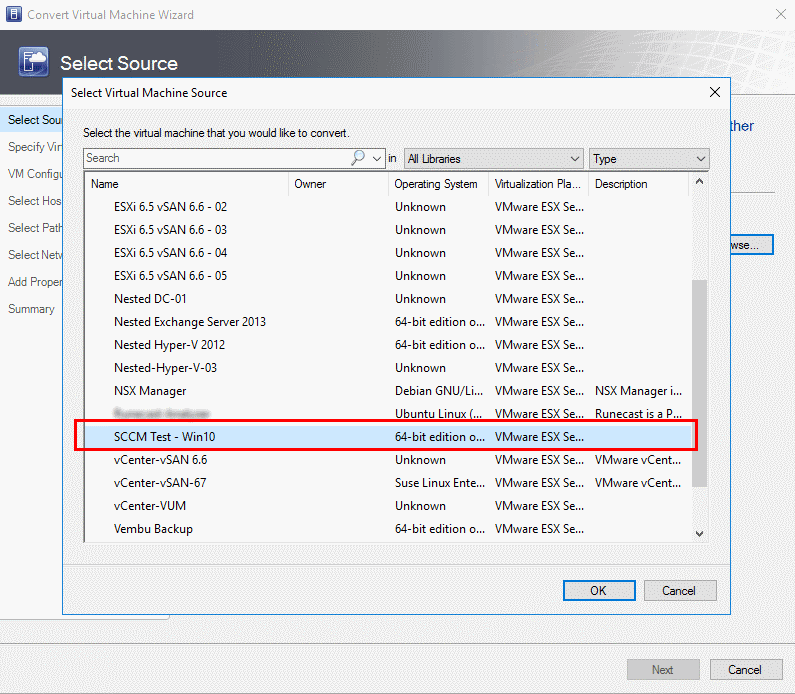
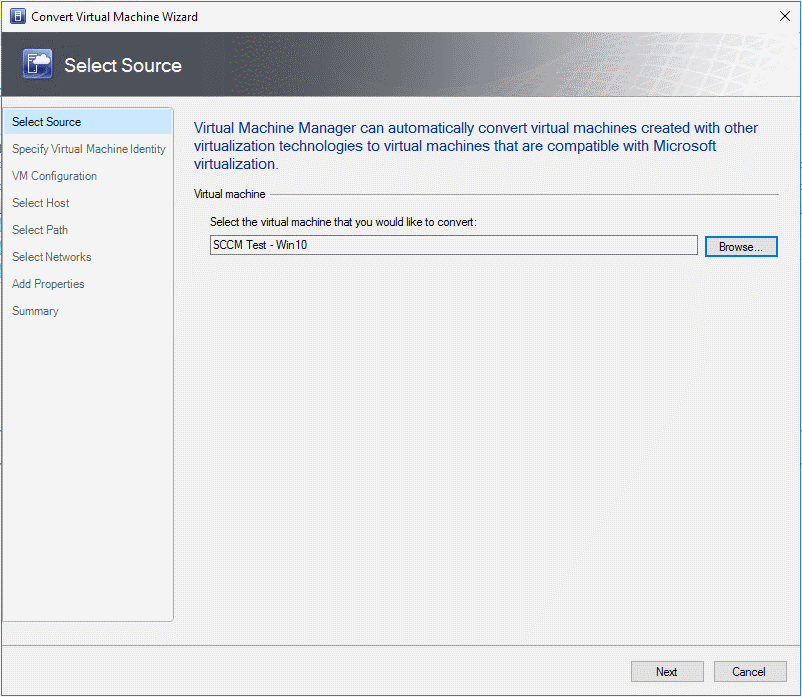
1. First, select in the source (in this case is VMware) select the Virtual Machine to be converted to Hyper-V.
Browse to your vCenter or ESXi host, and then select the Virtual Machine.
Note: When using System Center 2016, most recent Windows versions and VMware versions are supported.
For this conversation, we use a Windows 10 Virtual Machine (SCCM Test – Win10).
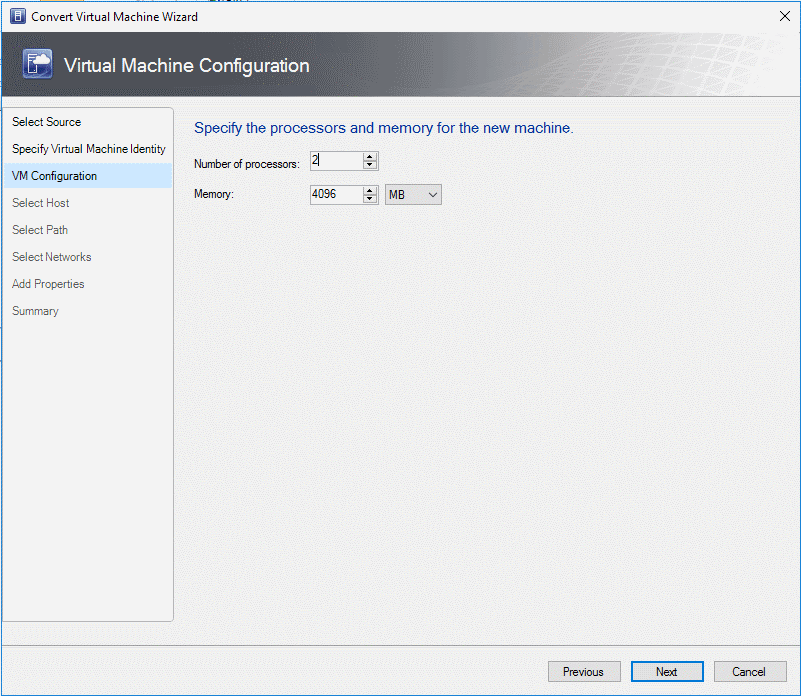
2. Click Next to start VM configuration before the conversion.
In the VM Configuration option, you can change the vCPU and vMemory values. In this case, we leave the values untouched.
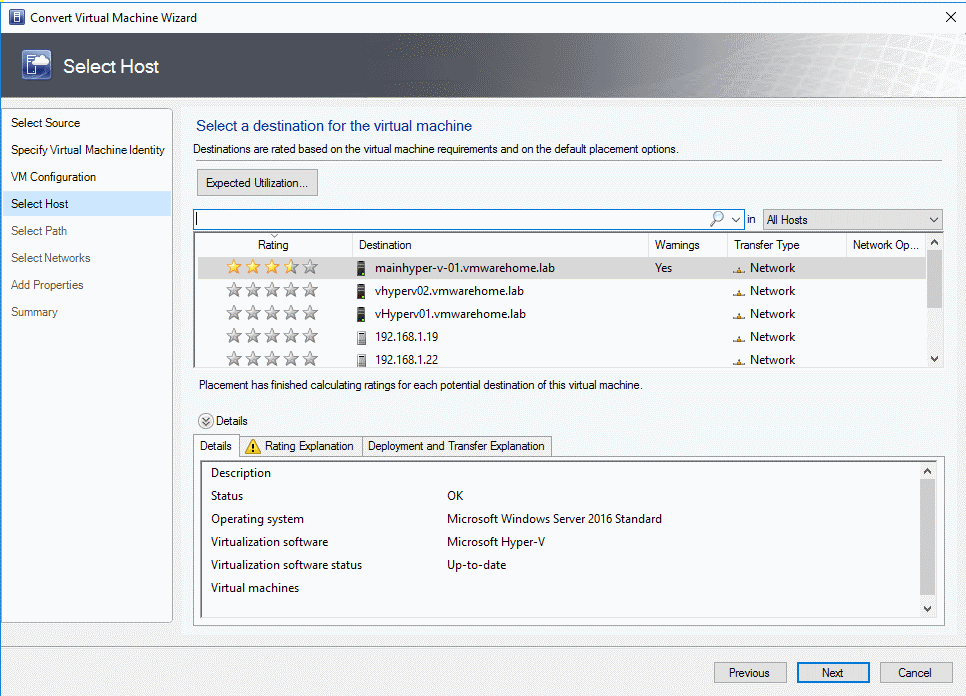
3. After VM Configuration, you need to select the Hyper-V destination for this Virtual Machine.
System Center has some feature that checks Virtual Machine resources and in the list of destination provide you the best choice to store this VM (if you have more than one destination).
In our case, System Center propose the Hyper-V server “mainhyper-v-01.” as the best option to store this new converted VM. This is a proposal, is not mandatory to select the proposed Hypervisor.
4. Select the destination Hyper-V and click Next.
Error note: One error that you may find in this section when selecting the Hyper-V is the following “No available connection to selected VM Network can be found.”

This means that logical networks are not linked with physical adapters from both networks (VMware and Hyper-V). You need to go to Fabric Resources Tab and then configure the network in the Logical Networks section.
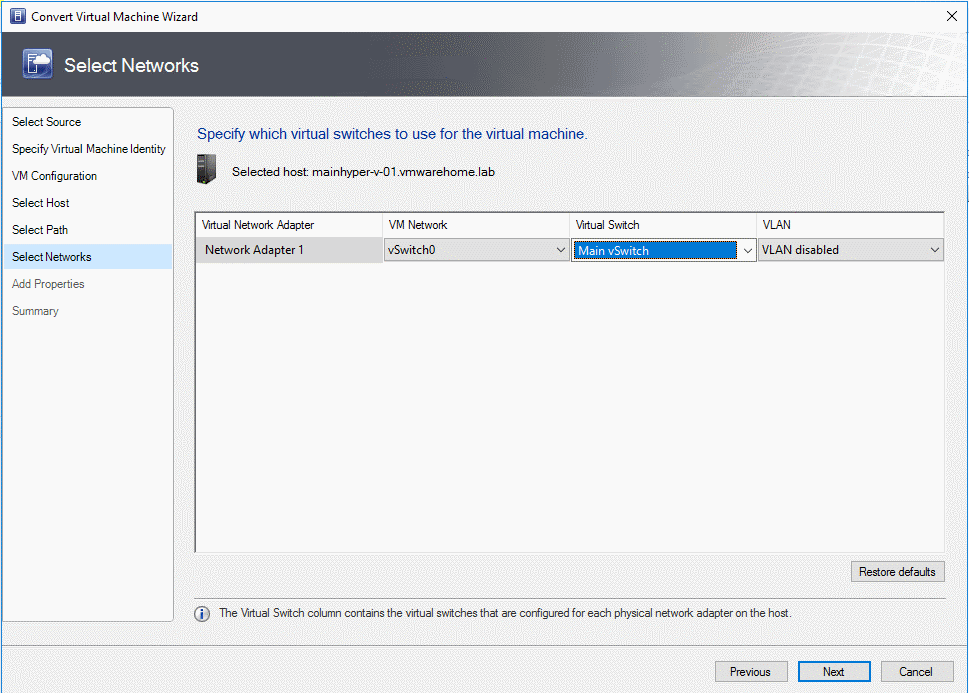
5. Match your VMware vSwitch Network, to your Hyper-V VMs network so that you can use later on in the network section.
Then restart your Conversion process.
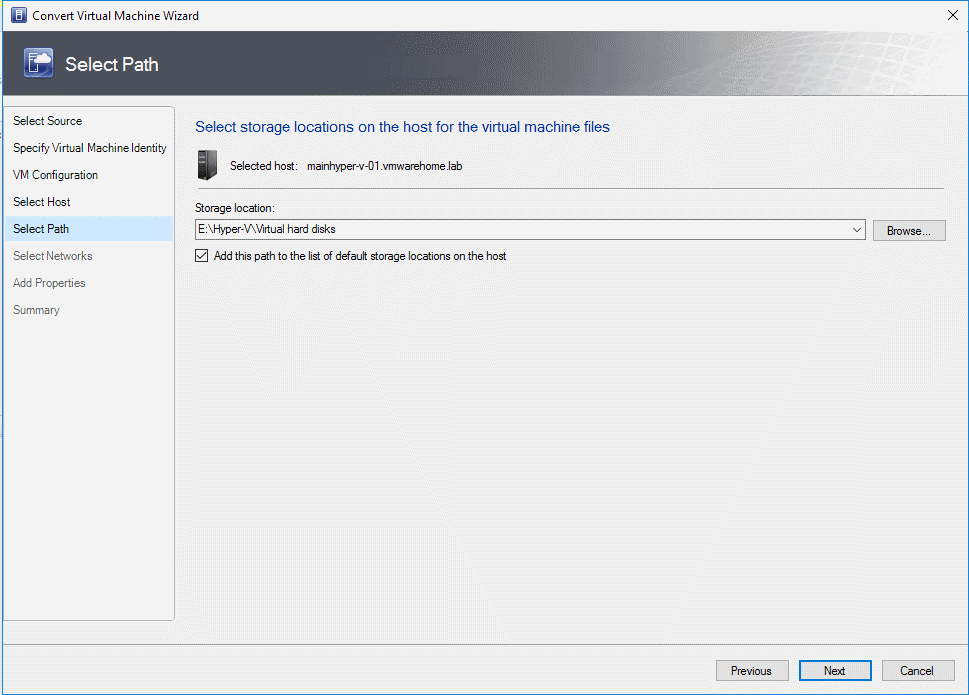
6. Next, select the location for your Virtual Machines in your Hyper-V.
Note: If you had saved this information previously in System Center for your Hyper-V Servers, System Center would populate that information here.
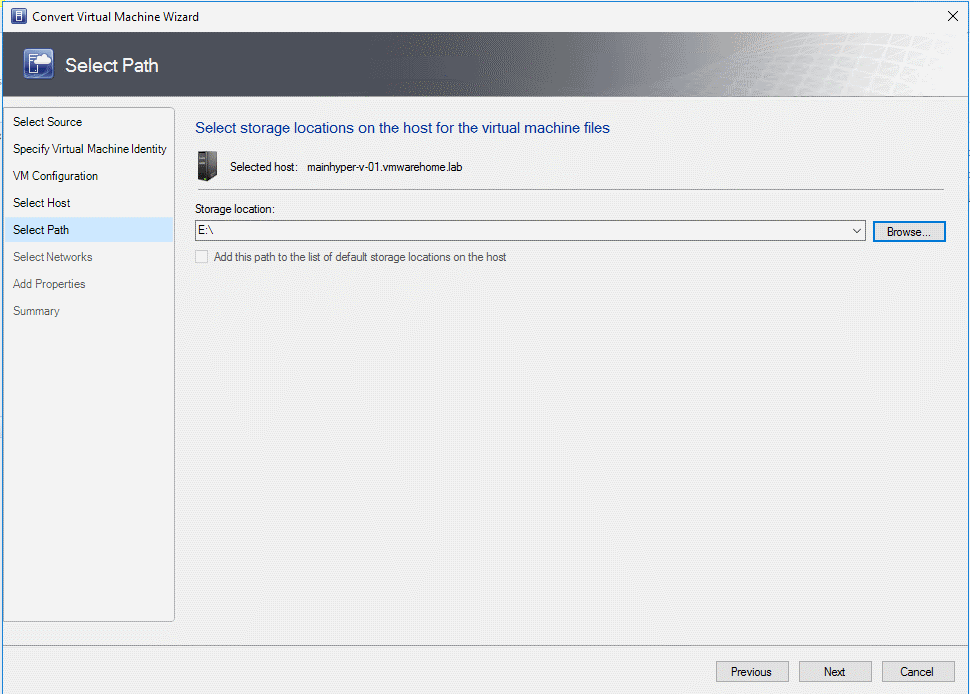
7. Browse your Hyper-V Server disks or shared folder, and select the path and click OK.
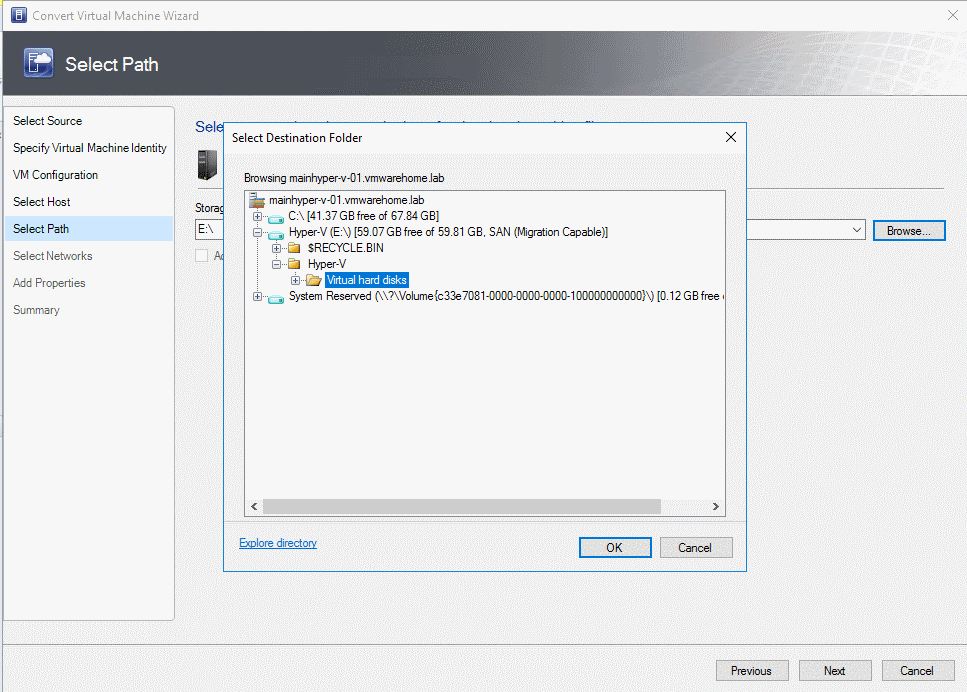
If you add the new path (without System Center recommendation), you can now save this path in your System Center by selecting the option “add this path to list of default storage location on the host” and click Next.
In the next section is where the converter matches the original network to the destination network.
This is a trick option because if previously you did not configure in System Center a Logical Network to match both networks, is not possible to select the Hyper-V and have this section working.
8. Check previous possible error in the Hyper-V destination selection section.
After you have your network configuration finish, you are almost finished.
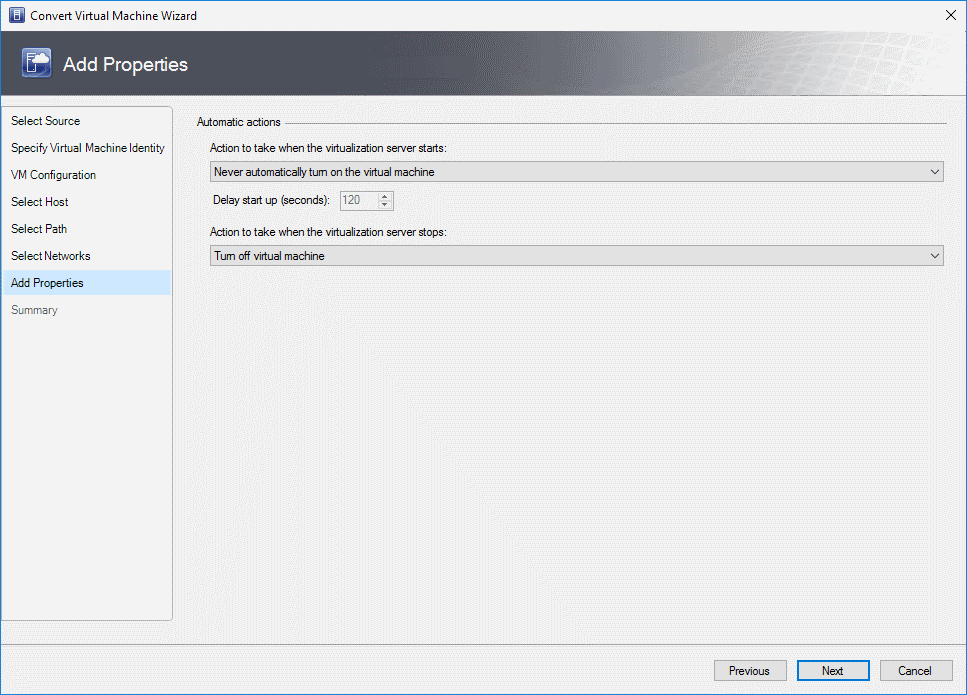
9. Next, select if you want the Source and Destination VMs to power on/off after the conversion and click Next.
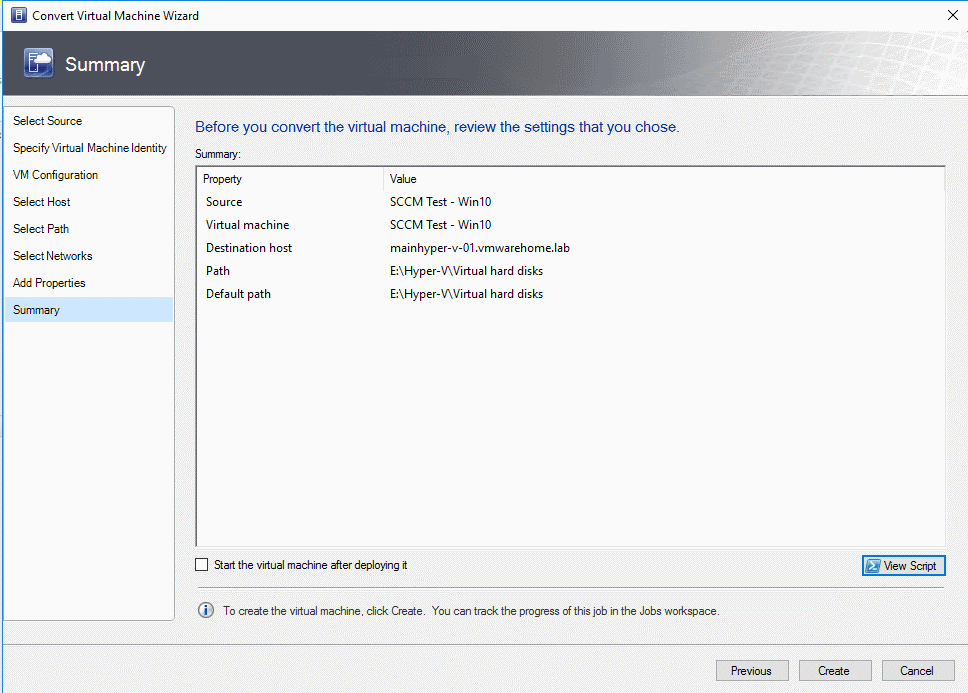
10. Double-check all your information about the conversion before the finish.
Note: Before finish configuration process, if you click the “View Script” button in the lower right corner, Converter provides you with a full script with all the process. You can use this script to do this manually by script, or save and use for more conversions (changing just VM name).
For this case, this was the script create by Converter:
# ——————————————————————————
# Convert Virtual Machine Wizard Script
# ——————————————————————————
# Script generated on Sunday, July 22, 2018 6:54:54 PM by Virtual Machine Manager
#
# For additional help on cmdlet usage, type get-help
# ——————————————————————————
$VMHost = Get-SCVMHost -VMMServer localhost | where {$_.Name -eq “mainhyper-v-01.vmwarehome.lab”}
$VM = Get-SCVirtualMachine -VMMServer localhost -Name “SCCM Test – Win10” -ID “1dbeb6c1-a524-4dbd-9478-981954a66226” | where {$_.VMHost.Name -eq “192.168.1.7”}
$VirtualNetwork = Get-SCVirtualNetwork -VMMServer localhost -Name “Main vSwitch” | where {$_.VMHostID -eq “2a7a1ed1-67fa-4c8d-8b59-e1d7e662e2ab”}
$VirtualNetworkAdapter = Get-SCVirtualNetworkAdapter -VMMServer localhost -Name “New Test” -ID “9e304670-54ee-4fc0-ad75-2264e96729f9”
$VMNetwork = Get-SCVMNetwork -VMMServer localhost -Name “vSwitch0” -ID “21ce24b6-fb08-4c1d-aff5-bf2db83f2540”
New-SCV2V -VMMServer localhost -VMHost $VMHost -RunAsynchronously -JobGroup eba19995-f1ea-4d94-9de3-1fc920fcfa0b -VM $VM -VirtualNetwork $VirtualNetwork -VirtualNetworkAdapter $VirtualNetworkAdapter -VMNetwork $VMNetwork
$VM = Get-SCVirtualMachine -VMMServer localhost -Name “SCCM Test – Win10” -ID “1dbeb6c1-a524-4dbd-9478-981954a66226” | where {$_.VMHost.Name -eq “192.168.1.7”}
$VMHost = Get-SCVMHost -VMMServer localhost | where {$_.Name -eq “mainhyper-v-01.vmwarehome.lab”}
New-SCV2V -VM $VM -VMHost $VMHost -Path “E:\Hyper-V\Virtual hard disks” -Name “SCCM Test – Win10” -Description “” -RunAsynchronously -JobGroup eba19995-f1ea-4d94-9de3-1fc920fcfa0b -Trigger -CPUCount 1 -MemoryMB 4096 -StartAction NeverAutoTurnOnVM -StopAction TurnOffVM
$VMHost = Get-SCVMHost -VMMServer localhost | where {$_.Name -eq “mainhyper-v-01.vmwarehome.lab”}
Set-SCVMHost -VMHost $VMHost -VMPaths “C:\ClusterStorage|E:\Hyper-V\Virtual hard disks”
If you check the script, it has all the configuration options that we have created for VM, Source, and Destination of this conversion.
For this example, we continue using VMM Converter.
11. To finish the configuration process and start the conversion process click Create.
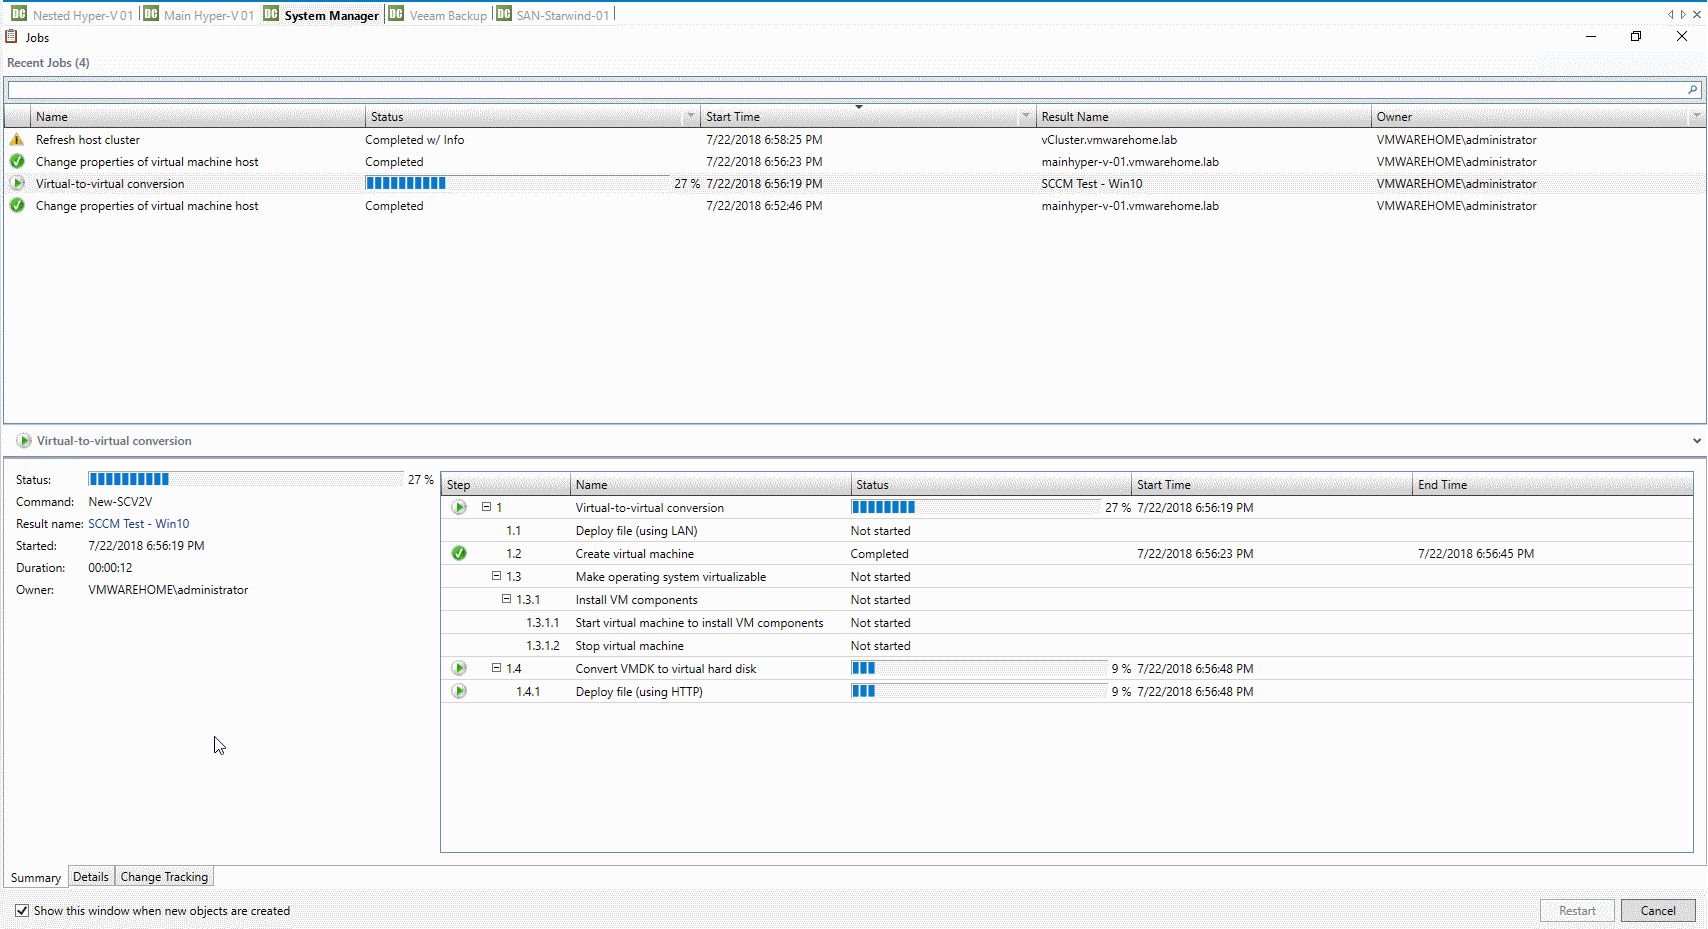
After we start the process, we can check the status of the conversion in the System Center jobs.
As we can see in the next image, the process started. You can return to job events to check the status of the conversion.
After the process is finished, (again the time depends on the VM size, source and destination infrastructures resources. Network is one of the most important)
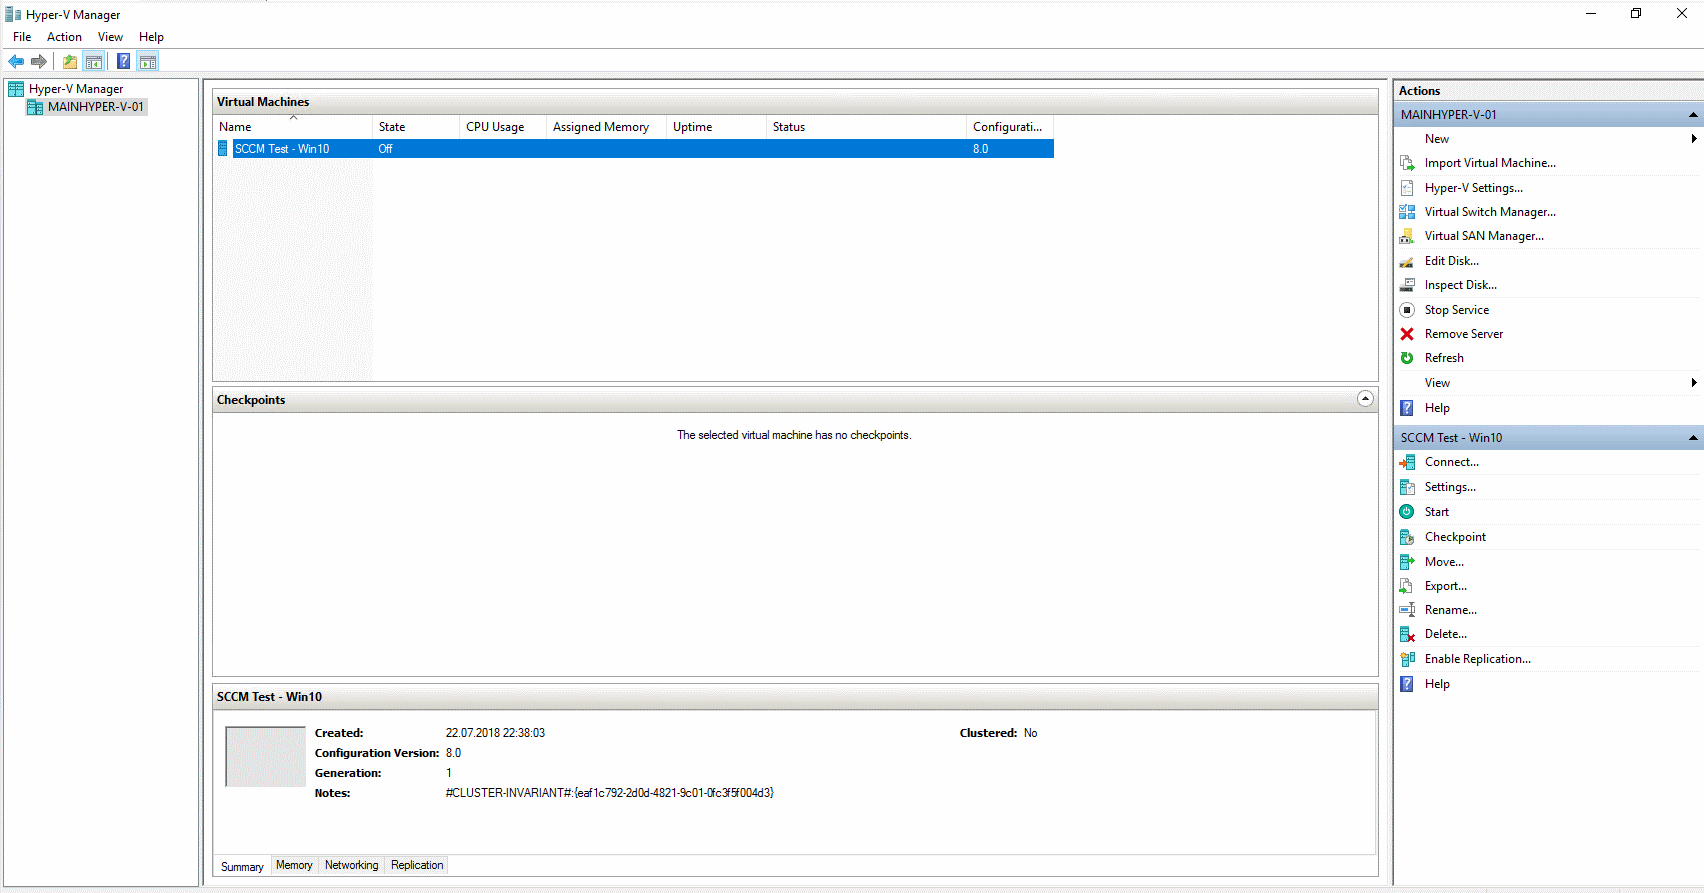
We now have a new Virtual Machine in our Hyper-V converted from VMware using System Center – Virtual Machine Manager (VMM) Converter.
Conclusion:
If you have licenses to use System Center – Virtual Machine Manager to convert your Virtual Machines, use it. Is more straightforward to use and all Virtual Infrastructure information is centralized and better to manage.
The latest version of System Center – VMM supports all Windows versions and VMware versions for these conversions.
Always be aware of the possible errors before starting the process.
First, ensure that Source and Destination are listed in your System Center, and Logical Networks needs to be created between VMware VMs Network and Hyper-V VMs Network.
Always check if you have free space in your local temp converter folder to store temporary files for the conversion (in this case is in your System Center).
Now that we have seen the process of converting VMware VM to Hyper-V using System Center 20160 – Virtual Machine Manager (VMM). We will see the procedures of Exporting OVF file in VMware and Importing it in Hyper-V using PowerShell in part 3 of this series.
Follow our Twitter and Facebook feeds for new releases, updates, insightful posts and more.