
Controlling and protecting Hyper-V hosts is essential for every Hyper-V administrator. Protection can be done by implementing security concepts, but it can also be done by controlling the resource consumption. Managing the resource consumption is very important in order to prevent your Hyper-V infrastructure from degraded performance. If you are not controlling your Hyper-V infrastructure, Virtual Machine performance may be degraded.
To prevent this risk, you can use the following features:
- Virtual Machine Resource Controls
- Host Resource
- DHCP Guard
- Router Guard
To keep the performances of your virtual machines robust, I will describe in this article how to control Hyper-V Host Resources and how to isolate Virtual Machines Resources.
Virtual Machine Resource Controls
CPU groups are managed through the Hyper-V Host Compute Service. Hyper-V Host Computer Service is known as ‘HCS’. In order to control resource, you must create CPU groups and it can be managed with a simple tool called ‘CPUGroups’.
You can download the CPU Groups tool from the Microsoft Download Center: https://go.microsoft.com/fwlink/?linkid=865968


This tool will help you to discover the CPU topology of a host and manage CPU groups. Please note that the Hyper-V Manager, WMI, and PowerShell management interfaces don’t support CPU groups. So the only way to manage CPU Group is to use ‘CPUGroups’ tool. This feature was introduced in Windows Server 2016.
CPUGroups will help you to dedicate compute resources to a VM based on a class cap. You can also set a specific Logical Processor (LP) affinity mapping in order to have exclusive access to all LPs in the CPUGroup. It is interesting if you want performance for a specific VM.
The syntax is very simple. Run the CpuGroups.exe and add one of the following parameters:
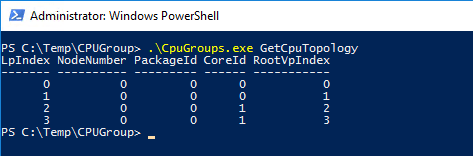
- GetCpuTopology: Prints the host’s processor topology
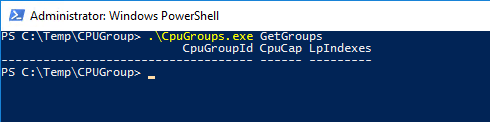
- GetGroups: Prints existing CPU groups and their configurations. In this example, I have no CPU Groups on my Hyper-V host yet
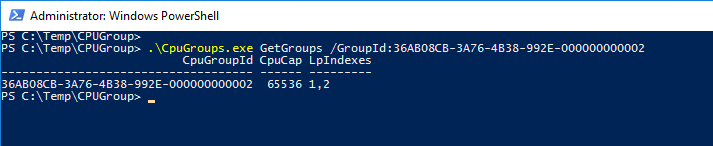
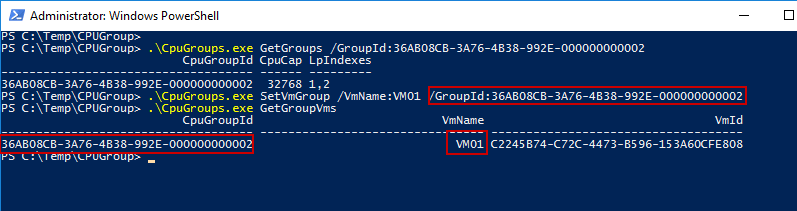
- GetGroups with GroupId: Prints a single CPU Group using the GroupId as a filter
- CreateGroup: Create a new CPU group. Microsoft used hexadecimal number for the group ID number. You can’t have duplicated numbers, so you must increment the last number:
- 36ab08cb-3a76-4b38-992e-000000000001
- 36ab08cb-3a76-4b38-992e-000000000002
- 36ab08cb-3a76-4b38-992e-000000000003
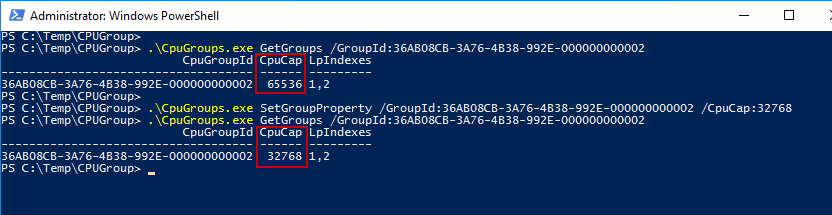
- SetGroupProperty: Set the CPU group cap to 50%. The CPU Cap starts from zero (0%) to 65536 (100%). In this case, I set the CpuCap to 32768, which means 50%
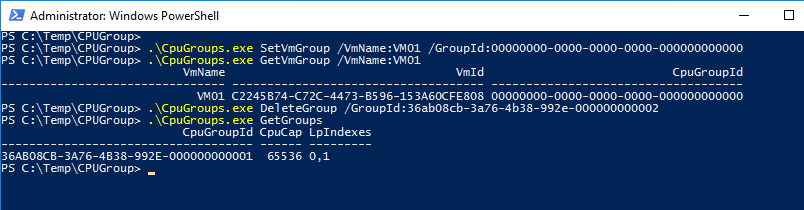
- SetVmGroup: Bind a VM to an existing CPU group. Use the VmName followed by the Virtual Machine Name, and the GroupdId parameter followed by the GroupID Number
- DeleteGroup: Unbind a VM from a CPU group and delete the group. Use the following number 36ab08cb-3a76-4b38-992e-000000000000, which is equal to NULL

CpuGroup is very interesting and powerful, but it is not well documented by Microsoft. So, test this feature in your test environment before using it in production.
Host Resource
Why is it so important?
This feature will prevent your Virtual Machine from using more than its allocated system resources. also, this will prevent the excessive activity from degrading the performance of the host. This will also help to prevent from degrading performance for other Virtual Machine.
How does it work?
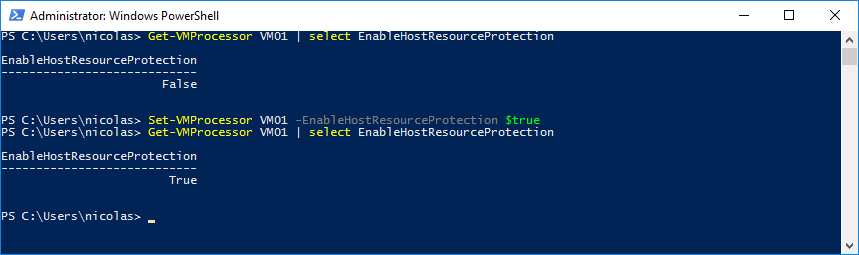
When monitoring if it detects a Virtual Machine with excessive activity, the Virtual Machine will be limited with fewer resources. By default, monitoring is disabled but you can easily enable it by running the following PowerShell command:
Set-VMProcessor
To disable this setting:
Set-VMProcessor -EnableHostResourceProtection $False
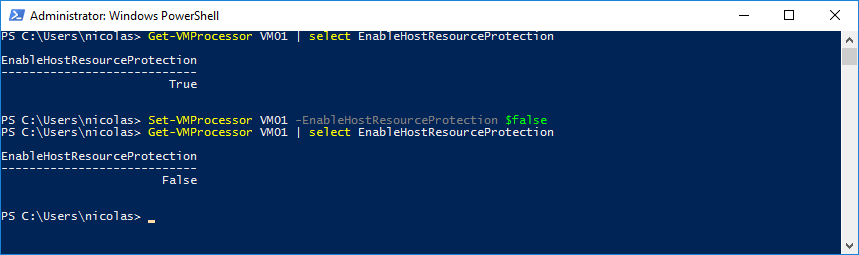
Note that you can only enable/disable this protection through PowerShell.
The Set-VMProcessor cmdlet configures the processors of a Virtual Machine. Adding the ‘EnableHostResourceProtection’ parameter lets you enable host resource protection.
Other parameters can be used with the Set-VMProcessor cmdlet in order to control your Virtual Machines. Let’s see these parameters:
- CompatibilityForMigrationEnabled: Configures the VM processor for compatibility when migrating the virtual machine to another host
- CompatibilityForOlderOperatingSystemsEnabled: Configures the VM processor for compatibility with older operating systems
- Maximum: Configures the maximum percentage of resources available to the VM processor. Allowed values range can be set from 0 to 100
- MaximumCountPerNumaNode: Specifies the maximum number of processors per NUMA node
- MaximumCountPerNumaSocket: Specifies the maximum number of sockets per NUMA node
- RelativeWeight: Sets the priority for allocating the physical computer’s processing power to the VM relative to others. Allowed values range can be set from 1 to 10000
- Reserve: Configures the percentage of processor resources to be reserved for this VM. Allowed values range can be set from 0 to 100
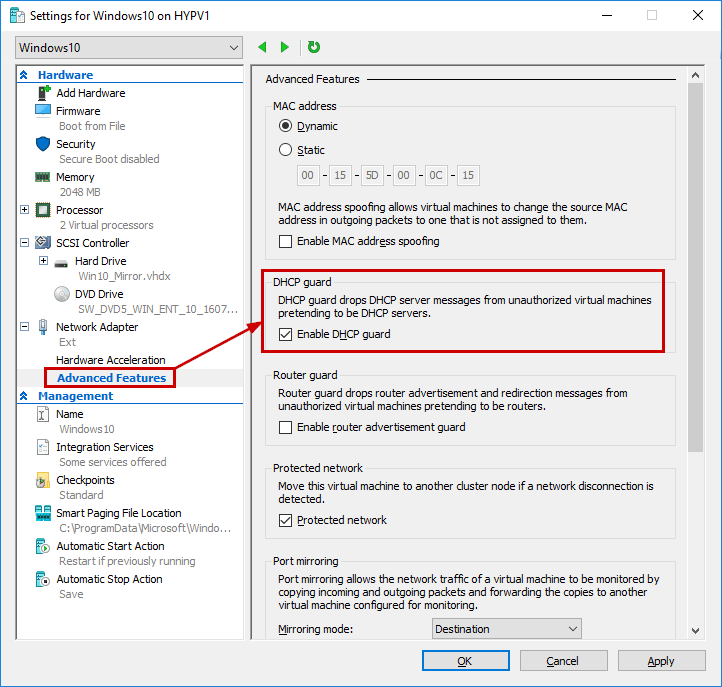
DHCP Guard
DHCP Guard is a security feature that appears in Windows Server 2012 and later. This feature can be used to secure your Hyper-V infrastructure thereby avoiding malicious Virtual Machines to act as DHCP servers on your network.
DHCP Guard is not enabled by default. Basically, DHCP Guard drops DHCP server messages from unauthorized Virtual Machines pretending to be DHCP servers. Even if you enable this feature, this setting does not affect the ability to receive a DHCP offer. This setting will just block Virtual Machines to act as a DHCP server.
Also, it is extremely useful if your DHCP Server is connected to multiple virtual networks. In this case, you can make sure that DHCP offers are only provided on a specific interface.
To configure this setting, you can use the Hyper-V manager console or Windows PowerShell.
To enable using the GUI, right-click the Virtual Machine, and select Settings:
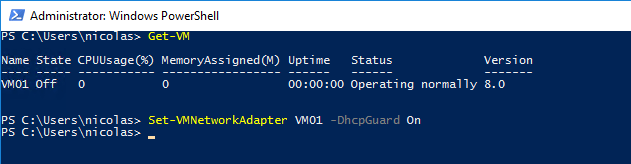
To configure DHCP Guard with PowerShell, you must use the Set-VMNetworkAdapter cmdlet followed by the DHCPGuard parameter:
Set-VMNetworkAdapter VM01 -DhcpGuard On
You can then disable DHCP Guard on selected Virtual Machine:
Set-VMNetworkAdapter VM01 -DhcpGuard Off
Note that you can also enable DHCPGuard on all Virtual Machines:
Set-VMNetworkAdapter * -DhcpGuard On
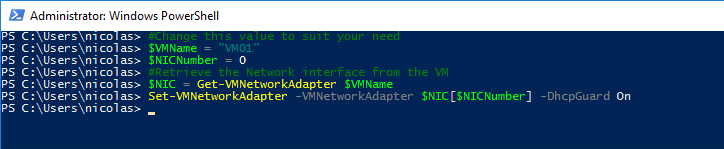
To enable this feature on a specific network interface :
#Change this value to suit your need
$VMName = VM01
$NICNumber = 0
#Retrieve the Network interface from the VM
$NIC = Get-VMNetworkAdapter $VMName
#To enable the feature
Set-VMNetworkAdapter -VMNetworkAdapter $NIC
#To disable the feature
#Set-VMNetworkAdapter -VMNetworkAdapter $NIC[$NICNumber] -DhcpGuard Off
What about the performance?
Microsoft said that there is a minimal impact on performance, so you can safely enable this setting on one or more Virtual Machines.
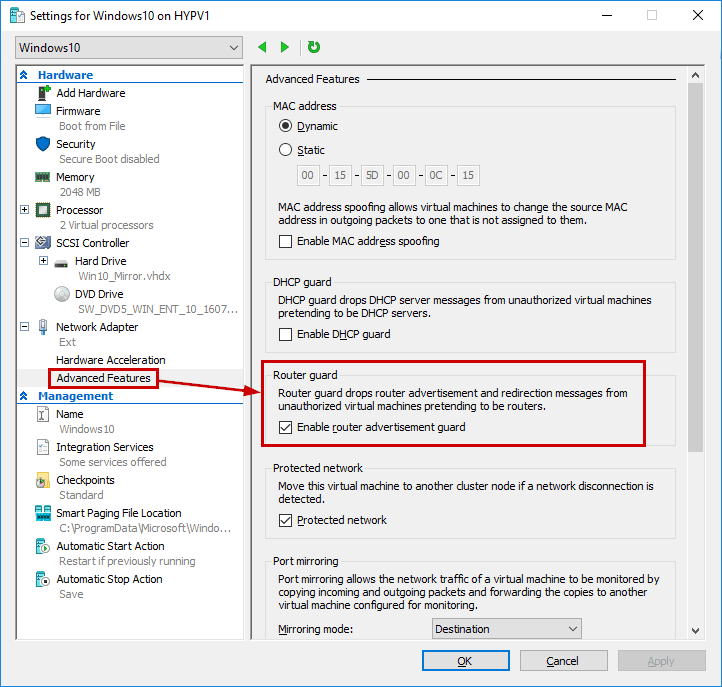
Router Guard
Router Guard is very similar to DHCP Guard. This feature will prevent uncontrolled use of Virtual Machines as routers in Hyper-V infrastructure.
Let’s imagine you have a Virtual Machine being connected to multiple Virtual Networks. In such case, if you only want this VM to be able to broadcast on a specific Virtual Network, then you should enable router guard. This feature is accessible from the Network Adapter Advanced Features node of a Virtual Machine’s settings.
To enable this feature using the GUI, right click on your VM and then click on Settings:
To enable this feature using Windows PowerShell:
Get-VMNetworkAdapter –VMName VM01 | Set-VMNetworkAdapter –RouterGuard on
This feature discards the following packets:
- ICMPv4 Type 5
- ICMPv4 Type 9
- ICMPv6 Type 134
- ICMPv6 Type 137
Conclusion
In this article, we discussed some important concepts:
- Virtual Machine Resource Controls
- DHCP Guard
- Router Guard
Thus, with these features, we can now manage our Hyper-V hosts in a secure way by controlling the resources. This is helpful for Hyper-V administrators to secure their Hyper-V environment without a big impact on performance.
To troubleshoot your Hyper-V infrastructure, I advise you to use the Hyper-V Port Mirroring feature.
Follow our Twitter and Facebook feeds for new releases, updates, insightful posts and more.