
In earlier versions of Hyper-V (before Windows Server 2012 R2), it was not possible to boot a Virtual Machine from a SCSI Virtual Hard Drive. It was also not possible to copy files from a Hyper-V Host to virtual machines without having a network connection in the virtual machine.
In fact, the Hyper-V BIOS was not aware of SCSI Controllers unless you installed the Integration Services component. In Virtual Machines running on Windows Server 2012 and earlier, the Hyper-V BIOS only supported legacy drives such as IDE Controller and Legacy Network Adaptors, which allowed a virtual machine to boot only from a Legacy IDE Controller.
Starting with Windows Server 2012 R2, there are two types of Hyper-V Boot architectures: Hyper-V BIOS and Hyper-V Unified Extensible Firmware Interface (UEFI) BIOS.
Hyper-V running on Windows Server 2012 R2 supports two types of Generation Virtual Machines: Generation 1 and Generation 2.
In this post, we’ll take a look at Hyper-V Generation 1 and Generation 2 Virtual Machines and will cover the following:

- How to create Gen 1 & Gen 2 VMs
- How to check a VM is Gen 1 or Gen 2
- How to convert a VM from Gen 1 to Gen 2
- Comparison between Gen 1 & Gen 2 VMs
- How to backup Gen 1 & Gen 2 VMs
There is always confusion around the terms – Hyper-V configuration versions and Virtual Machine generations. Hence I’m starting with clarifying these terms.
- Hyper-V Virtual Machine generation defines and recognizes the virtual hardware in the Virtual Machine by adding more or fewer functionalities depending on the VM Generation
- Microsoft stated that Hyper-V Virtual Machine version represents the VM configuration, saved state and snapshots compatibility with the Hyper-V host version. It is also known as VM configuration version
Example:
If you have a VM with version 6.2 (from Windows Server 2016 Hyper-V first version) running in a Windows Server 2019 Hyper-V, this VM will not be able to use some of the new features in the latest Hyper-V 2016 and Hyper-V 2019 (like Virtual Processor Count for Windows Server 2016 latest version and Hibernation support for Windows Server 2019, just to mention two example)
How to Create Gen 1 or Gen 2 Virtual Machines
When creating a generation 1 and generation 2 Virtual Machine, the requirements are always the type of Guest OS you will use, the type of boot that you will select and the type of features that you want to use.
In the next section, I’ve mentioned some of those restrictions and requirements regarding both types.
There are two ways to create a Virtual Machine with Gen 1 and Gen 2 and again It’s using Hyper-V Manager and PowerShell.
Note: When using System Center Virtual Machine Manager (SCVMM) to manage your Hyper-V, it is also possible (like in Hyper-VM Manager) to select which Virtual Machine Generation we want to create.
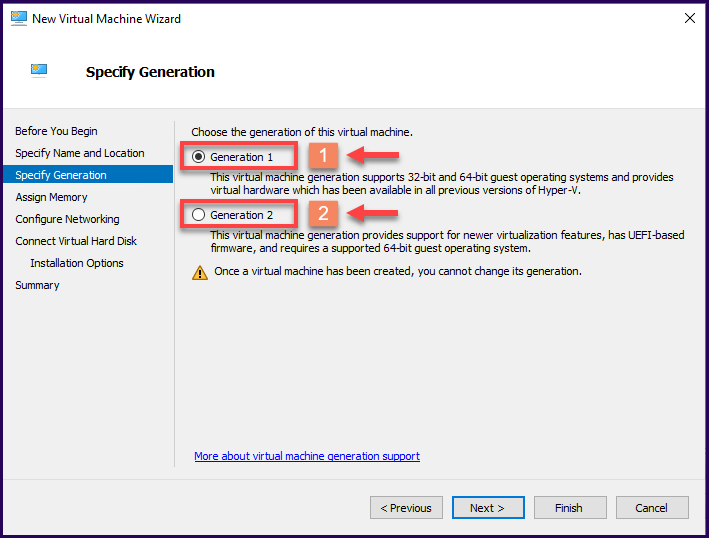
Using Hyper-V Manager
Using Hyper-V Manager, you have got an option to choose the generation of the virtual machine that you are yet to create.
Using PowerShell
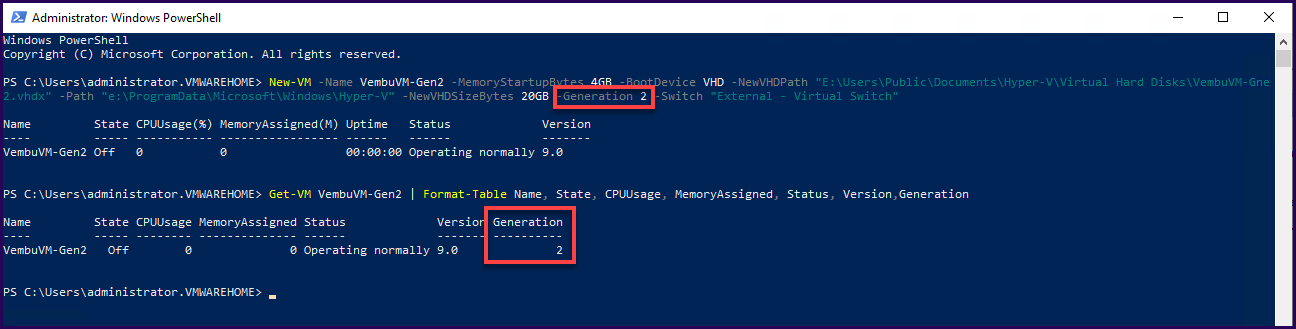
When using PowerShell to create a Virtual Machine, we need to add the Generation parameter to the command.
Example: we will create VM and also the Virtual Disk, using:
In the above example, we created a VM was created with the following parameters:
- 4Gb of memory (-MemoryStartupBytes)
- Boot with the Virtual Disk (-BootDevice)
- Virtual Disk with 20Gb (-NewVHDSizeBytes)
- Generation 2 (-Generation)
- Connected to Virtual Switch “External – Virtual Switch” (-Switch)
Note: It is not mandatory to create the Virtual Disk when creating the new Virtual Machine.
When creating a VM with PowerShell, we can create the VM without a virtual disk and then add the disk later on. Using PowerShell command, we can create a new disk using New-VHD and add the disk to the created VM using Add-VMHardDiskDrive or you can use Hyper-V Manager to create and add a disk to the created VM.
How to check a VM is Gen 1 or Gen 2
There are two ways to verify the generation of your Hyper-V VMs, either using the Hyper-V Manager and through PowerShell.
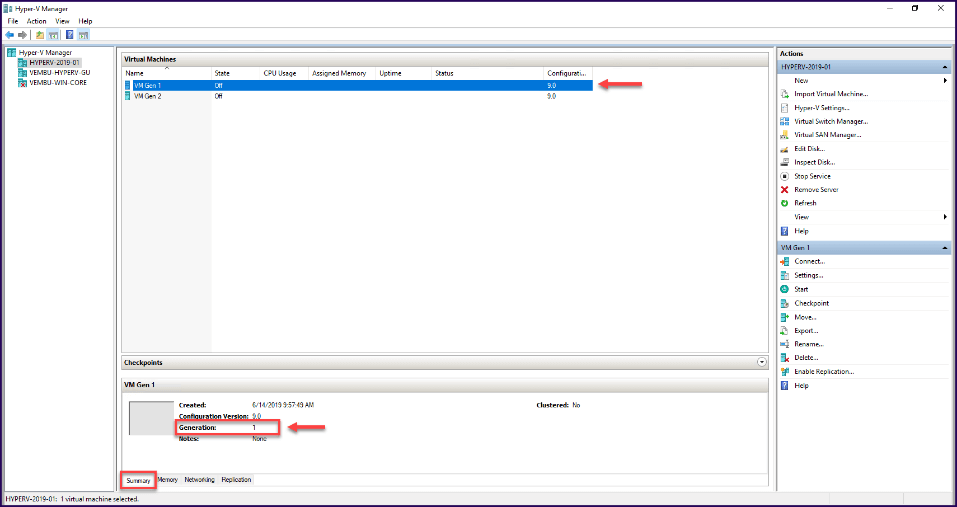
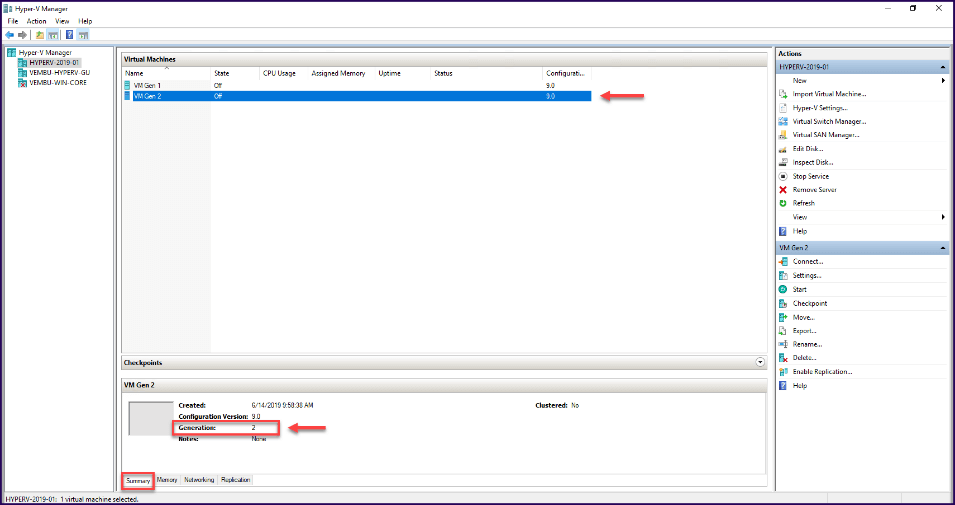
1) Hyper-V Manager – Open your Hyper-V Manager console, select the Virtual Machine, and you will see the VM Generation display in the VM Summary Tab.

2) PowerShell command – Use the following command to identify the VM generation type.
In the “Generation” parameter column you’ll get the Virtual Machine Generation.
How to convert Gen 1 VM to Gen 2
Converting a VM generation is not supported by Microsoft, there are no tools provided by Microsoft to perform this task, however, there are some PowerShell scripts and third-party tools that can do the trick. There is a tool provided by Microsoft that converts the Virtual Disk to GPT, not the VM itself then the Virtual Disk can be attached to a new Generation 2 VM, is called MBR2GPT.
I do not recommend converting any Generation VM. It’s not an easy task, it can create many issues on the Virtual Disk and also in the Guest OS, but if even then you need to do this task, check a script called Convert-VMGeneration.
Comparison Between Gen 1 and Gen 2 VMs
When choosing to create a VM with generation 1 or generation2 always depends on what Guest OS you will use and most importantly what type of boot.
Generation 1 – Features & Advantages
- Uses BIOS Firmware
- Supports older versions of Microsoft Operating Systems, like Windows XP, Windows Server 2003 and above
- Supports both x86 and x64 Operating System
- PXE boot by using a legacy network adapter
- Boot from floppy (.VFD)
- Provides 2 IDE controllers – IDE 0 and IDE 1 to attach up to two drives on each controller
Generation 2 – Features & Advantages
- Uses UEFI Firmware
- Supports Guest Operating System VMs Windows Server 2012 & above
- Provides Secure boot by default, and helps computer fight against the Virus infections and Malware attacks
- Hot add/removal of the virtual network adapter
- Shielded virtual machines
- Storage spaces direct
- Boot from a SCSI virtual hard disk (.VHDX) or virtual DVD (.ISO). Connect up to four SCSI controllers, attach 64 drives
- PXE boot by using a standard network adapter
- Boot Volume can be resized when using a VHDX file while VM is running
With new Windows Server 2019 Hyper-V, Generation 2 VMs can now also be deployed in Azure. Still, there are some restrictions in using generation 2 VMs in Azure, but now it is possible to deploy. Check out this Microsoft page to get more details on Generation 2 VMs (preview) on Azure.
Gen 1 & Gen 2 Cons:
Gen 1 doesn’t support boot from SCSI.
Gen 2 VMs doesn’t support older Guest OS x64 & x32 like Windows 7 or Windows 2008/R2. Further, many older versions of Linux OS is not supported in Gen 2 VMs.
Backup Gen 1 and Gen 2 Hyper-V VMs
Despite the VM generation, you need to protect their data. But, there are some restrictions on Generation 2 VMs with specific requirements.
- Flat VMDK restore is not supported for generation 2 guest OSes with more than 2TB disk
- Live restore to Windows Server 2008 R2 and Windows Server 2012 is not supported for Generation 2 guest machines
- Recovery of Generation 2 Linux OS with UEFI partition (secure boot enabled) will not work as no “.efi file” is found during the restore
Vembu BDR Suite is one such solution that supports backup for both generations Hyper-V VMs.
Vembu BDR Suite – Hyper-V backup features
- Host-Level Image-based Backup
- Backup from Hyper-V Cluster, SMB and CSV
- Application-Consistent Backup
- Instant VM Recovery
- Granular Recovery for Files & MS-Apps
- Cross-Hypervisor Migration (V2V)
- Automatic Backup Verification
- Replicate backups to Cloud or Remote/Branch Office
Final thoughts
How to decide which generation VM you should we use?
By default, I always recommend using Generation 2. It is easy to manage, has more features, more secure, can add more resources to the VM and is a faster VM (particularly when booting), than Generation 1 VMs.
However, if you are using x32 bit Guest OS – need to have legally Guest OS, you have some special software requirements to use Gen 1 VMs, or you need to use some virtual floppy or COM ports, then you need to use Generation 1 VMs. Also, for VMs with Linux Guest OS, it is better to use Generation 1.
Experience modern data protection with this latest Vembu BDR Suite v.4.0.1.
Start your 30-day FREE TRIAL Now!
Follow our Twitter and Facebook feeds for new releases, updates, insightful posts and more.