
Table of Contents
- Snapshots can be created with a couple of options
- How Virtual Machine Snapshot Works?
- Use cases for snapshots
- Best practices for snapshots
- How to create, restore and delete snapshots
Taxonomy of a snapshot in a VMware vSphere environment
One of the major benefits of server virtualization is that you can deal with your servers just like a collection of files on a disk. This unlocks a wide range of operational capabilities that are simply impossible on physical servers.
One of these unique capabilities (we all take for granted these days) is the use of snapshots.
The ability to create a point in time snapshot of a virtual machine was first introduced in VMware Workstation 4.
You can create a snapshot of a VM when it is powered on, off or suspended. A snapshot stores the complete state and data of a virtual machine whenever a snapshot is created.

A virtual machine consists of the following files:
| File | Usage | Description |
|---|---|---|
| .vmx | vmname.vmx | Virtual machine configuration file |
| .vmxf | vmname.vmxf | Additional virtual machine configuration files |
| .vmdk | vmname.vmdk | Virtual disk characteristics |
| -flat.vmdk | vmname-flat.vmdk | Virtual machine data disk |
| .nvram | vmname.nvram or nvram | Virtual machine BIOS or EFI configuration |
| .vmsd | vmname.vmsd | Virtual machine snapshots |
| .vmsn | vmname.vmsn | Virtual machine snapshot data file |
| .vswp | vmname.vswp | Virtual machine swap file |
| .vmss | vmname.vmss | Virtual machine suspend file |
| .log | vmware.log | Current virtual machine log file |
| -#.log | vmware-#.log (where # is a number starting with 1) | Old virtual machine log files |
Snapshots can be created with a couple of options:
- You can choose to include the virtual machine’s RAM in the snapshot. This saves the content of the RAM into the snapshot so you can roll back to the exact running state of the VM. Without this option enabled, the VM would be in a crash consistent state in which all RAM content is lost
- Another option is to quiesce the file system of the VM. This option puts the file system in a sort of idle state so a more consistent snapshot can be created. VMware Tools is used to quiesce the file system. Quiescing temporarily freezes running processes and is not needed if a snapshot is created including the VMs RAM
How Virtual Machine Snapshot Works?
If a snapshot is created of a VM, vSphere basically freezes the original files by making them read-only and creates writeable delta files in which changes are kept.
It keeps track of all the snapshots in a metafile called
The state of a snapshot is stored in
You can easily commit the changes to the original file or revert the snapshot after which the delta files are simply removed and the VM rolls back to the original frozen files which are unlocked again.
Use cases for snapshots
The most common use case for snapshots is creating a temporary snapshot before applying administrative changes to a VM such as an upgrade, update or patch. Snapshotting a VM provides a very quick and easy rollback scenario in case the change causes unforeseen issues.
Another big use case for snapshots is third party software, like BDRSuite, leveraging the VMware snapshot technology to consistently create backup files that are fed into the backup solution.
Best practices for snapshots
VMware recommends the following best practices when working with snapshots:
Do not use snapshots as backups
It is not recommended to use VMware Snapshots as a backup since VMware Snapshot is stored in the same folder as the original VM and relies on the original disk. In this case, you will not be able to restore a disk from a snapshot if the original disk is lost. Hence, it’s not a very reliable approach for protecting your data!
Many 3rd party backup solutions leverage the snapshot technology and the underlying mechanisms to create backup files. Backup software such as BDRSuite takes these backup files and stores them safely in multiple isolated repositories, ideally following a 3-2-1 strategy. This ensures that you’ll have a copy of your data no matter what happens.
Use only 2 to 3 snapshots per VM
While you can daisy chain up to 32 snapshots for a single VM, you should not exceed 2 to 3 snapshots. vSphere needs to keep track of all the delta disks. Committing all the delta files can be a slow and cumbersome process that is infamous for breaking in the worst times. Keep your snapshots tidy and neat, so the risk of data loss is minimized!
Do not use a single snapshot for more than 72 hours
All the disk I/O is written to delta files. These files can grow rapidly and committing these files to the original disk files can take a very long time and put a strain on your storage system if the snapshot was accidentally not removed and allowed to grow over time. As a general guideline, remove the snapshots after a maximum of 72 hours. If the VM is very I/O intensive I would even recommend a shorter timeframe!
Routinely check for snapshots that were not deleted correctly
If snapshots are not removed automatically by third-party backup software, they might not show up in the UI. Most VMware admins have made it their daily early morning routine to check their environment for stale snapshots. There are many solutions out there to help you automate this task, such as PowerShell scripts or ready to use software tools. Google is your friend here…
Check out the article VMware Snapshot best Practices to know more in detail
How to create, restore and delete snapshots
Snapshot management can be handled in multiple ways.
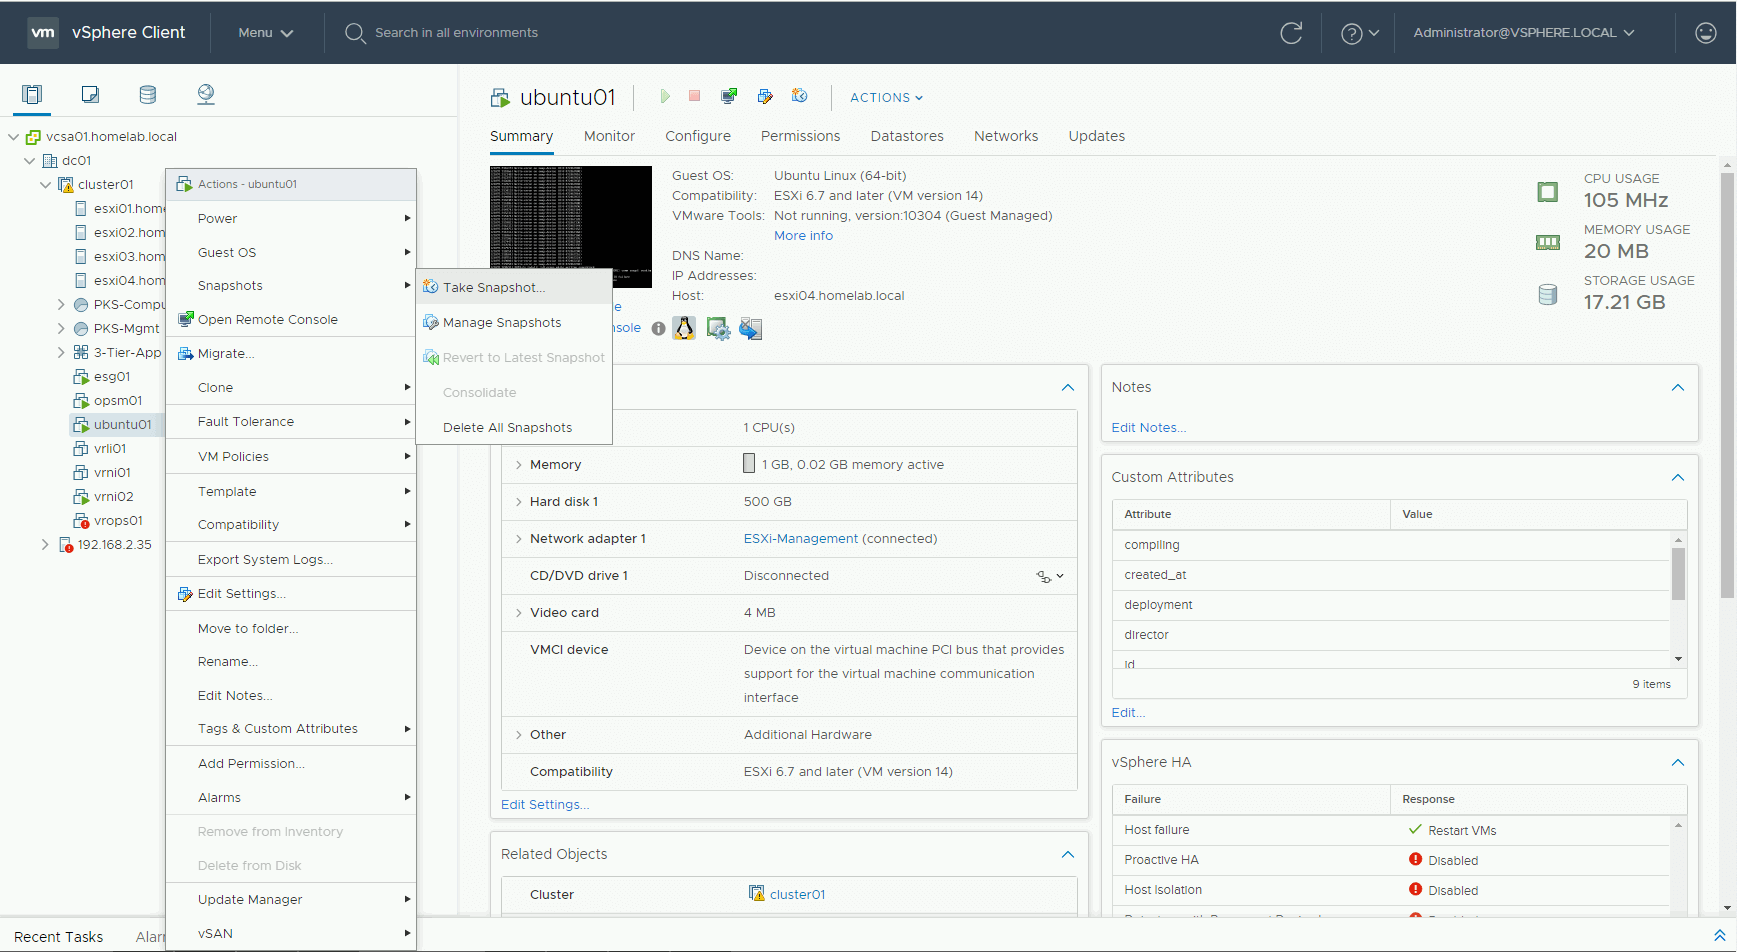
The vSphere Client obviously provides an easy to use UI for creating, reverting and deleting snapshots.
Simply right-click on a VM and select Snapshots:
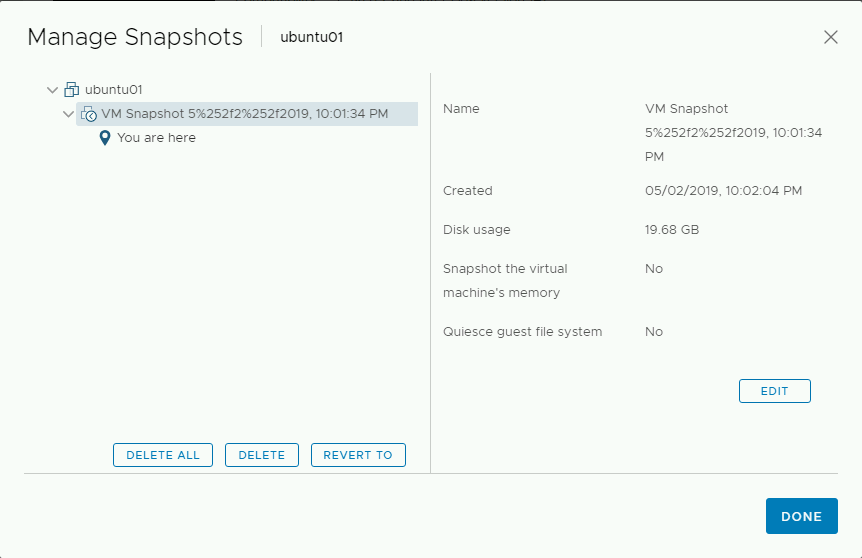
Manage snapshots takes you to a separate window in which you can manage the snapshots in full detail:
You can also programmatically leverage snapshots using the vSphere API and the Snapshot managed object type it provides.
Of course, there is also the option of using the vSphere PowerCLI cmdlets.
Using PowerCLI to manage snapshots
VMware PowerCLI is a management framework based on PowerShell.
PowerCLI allows administrators to manage their VMware environment using the command line. You can simply install VMware PowerCLI straight from the official PowerShell Gallery by issuing the following command from a PowerShell console:
Install-Module VMware.PowerCLI
To allow the execution of local PowerShell scripts, you need to relax the execution policy:
Set-ExecutionPolicy RemoteSigned.
Next, you need to connect PowerCLI to vCenter Server. You can do this using the command:
Connect-VIServer.
After authenticating, you can leverage all the PowerCLI commands such as get-vm but also Snapshot specific commands such as Get-Snapshot, New-Snapshot, and Remove-Snapshot. By piping commands, you can very easily bulk manage snapshots in your environment. For example:
Get-VM -Name TestVM | Get-Snapshot | Remove-Snapshot
Get-VM -Name TestVM | New-Snapshot -Name TestSnapshot
Follow our Twitter and Facebook feeds for new releases, updates, insightful posts and more.